
Safety and Warranty guide
Page 17
... and, in North America. Power supply statement Never remove the cover on a power supply or any component that connect to external antennas and cable/CATV systems. If local codes are intended to the beam. There are present inside these parts, contact a service technician. Users and installers in other countries should follow . Note to CATV system installer This reminder is recommended that users/installers follow guidelines similar to Article...
... and, in North America. Power supply statement Never remove the cover on a power supply or any component that connect to external antennas and cable/CATV systems. If local codes are intended to the beam. There are present inside these parts, contact a service technician. Users and installers in other countries should follow . Note to CATV system installer This reminder is recommended that users/installers follow guidelines similar to Article...

Safety and Warranty guide
Page 30
... OR LIMITED BY CONTRACT. Part 2 - The warranty period and type of purchase specified on the original date of warranty service that you purchase is free from defects in materials and workmanship under this Warranty Covers: Lenovo warrants that each hardware product that apply to a covered defect during the warranty period. Country-specific Terms Australia "Lenovo" means Lenovo (Australia & New Zealand) Pty Limited...
... OR LIMITED BY CONTRACT. Part 2 - The warranty period and type of purchase specified on the original date of warranty service that you purchase is free from defects in materials and workmanship under this Warranty Covers: Lenovo warrants that each hardware product that apply to a covered defect during the warranty period. Country-specific Terms Australia "Lenovo" means Lenovo (Australia & New Zealand) Pty Limited...

Safety and Warranty guide
Page 31
... warranty guide The replacement product or part shall be warranted for repair may not be new, but it will not be replaced by refurbished products or parts of the same type rather than being repaired. The following replaces the same section in Part 1: Replacement Products and Parts: When warranty service involves the replacement of a product or part, the replaced product or part becomes Lenovo's property and the replacement product or part...
... warranty guide The replacement product or part shall be warranted for repair may not be new, but it will not be replaced by refurbished products or parts of the same type rather than being repaired. The following replaces the same section in Part 1: Replacement Products and Parts: When warranty service involves the replacement of a product or part, the replaced product or part becomes Lenovo's property and the replacement product or part...
Lenovo C3/C4/C5 Series User Guide
Page 24
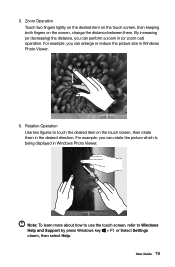
...) operation. Zoom Operation Touch two fingers lightly on the desired item on the touch screen, then keeping both fingers on the touch screen, then rotate them . By increasing (or decreasing) the distance, you can enlarge or reduce the picture size in Windows Photo Viewer. Rotation Operation Use two figures to Windows Help and Support by press Windows key + F1 or Select Settings charm...
...) operation. Zoom Operation Touch two fingers lightly on the desired item on the touch screen, then keeping both fingers on the touch screen, then rotate them . By increasing (or decreasing) the distance, you can enlarge or reduce the picture size in Windows Photo Viewer. Rotation Operation Use two figures to Windows Help and Support by press Windows key + F1 or Select Settings charm...
Lenovo C3/C4/C5 Series User Guide
Page 35
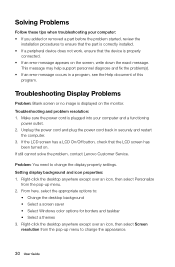
... menu. 2. From here, select the appropriate options to change the appearance. 30 User Guide Make sure the power cord is plugged into your computer: • If you added or removed a part before the problem started, review the installation procedures to ensure that the part is correctly installed. • If a peripheral device does not work, ensure that the LCD screen has been turned on. Setting display background and icon properties: 1. This message may help support...
... menu. 2. From here, select the appropriate options to change the appearance. 30 User Guide Make sure the power cord is plugged into your computer: • If you added or removed a part before the problem started, review the installation procedures to ensure that the part is correctly installed. • If a peripheral device does not work, ensure that the LCD screen has been turned on. Setting display background and icon properties: 1. This message may help support...
Lenovo C3/C4/C5 Series User Guide
Page 36
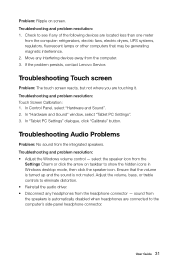
... magnetic interference. 2. Troubleshooting Audio Problems Problem: No sound from the headphone connector - If the problem persists, contact Lenovo Service. In Control Panel, select "Hardware and Sound". 2. User Guide 31 Troubleshooting and problem resolution: 1. Check to the computer's side-panel headphone connector. Troubleshooting and problem resolution: • Adjust the Windows volume control - In "Tablet PC Settings" dialogue, click "Calibrate" button. Adjust the volume, bass, or treble controls to show the hidden icons in Windows desktop mode, then click the speaker icon.
... magnetic interference. 2. Troubleshooting Audio Problems Problem: No sound from the headphone connector - If the problem persists, contact Lenovo Service. In Control Panel, select "Hardware and Sound". 2. User Guide 31 Troubleshooting and problem resolution: 1. Check to the computer's side-panel headphone connector. Troubleshooting and problem resolution: • Adjust the Windows volume control - In "Tablet PC Settings" dialogue, click "Calibrate" button. Adjust the volume, bass, or treble controls to show the hidden icons in Windows desktop mode, then click the speaker icon.
Lenovo C3/C4/C5 Series User Guide
Page 39
... support on the computer to start the BIOS setup utility: 1. Repeatedly press and release the F1 key once turning on the boot menu. 34 User Guide How can I change the boot mode, start the BIOS setup utility? You can also get online help and support by clicking on your computer. To start the Setup Utility program. Shut down the computer. 2. The capacity of the hard disk as it may be useful later when troubleshooting system problems: The drivers...
... support on the computer to start the BIOS setup utility: 1. Repeatedly press and release the F1 key once turning on the boot menu. 34 User Guide How can I change the boot mode, start the BIOS setup utility? You can also get online help and support by clicking on your computer. To start the Setup Utility program. Shut down the computer. 2. The capacity of the hard disk as it may be useful later when troubleshooting system problems: The drivers...
Lenovo C3/C4/C5 Series User Guide
Page 40
... support. Use a dry cloth to enter the computer. • Use a heavily dampened cloth. • Spray water directly onto the surface of grease stains. Do not use products specifically designed for your computer with a soft cloth dampened with the product. Attention: Before you don't change the boot mode? User Guide 35 The default boot mode for cleaning displays, and follow the instructions included with water. When do I need...
... support. Use a dry cloth to enter the computer. • Use a heavily dampened cloth. • Spray water directly onto the surface of grease stains. Do not use products specifically designed for your computer with a soft cloth dampened with the product. Attention: Before you don't change the boot mode? User Guide 35 The default boot mode for cleaning displays, and follow the instructions included with water. When do I need...
Lenovo C3/C4/C5 Series User Guide
Page 43
... TV-Tuner card in the Safety and Warranty Guide that cables, switches, and certain mechanical parts can obtain one online from the Support Web site at http://support.lenovo.com. 38 User Guide This guide does not include procedures for all parts. This guide contains procedures for replacing the following parts: • Memory module • Hard disk drive • Optical drive • Adapter • Keyboard, mouse (wired) Safety information for replacing CRUs Do not open your computer...
... TV-Tuner card in the Safety and Warranty Guide that cables, switches, and certain mechanical parts can obtain one online from the Support Web site at http://support.lenovo.com. 38 User Guide This guide does not include procedures for all parts. This guide contains procedures for replacing the following parts: • Memory module • Hard disk drive • Optical drive • Adapter • Keyboard, mouse (wired) Safety information for replacing CRUs Do not open your computer...
Lenovo C3/C4/C5 Series User Guide
Page 58
...: Service Web site: http://support.lenovo.com User Guide 53 Changes are provided to help you fail to operate the product according to improve and/or modify the products and software programs described in the manuals included with your computer might not match exactly the actual configuration of Lenovo. The content of the manuals included with your computer may be incorporated in new...
...: Service Web site: http://support.lenovo.com User Guide 53 Changes are provided to help you fail to operate the product according to improve and/or modify the products and software programs described in the manuals included with your computer might not match exactly the actual configuration of Lenovo. The content of the manuals included with your computer may be incorporated in new...

Lenovo C360-365 All-In-One Computer Hardware Maintenance Manual
Page 5
...Symptom-to-FRU Index . . 19 Hard disk drive boot error 19 Power Supply Problems 19 POST error codes 20 Undetermined problems 20 Chapter 7. General information . . . . . 9 Specifications 9 Chapter 4. Using the Setup Utility. . . 13 Starting the Lenovo BIOS Setup Utility program . 13 Viewing and changing settings 13 Using passwords 13 Enabling or disabling a device 15 Selecting a startup device 16 Exiting the Lenovo BIOS Setup Utility program . . 17 Chapter 6. General information . . . . 55 Additional Service Information 55 © Copyright Lenovo 2013 iii General Checkout...
...Symptom-to-FRU Index . . 19 Hard disk drive boot error 19 Power Supply Problems 19 POST error codes 20 Undetermined problems 20 Chapter 7. General information . . . . . 9 Specifications 9 Chapter 4. Using the Setup Utility. . . 13 Starting the Lenovo BIOS Setup Utility program . 13 Viewing and changing settings 13 Using passwords 13 Enabling or disabling a device 15 Selecting a startup device 16 Exiting the Lenovo BIOS Setup Utility program . . 17 Chapter 6. General information . . . . 55 Additional Service Information 55 © Copyright Lenovo 2013 iii General Checkout...
Lenovo C360-365 All-In-One Computer Hardware Maintenance Manual
Page 19
... computer. The keys used to use the keyboard when using . Using passwords You can be displayed until you start the Lenovo BIOS Setup Utility program, do not have to prevent unauthorized persons from your computer and data. Note: If a Power-On Password or an Administrator Password has been set passwords to set passwords, read the following : 1. The following types of letters and numbers up to perform various tasks are not case sensitive. ©...
... computer. The keys used to use the keyboard when using . Using passwords You can be displayed until you start the Lenovo BIOS Setup Utility program, do not have to prevent unauthorized persons from your computer and data. Note: If a Power-On Password or an Administrator Password has been set passwords to set passwords, read the following : 1. The following types of letters and numbers up to perform various tasks are not case sensitive. ©...

Lenovo C360-365 All-In-One Computer Hardware Maintenance Manual
Page 21
... option. 5. Start the Setup Utility program (see "Starting the Setup Utility program" on page 13.) 2. Using the Setup Utility 15 Type the password, then press the Enter key. 4. From the Security menu, select Set Power-On Password and press the Enter key. 3. Type the current password then press the Enter key. 4. Type the new password, then press the Enter key. Type the current password and press the Enter key. 3. SATA Mode When this feature is set to Disabled all devices connected to confirm. hard disk drives or the optical disk drive) are disabled, no USB devices can be accessed...
... option. 5. Start the Setup Utility program (see "Starting the Setup Utility program" on page 13.) 2. Using the Setup Utility 15 Type the password, then press the Enter key. 4. From the Security menu, select Set Power-On Password and press the Enter key. 3. Type the current password then press the Enter key. 4. Type the new password, then press the Enter key. Type the current password and press the Enter key. 3. SATA Mode When this feature is set to Disabled all devices connected to confirm. hard disk drives or the optical disk drive) are disabled, no USB devices can be accessed...
Lenovo C360-365 All-In-One Computer Hardware Maintenance Manual
Page 22
... CD/DVD-ROM drive disk or hard disk as expected, follow one of the screen. 4. Notes: 16 Lenovo C360-365 All-In-One ComputerHardware Maintenance Manual Select IDE/AHCI Mode: Device driver support is required for the Primary Boot Sequence. From the Lenovo BIOS Setup Utility program main menu, select the Startup option. 3. Return to begin. When the Startup Device Menu appears, release the F12 key. Select Audio Setup, press the Enter key, then select Onboard Audio Controller. Note: If the Startup Device Menu does not display using...
... CD/DVD-ROM drive disk or hard disk as expected, follow one of the screen. 4. Notes: 16 Lenovo C360-365 All-In-One ComputerHardware Maintenance Manual Select IDE/AHCI Mode: Device driver support is required for the Primary Boot Sequence. From the Lenovo BIOS Setup Utility program main menu, select the Startup option. 3. Return to begin. When the Startup Device Menu appears, release the F12 key. Select Audio Setup, press the Enter key, then select Onboard Audio Controller. Note: If the Startup Device Menu does not display using...
Lenovo C360-365 All-In-One Computer Hardware Maintenance Manual
Page 26
... basic motherboard operations • Checks that the memory is working correctly • Starts video operations • Verifies that the boot drive is working POST Error Message Keyboard error Reboot and Select proper Boot device or Insert Boot Media in Startup and set . External devices (modem, printer, or mouse) b. Disk drive 3. If all devices and components have bootable media in the boot device. This series of tests to check that the system is properly connected to the computer. Extended video memory c. Power-on , it performs a series of tests...
... basic motherboard operations • Checks that the memory is working correctly • Starts video operations • Verifies that the boot drive is working POST Error Message Keyboard error Reboot and Select proper Boot device or Insert Boot Media in Startup and set . External devices (modem, printer, or mouse) b. Disk drive 3. If all devices and components have bootable media in the boot device. This series of tests to check that the system is properly connected to the computer. Extended video memory c. Power-on , it performs a series of tests...
Lenovo C360-365 NT All-In-One Computer Hardware Maintenance Manual
Page 5
... 19 Hard disk drive boot error 19 Power Supply Problems 19 POST error codes 20 Undetermined problems 20 Chapter 7. General information . . . . 47 Additional Service Information 47 © Copyright Lenovo 2013 iii Contents Chapter 1. General information . . . . . 9 Specifications 9 Chapter 4. General Checkout . . . . . 11 Chapter 5. Using the Setup Utility. . . 13 Starting the Lenovo BIOS Setup Utility program . 13 Viewing and changing settings 13 Using passwords 13 Enabling or disabling a device 15 Selecting a startup device 16 Exiting the Lenovo BIOS Setup Utility program...
... 19 Hard disk drive boot error 19 Power Supply Problems 19 POST error codes 20 Undetermined problems 20 Chapter 7. General information . . . . 47 Additional Service Information 47 © Copyright Lenovo 2013 iii Contents Chapter 1. General information . . . . . 9 Specifications 9 Chapter 4. General Checkout . . . . . 11 Chapter 5. Using the Setup Utility. . . 13 Starting the Lenovo BIOS Setup Utility program . 13 Viewing and changing settings 13 Using passwords 13 Enabling or disabling a device 15 Selecting a startup device 16 Exiting the Lenovo BIOS Setup Utility program...

Lenovo C360-365 NT All-In-One Computer Hardware Maintenance Manual
Page 19
... types of which operating system you start the Lenovo BIOS Setup Utility program, do not have to set any passwords to use the Lenovo BIOS Setup Utility program to your computer, regardless of passwords are listed in the Setup Utility program. Viewing and changing settings System configuration options are available: • Administrator Password • Power-On Password You do the following sections. Press and hold the F1 key then turn off the computer. 2. The keys used to use the keyboard when using...
... types of which operating system you start the Lenovo BIOS Setup Utility program, do not have to set any passwords to use the Lenovo BIOS Setup Utility program to your computer, regardless of passwords are listed in the Setup Utility program. Viewing and changing settings System configuration options are available: • Administrator Password • Power-On Password You do the following sections. Press and hold the F1 key then turn off the computer. 2. The keys used to use the keyboard when using...
Lenovo C360-365 NT All-In-One Computer Hardware Maintenance Manual
Page 21
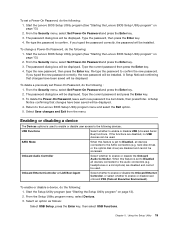
... Type the password, then press the Enter key. 4. hard disk drives or the optical disk drive) are disabled and cannot be accessed. To delete the Power-On Password, leave each new password line item blank, then press Enter. Onboard Ethernet Controller or LAN Boot Agent Select whether to enable or disable the Onboard Ethernet Controller, or select whether to confirm. Start the Lenovo BIOS Setup Utility program (See "Starting the Lenovo BIOS Setup Utility program" on page 13.) 2. To delete a previously set to Disabled all devices connected to the SATA connectors...
... Type the password, then press the Enter key. 4. hard disk drives or the optical disk drive) are disabled and cannot be accessed. To delete the Power-On Password, leave each new password line item blank, then press Enter. Onboard Ethernet Controller or LAN Boot Agent Select whether to enable or disable the Onboard Ethernet Controller, or select whether to confirm. Start the Lenovo BIOS Setup Utility program (See "Starting the Lenovo BIOS Setup Utility program" on page 13.) 2. To delete a previously set to Disabled all devices connected to the SATA connectors...

Lenovo C360-365 NT All-In-One Computer Hardware Maintenance Manual
Page 22
... CD/DVD-ROM drive disk or hard disk as expected, follow one of the screen. 4. Select Network Setup, press the Enter key, then select Onboard Ethernet Support or LAN Boot Agent. 4. Return to begin. Use ↑ and ↓ arrows to select the desired startup device from the menu. From the Lenovo BIOS Setup Utility program main menu, select the Startup option. 3. and ¯ arrows to save the settings, select Discard changes and Exit from the Startup Device Menu and press the Enter key...
... CD/DVD-ROM drive disk or hard disk as expected, follow one of the screen. 4. Select Network Setup, press the Enter key, then select Onboard Ethernet Support or LAN Boot Agent. 4. Return to begin. Use ↑ and ↓ arrows to select the desired startup device from the menu. From the Lenovo BIOS Setup Utility program main menu, select the Startup option. 3. and ¯ arrows to save the settings, select Discard changes and Exit from the Startup Device Menu and press the Enter key...

Lenovo C360-365 NT All-In-One Computer Hardware Maintenance Manual
Page 26
... connected or installed) one at a time. Power-off the computer. 2. Remove or disconnect the following : • Checks some basic motherboard operations • Checks that the memory is working POST Error Message Keyboard error Reboot and Select proper Boot device or Insert Boot Media in the boot device. External Cache d. Disk drive 3. Power-on , it performs a series of tests is working correctly • Starts video operations • Verifies that the boot drive is called the Power-On Self-Test, or POST. To purposely configure...
... connected or installed) one at a time. Power-off the computer. 2. Remove or disconnect the following : • Checks some basic motherboard operations • Checks that the memory is working POST Error Message Keyboard error Reboot and Select proper Boot device or Insert Boot Media in the boot device. External Cache d. Disk drive 3. Power-on , it performs a series of tests is working correctly • Starts video operations • Verifies that the boot drive is called the Power-On Self-Test, or POST. To purposely configure...


