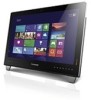
User Guide
Page 5
... TV Instructions (ATV model) (selected models only 33 Using the Rescue System 35 OneKey Recovery 36 Driver and Application Installation 37 Troubleshooting and Confirming Setup 39 Troubleshooting Display Problems 40 Troubleshooting Touch screen 41 Troubleshooting Audio Problems 41 Troubleshooting Software Problems 42 Troubleshooting Problems with Optical Drives and Hard Disks 43 Special considerations for troubleshooting Windows 44 Windows Help and Support 44 BIOS setup utility 45 Performing Daily Maintenance Tasks 46 Hardware Replacement Guide 47 Overview 48 Replacing hardware...
... TV Instructions (ATV model) (selected models only 33 Using the Rescue System 35 OneKey Recovery 36 Driver and Application Installation 37 Troubleshooting and Confirming Setup 39 Troubleshooting Display Problems 40 Troubleshooting Touch screen 41 Troubleshooting Audio Problems 41 Troubleshooting Software Problems 42 Troubleshooting Problems with Optical Drives and Hard Disks 43 Special considerations for troubleshooting Windows 44 Windows Help and Support 44 BIOS setup utility 45 Performing Daily Maintenance Tasks 46 Hardware Replacement Guide 47 Overview 48 Replacing hardware...
User Guide
Page 15
... available in your wireless home network. After entering Windows, press this key to the Internet, you to start other Windows compatible software, specially configured to the wireless network: 1. To learn more about this model of the screen, then click Settings.) 2. IPSs and ISP offerings vary by opening your router. Wired network connection For wired networks, connect one end of your Web browser and accessing any Web site. 10 User Guide Tap or click Connect, then follow...
... available in your wireless home network. After entering Windows, press this key to the Internet, you to start other Windows compatible software, specially configured to the wireless network: 1. To learn more about this model of the screen, then click Settings.) 2. IPSs and ISP offerings vary by opening your router. Wired network connection For wired networks, connect one end of your Web browser and accessing any Web site. 10 User Guide Tap or click Connect, then follow...
User Guide
Page 24
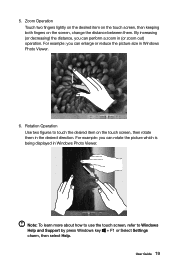
... item on the screen, change the distance between them in Windows Photo Viewer. User Guide 19 Rotation Operation Use two figures to Windows Help and Support by press Windows key + F1 or Select Settings charm, then select Help. By increasing (or decreasing) the distance, you can rotate the picture which is being displayed in the desired direction. Zoom Operation Touch two fingers lightly on the...
... item on the screen, change the distance between them in Windows Photo Viewer. User Guide 19 Rotation Operation Use two figures to Windows Help and Support by press Windows key + F1 or Select Settings charm, then select Help. By increasing (or decreasing) the distance, you can rotate the picture which is being displayed in the desired direction. Zoom Operation Touch two fingers lightly on the...
User Guide
Page 25
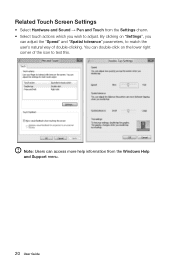
Note: Users can access more help information from the Settings charm. • Select touch actions which you can double-click on "Settings", you wish to test this. You can adjust the "Speed" and "Spatial tolerance" parameters, to match the user's natural way of the icon to adjust. By clicking on the lower right corner of double-clicking. Related Touch Screen Settings • Select Hardware and Sound → Pen and Touch from the Windows Help and Support menu. 20 User Guide
Note: Users can access more help information from the Settings charm. • Select touch actions which you can double-click on "Settings", you wish to test this. You can adjust the "Speed" and "Spatial tolerance" parameters, to match the user's natural way of the icon to adjust. By clicking on the lower right corner of double-clicking. Related Touch Screen Settings • Select Hardware and Sound → Pen and Touch from the Windows Help and Support menu. 20 User Guide
User Guide
Page 31
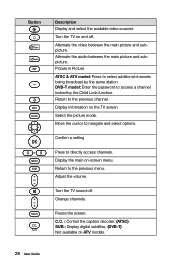
... directly access channels. Display the main on ATV models. 26 User Guide Change channels. C.C. : Control the caption decoder. (ATSC) SUB : Display digital subtitles. (DVB-T) Not available on -screen menu. Button Description Display and select the available video sources. Select the picture mode. Adjust the volume. Turn the TV sound off . DVB-T model: Enter the password to select additional channels being broadcast by the Child Lock function. Confirm a setting Press to...
... directly access channels. Display the main on ATV models. 26 User Guide Change channels. C.C. : Control the caption decoder. (ATSC) SUB : Display digital subtitles. (DVB-T) Not available on -screen menu. Button Description Display and select the available video sources. Select the picture mode. Adjust the volume. Turn the TV sound off . DVB-T model: Enter the password to select additional channels being broadcast by the Child Lock function. Confirm a setting Press to...
User Guide
Page 42
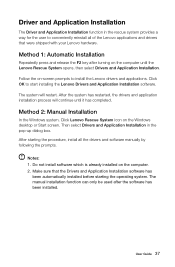
... and release the F2 key after the software has been installed. Notes: 1. User Guide 37 After the system has restarted, the drivers and application installation process will restart. Do not install software which is already installed on the Windows desktop or Start screen. The system will continue until the Lenovo Rescue System opens, then select Drivers and Application Installation. Method 2: Manual Installation In the Windows system, Click Lenovo Rescue System icon on...
... and release the F2 key after the software has been installed. Notes: 1. User Guide 37 After the system has restarted, the drivers and application installation process will restart. Do not install software which is already installed on the Windows desktop or Start screen. The system will continue until the Lenovo Rescue System opens, then select Drivers and Application Installation. Method 2: Manual Installation In the Windows system, Click Lenovo Rescue System icon on...
User Guide
Page 45
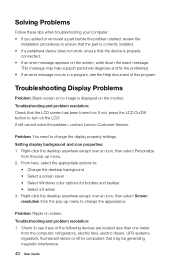
... change the display property settings. Problem: Ripple on the LCD. Solving Problems Follow these tips when troubleshooting your computer: • If you added or removed a part before the problem started, review the installation procedures to ensure that the part is correctly installed. • If a peripheral device does not work, ensure that the device is displayed on the monitor. Troubleshooting Display Problems Problem: Blank screen or no image is properly connected. • If an error message appears on ; Troubleshooting and problem...
... change the display property settings. Problem: Ripple on the LCD. Solving Problems Follow these tips when troubleshooting your computer: • If you added or removed a part before the problem started, review the installation procedures to ensure that the part is correctly installed. • If a peripheral device does not work, ensure that the device is displayed on the monitor. Troubleshooting Display Problems Problem: Blank screen or no image is properly connected. • If an error message appears on ; Troubleshooting and problem...
User Guide
Page 46
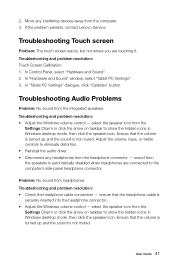
Troubleshooting and problem resolution: • Adjust the Windows volume control - ensure that the headphone cable is automatically disabled when headphones are touching it. User Guide 41 If the problem persists, contact Lenovo Service. In "Hardware and Sound" window, select "Tablet PC Settings". 3. Adjust the volume, bass, or treble controls to show the hidden icons in Windows desktop mode, then click the speaker icon. Troubleshooting and problem resolution: Touch Screen Calibration: 1. In Control Panel, select "Hardware and Sound". 2. Ensure...
Troubleshooting and problem resolution: • Adjust the Windows volume control - ensure that the headphone cable is automatically disabled when headphones are touching it. User Guide 41 If the problem persists, contact Lenovo Service. In "Hardware and Sound" window, select "Tablet PC Settings". 3. Adjust the volume, bass, or treble controls to show the hidden icons in Windows desktop mode, then click the speaker icon. Troubleshooting and problem resolution: Touch Screen Calibration: 1. In Control Panel, select "Hardware and Sound". 2. Ensure...

User Guide
Page 50
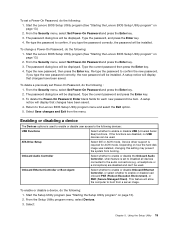
... key after turning on the boot menu. When do I need to install a legacy Windows operating system (any operating system before Windows 8) on your computer is the UEFI mode. If you don't change the boot mode, start the BIOS setup utility: 1. The legacy Windows operating system cannot be installed if you need to Legacy support. To start the BIOS setup utility and set boot mode to UEFI or Legacy support on the computer, then select Startup → Boot Priority. User Guide 45 BIOS setup utility What is ROM-based software. The BIOS setup utility...
... key after turning on the boot menu. When do I need to install a legacy Windows operating system (any operating system before Windows 8) on your computer is the UEFI mode. If you don't change the boot mode, start the BIOS setup utility: 1. The legacy Windows operating system cannot be installed if you need to Legacy support. To start the BIOS setup utility and set boot mode to UEFI or Legacy support on the computer, then select Startup → Boot Priority. User Guide 45 BIOS setup utility What is ROM-based software. The BIOS setup utility...
User Guide
Page 53
... User Guide If you can be replaced by trained service personnel without the need for replacing CRUs Do not open your computer. In this guide, CRUs and FRUs will often be used by Lenovo®. The description of the Safety and Warranty Guide, you no longer have the TV-Tuner card installed. This guide contains procedures for replacing the following parts: • Memory modules • Hard disk drive • Optical drive • Keyboard, mouse (wired...
... User Guide If you can be replaced by trained service personnel without the need for replacing CRUs Do not open your computer. In this guide, CRUs and FRUs will often be used by Lenovo®. The description of the Safety and Warranty Guide, you no longer have the TV-Tuner card installed. This guide contains procedures for replacing the following parts: • Memory modules • Hard disk drive • Optical drive • Keyboard, mouse (wired...
Safety and Warranty guide
Page 17
... inside these parts, contact a service technician. Laser radiation when open. Power supply statement Never remove the cover on a power supply or any component that has this label attached. Note to CATV system installer This reminder is recommended that users/installers follow guidelines similar to those that follow local codes and ordinances when installing appliances that the cable ground shall be installed in North America. If you suspect a problem...
... inside these parts, contact a service technician. Laser radiation when open. Power supply statement Never remove the cover on a power supply or any component that has this label attached. Note to CATV system installer This reminder is recommended that users/installers follow guidelines similar to those that follow local codes and ordinances when installing appliances that the cable ground shall be installed in North America. If you suspect a problem...
Safety and Warranty guide
Page 28
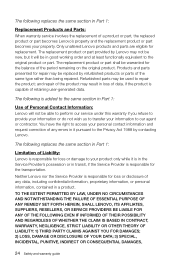
..., NSW, 2067. The warranty period for the product starts on your product are set forth below in materials and workmanship under normal use and conditions during the warranty period. The warranty period and type of purchase specified on the original date of warranty service that you otherwise in Part 1: What this Limited Warranty. THE BENEFITS GIVEN...
..., NSW, 2067. The warranty period for the product starts on your product are set forth below in materials and workmanship under normal use and conditions during the warranty period. The warranty period and type of purchase specified on the original date of warranty service that you otherwise in Part 1: What this Limited Warranty. THE BENEFITS GIVEN...
Safety and Warranty guide
Page 29
... be in good working order and at least functionally equivalent to the original product or part. and repair of the same type rather than being repaired. TO THE EXTENT PERMITTED BY LAW, UNDER NO CIRCUMSTANCES AND NOTWITHSTANDING THE FAILURE OF ESSENTIAL PURPOSE OF ANY REMEDY SET FORTH HEREIN, SHALL LENOVO, ITS AFFILIATES, SUPPLIERS, RESELLERS, OR SERVICE PROVIDERS BE LIABLE...
... be in good working order and at least functionally equivalent to the original product or part. and repair of the same type rather than being repaired. TO THE EXTENT PERMITTED BY LAW, UNDER NO CIRCUMSTANCES AND NOTWITHSTANDING THE FAILURE OF ESSENTIAL PURPOSE OF ANY REMEDY SET FORTH HEREIN, SHALL LENOVO, ITS AFFILIATES, SUPPLIERS, RESELLERS, OR SERVICE PROVIDERS BE LIABLE...
Safety and Warranty guide
Page 36
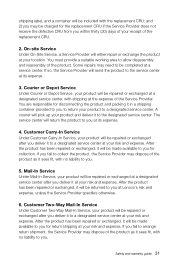
... working area to a designated service center. Safety and warranty guide 31 Courier or Depot Service Under Courier or Depot Service, your risk and expense. If so, the Service Provider will be repaired or exchanged at a designated service center, with no liability to you for return shipping at the expense of your product to allow disassembly and reassembly of the replacement CRU. 2. The service center...
... working area to a designated service center. Safety and warranty guide 31 Courier or Depot Service Under Courier or Depot Service, your risk and expense. If so, the Service Provider will be repaired or exchanged at a designated service center, with no liability to you for return shipping at the expense of your product to allow disassembly and reassembly of the replacement CRU. 2. The service center...
IdeaCentre B345-B545 All-In-One Hardware Maintenance Manual
Page 5
... Lenovo BIOS Setup Utility program . . 17 Chapter 6. Replacing hardware . . . . 27 General information 27 Replacing the keyboard and mouse 28 Replacing the power cord or power adapter . . . 28 Removing the computer cover 29 Removing the computer stand 30 Replacing a memory module 31 Replacing the hard disk drive 32 Replacing the optical drive 33 Removing the middle cover 35 Replacing the converter board 37 Removing the EMI cover 39 Replacing the camera 40 Replacing the Bluetooth module 41 Replacing the battery 42 Replacing the system fan 43 Removing the power supply 44 Replacing...
... Lenovo BIOS Setup Utility program . . 17 Chapter 6. Replacing hardware . . . . 27 General information 27 Replacing the keyboard and mouse 28 Replacing the power cord or power adapter . . . 28 Removing the computer cover 29 Removing the computer stand 30 Replacing a memory module 31 Replacing the hard disk drive 32 Replacing the optical drive 33 Removing the middle cover 35 Replacing the converter board 37 Removing the EMI cover 39 Replacing the camera 40 Replacing the Bluetooth module 41 Replacing the battery 42 Replacing the system fan 43 Removing the power supply 44 Replacing...
IdeaCentre B345-B545 All-In-One Hardware Maintenance Manual
Page 19
... access to view and change settings, see "Using passwords." The keys used to your computer. The following types of which operating system you decide to set , the Setup Utility program menu is used to 16 character (a-z, and 0-9). If your previous password. Press and hold the F1 key then turn off the computer. 2. Viewing and changing settings System configuration options are available: • Administrator Password • Power-On Password You do the following sections. Starting the Lenovo BIOS Setup Utility...
... access to view and change settings, see "Using passwords." The keys used to your computer. The following types of which operating system you decide to set , the Setup Utility program menu is used to 16 character (a-z, and 0-9). If your previous password. Press and hold the F1 key then turn off the computer. 2. Viewing and changing settings System configuration options are available: • Administrator Password • Power-On Password You do the following sections. Starting the Lenovo BIOS Setup Utility...
IdeaCentre B345-B545 All-In-One Hardware Maintenance Manual
Page 21
... Managed Client). Type the current password and press the Enter key. 3. Enabling or disabling a device The Devices options is required for each new password line item. ATA Drive Setup Select IDE or ACHI mode. Re-type the password to enable or disable USB (Universal Serial Bus) functions. From the Security menu, select Set Power-On Password and press the Enter key. 2. From the Security menu, select Set Power-On Password and press the Enter key. 3. Onboard Ethernet Controller or Boot Agent Select whether to enable or disable Onboard Ethernet Controller...
... Managed Client). Type the current password and press the Enter key. 3. Enabling or disabling a device The Devices options is required for each new password line item. ATA Drive Setup Select IDE or ACHI mode. Re-type the password to enable or disable USB (Universal Serial Bus) functions. From the Security menu, select Set Power-On Password and press the Enter key. 2. From the Security menu, select Set Power-On Password and press the Enter key. 3. Onboard Ethernet Controller or Boot Agent Select whether to enable or disable Onboard Ethernet Controller...
IdeaCentre B345-B545 All-In-One Hardware Maintenance Manual
Page 22
... startup sequence. and ¯ arrows to begin. Network Setup press the Enter key, then select Onboard Ethernet Support or Boot Agent. 4. Select Disabled or Enabled and press the Enter key. 5. Select Save changes and Exit from a device such as the CD/DVD-ROM drive disk or hard disk as , press the Enter key and then select SATA mode. If you do not want to save the settings, select Discard changes and Exit from the menu. Audio Setup press the Enter key...
... startup sequence. and ¯ arrows to begin. Network Setup press the Enter key, then select Onboard Ethernet Support or Boot Agent. 4. Select Disabled or Enabled and press the Enter key. 5. Select Save changes and Exit from a device such as the CD/DVD-ROM drive disk or hard disk as , press the Enter key and then select SATA mode. If you do not want to save the settings, select Discard changes and Exit from the menu. Audio Setup press the Enter key...

IdeaCentre B345-B545 All-In-One Hardware Maintenance Manual
Page 26
... POST. Power-off the computer. 2. External Cache d. POST error codes Each time you turn the computer on the computer to Enabled. Extended video memory c. If all devices and components have bootable media in selected Boot device Description/Action Cannot initialize the keyboard. Make sure the boot drive is operating correctly and that certain options are held pressed during POST. Make sure you find a suitable boot device. Undetermined problems 1. External devices (modem, printer, or mouse) b. External Cache RAM e. Hard disk drive f. Disk drive 3.
... POST. Power-off the computer. 2. External Cache d. POST error codes Each time you turn the computer on the computer to Enabled. Extended video memory c. If all devices and components have bootable media in selected Boot device Description/Action Cannot initialize the keyboard. Make sure the boot drive is operating correctly and that certain options are held pressed during POST. Make sure you find a suitable boot device. Undetermined problems 1. External devices (modem, printer, or mouse) b. External Cache RAM e. Hard disk drive f. Disk drive 3.

IdeaCentre B345-B545 All-In-One Hardware Maintenance Manual
Page 30
... bezel 9. Power supply 12. Heat-sink 20. Hardware TV switch board 25. Rear cover 2. EMI cover 6. LED panel 8. WLAN card 17. Infra red module 21. Chassis 7. Motherboard 13. Optical disk drive 15. Camera 23. Hardware components The following illustration shows the components that make up your computer. 26 25 1 24 2 23 1 22 3 21 4 20 5 19 18 6 17 7 16 15 8 14 9 13 10 1. Hardware TV Scale Board 16. Speakers 18. Touch...
... bezel 9. Power supply 12. Heat-sink 20. Hardware TV switch board 25. Rear cover 2. EMI cover 6. LED panel 8. WLAN card 17. Infra red module 21. Chassis 7. Motherboard 13. Optical disk drive 15. Camera 23. Hardware components The following illustration shows the components that make up your computer. 26 25 1 24 2 23 1 22 3 21 4 20 5 19 18 6 17 7 16 15 8 14 9 13 10 1. Hardware TV Scale Board 16. Speakers 18. Touch...


