

Lenovo IdeaCentre B500 Hardware Maintenance Manual
Page 2
... wireless card 46 Replacing the system board 47 Replacing the touch sensor board 49 Replacing the LCD panel 51 Replacing the camera 52 Replacing the keyboard 53 Replacing the Mouse 54 Replacing the power cord or power adapter 55 Replacing the remote control 55 Chapter 9. Locations 27 Locating components and connectors 27 Chapter 8. Additional Service Information 56 Power management 56 Appendix. Statement 57 ii Symptom-to-FRU Index 22 Hard disk drive boot error 22 Power Supply Problems 23 Beep symptoms 24 POST error codes 24 Undetermined problems...
... wireless card 46 Replacing the system board 47 Replacing the touch sensor board 49 Replacing the LCD panel 51 Replacing the camera 52 Replacing the keyboard 53 Replacing the Mouse 54 Replacing the power cord or power adapter 55 Replacing the remote control 55 Chapter 9. Locations 27 Locating components and connectors 27 Chapter 8. Additional Service Information 56 Power management 56 Appendix. Statement 57 ii Symptom-to-FRU Index 22 Hard disk drive boot error 22 Power Supply Problems 23 Beep symptoms 24 POST error codes 24 Undetermined problems...
Lenovo IdeaCentre B500 Hardware Maintenance Manual
Page 9
... Safety inspection guide The intent of this inspection guide is to attachment of steps presented in good condition. Each machine, as loose or missing hardware The guide consists of a series of features or options not covered by this inspection guide. Checklist: 1. Check exterior covers for 0.1 ohm or less between the external ground pin and frame ground. Disconnect the power cord. 3. A third-wire ground connector in...
... Safety inspection guide The intent of this inspection guide is to attachment of steps presented in good condition. Each machine, as loose or missing hardware The guide consists of a series of features or options not covered by this inspection guide. Checklist: 1. Check exterior covers for 0.1 ohm or less between the external ground pin and frame ground. Disconnect the power cord. 3. A third-wire ground connector in...
Lenovo IdeaCentre B500 Hardware Maintenance Manual
Page 10
... by a certified electrician. 8 Use product-specific ESD procedures when they are all at the same charge. Hardware Maintenance Manual Handling electrostatic discharge-sensitive devices Any computer part containing transistors or integrated circuits (ICs) should be verified by equalizing the charge so that meets the specific service requirement. When handling ESD-sensitive parts: •• Keep the parts in charge between objects...
... by a certified electrician. 8 Use product-specific ESD procedures when they are all at the same charge. Hardware Maintenance Manual Handling electrostatic discharge-sensitive devices Any computer part containing transistors or integrated circuits (ICs) should be verified by equalizing the charge so that meets the specific service requirement. When handling ESD-sensitive parts: •• Keep the parts in charge between objects...
Lenovo IdeaCentre B500 Hardware Maintenance Manual
Page 15
... software package. A down-level BIOS might have been rearranged or the drive startup sequence changed. Power-off the computer and all cables and power cords. 3. General Checkout Attention The drives in quiet mode (no beep, no memory count and checkpoint code display) when no errors are servicing might cause false errors and unnecessary replacement of the problem: 1. Select Start Options. 3. Set Power-On Self-Test to help determine the cause of the system board. Set all external devices...
... software package. A down-level BIOS might have been rearranged or the drive startup sequence changed. Power-off the computer and all cables and power cords. 3. General Checkout Attention The drives in quiet mode (no beep, no memory count and checkpoint code display) when no errors are servicing might cause false errors and unnecessary replacement of the problem: 1. Select Start Options. 3. Set Power-On Self-Test to help determine the cause of the system board. Set all external devices...

Lenovo IdeaCentre B500 Hardware Maintenance Manual
Page 16
... Service Support and Engineering functions. •• Machine type and model •• Processor or hard disk upgrades •• Failure symptom - Is this the original reported failure? •• Diagnostics version - Have the same adapters/attachments in the system 7. BIOS level •• Operating system software - Have the same BIOS level 3. Have the same setup for readable instructions or a main menu on the display. Hardware Maintenance Manual 5. Is the failure repeatable? - Are the exact machine type...
... Service Support and Engineering functions. •• Machine type and model •• Processor or hard disk upgrades •• Failure symptom - Is this the original reported failure? •• Diagnostics version - Have the same adapters/attachments in the system 7. BIOS level •• Operating system software - Have the same BIOS level 3. Have the same setup for readable instructions or a main menu on the display. Hardware Maintenance Manual 5. Is the failure repeatable? - Are the exact machine type...
Lenovo IdeaCentre B500 Hardware Maintenance Manual
Page 21
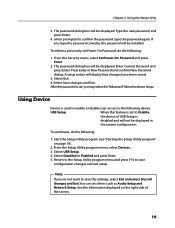
...USB Setup is set others such as Audio Setup and Network Setup. From the Security menu, select Set Power-On Password and press Enter. 2. See the information displayed on page 16). 2. Using the Setup Utility 3. The password dialog box will not be displayed. Select Exit. 4. Select Disabled or Enabled and press Enter. 5. Using Device Device is used to enable or disable user access to the following : 1. From the Setup Utility program menu, select Devices. 3. Chapter 5. Type the new password, and press Enter. 4. Press Enter in the system configuration. A setup...
...USB Setup is set others such as Audio Setup and Network Setup. From the Security menu, select Set Power-On Password and press Enter. 2. See the information displayed on page 16). 2. Using the Setup Utility 3. The password dialog box will not be displayed. Select Exit. 4. Select Disabled or Enabled and press Enter. 5. Using Device Device is used to enable or disable user access to the following : 1. From the Setup Utility program menu, select Devices. 3. Chapter 5. Type the new password, and press Enter. 4. Press Enter in the system configuration. A setup...
Lenovo IdeaCentre B500 Hardware Maintenance Manual
Page 22
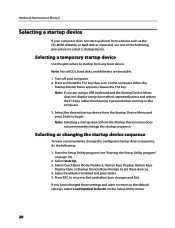
...-ROM, diskette, or hard disk as expected, use one of the following : 1. When the Startup Device Menu appears, release the F12 key. Press and hold the F12 key then turn on the computer. 3. Note: Selecting a startup device from the Startup Device Menu and press Enter to the default settings, select Load Optimal Defaults on page 16). 2. Press ESC to return to select a startup device. Hardware Maintenance Manual Selecting a startup device If your computer. 2. Select Quick Boot Mode, Numlock, Option Keys Display, Option Keys Display...
...-ROM, diskette, or hard disk as expected, use one of the following : 1. When the Startup Device Menu appears, release the F12 key. Press and hold the F12 key then turn on the computer. 3. Note: Selecting a startup device from the Startup Device Menu and press Enter to the default settings, select Load Optimal Defaults on page 16). 2. Press ESC to return to select a startup device. Hardware Maintenance Manual Selecting a startup device If your computer. 2. Select Quick Boot Mode, Numlock, Option Keys Display, Option Keys Display...
Lenovo IdeaCentre B500 Hardware Maintenance Manual
Page 27
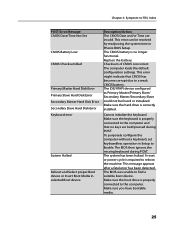
... Phenix BIOS Setup. Make sure the keyboard is required to Enable. A reset or power cycle is properly connected to -FRU Index POST Error Message CMOS Date/Time Not Set CMOS Battery Low CMOS Checksum Bad Primary Master Hard Disk Error Primary Slave Hard Disk Error Secondary Master Hard Disk Error Secondary Slave Hard Disk Error Keyboard error System Halted Reboot and Select proper Boot device or Insert Boot Media in Setup to reboot the machine. Make sure you have bootable media. 25 To purposely configure the computer without a keyboard, set keyboardless operation...
... Phenix BIOS Setup. Make sure the keyboard is required to Enable. A reset or power cycle is properly connected to -FRU Index POST Error Message CMOS Date/Time Not Set CMOS Battery Low CMOS Checksum Bad Primary Master Hard Disk Error Primary Slave Hard Disk Error Secondary Master Hard Disk Error Secondary Slave Hard Disk Error Keyboard error System Halted Reboot and Select proper Boot device or Insert Boot Media in Setup to reboot the machine. Make sure you have bootable media. 25 To purposely configure the computer without a keyboard, set keyboardless operation...
Lenovo IdeaCentre B500 Hardware Maintenance Manual
Page 28
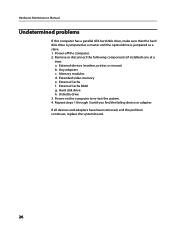
... failing device or adapter. a. Memory modules d. Hard disk drive h. If all devices and adapters have been removed, and the problem continues, replace the system board. 26 External devices (modem, printer, or mouse) b. Power-on the computer to re-test the system. 4. Extended video memory e. Remove or disconnect the following components (if installed) one at a time. Hardware Maintenance Manual Undetermined problems If this computer has a parallel ATA hard disk drive, make sure that the hard disk drive is jumpered as a master and the optical drive is jumpered...
... failing device or adapter. a. Memory modules d. Hard disk drive h. If all devices and adapters have been removed, and the problem continues, replace the system board. 26 External devices (modem, printer, or mouse) b. Power-on the computer to re-test the system. 4. Extended video memory e. Remove or disconnect the following components (if installed) one at a time. Hardware Maintenance Manual Undetermined problems If this computer has a parallel ATA hard disk drive, make sure that the hard disk drive is jumpered as a master and the optical drive is jumpered...
Lenovo Safety and Warranty Guide V1.0.0
Page 9
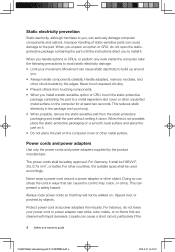
... install a static-sensitive option or CRU, touch the static-protective package containing the part to a metal expansion-slot cover or other circuit boards by the edges. The power cords shall be used accordingly. For other countries, the suitable types shall be safety approved. Always route power cords so that they will not be H05VV-F, 3G, 0.75 mm2, or better. Handle adapters, memory...
... install a static-sensitive option or CRU, touch the static-protective package containing the part to a metal expansion-slot cover or other circuit boards by the edges. The power cords shall be used accordingly. For other countries, the suitable types shall be safety approved. Always route power cords so that they will not be H05VV-F, 3G, 0.75 mm2, or better. Handle adapters, memory...
Lenovo Safety and Warranty Guide V1.0.0
Page 17
... guidelines similar to those that has this label attached. Power supply statement Never remove the cover on a power supply or any component that follow. If you suspect a problem with television tuner options installed The notice below applies to products containing television (TV) tuner devices that connect to external antennas or to cable/CATV systems, or both, and that are not applicable, it is...
... guidelines similar to those that has this label attached. Power supply statement Never remove the cover on a power supply or any component that follow. If you suspect a problem with television tuner options installed The notice below applies to products containing television (TV) tuner devices that connect to external antennas or to cable/CATV systems, or both, and that are not applicable, it is...
Lenovo Safety and Warranty Guide V1.0.0
Page 28
... : 1. What this warranty and to perform service; backup or secure all features, parts, options, alterations, and attachments not under this Warranty Does not Cover This warranty does not cover the following: • uninterrupted or error-free operation of a product; • loss of Personal Information If you obtain service under this warranty, Lenovo will use and process information about any Personal Data...
... : 1. What this warranty and to perform service; backup or secure all features, parts, options, alterations, and attachments not under this Warranty Does not Cover This warranty does not cover the following: • uninterrupted or error-free operation of a product; • loss of Personal Information If you obtain service under this warranty, Lenovo will use and process information about any Personal Data...
User Manual
Page 30
... mouse, game or wireless telephone function. Press the related button to use it again. In Windows MCE mode: MCE remote control works normally. power indicator blinks every three seconds, this indicates that the battery power is low and the remote control will stop blinking. When the remote control power indicator blinks 3 times per second during 3 seconds and if in telephone mode there are 3 beeps during 3 seconds, this means that the remote control cannot be used...
... mouse, game or wireless telephone function. Press the related button to use it again. In Windows MCE mode: MCE remote control works normally. power indicator blinks every three seconds, this indicates that the battery power is low and the remote control will stop blinking. When the remote control power indicator blinks 3 times per second during 3 seconds and if in telephone mode there are 3 beeps during 3 seconds, this means that the remote control cannot be used...

User Manual
Page 34
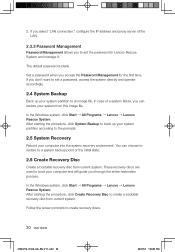
... be used. 2.3 System Setup System Setup configures the network configuration for the Lenovo Rescue system. 2.3.1 Launch Turn on the network access mode of the ADSL connection. After starting the procedure, install all passwords for the Lenovo Rescue System to start installing the Lenovo Drivers and Application Installation. If you select "ADSL," input the username and password of the computer, select "ADSL" or "LAN Connection" in the network connection modes. 1. After that the Drivers and Application installation has been installed automatically. User Guide...
... be used. 2.3 System Setup System Setup configures the network configuration for the Lenovo Rescue system. 2.3.1 Launch Turn on the network access mode of the ADSL connection. After starting the procedure, install all passwords for the Lenovo Rescue System to start installing the Lenovo Drivers and Application Installation. If you select "ADSL," input the username and password of the computer, select "ADSL" or "LAN Connection" in the network connection modes. 1. After that the Drivers and Application installation has been installed automatically. User Guide...
User Manual
Page 35
... set the password for the first time. If you select "LAN connection," configure the IP address and proxy server of a system failure, you don't want to the prompts. 2.5 System Recovery Reboot your system from this image file. These recovery discs are used to boot your system partition to create recovery discs. 30 User Guide 31043712_IC B5_UG_EN_V1.1.indd 30 2010.5.7 1:49:25 PM 2. The default password is blank. In the Windows system, click Start...
... set the password for the first time. If you select "LAN connection," configure the IP address and proxy server of a system failure, you don't want to the prompts. 2.5 System Recovery Reboot your system from this image file. These recovery discs are used to boot your system partition to create recovery discs. 30 User Guide 31043712_IC B5_UG_EN_V1.1.indd 30 2010.5.7 1:49:25 PM 2. The default password is blank. In the Windows system, click Start...
User Manual
Page 45
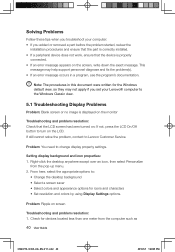
... added or removed a part before the problem started, review the installation procedures and ensure that the part is properly connected. • If an error message appears on the LCD. Setting display background and icon properties: 1. Problem: You need to change display property settings. Check for the Windows default view, so they may help support personnel diagnose and fix the problem(s). • If an error message occurs in this document were written for devices located...
... added or removed a part before the problem started, review the installation procedures and ensure that the part is properly connected. • If an error message appears on the LCD. Setting display background and icon properties: 1. Problem: You need to change display property settings. Check for the Windows default view, so they may help support personnel diagnose and fix the problem(s). • If an error message occurs in this document were written for devices located...
User Manual
Page 49
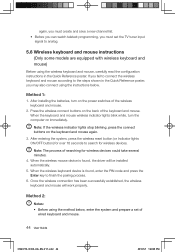
..., the wireless keyboard and mouse will be installed automatically. 5. After entering the system, press the wireless reset button (or Indicator lights ON/OFF button) for wireless devices could take several minutes. 4. If you fail to connect the wireless keyboard and mouse according to analog. 5.6 Wireless keyboard and mouse instructions (Only some models are equipped with wireless keyboard and mouse) Before using the wireless keyboard and mouse, carefully read the configuration instructions in the Quick Reference poster, you must set of searching...
..., the wireless keyboard and mouse will be installed automatically. 5. After entering the system, press the wireless reset button (or Indicator lights ON/OFF button) for wireless devices could take several minutes. 4. If you fail to connect the wireless keyboard and mouse according to analog. 5.6 Wireless keyboard and mouse instructions (Only some models are equipped with wireless keyboard and mouse) Before using the wireless keyboard and mouse, carefully read the configuration instructions in the Quick Reference poster, you must set of searching...
User Manual
Page 50
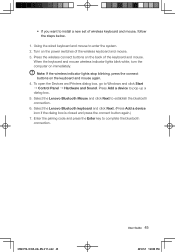
... the Enter key to Windows and click Start → Control Panel → Hardware and Sound. To open the Devices and Printers dialog box, go to complete the bluetooth connection. 31043712_IC B5_UG_EN_V1.1.indd 45 User Guide 45 2010.5.7 1:49:36 PM Press Add a device to establish the bluetooth connection. 6. Select the Lenovo Bluetooth keyboard and click Next. (Press Add a device icon if the dialog box is closed and press the connect button again...
... the Enter key to Windows and click Start → Control Panel → Hardware and Sound. To open the Devices and Printers dialog box, go to complete the bluetooth connection. 31043712_IC B5_UG_EN_V1.1.indd 45 User Guide 45 2010.5.7 1:49:36 PM Press Add a device to establish the bluetooth connection. 6. Select the Lenovo Bluetooth keyboard and click Next. (Press Add a device icon if the dialog box is closed and press the connect button again...
Lenovo IdeaCentre B500/B505 Quick Reference V1.1
Page 1
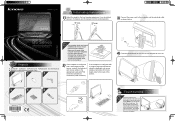
.../2 connector) and mouse connectors (USB connector). The indicator light turns off automatically after 10 seconds of the buttons ONCE to turn it on any of the buttons to activate them. Make sure the angle of the computer is configured with a wired keyboard and mouse, connect the keyboard and mouse cables to turn the indicator light ON to change settings as shown below. The buttons remain active while the indicator light is configured with a wireless keyboard and mouse, setup the keyboard and mouse wireless connection...
.../2 connector) and mouse connectors (USB connector). The indicator light turns off automatically after 10 seconds of the buttons ONCE to turn it on any of the buttons to activate them. Make sure the angle of the computer is configured with a wired keyboard and mouse, connect the keyboard and mouse cables to turn the indicator light ON to change settings as shown below. The buttons remain active while the indicator light is configured with a wireless keyboard and mouse, setup the keyboard and mouse wireless connection...

Lenovo IdeaCentre B500/B505 Quick Reference V1.1
Page 2
...266;!Optical drive 2 Ċ!Power button 3 Ċ!Card reader 4 Ċ!USB ports (2) 5 Ċ!Headphone connector 2 6 Ċ!Microphone connector 3 4 5 61 7 Ċ!AV-IN connector (Selected models only) 8 Ċ!PS/2 Keyboard connector 7 9 Ċ!Ethernet connector 12 8 10 Ċ!USB ports (2) 9 10 11 Ċ!TV-Tuner connector (Selected 11 models only) 12 Ċ!Power connector When the battery indicator light blinks red, it means that could interrupt the wireless connection. 7. Remove the batteries from the keyboard, mouse and remote control if you hear multiple beep sounds...
...266;!Optical drive 2 Ċ!Power button 3 Ċ!Card reader 4 Ċ!USB ports (2) 5 Ċ!Headphone connector 2 6 Ċ!Microphone connector 3 4 5 61 7 Ċ!AV-IN connector (Selected models only) 8 Ċ!PS/2 Keyboard connector 7 9 Ċ!Ethernet connector 12 8 10 Ċ!USB ports (2) 9 10 11 Ċ!TV-Tuner connector (Selected 11 models only) 12 Ċ!Power connector When the battery indicator light blinks red, it means that could interrupt the wireless connection. 7. Remove the batteries from the keyboard, mouse and remote control if you hear multiple beep sounds...


