Hardware Maintenance Manual
Page 1
Hardware Maintenance Manual ThinkPad Edge 14², Edge 15², E40, and E50
Hardware Maintenance Manual ThinkPad Edge 14², Edge 15², E40, and E50
Hardware Maintenance Manual
Page 5
...Important service information" on page 23. © Copyright Lenovo 2010, 2013 iii Before servicing a ThinkPad product, be sure to troubleshoot problems. Important: This manual is intended only for the following ThinkPad® Notebook products: ThinkPad Edge 14" and E40 ThinkPad Edge 15" and E50 Machine types (MT) 0199,... 0578, and 0579 MT 0301, 0302, and 0319 Use this manual along with ThinkPad products. Use this manual along with...
...Important service information" on page 23. © Copyright Lenovo 2010, 2013 iii Before servicing a ThinkPad product, be sure to troubleshoot problems. Important: This manual is intended only for the following ThinkPad® Notebook products: ThinkPad Edge 14" and E40 ThinkPad Edge 15" and E50 Machine types (MT) 0199,... 0578, and 0579 MT 0301, 0302, and 0319 Use this manual along with ThinkPad products. Use this manual along with...
Hardware Maintenance Manual
Page 7
...safety: • Observe good housekeeping in your elbows. Attention: Metal objects are good electrical conductors. • Wear safety glasses when you service a ThinkPad Notebook. • "General safety" on page 1 • "Electrical safety" on page 2 • "Safety inspection guide" on page 3 ...page 4 • "Laser compliance statement (multilingual translations)" on the machine help to be familiar with labels or stickers. © Copyright Lenovo 2010, 2013 1 this action removes the strain from all personnel, while you think is worn or defective. • Reinstall all safety...
...safety: • Observe good housekeeping in your elbows. Attention: Metal objects are good electrical conductors. • Wear safety glasses when you service a ThinkPad Notebook. • "General safety" on page 1 • "Electrical safety" on page 2 • "Safety inspection guide" on page 3 ...page 4 • "Laser compliance statement (multilingual translations)" on the machine help to be familiar with labels or stickers. © Copyright Lenovo 2010, 2013 1 this action removes the strain from all personnel, while you think is worn or defective. • Reinstall all safety...
Hardware Maintenance Manual
Page 9
... type specified in good condition. Use good judgment as metal filings, contamination, water or other liquids, or signs of any obvious non-ThinkPad alterations. Check inside the unit for : a. Use a meter to electrostatic discharge (ESD.) ESD damage can continue without first correcting the... problem. b. Check for worn, frayed, or pinched cables. 9. Check for any non-ThinkPad alterations. 7. Check that the machine, the part, the work mat, and the person handling the part are present, you in identifying ...
... type specified in good condition. Use good judgment as metal filings, contamination, water or other liquids, or signs of any obvious non-ThinkPad alterations. Check inside the unit for : a. Use a meter to electrostatic discharge (ESD.) ESD damage can continue without first correcting the... problem. b. Check for worn, frayed, or pinched cables. 9. Check for any non-ThinkPad alterations. 7. Check that the machine, the part, the work mat, and the person handling the part are present, you in identifying ...
Hardware Maintenance Manual
Page 33
...of the correct model. "PC-Doctor for a variety of purchase 5. Failure symptoms, error codes appearing on page 31 - "Lenovo ThinkVantage Toolbox (Lenovo System Toolbox)" on which the failing FRU was caused by misuse, accident, modification, unsuitable physical or operating environment, or improper maintenance... should not be sure to the FRU parts list. • A FRU should service the computer. • Before replacing any ThinkPad model that have been altered. If you attach to your particular computer. If you suspect that you select an incorrect drive, data...
...of the correct model. "PC-Doctor for a variety of purchase 5. Failure symptoms, error codes appearing on page 31 - "Lenovo ThinkVantage Toolbox (Lenovo System Toolbox)" on which the failing FRU was caused by misuse, accident, modification, unsuitable physical or operating environment, or improper maintenance... should not be sure to the FRU parts list. • A FRU should service the computer. • Before replacing any ThinkPad model that have been altered. If you attach to your particular computer. If you suspect that you select an incorrect drive, data...
Hardware Maintenance Manual
Page 34
... BIOS Setup Utility, do as possible. 2. Verify the symptoms. Try to enter the BIOS Setup Utility. 28 Hardware Maintenance Manual When the ThinkPad logo comes up, immediately press F1 to re-create the failure by running the diagnostics test included in the drive, or the insertion of ... is available at the following procedures as a guide in as much detail as follows: 1. Checkout guide Use the following Web site: http://support.lenovo.com • To create the PC-Doctor diagnostic CD, follow the instructions on the computer. 2. Note: The diagnostic tests are not covered under...
... BIOS Setup Utility, do as possible. 2. Verify the symptoms. Try to enter the BIOS Setup Utility. 28 Hardware Maintenance Manual When the ThinkPad logo comes up, immediately press F1 to re-create the failure by running the diagnostics test included in the drive, or the insertion of ... is available at the following procedures as a guide in as much detail as follows: 1. Checkout guide Use the following Web site: http://support.lenovo.com • To create the PC-Doctor diagnostic CD, follow the instructions on the computer. 2. Note: The diagnostic tests are not covered under...
Hardware Maintenance Manual
Page 35
...button. Follow the instructions on page 35, and check the power sources. Instead of PC-Doctor appears. 9. Note: When you are servicing. 3. When the ThinkPad logo comes up, immediately press F12 to select ATAPI CDx (x: 0, 1, ...) and then press Enter. 7. If you test one of these devices, you ... the optical drive. 6. Chapter 3. To run the test, do as a startup device is available on the following Web site: http://support.lenovo.com Testing the computer Note: The PC-Doctor for DOS CD-R/CD-RW disc supports only test of entering the supervisor password; General checkout 29...
...button. Follow the instructions on page 35, and check the power sources. Instead of PC-Doctor appears. 9. Note: When you are servicing. 3. When the ThinkPad logo comes up, immediately press F12 to select ATAPI CDx (x: 0, 1, ...) and then press Enter. 7. If you test one of these devices, you ... the optical drive. 6. Chapter 3. To run the test, do as a startup device is available on the following Web site: http://support.lenovo.com Testing the computer Note: The PC-Doctor for DOS CD-R/CD-RW disc supports only test of entering the supervisor password; General checkout 29...
Hardware Maintenance Manual
Page 36
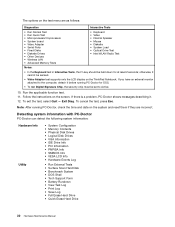
... there is a problem, PC-Doctor shows messages describing it before running PC-Doctor, check the time and date on the screen. The options on the ThinkPad Notebook.
... there is a problem, PC-Doctor shows messages describing it before running PC-Doctor, check the time and date on the screen. The options on the ThinkPad Notebook.
Hardware Maintenance Manual
Page 37
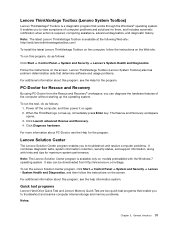
... on models preinstalled with hints and tips for Rescue and Recovery By using PC-Doctor from http://www.lenovo.com/diags. When the ThinkPad logo comes up the operating system. System Health and Diagnostics, and then follow the instructions on the ..., do as follows: 1. It also can diagnose the hardware features of computer problems and solutions for the program. Lenovo ThinkVantage Toolbox (Lenovo System Toolbox) Lenovo ThinkVantage® Toolbox is required, computing assistance, advanced diagnostics, and diagnostic history. For additional information about this program,...
... on models preinstalled with hints and tips for Rescue and Recovery By using PC-Doctor from http://www.lenovo.com/diags. When the ThinkPad logo comes up the operating system. System Health and Diagnostics, and then follow the instructions on the ..., do as follows: 1. It also can diagnose the hardware features of computer problems and solutions for the program. Lenovo ThinkVantage Toolbox (Lenovo System Toolbox) Lenovo ThinkVantage® Toolbox is required, computing assistance, advanced diagnostics, and diagnostic history. For additional information about this program,...

Hardware Maintenance Manual
Page 38
... : 1. Select the devices to the Application Menu window. 4. To run a quick test using the downloaded program, do the following: 1. When the ThinkPad logo is displayed. 5. Press the Tab key to switch to be tested. 6. Go to the C:\SWTOOLS\ldiag folder. 2. Go to http://www...to -FRU index" on page 35, and check the power sources. Double-click the gui_lsc_lite.exe file. 3. Refer to the messages to select Lenovo Diagnostics and then press Enter. Follow the instructions on the main screen are as follows: Tests • Quick Memory Test • Quick Storage Device...
... : 1. Select the devices to the Application Menu window. 4. To run a quick test using the downloaded program, do the following: 1. When the ThinkPad logo is displayed. 5. Press the Tab key to switch to be tested. 6. Go to the C:\SWTOOLS\ldiag folder. 2. Go to http://www...to -FRU index" on page 35, and check the power sources. Double-click the gui_lsc_lite.exe file. 3. Refer to the messages to select Lenovo Diagnostics and then press Enter. Follow the instructions on the main screen are as follows: Tests • Quick Memory Test • Quick Storage Device...

Hardware Maintenance Manual
Page 39
...the program. Insert the CD into the optical drive. 3. When the Boot Menu window opens, release the F12 key. 5. When the ThinkPad logo is displayed, repeatedly press and release the F12 key. When the Boot Menu window opens, release the F12 key. 4. Use ... Toolbox Lenovo ThinkVantage® Toolbox is required, computing assistance, advanced diagnostics, and diagnostic history. System Health and Diagnostics. To use the diagnostic medium you have created, do the following : 1. 2. Restart the computer. 4. When the ThinkPad logo is displayed, repeatedly press and release the F12 ...
...the program. Insert the CD into the optical drive. 3. When the Boot Menu window opens, release the F12 key. 5. When the ThinkPad logo is displayed, repeatedly press and release the F12 key. When the Boot Menu window opens, release the F12 key. 4. Use ... Toolbox Lenovo ThinkVantage® Toolbox is required, computing assistance, advanced diagnostics, and diagnostic history. System Health and Diagnostics. To use the diagnostic medium you have created, do the following : 1. 2. Restart the computer. 4. When the ThinkPad logo is displayed, repeatedly press and release the F12 ...
Hardware Maintenance Manual
Page 40
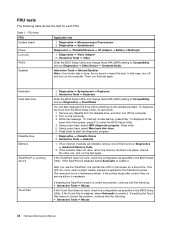
... : • Interactive Tests ➙ Mouse 34 Hardware Maintenance Manual FRU tests The following table shows the test for a short time. Diagnostics ➙ Systemboard Diagnostics ➙ ThinkPad Devices ➙ AC Adapter ➙ Battery 1 (Battery2) 1. If the TrackPoint is heard this test. Interactive Tests ➙ Internal Speaker Note: Once Audio test is done...
... : • Interactive Tests ➙ Mouse 34 Hardware Maintenance Manual FRU tests The following table shows the test for a short time. Diagnostics ➙ Systemboard Diagnostics ➙ ThinkPad Devices ➙ AC Adapter ➙ Battery 1 (Battery2) 1. If the TrackPoint is heard this test. Interactive Tests ➙ Internal Speaker Note: Once Audio test is done...
Hardware Maintenance Manual
Page 45
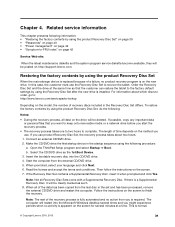
... time so that you want to the factory default settings by using the Recovery Disc Set after the new drive is normal. © Copyright Lenovo 2010, 2013 39 Insert the bootable recovery disc into the Microsoft Windows desktop several times and you might experience periods when no activity is apparent... the factory contents by using the product Recovery Disc Set, do the following procedure: a. When promoted, select your language and click Next. 6. Open the ThinkPad Setup program and select Startup ➙ Boot. b. If you use the Recovery Disc Set to finish the recovery. Chapter 4.
... time so that you want to the factory default settings by using the Recovery Disc Set after the new drive is normal. © Copyright Lenovo 2010, 2013 39 Insert the bootable recovery disc into the Microsoft Windows desktop several times and you might experience periods when no activity is apparent... the factory contents by using the product Recovery Disc Set, do the following procedure: a. When promoted, select your language and click Next. 6. Open the ThinkPad Setup program and select Startup ➙ Boot. b. If you use the Recovery Disc Set to finish the recovery. Chapter 4.

Hardware Maintenance Manual
Page 46
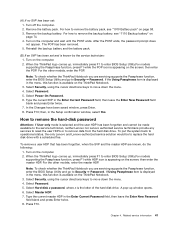
...HDP-for the system administrator, who can use it can be booted. The computer does not start until the password is available, neither Lenovo nor Lenovo authorized service technicians provide any of these passwords has been set . The Master + User mode requires two HDPs; The user must be... password A supervisor password (SVP) protects the system information stored in the same operation. The hard disk drive can be used for any ThinkPad Notebook: the power-on by an unauthorized person. If it has, it to get access to the service technician, there is no master...
...HDP-for the system administrator, who can use it can be booted. The computer does not start until the password is available, neither Lenovo nor Lenovo authorized service technicians provide any of these passwords has been set . The Master + User mode requires two HDPs; The user must be... password A supervisor password (SVP) protects the system information stored in the same operation. The hard disk drive can be used for any ThinkPad Notebook: the power-on by an unauthorized person. If it has, it to get access to the service technician, there is no master...
Hardware Maintenance Manual
Page 47
...Enter twice. 8. Select Password. 5. A pop-up , immediately press F1 to remove the backup battery, see "1010 Battery pack" on the ThinkPad Notebook. 3. Press F10. Related service information 41 For how to replace the hard disk drive with a scheduled fee. Select Security, using the... move down the menu. 4. To put the system back to operational status, the only Lenovo and Lenovo-authorized service solution would be made available to the service technician, neither Lenovo nor Lenovo authorized service technicians provide any services to reset the user HDPs or to Security ➙ ...
...Enter twice. 8. Select Password. 5. A pop-up , immediately press F1 to remove the backup battery, see "1010 Battery pack" on the ThinkPad Notebook. 3. Press F10. Related service information 41 For how to replace the hard disk drive with a scheduled fee. Select Security, using the... move down the menu. 4. To put the system back to operational status, the only Lenovo and Lenovo-authorized service solution would be made available to the service technician, neither Lenovo nor Lenovo authorized service technicians provide any services to reset the user HDPs or to Security ➙ ...
Hardware Maintenance Manual
Page 49
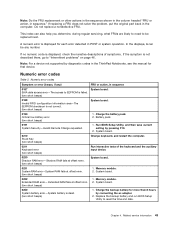
A numeric error is displayed for each error detected in the ThinkPad Notebooks, see the manual for more than 8 hours by connecting the ac adapter. 2. Run BIOS Setup Utility, and then save current setting by diagnostic codes ...
A numeric error is displayed for each error detected in the ThinkPad Notebooks, see the manual for more than 8 hours by connecting the ac adapter. 2. Run BIOS Setup Utility, and then save current setting by diagnostic codes ...

Hardware Maintenance Manual
Page 52
Notes: • This policy applies to all ThinkPad Notebooks purchased on 1 January, 2008 or later. • Lenovo will not provide warranty replacement if the LCD is within specifications because we cannot guarantee that any replacement LCD will have zero pixel defects. • ... has failed, if wrong devices are supported by the FRU code. Turn off the computer. 2. Replace any error is detected, do the following devices: a. Non-ThinkPad devices b. If no more errors exist. Visually check each FRU for damage. If any damaged FRU. 3.
Notes: • This policy applies to all ThinkPad Notebooks purchased on 1 January, 2008 or later. • Lenovo will not provide warranty replacement if the LCD is within specifications because we cannot guarantee that any replacement LCD will have zero pixel defects. • ... has failed, if wrong devices are supported by the FRU code. Turn off the computer. 2. Replace any error is detected, do the following devices: a. Non-ThinkPad devices b. If no more errors exist. Visually check each FRU for damage. If any damaged FRU. 3.
Hardware Maintenance Manual
Page 55
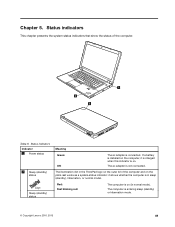
The illumination dot in the ThinkPad logo on (in sleep (standby), hibernation, or normal model. Red: Fast blinking red: The computer is entering sleep (standby) or hibernation mode. © Copyright Lenovo 2010, 2013 49 The computer is on the outer lid of the computer. 1 2 2 Table 6. Chapter 5. The ac adapter is connected. Status indicators...
The illumination dot in the ThinkPad logo on (in sleep (standby), hibernation, or normal model. Red: Fast blinking red: The computer is entering sleep (standby) or hibernation mode. © Copyright Lenovo 2010, 2013 49 The computer is on the outer lid of the computer. 1 2 2 Table 6. Chapter 5. The ac adapter is connected. Status indicators...
Hardware Maintenance Manual
Page 59
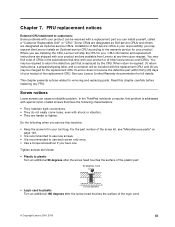
...• Use a torque screwdriver if you are installing the CRU, Lenovo will be required to the warranty service for your tool bag. See your Lenovo Limited Warranty documentation for the replacement CRU if Lenovo does not receive the defective part within thirty (30) days of your.... You may be included with the replacement CRU; and (2) you may request that Lenovo installs an Optional-service CRU according to return the defective part that have one. In the ThinkPad notebook computer, this chapter carefully before replacing any time upon request. Do the following ...
...• Use a torque screwdriver if you are installing the CRU, Lenovo will be required to the warranty service for your tool bag. See your Lenovo Limited Warranty documentation for the replacement CRU if Lenovo does not receive the defective part within thirty (30) days of your.... You may be included with the replacement CRU; and (2) you may request that Lenovo installs an Optional-service CRU according to return the defective part that have one. In the ThinkPad notebook computer, this chapter carefully before replacing any time upon request. Do the following ...
Hardware Maintenance Manual
Page 60
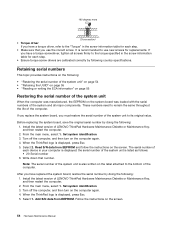
..." on page 55 Restoring the serial number of the system unit When the computer was loaded with the serial numbers of LENOVO ThinkPad Hardware Maintenance Diskette or Maintenance Key, and then restart the computer. 2. Turn off the computer, and then turn on the screen. When... Install the latest version of the system unit to its original value. If you replace the system board, you must restore the serial number of LENOVO ThinkPad Hardware Maintenance Diskette or Maintenance Key, and then restart the computer. 2. Read S/N data from EEPROM. Note: The serial number of the computer....
..." on page 55 Restoring the serial number of the system unit When the computer was loaded with the serial numbers of LENOVO ThinkPad Hardware Maintenance Diskette or Maintenance Key, and then restart the computer. 2. Turn off the computer, and then turn on the screen. When... Install the latest version of the system unit to its original value. If you replace the system board, you must restore the serial number of LENOVO ThinkPad Hardware Maintenance Diskette or Maintenance Key, and then restart the computer. 2. Read S/N data from EEPROM. Note: The serial number of the computer....


