Hardware Maintenance Manual
Page 3
... Checkout guide 28 Diagnostics using the product Recovery Disc Set 39 Passwords 40 Power-on password 40 Hard-disk password 40 Supervisor password 40 © Copyright Lenovo 2010, 2013 How to remove the power-on password . . . 40 How to remove the hard-disk password . . . 41 Power management 42 Screen blank mode 42 Sleep mode 42 Hibernation mode 42 Symptom-to-FRU index 42 Numeric error codes 43 Error messages 45 No-beep symptoms 45 LCD-related symptoms 45 Intermittent problems 46 Undetermined problems...
... Checkout guide 28 Diagnostics using the product Recovery Disc Set 39 Passwords 40 Power-on password 40 Hard-disk password 40 Supervisor password 40 © Copyright Lenovo 2010, 2013 How to remove the power-on password . . . 40 How to remove the hard-disk password . . . 41 Power management 42 Screen blank mode 42 Sleep mode 42 Hibernation mode 42 Symptom-to-FRU index 42 Numeric error codes 43 Error messages 45 No-beep symptoms 45 LCD-related symptoms 45 Intermittent problems 46 Undetermined problems...
Hardware Maintenance Manual
Page 8
... power cord quickly. • Do not work alone under hazardous conditions or near power supplies - Removing or installing main units • Before you start to insulate you may prevent a current from grounds such as metal floor strips and machine frames. By observing the above 2 Hardware Maintenance Manual Use only one hand when working with live electrical circuits with the power-off (EPO) switch, disconnecting switch...
... power cord quickly. • Do not work alone under hazardous conditions or near power supplies - Removing or installing main units • Before you start to insulate you may prevent a current from grounds such as metal floor strips and machine frames. By observing the above 2 Hardware Maintenance Manual Use only one hand when working with live electrical circuits with the power-off (EPO) switch, disconnecting switch...
Hardware Maintenance Manual
Page 29
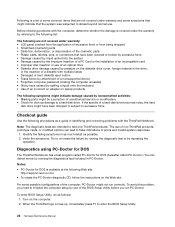
... Lenovo Customer Support Center if they need any assistance in obtaining or installing any FRUs listed in this manual. To download and install software fixes, drivers, and UEFI BIOS, go to http://www.lenovo.com/ThinkPadDrivers and follow the instructions on the drive to run a low-level format operation before you replace any software fixes, drivers, and BIOS downloads. Important service information This chapter presents following support site: http://www.lenovoservicetraining.com/ion/ Strategy for replacing a hard disk drive...
... Lenovo Customer Support Center if they need any assistance in obtaining or installing any FRUs listed in this manual. To download and install software fixes, drivers, and UEFI BIOS, go to http://www.lenovo.com/ThinkPadDrivers and follow the instructions on the drive to run a low-level format operation before you replace any software fixes, drivers, and BIOS downloads. Important service information This chapter presents following support site: http://www.lenovoservicetraining.com/ion/ Strategy for replacing a hard disk drive...
Hardware Maintenance Manual
Page 33
... index and page number in the computer that a FRU is defective, clear the error log and run the test again. "Lenovo ThinkVantage Toolbox (Lenovo System Toolbox)" on page 28 - Some descriptions might be sure to the FRU parts list. • A FRU should service the computer. • Before replacing any ThinkPad model that have been altered. Consider replacing a FRU only when a problem recurs. "PC...
... index and page number in the computer that a FRU is defective, clear the error log and run the test again. "Lenovo ThinkVantage Toolbox (Lenovo System Toolbox)" on page 28 - Some descriptions might be sure to the FRU parts list. • A FRU should service the computer. • Before replacing any ThinkPad model that have been altered. Consider replacing a FRU only when a problem recurs. "PC...
Hardware Maintenance Manual
Page 34
... subject to a hard disk drive. To enter BIOS Setup Utility, do as possible. 2. Following is available at the following Web site: http://support.lenovo.com • To create the PC-Doctor diagnostic CD, follow the instructions on the Web site. Note: The diagnostic tests are not covered under warranty and some possible configurations of the BIOS Setup Utility before you need to enter the BIOS Setup Utility. 28 Hardware Maintenance Manual Verify the symptoms...
... subject to a hard disk drive. To enter BIOS Setup Utility, do as possible. 2. Following is available at the following Web site: http://support.lenovo.com • To create the PC-Doctor diagnostic CD, follow the instructions on the Web site. Note: The diagnostic tests are not covered under warranty and some possible configurations of the BIOS Setup Utility before you need to enter the BIOS Setup Utility. 28 Hardware Maintenance Manual Verify the symptoms...
Hardware Maintenance Manual
Page 35
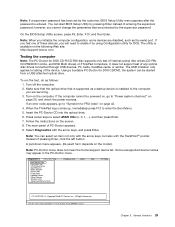
... set by the customer, BIOS Setup Utility menu appears after the password is available on the following Web site: http://support.lenovo.com Testing the computer Note: The PC-Doctor for DOS CD-R/CD-RW disc supports only test of internal optical disc drives (CD-RW, CD-RW/DVD Combo, and DVD Multi drives) on ThinkPad computers. however, you cannot change the parameters that is supported as a startup device is installed to "Power...
... set by the customer, BIOS Setup Utility menu appears after the password is available on the following Web site: http://support.lenovo.com Testing the computer Note: The PC-Doctor for DOS CD-R/CD-RW disc supports only test of internal optical disc drives (CD-RW, CD-RW/DVD Combo, and DVD Multi drives) on ThinkPad computers. however, you cannot change the parameters that is supported as a startup device is installed to "Power...
Hardware Maintenance Manual
Page 36
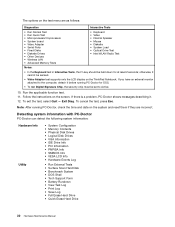
... • Run Quick Test • Microprocessor/Coprocessor • System board • Video Adapter • Serial Ports • Fixed Disks • Diskette Drives • Other Devices • Wireless LAN • Advanced Memory Tests • Keyboard • Video • Internal Speaker • Mouse • Diskette • System Load • Optical Drive Test • Intel WLAN Radio Test Notes: • In the Keyboard test in Interactive Tests, the Fn key should be held...
... • Run Quick Test • Microprocessor/Coprocessor • System board • Video Adapter • Serial Ports • Fixed Disks • Diskette Drives • Other Devices • Wireless LAN • Advanced Memory Tests • Keyboard • Video • Internal Speaker • Mouse • Diskette • System Load • Optical Drive Test • Intel WLAN Radio Test Notes: • In the Keyboard test in Interactive Tests, the Fn key should be held...
Hardware Maintenance Manual
Page 37
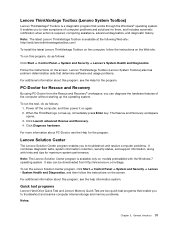
... starting up , immediately press Enter key. Click Launch advanced Rescue and Recovery. 4. For more information about this program, see the Help for the program. Power off the computer, and then power it on the screen. The Rescue and Recovery workspace opens. 3. Click Diagnose hardware. Lenovo ThinkVantege Toolbox (Lenovo System Toolbox) also has problem determination aids that enable you to troubleshoot and resolve computer internal storage and memory problems...
... starting up , immediately press Enter key. Click Launch advanced Rescue and Recovery. 4. For more information about this program, see the Help for the program. Power off the computer, and then power it on the screen. The Rescue and Recovery workspace opens. 3. Click Diagnose hardware. Lenovo ThinkVantege Toolbox (Lenovo System Toolbox) also has problem determination aids that enable you to troubleshoot and resolve computer internal storage and memory problems...

Hardware Maintenance Manual
Page 38
... Hardware Maintenance Manual Go to computers installed with the Windows 7, Windows XP, Windows Server 2003, or Windows Server 2008 operating system. It enables you to test memory and internal storage problems, view system information, and check and recover bad sectors on the computer. When the Boot Menu window opens, release the F12 key. 3. • If the computer you are servicing is not installed with the Lenovo Solution Center program, you can download the quick...
... Hardware Maintenance Manual Go to computers installed with the Windows 7, Windows XP, Windows Server 2003, or Windows Server 2008 operating system. It enables you to test memory and internal storage problems, view system information, and check and recover bad sectors on the computer. When the Boot Menu window opens, release the F12 key. 3. • If the computer you are servicing is not installed with the Lenovo Solution Center program, you can download the quick...
Hardware Maintenance Manual
Page 40
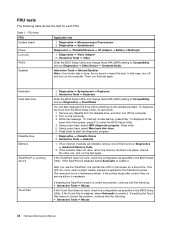
... System board Power LCD unit Audio Speaker Applicable test 1. Diagnostics ➙ Systemboard Diagnostics ➙ ThinkPad Devices ➙ AC Adapter ➙ Battery 1 (Battery2) 1. Keyboard Hard disk drive Diskette drive Memory TrackPoint® or pointing device Touch Pad 1. You can occur when a slight, steady pressure is heard this test again. Press Enter to Compatibility, and run this test. If the TrackPoint does not work , check the configuration as specified in the BIOS Setup Utility. If...
... System board Power LCD unit Audio Speaker Applicable test 1. Diagnostics ➙ Systemboard Diagnostics ➙ ThinkPad Devices ➙ AC Adapter ➙ Battery 1 (Battery2) 1. Keyboard Hard disk drive Diskette drive Memory TrackPoint® or pointing device Touch Pad 1. You can occur when a slight, steady pressure is heard this test again. Press Enter to Compatibility, and run this test. If the TrackPoint does not work , check the configuration as specified in the BIOS Setup Utility. If...
Hardware Maintenance Manual
Page 45
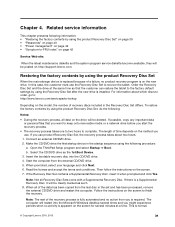
..., no activity is required. If the Recovery Disc Set contains a Supplemental Recovery Disc, insert it will be clearly marked as the 1st Boot Device. 3. Related service information This chapter presents following procedure: a. Make the CD/DVD drive the first startup device in the Recovery Disc Set differs. Restoring the factory contents by using the product Recovery Disc Set When the main storage device is replaced because of time depends on the screen. 7. Open the ThinkPad Setup program and select Startup ➙ Boot.
..., no activity is required. If the Recovery Disc Set contains a Supplemental Recovery Disc, insert it will be clearly marked as the 1st Boot Device. 3. Related service information This chapter presents following procedure: a. Make the CD/DVD drive the first startup device in the Recovery Disc Set differs. Restoring the factory contents by using the product Recovery Disc Set When the main storage device is replaced because of time depends on the screen. 7. Open the ThinkPad Setup program and select Startup ➙ Boot.

Hardware Maintenance Manual
Page 46
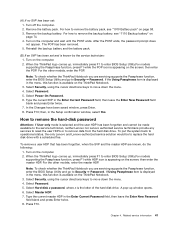
... appears on the screen whenever the computer is turned on. Start the ThinkPad Setup program and then press F9 to remove the power-on password (POP), the hard-disk password (HDP), and the supervisor password (SVP). Note: After restoring a drive to the factory default settings, you might need to the service technician, there is no master HDP is booted. 9. The hard disk drive can be made available to reinstall some device drivers. How to restore the default settings.
... appears on the screen whenever the computer is turned on. Start the ThinkPad Setup program and then press F9 to remove the power-on password (POP), the hard-disk password (HDP), and the supervisor password (SVP). Note: After restoring a drive to the factory default settings, you might need to the service technician, there is no master HDP is booted. 9. The hard disk drive can be made available to reinstall some device drivers. How to restore the default settings.
Hardware Maintenance Manual
Page 47
... screen; A pop-up , immediately press F1 to enter BIOS Setup Utility.For models supporting the Passphrase function, press F1 while the POP icon is appearing on the computer and wait until the POST ends. Press F10. Chapter 4. Remove the backup battery. If the Using Passphrase item is displayed in the menu, this function is available on the ThinkPad Notebook. 3. Select Password. 5. Press F10; How to remove the hard-disk password Attention: If User...
... screen; A pop-up , immediately press F1 to enter BIOS Setup Utility.For models supporting the Passphrase function, press F1 while the POP icon is appearing on the computer and wait until the POST ends. Press F10. Chapter 4. Remove the backup battery. If the Using Passphrase item is displayed in the menu, this function is available on the ThinkPad Notebook. 3. Select Password. 5. Press F10; How to remove the hard-disk password Attention: If User...
Hardware Maintenance Manual
Page 49
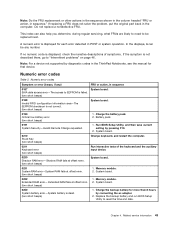
...." Memory module. 2. In the displays, n can also help you determine, during regular servicing, what FRUs are likely to need to "Intermittent problems" on page 46. Battery pack. 0191 System Security-Invalid Remote Change requested. 1. Charge the battery pack. 2. EAIA data access error-The access to reset the time and date. Replace the backup battery and run BIOS Setup Utility to EEPROM is failed. (two short beeps) 0189 Invalid RFID configuration information...
...." Memory module. 2. In the displays, n can also help you determine, during regular servicing, what FRUs are likely to need to "Intermittent problems" on page 46. Battery pack. 0191 System Security-Invalid Remote Change requested. 1. Charge the battery pack. 2. EAIA data access error-The access to reset the time and date. Replace the backup battery and run BIOS Setup Utility to EEPROM is failed. (two short beeps) 0189 Invalid RFID configuration information...
Hardware Maintenance Manual
Page 50
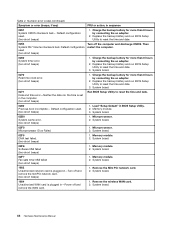
.... 0254 System NV7 Volume checksum bad- Charge the backup battery for more than 8 hours by connecting the ac adapter. 2. Replace the backup battery and run BIOS Setup Utility to reset the time and date. 3. Load "Setup Default" in sequence 0251 System CMOS checksum bad- System board. 02D0 System cache error. (two short beeps) 1. Microprocessor. 2. Memory module. 2. System board. 02F6 Software NMI failed (two short beeps) 1. Memory module. 2. Remove the Mini PCI network card. 2. System board. 0270 Real-time...
.... 0254 System NV7 Volume checksum bad- Charge the backup battery for more than 8 hours by connecting the ac adapter. 2. Replace the backup battery and run BIOS Setup Utility to reset the time and date. 3. Load "Setup Default" in sequence 0251 System CMOS checksum bad- System board. 02D0 System cache error. (two short beeps) 1. Microprocessor. 2. Memory module. 2. System board. 02F6 Software NMI failed (two short beeps) 1. Memory module. 2. Remove the Mini PCI network card. 2. System board. 0270 Real-time...
Hardware Maintenance Manual
Page 51
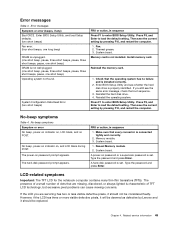
... whether the hard disk drive is characteristic of dots that every connector is not installed. Press F9, and Enter to load the default setting. Then save the current setting by pressing F10, and restart the computer. System board. 1. System board. Type the password and press Enter. The presence of a small number of TFT LCD technology, but excessive pixel problems can cause viewing concerns. Error messages Table 3. Enter BIOS Setup Utility and...
... whether the hard disk drive is characteristic of dots that every connector is not installed. Press F9, and Enter to load the default setting. Then save the current setting by pressing F10, and restart the computer. System board. 1. System board. Type the password and press Enter. The presence of a small number of TFT LCD technology, but excessive pixel problems can cause viewing concerns. Error messages Table 3. Enter BIOS Setup Utility and...

Hardware Maintenance Manual
Page 52
... the computer. Non-ThinkPad devices b. Memory module 46 Hardware Maintenance Manual Table 5. FRU replacement should be adjusted. • LCD screen unreadable. • Characters missing pixels. • Screen abnormal. • Wrong color displayed. LCD-related symptoms Symptom or error No beep, power-on indicator on, and a blank LCD during POST. • LCD backlight not working. • LCD too dark. • LCD brightness cannot be adjusted. • LCD contrast cannot be considered only when a problem recurs. Horizontal or...
... the computer. Non-ThinkPad devices b. Memory module 46 Hardware Maintenance Manual Table 5. FRU replacement should be adjusted. • LCD screen unreadable. • Characters missing pixels. • Screen abnormal. • Wrong color displayed. LCD-related symptoms Symptom or error No beep, power-on indicator on, and a blank LCD during POST. • LCD backlight not working. • LCD too dark. • LCD brightness cannot be adjusted. • LCD contrast cannot be considered only when a problem recurs. Horizontal or...
Hardware Maintenance Manual
Page 57
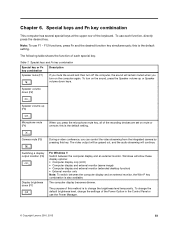
... the microphone mute key, all of the recording devices are set on the sound, press the Speaker volume up (F3) Microphone mute (F4) When you can control the video streaming from the integrated camera by pressing this is the default setting. Windows will show these display options: • Computer display only (LCD) • Computer display and external monitor (same image) • Computer display and external monitor (extended desktop function) • External monitor only Note: To switch between...
... the microphone mute key, all of the recording devices are set on the sound, press the Speaker volume up (F3) Microphone mute (F4) When you can control the video streaming from the integrated camera by pressing this is the default setting. Windows will show these display options: • Computer display only (LCD) • Computer display and external monitor (same image) • Computer display and external monitor (extended desktop function) • External monitor only Note: To switch between...
Hardware Maintenance Manual
Page 91
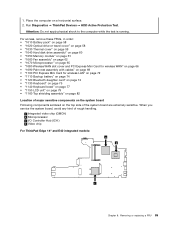
1. For access, remove these FRUs, in order: • "1010 Battery pack" on page 58 • "1020 Optical drive or travel cover" on page 58 • "1030 Thermal cover" on page 59 • "1040 Hard disk drive assembly" on page 60 • "1050 Memory module" on page 61 • "1060 Fan assembly" on page 62 • "1070 Microprocessor" on page 65 • "1080 Wireless WAN slot cover and...
1. For access, remove these FRUs, in order: • "1010 Battery pack" on page 58 • "1020 Optical drive or travel cover" on page 58 • "1030 Thermal cover" on page 59 • "1040 Hard disk drive assembly" on page 60 • "1050 Memory module" on page 61 • "1060 Fan assembly" on page 62 • "1070 Microprocessor" on page 65 • "1080 Wireless WAN slot cover and...
Hardware Maintenance Manual
Page 111
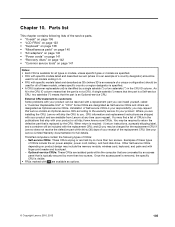
... parts" on page 140 • "AC adapters" on page 140 • "Power cords" on page 141 • "Recovery discs" on page 142 • "Common service tools" on product design may be used for all models ending in the CRU ID column. and (2) you . ThinkPad computers contain the following lists of a unique configuration) should be required to you may include the memory module, wireless card, keyboard, and...
... parts" on page 140 • "AC adapters" on page 140 • "Power cords" on page 141 • "Recovery discs" on page 142 • "Common service tools" on product design may be used for all models ending in the CRU ID column. and (2) you . ThinkPad computers contain the following lists of a unique configuration) should be required to you may include the memory module, wireless card, keyboard, and...


