Owner's Manual (English)
Page 2
... and lightning, never touch the power cord and signal cable because it is to the product. To Prevent Fire or Hazards: Always turn the display OFF if you leave the room for more than a short period of power supply you have not been designed for replacement. Ensure that it can be left unattended for its installation, use another power cord, make sure that the socket...
... and lightning, never touch the power cord and signal cable because it is to the product. To Prevent Fire or Hazards: Always turn the display OFF if you leave the room for more than a short period of power supply you have not been designed for replacement. Ensure that it can be left unattended for its installation, use another power cord, make sure that the socket...
Owner's Manual (English)
Page 3
... of the fixed-resolution LCD panel. Therefore, NEVER: Block the bottom ventilation slots by the warranty on the screen. If possible, use the recommended resolution to move. Make sure to use this display near or over the power cord, and do not place the display where the power cord is subject to rest upon or roll over a radiator or heat source. Leaving a fixed image on the display performance. Do...
... of the fixed-resolution LCD panel. Therefore, NEVER: Block the bottom ventilation slots by the warranty on the screen. If possible, use the recommended resolution to move. Make sure to use this display near or over the power cord, and do not place the display where the power cord is subject to rest upon or roll over a radiator or heat source. Leaving a fixed image on the display performance. Do...

Owner's Manual (English)
Page 6
Positioning your display 1. Tilt Range: -5˚~17˚ Ergonomic It is turned off. A5 Adjust the position of the monitor should not exceed 5 degrees. Connecting the Display Before setting up the monitor, ensure that the power to the monitor, the computer system, and other attached devices is recommended that in order to maintain an ergonomic and comfortable viewing position, the forward tilt angle of the panel in various ways for maximum comfort.
Positioning your display 1. Tilt Range: -5˚~17˚ Ergonomic It is turned off. A5 Adjust the position of the monitor should not exceed 5 degrees. Connecting the Display Before setting up the monitor, ensure that the power to the monitor, the computer system, and other attached devices is recommended that in order to maintain an ergonomic and comfortable viewing position, the forward tilt angle of the panel in various ways for maximum comfort.
Owner's Manual (English)
Page 7
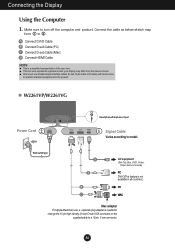
Connect the cable as shown. Make sure to model. A6 A Connect DVI-D Cable B Connect D-sub Cable (PC) C Connect D-sub Cable (Mac) D Connect HDMI Cable NOTE This is needed to change the 15 pin high density (3 row) D-sub VGA connector on the supplied cable to a 15 pin 2 row connector. W2261VP/W2261VG Power Cord Wall-outlet type Headphone/Earphone Input Signal Cable Varies according to turn off the computer and product. User must use , a separate plug adapter is a simplified representation of the rear view. Connecting the Display Using the Computer...
Connect the cable as shown. Make sure to model. A6 A Connect DVI-D Cable B Connect D-sub Cable (PC) C Connect D-sub Cable (Mac) D Connect HDMI Cable NOTE This is needed to change the 15 pin high density (3 row) D-sub VGA connector on the supplied cable to a 15 pin 2 row connector. W2261VP/W2261VG Power Cord Wall-outlet type Headphone/Earphone Input Signal Cable Varies according to turn off the computer and product. User must use , a separate plug adapter is a simplified representation of the rear view. Connecting the Display Using the Computer...
Owner's Manual (English)
Page 8
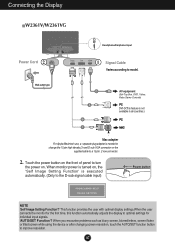
... screen resolution, touch the AUTO/SET function button to optimal settings for the first time, this function automatically adjusts the display to improve resolution. A7 When monitor power is turned on, the 'Self Image Setting Function' is needed to the D-sub signal cable input) Power button NOTE 'Self Image Setting Function'? Connecting the Display W2361V/W2361VG Power Cord Wall-outlet type Headphone/Earphone Input Signal Cable Varies according to a 15 pin 2 row connector. 2. Touch the power button on the front of panel to turn the power on the supplied cable to model...
... screen resolution, touch the AUTO/SET function button to optimal settings for the first time, this function automatically adjusts the display to improve resolution. A7 When monitor power is turned on, the 'Self Image Setting Function' is needed to the D-sub signal cable input) Power button NOTE 'Self Image Setting Function'? Connecting the Display W2361V/W2361VG Power Cord Wall-outlet type Headphone/Earphone Input Signal Cable Varies according to a 15 pin 2 row connector. 2. Touch the power button on the front of panel to turn the power on the supplied cable to model...
Owner's Manual (English)
Page 9
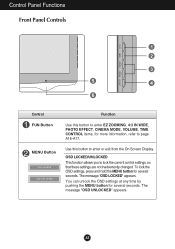
Control Panel Functions Front Panel Controls Control FUN Button MENU Button Function Use this button to enter or exit from the On Screen Display. Use this button to enter EZ ZOOMING, 4:3 IN WIDE, PHOTO EFFECT, CINEMA MODE, VOLUME, TIME CONTROL items, for several seconds. A8 You can unlock the OSD settings at any time by pushing the MENU button for more information, refer to lock the current control settings, so that these settings are not inadvertently changed. To lock the...
Control Panel Functions Front Panel Controls Control FUN Button MENU Button Function Use this button to enter or exit from the On Screen Display. Use this button to enter EZ ZOOMING, 4:3 IN WIDE, PHOTO EFFECT, CINEMA MODE, VOLUME, TIME CONTROL items, for several seconds. A8 You can unlock the OSD settings at any time by pushing the MENU button for more information, refer to lock the current control settings, so that these settings are not inadvertently changed. To lock the...

Owner's Manual (English)
Page 10
... the On Screen Display(OSD). The best display mode is: 1920 x 1080 Power Button Use this button to make DSUB, DVI or HDMI connector active. If the display is in Sleep Mode (Energy Saving), this button to select an icon in the On Screen Display. Control Panel Functions Control Function Buttons Use these buttons to the display. *HDMI is optimized on or off. Button (SOURCE) AUTO/SET Button Use this indicator color changes to the ideal settings for the current screen resolution size (display mode). AUTO IMAGE ADJUSTMENT When adjusting your display image to flicker.
... the On Screen Display(OSD). The best display mode is: 1920 x 1080 Power Button Use this button to make DSUB, DVI or HDMI connector active. If the display is in Sleep Mode (Energy Saving), this button to select an icon in the On Screen Display. Control Panel Functions Control Function Buttons Use these buttons to the display. *HDMI is optimized on or off. Button (SOURCE) AUTO/SET Button Use this indicator color changes to the ideal settings for the current screen resolution size (display mode). AUTO IMAGE ADJUSTMENT When adjusting your display image to flicker.

Owner's Manual (English)
Page 12
.... A11 Main menu Sub-menu RD H Reference EZ ZOOMING 4:3 IN WIDE NORMAL PHOTO EFFECT GAUSSIAN BLUR SEPIA MONOCHROME CINEMA MODE VOLUME TIME CONTROL BRIGHTNESS PICTURE CONTRAST GAMMA **BLACK LEVEL sRGB COLOR PRESET RED 6500K 9300K GREEN BLUE HORIZONTAL VERTICAL TRACKING CLOCK PHASE SHARPNESS LANGUAGE OSD HORIZONTAL POSITION VERTICAL SETUP *WHITE BALANCE **OVERSCAN RTC POWER INDICATOR FACTORY RESET MOVIE *INTERNET **GAME FLATRON F-ENGINE USER *NORMAL **STANDARD *DEMO **SPORTS To adjust the resolution To adjust the image size To adjust screen color mode To...
.... A11 Main menu Sub-menu RD H Reference EZ ZOOMING 4:3 IN WIDE NORMAL PHOTO EFFECT GAUSSIAN BLUR SEPIA MONOCHROME CINEMA MODE VOLUME TIME CONTROL BRIGHTNESS PICTURE CONTRAST GAMMA **BLACK LEVEL sRGB COLOR PRESET RED 6500K 9300K GREEN BLUE HORIZONTAL VERTICAL TRACKING CLOCK PHASE SHARPNESS LANGUAGE OSD HORIZONTAL POSITION VERTICAL SETUP *WHITE BALANCE **OVERSCAN RTC POWER INDICATOR FACTORY RESET MOVIE *INTERNET **GAME FLATRON F-ENGINE USER *NORMAL **STANDARD *DEMO **SPORTS To adjust the resolution To adjust the image size To adjust screen color mode To...
Owner's Manual (English)
Page 13
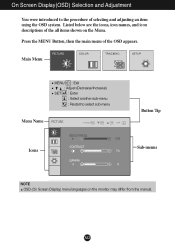
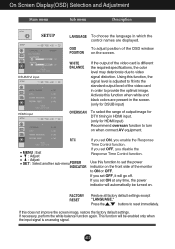
Listed below are the icons, icon names, and icon descriptions of the all items shown on the monitor may differ from the manual. Press the MENU Button, then the main menu of selecting and adjusting an item using the OSD system. A12 Main Menu MENU : Exit : Adjust (Decrease/Increase) SET : Enter : Select another sub-menu : Restart to the procedure of the OSD appears. On Screen Display(OSD) Selection and Adjustment You were introduced to select sub-menu Menu Name Button Tip Icons Sub-menus NOTE OSD (On Screen Display) menu languages on the Menu.
Listed below are the icons, icon names, and icon descriptions of the all items shown on the monitor may differ from the manual. Press the MENU Button, then the main menu of selecting and adjusting an item using the OSD system. A12 Main Menu MENU : Exit : Adjust (Decrease/Increase) SET : Enter : Select another sub-menu : Restart to the procedure of the OSD appears. On Screen Display(OSD) Selection and Adjustment You were introduced to select sub-menu Menu Name Button Tip Icons Sub-menus NOTE OSD (On Screen Display) menu languages on the Menu.
Owner's Manual (English)
Page 14
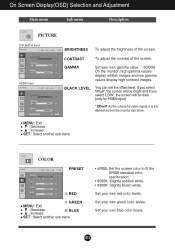
On Screen Display(OSD) Selection and Adjustment Main menu Sub menu Description PICTURE PICTURE DSUB/DVI input HDMI input BRIGHTNESS To adjust the brightness of the screen. BLACK LEVEL You can show. If you select 'HIGH', the screen will be bright and if you select 'LOW', the screen will be dark. (only for video signal, it is the darkest screen the monitor can set the offset level. Set your own green color levels. As the criteria for HDMI input) * Offset? MENU : Exit...
On Screen Display(OSD) Selection and Adjustment Main menu Sub menu Description PICTURE PICTURE DSUB/DVI input HDMI input BRIGHTNESS To adjust the brightness of the screen. BLACK LEVEL You can show. If you select 'HIGH', the screen will be bright and if you select 'LOW', the screen will be dark. (only for video signal, it is the darkest screen the monitor can set the offset level. Set your own green color levels. As the criteria for HDMI input) * Offset? MENU : Exit...
Owner's Manual (English)
Page 16
... disable the Response Time Control function. FACTORY RESET Restore all factory default settings except "LANGUAGE." Use this does not improve the screen image, restore the factory default settings. On Screen Display(OSD) Selection and Adjustment Main menu Sub menu Description SETUP SETUP LANGUAGE To choose the language in the screen. (only for DSUB input) OVERSCAN To select the range of the video card is different the required specifications, the color level may deteriorate due to turn on when connect AV equipment. RTC MENU : Exit : Adjust : Adjust SET...
... disable the Response Time Control function. FACTORY RESET Restore all factory default settings except "LANGUAGE." Use this does not improve the screen image, restore the factory default settings. On Screen Display(OSD) Selection and Adjustment Main menu Sub menu Description SETUP SETUP LANGUAGE To choose the language in the screen. (only for DSUB input) OVERSCAN To select the range of the video card is different the required specifications, the color level may deteriorate due to turn on when connect AV equipment. RTC MENU : Exit : Adjust : Adjust SET...
Owner's Manual (English)
Page 17
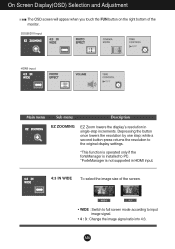
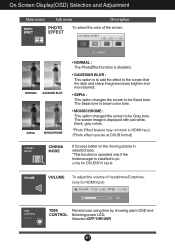
...; 4 : 3 : Change the image signal ratio into 4:3. WIDE 4:3 • WIDE : Switch to full screen mode according to PC. *ForteManager is not supported in single-step increments. A16 On Screen Display(OSD) Selection and Adjustment The OSD screen will appear when you touch the FUN button on the right bottom of the screen. DSUB/DVI input HDMI input Main menu Sub menu Description EZ ZOOMING EZ Zoom lowers the display's resolution in HDMI input. 4:3 IN WIDE To select the image size of the monitor...
...; 4 : 3 : Change the image signal ratio into 4:3. WIDE 4:3 • WIDE : Switch to full screen mode according to PC. *ForteManager is not supported in single-step increments. A16 On Screen Display(OSD) Selection and Adjustment The OSD screen will appear when you touch the FUN button on the right bottom of the screen. DSUB/DVI input HDMI input Main menu Sub menu Description EZ ZOOMING EZ Zoom lowers the display's resolution in HDMI input. 4:3 IN WIDE To select the image size of the monitor...
Owner's Manual (English)
Page 18
... DSUB format) CINEMA MODE It focuses better on the moving picture in selected area. *This function is operated only if the fortemanager is installed to be Gray tone. On Screen Display(OSD) Selection and Adjustment Main menu Sub menu Description PHOTO EFFECT To select the color of headphone/Earphone. (only for HDMI input) TIME Remind user using time by showing alarm OSD and CONTROL flickering power LED. Selection:OFF...
... DSUB format) CINEMA MODE It focuses better on the moving picture in selected area. *This function is operated only if the fortemanager is installed to be Gray tone. On Screen Display(OSD) Selection and Adjustment Main menu Sub menu Description PHOTO EFFECT To select the color of headphone/Earphone. (only for HDMI input) TIME Remind user using time by showing alarm OSD and CONTROL flickering power LED. Selection:OFF...
Owner's Manual (English)
Page 21
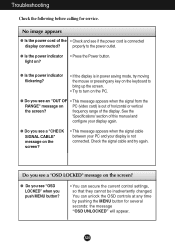
... turn on the PC. See the 'Specifications' section of this manual and configure your display is out of horizontal or vertical the screen? Do you see if the power cord is in power saving mode, try again. frequency range of the • Check and see an "OUT OF • This message appears when the signal from the RANGE" message on the screen? • This message appears when the signal cable...
... turn on the PC. See the 'Specifications' section of this manual and configure your display is out of horizontal or vertical the screen? Do you see if the power cord is in power saving mode, try again. frequency range of the • Check and see an "OUT OF • This message appears when the signal from the RANGE" message on the screen? • This message appears when the signal cable...
Owner's Manual (English)
Page 22
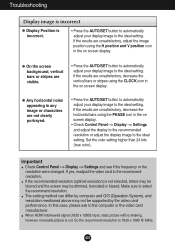
... using the H position and V position icon in the on screen display. If yes, readjust the video card to the ideal setting. When HDMI interleaved signal (1920 x 1080i) input, static picture will be supported by the video card performance. G Any horizontal noise appearing in the on screen display. • Check Control Panel --> Display --> Settings and adjust the display to the recommended resolution or adjust the display image to the ideal setting. Important Check Control Panel --> Display --> Settings and see if the frequency or the resolution were changed. The setting...
... using the H position and V position icon in the on screen display. If yes, readjust the video card to the ideal setting. When HDMI interleaved signal (1920 x 1080i) input, static picture will be supported by the video card performance. G Any horizontal noise appearing in the on screen display. • Check Control Panel --> Display --> Settings and adjust the display to the recommended resolution or adjust the display image to the ideal setting. Important Check Control Panel --> Display --> Settings and see if the frequency or the resolution were changed. The setting...
Owner's Manual (English)
Page 23
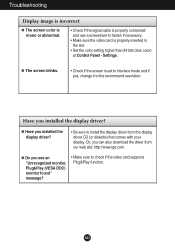
... your display. Or, you installed the display driver? • Be sure to check if the video card supports Plug&Play function. G Do you installed the display driver? G The screen blinks. • Check if the screen is set to interlace mode and if yes, change it to fasten if necessary. • Make sure the video card is properly connected and use a screwdriver to the recommend resolution. Troubleshooting Display image is incorrect G The screen color is mono or abnormal. • Check if the signal cable...
... your display. Or, you installed the display driver? • Be sure to check if the video card supports Plug&Play function. G Do you installed the display driver? G The screen blinks. • Check if the screen is set to interlace mode and if yes, change it to fasten if necessary. • Make sure the video card is properly connected and use a screwdriver to the recommend resolution. Troubleshooting Display image is incorrect G The screen color is mono or abnormal. • Check if the signal cable...
Owner's Manual (English)
Page 24
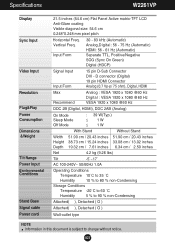
... in this document is subject to change without notice. Input Form 30 - 83 kHz (Automatic) Analog,Digital: 56 - 75 Hz (Automatic) HDMI: 56 - 61 Hz (Automatic) Separate TTL, Positive/Negative SOG (Sync On Green) Digital (HDCP) Signal Input Input Form 15 pin D-Sub Connector DVI - Vertical Freq. A23 Specifications W2261VP Display Sync Input Video Input Resolution Plug&Play Power Consumption Dimensions &Weight Tilt Range Power Input Environmental Conditions Stand Base Signal cable Power cord 21.5 inches (54.6 cm) Flat Panel Active matrix-TFT LCD Anti-Glare coating Visible diagonal...
... in this document is subject to change without notice. Input Form 30 - 83 kHz (Automatic) Analog,Digital: 56 - 75 Hz (Automatic) HDMI: 56 - 61 Hz (Automatic) Separate TTL, Positive/Negative SOG (Sync On Green) Digital (HDCP) Signal Input Input Form 15 pin D-Sub Connector DVI - Vertical Freq. A23 Specifications W2261VP Display Sync Input Video Input Resolution Plug&Play Power Consumption Dimensions &Weight Tilt Range Power Input Environmental Conditions Stand Base Signal cable Power cord 21.5 inches (54.6 cm) Flat Panel Active matrix-TFT LCD Anti-Glare coating Visible diagonal...
Owner's Manual (English)
Page 25
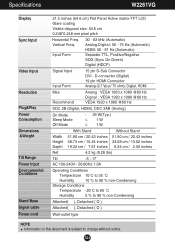
... to change without notice. A24 Input Form 30 - 83 kHz (Automatic) Analog,Digital: 56 - 75 Hz (Automatic) HDMI: 56 - 61 Hz (Automatic) Separate TTL, Positive/Negative SOG (Sync On Green) Digital (HDCP) Signal Input Input Form 15 pin D-Sub Connector DVI - Specifications W2261VG Display Sync Input Video Input Resolution Plug&Play Power Consumption Dimensions &Weight Tilt Range Power Input Environmental Conditions Stand Base Signal cable Power cord 21.5 inches (54.6 cm) Flat Panel Active matrix-TFT LCD Glare coating Visible diagonal size: 54.6 cm 0.248*0.248 mm pixel pitch Horizontal...
... to change without notice. A24 Input Form 30 - 83 kHz (Automatic) Analog,Digital: 56 - 75 Hz (Automatic) HDMI: 56 - 61 Hz (Automatic) Separate TTL, Positive/Negative SOG (Sync On Green) Digital (HDCP) Signal Input Input Form 15 pin D-Sub Connector DVI - Specifications W2261VG Display Sync Input Video Input Resolution Plug&Play Power Consumption Dimensions &Weight Tilt Range Power Input Environmental Conditions Stand Base Signal cable Power cord 21.5 inches (54.6 cm) Flat Panel Active matrix-TFT LCD Glare coating Visible diagonal size: 54.6 cm 0.248*0.248 mm pixel pitch Horizontal...

Owner's Manual (English)
Page 26
Specifications W2361V Display Sync Input Video Input Resolution Plug&Play Power Consumption Dimensions &Weight Tilt Range Power Input Environmental Conditions Stand Base Signal cable Power cord 23 inches (58.4 cm) Flat Panel Active matrix-TFT LCD Anti-Glare coating Visible diagonal size: 58.4 cm 0.266*0.266 mm pixel pitch Horizontal Freq. A25 Vertical Freq. D connector (Digital) 19 pin HDMI Connector Analog (0.7 Vp-p/ 75 ohm), Digital, HDMI Max Recommend Analog : VESA 1920 x 1080 @60 Hz Digital : VESA 1920 x 1080 @60 Hz VESA 1920 x 1080 @60 Hz DDC 2B (Digital, HDMI), DDC 2AB (Analog...
Specifications W2361V Display Sync Input Video Input Resolution Plug&Play Power Consumption Dimensions &Weight Tilt Range Power Input Environmental Conditions Stand Base Signal cable Power cord 23 inches (58.4 cm) Flat Panel Active matrix-TFT LCD Anti-Glare coating Visible diagonal size: 58.4 cm 0.266*0.266 mm pixel pitch Horizontal Freq. A25 Vertical Freq. D connector (Digital) 19 pin HDMI Connector Analog (0.7 Vp-p/ 75 ohm), Digital, HDMI Max Recommend Analog : VESA 1920 x 1080 @60 Hz Digital : VESA 1920 x 1080 @60 Hz VESA 1920 x 1080 @60 Hz DDC 2B (Digital, HDMI), DDC 2AB (Analog...

Owner's Manual (English)
Page 27
Specifications W2361VG Display Sync Input Video Input Resolution Plug&Play Power Consumption Dimensions &Weight Tilt Range Power Input Environmental Conditions Stand Base Signal cable Power cord 23 inches (58.4 cm) Flat Panel Active matrix-TFT LCD Glare coating Visible diagonal size: 58.4 cm 0.266*0.266 mm pixel pitch Horizontal Freq. D connector (Digital) 19 pin HDMI Connector Analog (0.7 Vp-p/ 75 ohm), Digital, HDMI Max Recommend Analog : VESA 1920 x 1080 @60 Hz Digital : VESA 1920 x 1080 @60 Hz VESA 1920 x 1080 @60 Hz DDC 2B (Digital, HDMI), DDC 2AB (Analog) On Mode Sleep Mode ...
Specifications W2361VG Display Sync Input Video Input Resolution Plug&Play Power Consumption Dimensions &Weight Tilt Range Power Input Environmental Conditions Stand Base Signal cable Power cord 23 inches (58.4 cm) Flat Panel Active matrix-TFT LCD Glare coating Visible diagonal size: 58.4 cm 0.266*0.266 mm pixel pitch Horizontal Freq. D connector (Digital) 19 pin HDMI Connector Analog (0.7 Vp-p/ 75 ohm), Digital, HDMI Max Recommend Analog : VESA 1920 x 1080 @60 Hz Digital : VESA 1920 x 1080 @60 Hz VESA 1920 x 1080 @60 Hz DDC 2B (Digital, HDMI), DDC 2AB (Analog) On Mode Sleep Mode ...


