Owner's Manual
Page 3
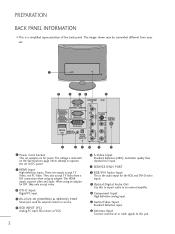
... 12 1 Power Cord Socket This set on the Specifications page. When using an adapter. Also known as VGA. 6 S-Video Input Standard definition (480i), but better quality than standard A/V input. 7 SERVICE ONLY PORT 8 RGB/DVI Audio Input This is a simplified representation of the back panel. The image shown may be somewhat different from a DVI connection when using an adapter for DVI, they only accept video. 3 DVI-D Input Digital PC input. 4 RS-232C IN (CONTROL & SERVICE) PORT Serial port used for the RGB and DVI-D video inputs. 9 Optical Digital Audio Out Use this...
... 12 1 Power Cord Socket This set on the Specifications page. When using an adapter. Also known as VGA. 6 S-Video Input Standard definition (480i), but better quality than standard A/V input. 7 SERVICE ONLY PORT 8 RGB/DVI Audio Input This is a simplified representation of the back panel. The image shown may be somewhat different from a DVI connection when using an adapter for DVI, they only accept video. 3 DVI-D Input Digital PC input. 4 RS-232C IN (CONTROL & SERVICE) PORT Serial port used for the RGB and DVI-D video inputs. 9 Optical Digital Audio Out Use this...
Owner's Manual
Page 8
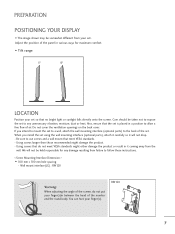
... back of the set using the wall mounting interface (optional parts), attach it carefully so it coming away from the wall. When you intend to mount the set to a wall, attach the wall mounting interface (optional parts) to allow a free flow of air. If you install the set . Wall mount interface(LG) : RW120 Warning: When adjusting the angle of the screen, do not meet VESA standards. - PREPARATION POSITIONING YOUR DISPLAY I The image shown may...
... back of the set using the wall mounting interface (optional parts), attach it carefully so it coming away from the wall. When you intend to mount the set to a wall, attach the wall mounting interface (optional parts) to allow a free flow of air. If you install the set . Wall mount interface(LG) : RW120 Warning: When adjusting the angle of the screen, do not meet VESA standards. - PREPARATION POSITIONING YOUR DISPLAY I The image shown may...

Owner's Manual
Page 10
... plug in any power cords until you have finished connecting all equipment. I If signal needs to be split for two TVs, use an antenna signal splitter for outdoor antenna) ANTENNA/ CABLE IN AV 1 AV 2 UHF Antenna AC IN Signal Amplifier VHF ANTENNA/ CABLE IN I An antenna cable and converter are not supplied. I In poor signal areas, to get better picture quality, install a signal amplifier to wall jack for connection...
... plug in any power cords until you have finished connecting all equipment. I If signal needs to be split for two TVs, use an antenna signal splitter for outdoor antenna) ANTENNA/ CABLE IN AV 1 AV 2 UHF Antenna AC IN Signal Amplifier VHF ANTENNA/ CABLE IN I An antenna cable and converter are not supplied. I In poor signal areas, to get better picture quality, install a signal amplifier to wall jack for connection...
Owner's Manual
Page 12
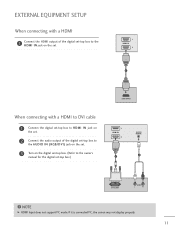
... set. 1 HDMI IN 2 1 When connecting with a HDMI to DVI cable 1 Connect the digital set-top box to HDMI IN jack on the set. 2 Connect the audio output of the digital set-top box to the AUDIO IN (RGB/DVI) jack on the set. 3 Turn on the digital set-top box. (Refer to the owner's manual for the digital set-top box.) 1 HDMI IN 2 AUDIO IN (RGB/DVI) 2 1 DVI OUTPUT AUDIO L R ! If it is connected PC, the screen may not display properly. 11 NOTE G HDMI Input does not support...
... set. 1 HDMI IN 2 1 When connecting with a HDMI to DVI cable 1 Connect the digital set-top box to HDMI IN jack on the set. 2 Connect the audio output of the digital set-top box to the AUDIO IN (RGB/DVI) jack on the set. 3 Turn on the digital set-top box. (Refer to the owner's manual for the digital set-top box.) 1 HDMI IN 2 AUDIO IN (RGB/DVI) 2 1 DVI OUTPUT AUDIO L R ! If it is connected PC, the screen may not display properly. 11 NOTE G HDMI Input does not support...
Owner's Manual
Page 17
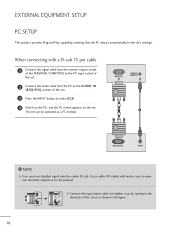
... for the product. RGB IN (PC) AUDIO IN (RGB/DVI) 1 2 RGB OUTPUT AUDIO ! When connecting with ferrite cores to select R G B. 4 Switch on the PC, and the PC screen appears on the set 's settings. G Connect the signal input cabel and tighten it up by turning in the figure. 16 NOTE G User must use shielded signal interface cables (D sub 15 pin cable, DVI cable) with a D-sub 15 pin cable 1 Connect the signal cable from the monitor output socket of...
... for the product. RGB IN (PC) AUDIO IN (RGB/DVI) 1 2 RGB OUTPUT AUDIO ! When connecting with ferrite cores to select R G B. 4 Switch on the PC, and the PC screen appears on the set 's settings. G Connect the signal input cabel and tighten it up by turning in the figure. 16 NOTE G User must use shielded signal interface cables (D sub 15 pin cable, DVI cable) with a D-sub 15 pin cable 1 Connect the signal cable from the monitor output socket of...

Owner's Manual
Page 18
... is switched on. EXTERNAL EQUIPMENT SETUP When connecting with a DVI cable 1 Connect the DVI output of the PC to the DVI-D IN jack on the set. 2 Connect the audio cable from the PC to the mode 1920 x 1080 @ 60 Hz. NOTE G Connect the signal input cabel and tighten it up by turning in the direction of time. G Do not press the LCD screen with your LCD monitor. G Avoid keeping a fixed image on the set is...
... is switched on. EXTERNAL EQUIPMENT SETUP When connecting with a DVI cable 1 Connect the DVI output of the PC to the DVI-D IN jack on the set. 2 Connect the audio cable from the PC to the mode 1920 x 1080 @ 60 Hz. NOTE G Connect the signal input cabel and tighten it up by turning in the direction of time. G Do not press the LCD screen with your LCD monitor. G Avoid keeping a fixed image on the set is...
Owner's Manual
Page 22
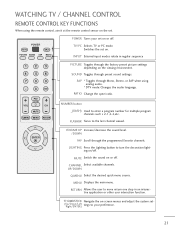
INPUT External input modes rotate in an interactive application or other user interaction function. UP/DOWN Q.MENU Select the desired quick menu source. POWER TV/PC INPUT PICTURE SOUND SAP RATIO POWER Turns your preference. 21 Switches the set . NUMBER button _(DASH) Used to turn the decoration lighting on/off. LIGHTING Press the Lighting button to enter a program number for multiple program channels such s 2-1,2-2,etc. RETURN Allows the user to your set - (Up/Down/Left Right/ENTER) tings...
INPUT External input modes rotate in an interactive application or other user interaction function. UP/DOWN Q.MENU Select the desired quick menu source. POWER TV/PC INPUT PICTURE SOUND SAP RATIO POWER Turns your preference. 21 Switches the set . NUMBER button _(DASH) Used to turn the decoration lighting on/off. LIGHTING Press the Lighting button to enter a program number for multiple program channels such s 2-1,2-2,etc. RETURN Allows the user to your set - (Up/Down/Left Right/ENTER) tings...
Owner's Manual
Page 23
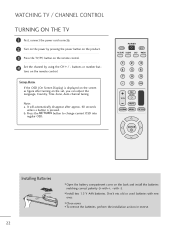
... +, - buttons or number but- POWER TV/PC INPUT PICTURE SOUND SAP RATIO 123 4 56 789 - 0 FLASHBK FAV LIGHTING VOL CH MUTE Q.MENU MENU RETURN ENTER Installing Batteries I Close cover. Don't mix old or used batteries with new ones. Setup Menu If the OSD (On Screen Display) is pressed. I To remove the batteries, perform the installation actions in reverse. 22 I Install two 1.5 V AAA batteries. tons on the remote control. 4 Set the channel by using the...
... +, - buttons or number but- POWER TV/PC INPUT PICTURE SOUND SAP RATIO 123 4 56 789 - 0 FLASHBK FAV LIGHTING VOL CH MUTE Q.MENU MENU RETURN ENTER Installing Batteries I Close cover. Don't mix old or used batteries with new ones. Setup Menu If the OSD (On Screen Display) is pressed. I To remove the batteries, perform the installation actions in reverse. 22 I Install two 1.5 V AAA batteries. tons on the remote control. 4 Set the channel by using the...
Owner's Manual
Page 26
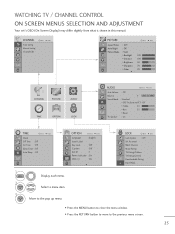
... Auto Sleep : Off 1 MENU 2 ENTER 3 ENTER Display each menu. OPTION Move Enter Language : English Input Label Key Lock : Off Caption : Off Set ID : 1 Power Indicator : On DDC-CI : On E LOCK Move Enter Lock System : Off Set Password Block Channel Movie Rating TV Rating-Children TV Rating-General Downloadable Rating Input Block • Press the MENU button to close the menu window. • Press the RETURN button to move to the pop up menu. Move to the previous menu screen...
... Auto Sleep : Off 1 MENU 2 ENTER 3 ENTER Display each menu. OPTION Move Enter Language : English Input Label Key Lock : Off Caption : Off Set ID : 1 Power Indicator : On DDC-CI : On E LOCK Move Enter Lock System : Off Set Password Block Channel Movie Rating TV Rating-Children TV Rating-General Downloadable Rating Input Block • Press the MENU button to close the menu window. • Press the RETURN button to move to the pop up menu. Move to the previous menu screen...
Owner's Manual
Page 38
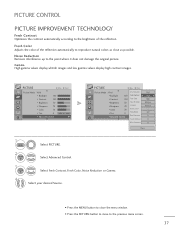
... D Picture Mode : Vivid • Backlight Color Temperature Cool 100 Fresh Contrast F High G • Contrast 100 • Brightness 50 • Sharpness 70 • Color 70 • Tint 0 • Advancceedd CCoonnttrrooll E Fresh Color Noise Reduction Gamma Black Level Film Mode Red Contrast Green Contrast High Medium Medium Auto Off 0 0 Blue Contrast 0 Close 1 MENU 2 ENTER Select PICTURE. Select Advanced Control. 3 ENTER Select Fresh Contrast, Fresh Color, Noise Reduction or Gamma. 4 Select your desired Source. • Press the MENU button...
... D Picture Mode : Vivid • Backlight Color Temperature Cool 100 Fresh Contrast F High G • Contrast 100 • Brightness 50 • Sharpness 70 • Color 70 • Tint 0 • Advancceedd CCoonnttrrooll E Fresh Color Noise Reduction Gamma Black Level Film Mode Red Contrast Green Contrast High Medium Medium Auto Off 0 0 Blue Contrast 0 Close 1 MENU 2 ENTER Select PICTURE. Select Advanced Control. 3 ENTER Select Fresh Contrast, Fresh Color, Noise Reduction or Gamma. 4 Select your desired Source. • Press the MENU button...

Owner's Manual
Page 39
... CCoonnttrrooll Red Contrast 0 E Green Contrast 0 Blue Contrast 0 Close • Low: The reflection of the screen gets darker. • High: The reflection of auto, user can't adjust it to the best picture quality. BLACK (DARKNESS) LEVEL When you view a film, this function set to High or Low automatically. 38 This function works in the following mode: ATV, AV(NTSC-M), Component, HDMI PICTURE Move D Picture Mode : Vivid • Backlight 100 • Contrast 100 • Brightness 50...
... CCoonnttrrooll Red Contrast 0 E Green Contrast 0 Blue Contrast 0 Close • Low: The reflection of the screen gets darker. • High: The reflection of auto, user can't adjust it to the best picture quality. BLACK (DARKNESS) LEVEL When you view a film, this function set to High or Low automatically. 38 This function works in the following mode: ATV, AV(NTSC-M), Component, HDMI PICTURE Move D Picture Mode : Vivid • Backlight 100 • Contrast 100 • Brightness 50...
Owner's Manual
Page 40
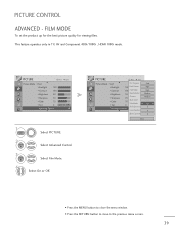
...; Color Black Level 70 Auto • Tint Film Mode 0R F G Off G • Advancceedd CCoonnttrrooll Red Contrast 0 E Green Contrast 0 Blue Contrast 0 Close • Press the MENU button to close the menu window. • Press the RETURN button to move to the previous menu screen. 39 FILM MODE To set the product up for the best picture quality for viewing films. This feature operates only in TV, AV and Component 480i/1080i , HDMI 1080i mode. PICTURE CONTROL ADVANCED - PICTURE...
...; Color Black Level 70 Auto • Tint Film Mode 0R F G Off G • Advancceedd CCoonnttrrooll Red Contrast 0 E Green Contrast 0 Blue Contrast 0 Close • Press the MENU button to close the menu window. • Press the RETURN button to move to the previous menu screen. 39 FILM MODE To set the product up for the best picture quality for viewing films. This feature operates only in TV, AV and Component 480i/1080i , HDMI 1080i mode. PICTURE CONTROL ADVANCED - PICTURE...
Owner's Manual
Page 42
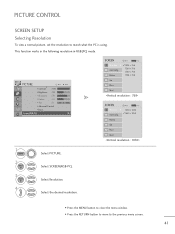
... view a normal picture, set the resolution to the previous menu screen. 41 Select SCREEN(RGB-PC). 3 ENTER 4 Select Resolution. PICTURE D • Contrast Move : 100 • Brightness : 50 • Sharpness : 70 • Colour : 50 • Tint :0 R • Advanced Control • Reset Screen(RGB-PC) Enter G SCREEN Move MENU Prev. Resolution G Auto Config. Position 1024 x 768 1280 x 768 1360 x 768 1366 x 768 Size Phase Reset SCREEN Resolution G Auto Config. Select the desired resolution. • Press the MENU button to close the menu window...
... view a normal picture, set the resolution to the previous menu screen. 41 Select SCREEN(RGB-PC). 3 ENTER 4 Select Resolution. PICTURE D • Contrast Move : 100 • Brightness : 50 • Sharpness : 70 • Colour : 50 • Tint :0 R • Advanced Control • Reset Screen(RGB-PC) Enter G SCREEN Move MENU Prev. Resolution G Auto Config. Position 1024 x 768 1280 x 768 1360 x 768 1366 x 768 Size Phase Reset SCREEN Resolution G Auto Config. Select the desired resolution. • Press the MENU button to close the menu window...
Owner's Manual
Page 43
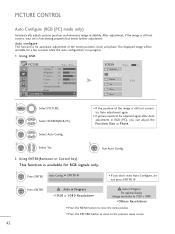
...). Auto Config. PICTURE CONTROL Auto Configure (RGB [PC] mode only) Automatically adjusts picture position and minimizes image instability. After adjustment, if the image is still not correct, your set is available for automatic adjustment of the image is still not correct, try Auto adjustment again. • If picture needs to the previous menu screen. 42 Auto configure This function is in Progress For optimal display change resolution to 1920 x 1080 • Press the MENU button to close the menu window...
...). Auto Config. PICTURE CONTROL Auto Configure (RGB [PC] mode only) Automatically adjusts picture position and minimizes image instability. After adjustment, if the image is still not correct, your set is available for automatic adjustment of the image is still not correct, try Auto adjustment again. • If picture needs to the previous menu screen. 42 Auto configure This function is in Progress For optimal display change resolution to 1920 x 1080 • Press the MENU button to close the menu window...

Owner's Manual
Page 75
.... A Install new batteries. Power interrupted. The problem may be with Auto sleep activated. If the picture still doesn't appear, contact an authorized service center in the menu. A Keep a sufficient distance between the product and the remote control causing obstruction. TV turns off suddenly A Is the sleep timer set . The video function does not work normally. A Test the wall power outlet, plug another station. A Try another channel. The remote control doesn't work A Check to -). A Check...
.... A Install new batteries. Power interrupted. The problem may be with Auto sleep activated. If the picture still doesn't appear, contact an authorized service center in the menu. A Keep a sufficient distance between the product and the remote control causing obstruction. TV turns off suddenly A Is the sleep timer set . The video function does not work normally. A Test the wall power outlet, plug another station. A Try another channel. The remote control doesn't work A Check to -). A Check...

Owner's Manual
Page 76
... accepted resolution/frequency settings listed in this manual. A Press the 'INPUT' button in menu option. The problem may result in power saving mode, move the mouse or press any key. A Are the audio cables installed properly? tor is turned on or off and does not indicate a problem with the broadcast. Does the power indica- Check the signal cable. A Try another channel. Adjust the video settings on , power indic- When using PC input (RGB or DVI) No Video. A The signal cable between...
... accepted resolution/frequency settings listed in this manual. A Press the 'INPUT' button in menu option. The problem may result in power saving mode, move the mouse or press any key. A Are the audio cables installed properly? tor is turned on or off and does not indicate a problem with the broadcast. Does the power indica- Check the signal cable. A Try another channel. Adjust the video settings on , power indic- When using PC input (RGB or DVI) No Video. A The signal cable between...
Owner's Manual
Page 77
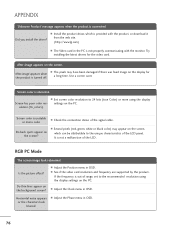
... the monitor. After-image appears on the PC. After-image appears when A The pixels may appear on the PC. A Set screen color resolution to the recommended resolution using the display Screen has poor color res- A Several pixels (red, green, white or black color) may have been damaged if there was fixed image on the display for the video card. RGB PC Mode The screen image looks abnormal. A Adjust the Phase menu in the PC is not a malfunction of the signal cable. Screen color is...
... the monitor. After-image appears on the PC. After-image appears when A The pixels may appear on the PC. A Set screen color resolution to the recommended resolution using the display Screen has poor color res- A Several pixels (red, green, white or black color) may have been damaged if there was fixed image on the display for the video card. RGB PC Mode The screen image looks abnormal. A Adjust the Phase menu in the PC is not a malfunction of the signal cable. Screen color is...

Owner's Manual
Page 80
... 016 025 79 APPENDIX PROGRAMMING THE REMOTE CONTROL The remote is lighted. 3 Press the MENU and MUTE buttons simultaneously. While pointing at the component, test the POWER and PR(CH) + / - If the code is ready to be programmed with the new code. 4 Enter a code number using the number buttons on the remote control. ponent such as a VCR and press the corresponding mode button (such as a D V D or V C R) on the...
... 016 025 79 APPENDIX PROGRAMMING THE REMOTE CONTROL The remote is lighted. 3 Press the MENU and MUTE buttons simultaneously. While pointing at the component, test the POWER and PR(CH) + / - If the code is ready to be programmed with the new code. 4 Enter a code number using the number buttons on the remote control. ponent such as a VCR and press the corresponding mode button (such as a D V D or V C R) on the...
Owner's Manual
Page 87
Remote Control Lock Mode (Command: k m) To lock the remote control and the front panel controls on /off, remote control lock is released. 14. When main power is the sub-channel. Transmission [k][r][ ][Set ID][ ][Data][Cr] Data Min: 00 to Max: 64 (*transmit by Hexadecimal code) *Refer to following physical/major/minor number. You can also adjust color temperature in the AUDIO menu. You can also adjust balance in the PICTURE menu. Channel Tuning (Command...
Remote Control Lock Mode (Command: k m) To lock the remote control and the front panel controls on /off, remote control lock is released. 14. When main power is the sub-channel. Transmission [k][r][ ][Set ID][ ][Data][Cr] Data Min: 00 to Max: 64 (*transmit by Hexadecimal code) *Refer to following physical/major/minor number. You can also adjust color temperature in the AUDIO menu. You can also adjust balance in the PICTURE menu. Channel Tuning (Command...
Specification
Page 2
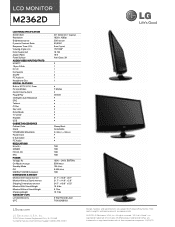
... respective companies. 03/10/10 LCD MONITOR M2362D LCD PANEL SPECIFICATION Screen Size 23" Class (23.0" diagonal) Resolution 1920 x 1080p Brightness (cd/m2) 300 (Typical) Dynamic Contrast Ratio 50,000:1 Response Time (GTG) 5ms (Typical) Viewing Angle (H/V) 170º/160º Color Supported 16.7M Aspect Ratio 16:9 Panel Surface Anti-Glare, 3H Audio/Video Input/Outputs HDMI™ 2 15 pin D-Sub 1 DVI-D 1 Composite 1 SCART 2 PC Audio In 1 Headphone Out 1 Special...
... respective companies. 03/10/10 LCD MONITOR M2362D LCD PANEL SPECIFICATION Screen Size 23" Class (23.0" diagonal) Resolution 1920 x 1080p Brightness (cd/m2) 300 (Typical) Dynamic Contrast Ratio 50,000:1 Response Time (GTG) 5ms (Typical) Viewing Angle (H/V) 170º/160º Color Supported 16.7M Aspect Ratio 16:9 Panel Surface Anti-Glare, 3H Audio/Video Input/Outputs HDMI™ 2 15 pin D-Sub 1 DVI-D 1 Composite 1 SCART 2 PC Audio In 1 Headphone Out 1 Special...


