Owner's Manual
Page 3
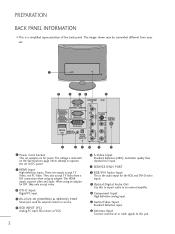
... standard A/V input. 7 SERVICE ONLY PORT 8 RGB/DVI Audio Input This is the audio input for external control or service. 5 RGB INPUT (PC) Analog PC input. The voltage is a simplified representation of the back panel. The HDMI inputs support video and audio. Never attempt to this to export audio ...an adapter. The image shown may be somewhat different from a DVI connection when using an adapter for DVI, they only accept video. 3 DVI-D Input Digital PC input. 4 RS-232C IN (CONTROL & SERVICE) PORT Serial port used for the RGB and DVI-D video inputs. 9 Optical Digital Audio Out Use this...
... standard A/V input. 7 SERVICE ONLY PORT 8 RGB/DVI Audio Input This is the audio input for external control or service. 5 RGB INPUT (PC) Analog PC input. The voltage is a simplified representation of the back panel. The HDMI inputs support video and audio. Never attempt to this to export audio ...an adapter. The image shown may be somewhat different from a DVI connection when using an adapter for DVI, they only accept video. 3 DVI-D Input Digital PC input. 4 RS-232C IN (CONTROL & SERVICE) PORT Serial port used for the RGB and DVI-D video inputs. 9 Optical Digital Audio Out Use this...
Owner's Manual
Page 9
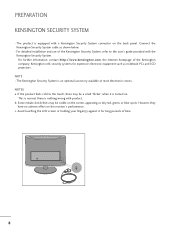
Connect the Kensington Security System cable as notebook PCs and LCD projectors. If the product feels cold to the user's guide provided with the Kensington Security System. Avoid touching the LCD screen or holding ...
Connect the Kensington Security System cable as notebook PCs and LCD projectors. If the product feels cold to the user's guide provided with the Kensington Security System. Avoid touching the LCD screen or holding ...
Owner's Manual
Page 12
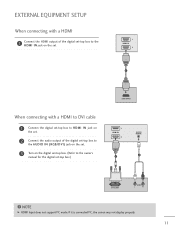
... to the owner's manual for the digital set-top box.) 1 HDMI IN 2 AUDIO IN (RGB/DVI) 2 1 DVI OUTPUT AUDIO L R ! NOTE G HDMI Input does not support PC mode. If it is connected PC, the screen may not display properly. 11
... to the owner's manual for the digital set-top box.) 1 HDMI IN 2 AUDIO IN (RGB/DVI) 2 1 DVI OUTPUT AUDIO L R ! NOTE G HDMI Input does not support PC mode. If it is connected PC, the screen may not display properly. 11
Owner's Manual
Page 17
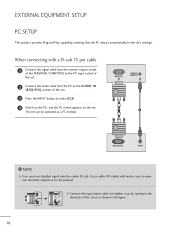
... from the monitor output socket of the PERSONAL COMPUTER to the PC input socket of the set. 2 Connect the audio cable from the PC to the AUDIO IN (RGB/DVI) sockets of the arrow as a PC monitor. The set 's settings. RGB IN (PC) AUDIO IN (RGB/DVI) 1 2 RGB OUTPUT AUDIO ! G Connect the... of the set. 3 Press the INPUT button to select R G B. 4 Switch on the PC, and the PC screen appears on the set. EXTERNAL EQUIPMENT SETUP PC SETUP This product provides Plug and Play capability, meaning that the PC adjusts automatically to the set can be operated as shown in the figure. 16 When...
... from the monitor output socket of the PERSONAL COMPUTER to the PC input socket of the set. 2 Connect the audio cable from the PC to the AUDIO IN (RGB/DVI) sockets of the arrow as a PC monitor. The set 's settings. RGB IN (PC) AUDIO IN (RGB/DVI) 1 2 RGB OUTPUT AUDIO ! G Connect the... of the set. 3 Press the INPUT button to select R G B. 4 Switch on the PC, and the PC screen appears on the set. EXTERNAL EQUIPMENT SETUP PC SETUP This product provides Plug and Play capability, meaning that the PC adjusts automatically to the set can be operated as shown in the figure. 16 When...

Owner's Manual
Page 18
EXTERNAL EQUIPMENT SETUP When connecting with a DVI cable 1 Connect the DVI output of the PC to the DVI-D IN jack on the set. 2 Connect the audio cable from the PC to the AUDIO IN (RGB/DVI) sockets of the arrow as this will have no impact or effect on the set has been... set. However, this may produce some scaled or processed pictures may become permanently imprinted on . G Avoid keeping a fixed image on the monitor performance. DVI-D IN (PC) AUDIO IN (RGB/DVI) 2 1 DVI OUTPUT AUDIO ! This is normal, there is nothing wrong with the set is cold, there may appear on the screen...
EXTERNAL EQUIPMENT SETUP When connecting with a DVI cable 1 Connect the DVI output of the PC to the DVI-D IN jack on the set. 2 Connect the audio cable from the PC to the AUDIO IN (RGB/DVI) sockets of the arrow as this will have no impact or effect on the set has been... set. However, this may produce some scaled or processed pictures may become permanently imprinted on . G Avoid keeping a fixed image on the monitor performance. DVI-D IN (PC) AUDIO IN (RGB/DVI) 2 1 DVI OUTPUT AUDIO ! This is normal, there is nothing wrong with the set is cold, there may appear on the screen...
Owner's Manual
Page 22
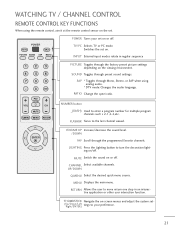
TV/PC Selects TV or PC mode. Switches the set - (Up/Down/Left Right/ENTER) tings to move return one step in regular sequence 1 2 3 4 56 7 8 9 - 0 FLASHBK FAV LIGHTING VOL CH MUTE Q.... user to your set . INPUT External input modes rotate in an interactive application or other user interaction function. RATIO Change the spect ratio. POWER TV/PC INPUT PICTURE SOUND SAP RATIO POWER Turns your preference. 21 MENU Displays the main menu. WATCHING TV / CHANNEL CONTROL REMOTE CONTROL KEY FUNCTIONS When using...
TV/PC Selects TV or PC mode. Switches the set - (Up/Down/Left Right/ENTER) tings to move return one step in regular sequence 1 2 3 4 56 7 8 9 - 0 FLASHBK FAV LIGHTING VOL CH MUTE Q.... user to your set . INPUT External input modes rotate in an interactive application or other user interaction function. RATIO Change the spect ratio. POWER TV/PC INPUT PICTURE SOUND SAP RATIO POWER Turns your preference. 21 MENU Displays the main menu. WATCHING TV / CHANNEL CONTROL REMOTE CONTROL KEY FUNCTIONS When using...
Owner's Manual
Page 23
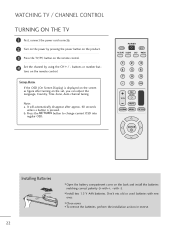
...with new ones. tons on the remote control. 4 Set the channel by pressing the power button on the product. 3 Press the TV/PC button on the remote control. Press the RETURN button to change current OSD into regular OSD. I To remove the batteries, perform the installation... actions in reverse. 22 Note: a. POWER TV/PC INPUT PICTURE SOUND SAP RATIO 123 4 56 789 - 0 FLASHBK FAV LIGHTING VOL CH MUTE Q.MENU MENU RETURN ENTER Installing Batteries I Install two 1.5 V...
...with new ones. tons on the remote control. 4 Set the channel by pressing the power button on the product. 3 Press the TV/PC button on the remote control. Press the RETURN button to change current OSD into regular OSD. I To remove the batteries, perform the installation... actions in reverse. 22 Note: a. POWER TV/PC INPUT PICTURE SOUND SAP RATIO 123 4 56 789 - 0 FLASHBK FAV LIGHTING VOL CH MUTE Q.MENU MENU RETURN ENTER Installing Batteries I Install two 1.5 V...

Owner's Manual
Page 24
or NUMBER buttons to adjust the volume. button to select a programme number. VOLUME ADJUSTMENT 1 Press the VOL + or - POWER TV/PC INPUT PICTURE SOUND SAP RATIO 1 2 3 4 56 7 8 9 - 0 FLASHBK FAV LIGHTING VOL CH MUTE Q.MENU MENU RETURN ENTER 23 You can cancel this function by pressing the MUTE, VOL + or -. If you want to switch the sound off, press the MUTE button. WATCHING TV / CHANNEL CONTROL CHANNEL SELECTION 1 Press the CH + or -
or NUMBER buttons to adjust the volume. button to select a programme number. VOLUME ADJUSTMENT 1 Press the VOL + or - POWER TV/PC INPUT PICTURE SOUND SAP RATIO 1 2 3 4 56 7 8 9 - 0 FLASHBK FAV LIGHTING VOL CH MUTE Q.MENU MENU RETURN ENTER 23 You can cancel this function by pressing the MUTE, VOL + or -. If you want to switch the sound off, press the MUTE button. WATCHING TV / CHANNEL CONTROL CHANNEL SELECTION 1 Press the CH + or -
Owner's Manual
Page 30
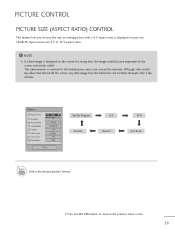
... visible. Although, after watching video that did not fill the screen, any after-image from the black bars will normally dissipate after a few minutes. I RGB-PC input source use 4:3 or 16:9 aspect ratio. ! Q.Menu Aspect Ratio Backlight Picture Mode Sound Mode Caption Multi Audio Sleep Timer CH Del/Add/Fav F 16...
... visible. Although, after watching video that did not fill the screen, any after-image from the black bars will normally dissipate after a few minutes. I RGB-PC input source use 4:3 or 16:9 aspect ratio. ! Q.Menu Aspect Ratio Backlight Picture Mode Sound Mode Caption Multi Audio Sleep Timer CH Del/Add/Fav F 16...
Owner's Manual
Page 42
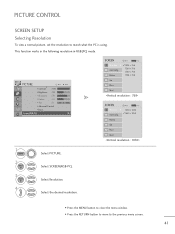
...desired resolution. • Press the MENU button to close the menu window. • Press the RETURN button to move to match what the PC is using. PICTURE CONTROL SCREEN SETUP Selecting Resolution To view a normal picture, set the resolution to the previous menu screen. 41 This function .... Move MENU Prev. 1400 x 1050 1680 x 1050 Position Size Phase Reset 1 MENU 2 ENTER Select PICTURE. Select SCREEN(RGB-PC). 3 ENTER 4 Select Resolution. Position 1024 x 768 1280 x 768 1360 x 768 1366 x 768 Size Phase Reset SCREEN Resolution G Auto Config. PICTURE D • Contrast ...
...desired resolution. • Press the MENU button to close the menu window. • Press the RETURN button to move to match what the PC is using. PICTURE CONTROL SCREEN SETUP Selecting Resolution To view a normal picture, set the resolution to the previous menu screen. 41 This function .... Move MENU Prev. 1400 x 1050 1680 x 1050 Position Size Phase Reset 1 MENU 2 ENTER Select PICTURE. Select SCREEN(RGB-PC). 3 ENTER 4 Select Resolution. Position 1024 x 768 1280 x 768 1360 x 768 1366 x 768 Size Phase Reset SCREEN Resolution G Auto Config. PICTURE D • Contrast ...
Owner's Manual
Page 43
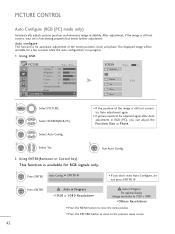
... Move : 100 • Brightness : 50 • Sharpness : 70 • Colour : 50 • Tint :0 R • Advanced Control • Reset Screen(RGB-PC) Enter G SCREEN Resolution Move MENU Prev. Auto Config. This function is available for a few seconds while the auto configuration is in RGB...correct, try Auto adjustment again. • If picture needs to the previous menu screen. 42 PICTURE CONTROL Auto Configure (RGB [PC] mode only) Automatically adjusts picture position and minimizes image instability. Auto configure This function is for automatic adjustment of the image is ...
... Move : 100 • Brightness : 50 • Sharpness : 70 • Colour : 50 • Tint :0 R • Advanced Control • Reset Screen(RGB-PC) Enter G SCREEN Resolution Move MENU Prev. Auto Config. This function is available for a few seconds while the auto configuration is in RGB...correct, try Auto adjustment again. • If picture needs to the previous menu screen. 42 PICTURE CONTROL Auto Configure (RGB [PC] mode only) Automatically adjusts picture position and minimizes image instability. Auto configure This function is for automatic adjustment of the image is ...

Owner's Manual
Page 44
...; Contrast Move : 100 • Brightness : 50 • Sharpness : 70 • Colour : 50 • Tint :0 R • Advanced Control • Reset Screen(RGB-PC) Enter G 1 MENU Select PICTURE. 2 ENTER Select SCREEN(RGB-PC). 3 ENTER Select Position, Size or Phase. 4 Make appropriate adjustments. Position G Size D F G E Phase Reset • Press the MENU button to close the... not clear after auto adjustment and especially if characters are still shaky, adjust the picture phase manually. This function works in the following mode: RGB[PC].
...; Contrast Move : 100 • Brightness : 50 • Sharpness : 70 • Colour : 50 • Tint :0 R • Advanced Control • Reset Screen(RGB-PC) Enter G 1 MENU Select PICTURE. 2 ENTER Select SCREEN(RGB-PC). 3 ENTER Select Position, Size or Phase. 4 Make appropriate adjustments. Position G Size D F G E Phase Reset • Press the MENU button to close the... not clear after auto adjustment and especially if characters are still shaky, adjust the picture phase manually. This function works in the following mode: RGB[PC].

Owner's Manual
Page 45
... 100 • Brightness : 50 • Sharpness : 70 • Colour : 50 • Tint :0 R • Advanced Control • Reset Screen(RGB-PC) Enter G 1 MENU 2 ENTER Select PICTURE. Select Yes. 5 ENTER Run Reset. Size Phase Reset G • Press the MENU button to close the menu ...Press the RETURN button to move to the default factory settings. Select SCREEN(RGB-PC). 3 ENTER 4 ENTER Select Reset. Auto Config. This function works in the following mode: RGB[PC]. SCREEN Resolution Move MENU Prev. PICTURE CONTROL Screen Reset Returns Position, Size and...
... 100 • Brightness : 50 • Sharpness : 70 • Colour : 50 • Tint :0 R • Advanced Control • Reset Screen(RGB-PC) Enter G 1 MENU 2 ENTER Select PICTURE. Select Yes. 5 ENTER Run Reset. Size Phase Reset G • Press the MENU button to close the menu ...Press the RETURN button to move to the default factory settings. Select SCREEN(RGB-PC). 3 ENTER 4 ENTER Select Reset. Auto Config. This function works in the following mode: RGB[PC]. SCREEN Resolution Move MENU Prev. PICTURE CONTROL Screen Reset Returns Position, Size and...

Owner's Manual
Page 56
... TV2-0 30 Close • To cancel On/Off Time function, select Off. • For On Time function only 1 ENTER Select Input. 2 Select DVI, T V, A V, Component, RGB-PC, or HDMI1-2. 3 Set the programme. 4 Adjust volume level at a preset time.
... TV2-0 30 Close • To cancel On/Off Time function, select Off. • For On Time function only 1 ENTER Select Input. 2 Select DVI, T V, A V, Component, RGB-PC, or HDMI1-2. 3 Set the programme. 4 Adjust volume level at a preset time.

Owner's Manual
Page 60
... the source. OPTION Move Enter Language : English IInnput LLaabbeell Key Lock : Off Caption : Off Set ID : 1 Power Indicator : On DDC-CI : On AV Component RGB-PC HDMI 1 HDMI 2 DVI Close E • Press the MENU button to close the menu window. • Press the RETURN button to move to the previous menu...
... the source. OPTION Move Enter Language : English IInnput LLaabbeell Key Lock : Off Caption : Off Set ID : 1 Power Indicator : On DDC-CI : On AV Component RGB-PC HDMI 1 HDMI 2 DVI Close E • Press the MENU button to close the menu window. • Press the RETURN button to move to the previous menu...
Owner's Manual
Page 66
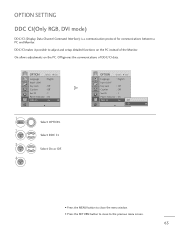
Off ignores the communications of the Monitor. Select DDC CI. Select On or Off. On allows adjustments on the PC instead of DDC/CI data. OPTION Move Enter Language : English Input Label Key Lock : Off Caption : Off Set ID : 1 Power Indicator : On ... 4 ENTER Select OPTION. OPTION SETTING DDC CI(Only RGB, DVI mode) DDC/CI (Display Data Channel Command Interface) is a communication protocol for communications between a PC and Monitor. OPTION Move Enter Language : English Input Label Key Lock : Off Caption : Off Set ID : 1 Power Indicator : On DDDC-CCII :: On ...
Off ignores the communications of the Monitor. Select DDC CI. Select On or Off. On allows adjustments on the PC instead of DDC/CI data. OPTION Move Enter Language : English Input Label Key Lock : Off Caption : Off Set ID : 1 Power Indicator : On ... 4 ENTER Select OPTION. OPTION SETTING DDC CI(Only RGB, DVI mode) DDC/CI (Display Data Channel Command Interface) is a communication protocol for communications between a PC and Monitor. OPTION Move Enter Language : English Input Label Key Lock : Off Caption : Off Set ID : 1 Power Indicator : On DDDC-CCII :: On ...

Owner's Manual
Page 74
... Block. 3 ENTER Select input source. 4 ENTER Select O n or O f f. LOCK Move Enter Lock System : Off Set Password AV F Off G Block Channel Component Off Movie Rating RGB-PC Off TV Rating-Children HDMI1 Off TV Rating-General HDMI2 Off DVI Downloadable Rating Off IInnppuutt BBlloocckk Close • Press the MENU button to close...
... Block. 3 ENTER Select input source. 4 ENTER Select O n or O f f. LOCK Move Enter Lock System : Off Set Password AV F Off G Block Channel Component Off Movie Rating RGB-PC Off TV Rating-Children HDMI1 Off TV Rating-General HDMI2 Off DVI Downloadable Rating Off IInnppuutt BBlloocckk Close • Press the MENU button to close...

Owner's Manual
Page 76
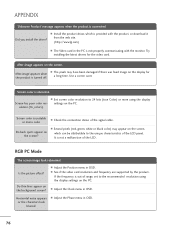
... the product is in power saving mode, move the mouse or press any key. Power is not connected. A If the product is turned on the PC to check the input source setting. 75 Adjust the video settings on or off and does not indicate a problem with the broadcast. A Press the 'INPUT... one of range' message appear? A Are the audio cables installed properly? A Adjust brightness and contrast again. Picture OK but no sound No output from the PC (Video card) is blue but the screen appears extremely dark. A Try another channel. A The signal from one of the product.
... the product is in power saving mode, move the mouse or press any key. Power is not connected. A If the product is turned on the PC to check the input source setting. 75 Adjust the video settings on or off and does not indicate a problem with the broadcast. A Press the 'INPUT... one of range' message appear? A Are the audio cables installed properly? A Adjust brightness and contrast again. Picture OK but no sound No output from the PC (Video card) is blue but the screen appears extremely dark. A Try another channel. A The signal from one of the product.
Owner's Manual
Page 77
...unique characteristics of range, set to 24 bits (true Color) or more using the display settings on the screen? from the web site. (http://www.lg.com) A The Video card in OSD. After-image appears when A The pixels may appear on the screen, which is out of the LCD panel..... Use a screen saver. It is not properly communicating with the product, or download it Did you install the driver? Do thin lines appear on the PC. Horizontal noise appears or the characters look blurred. a long time. settings on the background screen? A Check the connection status of the LCD. A Adjust the...
...unique characteristics of range, set to 24 bits (true Color) or more using the display settings on the screen? from the web site. (http://www.lg.com) A The Video card in OSD. After-image appears when A The pixels may appear on the screen, which is out of the LCD panel..... Use a screen saver. It is not properly communicating with the product, or download it Did you install the driver? Do thin lines appear on the PC. Horizontal noise appears or the characters look blurred. a long time. settings on the background screen? A Check the connection status of the LCD. A Adjust the...

Owner's Manual
Page 79
... Hz Horizontal Frequency 30 kHz to 83 kHz Vertical Frequency 56 Hz to 75 Hz Synchronization Type Separate Sync, Digital Input Connector TV, D-Sub Analog, PC Audio In, component, DVI-D, HDMI*2, CVBS, S-VIDEO Power Rated Voltage AC 100-240 V~ 50 / 60 Hz 1.0 A Power Consumption On Mode : 55 W (typ.) Sleep Mode 1 W(RGB...
... Hz Horizontal Frequency 30 kHz to 83 kHz Vertical Frequency 56 Hz to 75 Hz Synchronization Type Separate Sync, Digital Input Connector TV, D-Sub Analog, PC Audio In, component, DVI-D, HDMI*2, CVBS, S-VIDEO Power Rated Voltage AC 100-240 V~ 50 / 60 Hz 1.0 A Power Consumption On Mode : 55 W (typ.) Sleep Mode 1 W(RGB...


