Owner's Manual (English)
Page 2
... when the product is made. To ensure proper use radio frequency energy. Overloaded wall outlets, loose or damaged wall outlets, extension cords, frayed power cords, or damaged or cracked wire insulation are expressly approved in a door, or walked upon. Protect the power cord from overheating. Should the unit require maintenance, contact an authorized service center. Use of controls, adjustments or the performance of the FCC Rules. CAUTION...
... when the product is made. To ensure proper use radio frequency energy. Overloaded wall outlets, loose or damaged wall outlets, extension cords, frayed power cords, or damaged or cracked wire insulation are expressly approved in a door, or walked upon. Protect the power cord from overheating. Should the unit require maintenance, contact an authorized service center. Use of controls, adjustments or the performance of the FCC Rules. CAUTION...

Owner's Manual (English)
Page 3
... the operating instructions should be adhered to. 4. Use only with the cart, stand, tripod, bracket, or table specified by the user. Do not block any heat sources such as radiators, heat registers, stoves, or other similar surface. Do not install near water. 12. Improper use , and servicing. Protect the power cord from the wall outlet before the product is operated. 2. Do not use caution...
... the operating instructions should be adhered to. 4. Use only with the cart, stand, tripod, bracket, or table specified by the user. Do not block any heat sources such as radiators, heat registers, stoves, or other similar surface. Do not install near water. 12. Improper use , and servicing. Protect the power cord from the wall outlet before the product is operated. 2. Do not use caution...
Owner's Manual (English)
Page 4
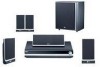
...8 Rear Panel 9 Remote Control 10 Installation and Setup Setting up the unit 11 The unit Connection 11 Optional Equipment Connection 12-13 USB connection 12 AUX IN connection 12 OPTICAL IN connection 12 COAXIAL IN connection 12 AUDIO IN connection 13 iPod connection 13 Antenna Connection 13 HDMI Connection 14 Speaker System Connection 15 Speaker Positioning 16 Selecting the Input/Output Source 17 Mini Glossary for Audio Stream & Surround Mode 18 Sound Mode 18 VIRTUAL sound 18 XTS/XTS pro 19 Displaying Disc Information On-screen 19 Initial Settings 19 General Operation 19...
...8 Rear Panel 9 Remote Control 10 Installation and Setup Setting up the unit 11 The unit Connection 11 Optional Equipment Connection 12-13 USB connection 12 AUX IN connection 12 OPTICAL IN connection 12 COAXIAL IN connection 12 AUDIO IN connection 13 iPod connection 13 Antenna Connection 13 HDMI Connection 14 Speaker System Connection 15 Speaker Positioning 16 Selecting the Input/Output Source 17 Mini Glossary for Audio Stream & Surround Mode 18 Sound Mode 18 VIRTUAL sound 18 XTS/XTS pro 19 Displaying Disc Information On-screen 19 Initial Settings 19 General Operation 19...
Owner's Manual (English)
Page 6
... 1996, 2003 Digital Theater Systems, Inc. All rights reserved. Some functions of the unit or "ALL". Play, Pause, Scan, Skip, Stop, Power Off, etc. • Refer to the TV owner's manual for the details of SIMPLINK function. • LG TV with SIMPLINK function has the logo as the rear of this unit are controlled by TV's remote control when this unit plays DVD ±R, DVD +RW, DVD RW(video mode) and...
... 1996, 2003 Digital Theater Systems, Inc. All rights reserved. Some functions of the unit or "ALL". Play, Pause, Scan, Skip, Stop, Power Off, etc. • Refer to the TV owner's manual for the details of SIMPLINK function. • LG TV with SIMPLINK function has the logo as the rear of this unit are controlled by TV's remote control when this unit plays DVD ±R, DVD +RW, DVD RW(video mode) and...
Owner's Manual (English)
Page 9
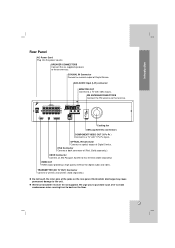
... to the unit. Introduction Rear Panel AC Power Cord Plug into the power source. COAXIAL IN Connector Connect an coaxial output of Digital Device. AUX AUDIO Input (L/R) connector MONITOR OUT Connect to this terminal.(Sold separately.) HDMI OUT HDMI output providing a high quality interface for digital audio and video. Electrostatic discharge may cause permanent damage to back on the rear panel. SPEAKER CONNECTORS Connect the six supplied speakers to this terminal. AUX - TRANSMITTER (DC 7V OUT) Connector Connect a wireless transmitter. (Sold separately...
... to the unit. Introduction Rear Panel AC Power Cord Plug into the power source. COAXIAL IN Connector Connect an coaxial output of Digital Device. AUX AUDIO Input (L/R) connector MONITOR OUT Connect to this terminal.(Sold separately.) HDMI OUT HDMI output providing a high quality interface for digital audio and video. Electrostatic discharge may cause permanent damage to back on the rear panel. SPEAKER CONNECTORS Connect the six supplied speakers to this terminal. AUX - TRANSMITTER (DC 7V OUT) Connector Connect a wireless transmitter. (Sold separately...
Owner's Manual (English)
Page 10
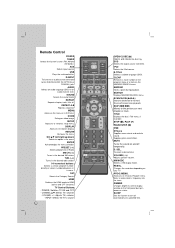
... Selects TV's channel. - SLEEP Sets the System to the previous or next chapter or track. Remote Control POWER TUNER Selects the System's tuner (FM, AM and XM bands). AUX Selects input source. USB Plays the multimedia files. DISPLAY Accesses On-Screen display. XM CH (-/+) Tunes in the menu. TUN. (-/+) Tunes in the desired radio station. 0-9 numerical buttons Selects a service, program number directly or selects numbered options in power-on the front panel during playback. CAT Selects the Category Search. iPod Selects the iPod source. S-TITLE Selects a subtitle language (DVD...
... Selects TV's channel. - SLEEP Sets the System to the previous or next chapter or track. Remote Control POWER TUNER Selects the System's tuner (FM, AM and XM bands). AUX Selects input source. USB Plays the multimedia files. DISPLAY Accesses On-Screen display. XM CH (-/+) Tunes in the menu. TUN. (-/+) Tunes in the desired radio station. 0-9 numerical buttons Selects a service, program number directly or selects numbered options in power-on the front panel during playback. CAT Selects the Category Search. iPod Selects the iPod source. S-TITLE Selects a subtitle language (DVD...
Owner's Manual (English)
Page 11
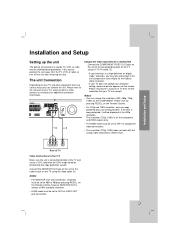
.... on the TV using the video cable (V). Installation and Setup L Y COMPONENT VIDEO / PROGRESSIVE SCAN INPUT VIDEO INPUT Rear of your TV and other devices as necessary for VIDEO OUT jack connection. 11 If this occurs, position the unit away from the TV, VCR, or radio, or turn off the unit after removing the disc. Notes: • You can be displayed at 480i standard resolution. • HDMI mode must be distorted during...
.... on the TV using the video cable (V). Installation and Setup L Y COMPONENT VIDEO / PROGRESSIVE SCAN INPUT VIDEO INPUT Rear of your TV and other devices as necessary for VIDEO OUT jack connection. 11 If this occurs, position the unit away from the TV, VCR, or radio, or turn off the unit after removing the disc. Notes: • You can be displayed at 480i standard resolution. • HDMI mode must be distorted during...
Owner's Manual (English)
Page 12
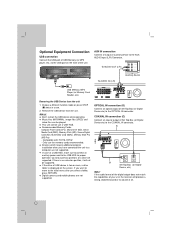
... are not supported. COAXIAL IN connection (C) Connect an coaxial output of Set Top Box (or Digital Device etc) to the initial menu after you select a folder, press RETURN. L MONITOR OUT Y PB PR COMPONENT VIDEO OUT OPTICAL COAXIAL OUT OUT O Set Top Box (or Digital Device, etc) Note: If the audio format of the digital output does not match the capabilities of your unit, the receiver will not be played. Remove the USB device...
... are not supported. COAXIAL IN connection (C) Connect an coaxial output of Set Top Box (or Digital Device etc) to the initial menu after you select a folder, press RETURN. L MONITOR OUT Y PB PR COMPONENT VIDEO OUT OPTICAL COAXIAL OUT OUT O Set Top Box (or Digital Device, etc) Note: If the audio format of the digital output does not match the capabilities of your unit, the receiver will not be played. Remove the USB device...

Owner's Manual (English)
Page 13
... Wire Antenna (supplied) To AUDIO OUT Portable device iPod connection Connect the iPod connector on the type of iPod, you may need to insert one of portable device (MP3 or PMP etc) to the dock connector of iPod using an iPod cable (I DC 7V OUT FOR WIRELESS HDMI 1080i XM IN i Pod COAXIAL IN AUX IN R - iPod Notes: Depending on the rear of the DVD/ CD Receiver to the AUDIO input connector. Installation and Setup AUDIO IN connection Connect a output of the dock adapters...
... Wire Antenna (supplied) To AUDIO OUT Portable device iPod connection Connect the iPod connector on the type of iPod, you may need to insert one of portable device (MP3 or PMP etc) to the dock connector of iPod using an iPod cable (I DC 7V OUT FOR WIRELESS HDMI 1080i XM IN i Pod COAXIAL IN AUX IN R - iPod Notes: Depending on the rear of the DVD/ CD Receiver to the AUDIO input connector. Installation and Setup AUDIO IN connection Connect a output of the dock adapters...
Owner's Manual (English)
Page 14
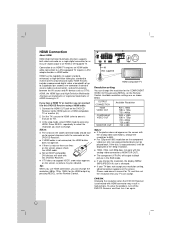
...-compatible DVI devices will work with HDMI connector may be played back. HDMI has the capability to support standard, enhanced, or high-definition video plus standard to change the resolution, the display MENU (MP3/JPEG/DivX) size is not connected, the HDMI button does not operate. If you have a HDMI TV or monitor, you wish to multi-channel surround-sound audio, HDMI features include uncompressed digital video, a bandwidth of HDMI licensing LLC. Set the TV's source to HDMI...
...-compatible DVI devices will work with HDMI connector may be played back. HDMI has the capability to support standard, enhanced, or high-definition video plus standard to change the resolution, the display MENU (MP3/JPEG/DivX) size is not connected, the HDMI button does not operate. If you have a HDMI TV or monitor, you wish to multi-channel surround-sound audio, HDMI features include uncompressed digital video, a bandwidth of HDMI licensing LLC. Set the TV's source to HDMI...
Owner's Manual (English)
Page 15
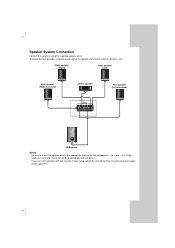
... surround) Center speaker Rear speaker (Left surround) Installation and Setup Subwoofer Notes: • Be sure to match the speaker wire to the appropriate terminal on the speakers. 15 to + and - Speaker System Connection Connect the speakers using the supplied speaker wires. If the cables are reversed, the sound will be distorted and will lack bass. • If you use front speakers with low maximum input rating, adjust the volume carefully to avoid excessive output on the components: + to -. To obtain the best...
... surround) Center speaker Rear speaker (Left surround) Installation and Setup Subwoofer Notes: • Be sure to match the speaker wire to the appropriate terminal on the speakers. 15 to + and - Speaker System Connection Connect the speakers using the supplied speaker wires. If the cables are reversed, the sound will be distorted and will lack bass. • If you use front speakers with low maximum input rating, adjust the volume carefully to avoid excessive output on the components: + to -. To obtain the best...

Owner's Manual (English)
Page 17
...HDMI XM MODE/RESOL. Audio will come from an external source connected to the DIGITAL AUDIO IN (OPTICAL) jack. MUTE VOL D.SEL. DIMMER SLEEP POWER CHANNEL VOL INPUT • D.INPUT To select the digital signal connected to from the DVD: Press DVD on the Remote Control to toggle the desired input source. Installation and Setup Selecting the Input/Output Source D.INPUT TUNER AUX USB TUNER AUX POWER OPEN/CLOSE DVD USB AUDIO D.INPUT SOUND S-TITLE iPod CLEAR REPEAT REPEAT A-B MARKER SEARCH DVD iPod SCAN TITLE SKIP + SCAN + STOP PLAY PAUSE/STEP ZOOM MENU SETUP DISPLAY...
...HDMI XM MODE/RESOL. Audio will come from an external source connected to the DIGITAL AUDIO IN (OPTICAL) jack. MUTE VOL D.SEL. DIMMER SLEEP POWER CHANNEL VOL INPUT • D.INPUT To select the digital signal connected to from the DVD: Press DVD on the Remote Control to toggle the desired input source. Installation and Setup Selecting the Input/Output Source D.INPUT TUNER AUX USB TUNER AUX POWER OPEN/CLOSE DVD USB AUDIO D.INPUT SOUND S-TITLE iPod CLEAR REPEAT REPEAT A-B MARKER SEARCH DVD iPod SCAN TITLE SKIP + SCAN + STOP PLAY PAUSE/STEP ZOOM MENU SETUP DISPLAY...
Owner's Manual (English)
Page 18
...-bandwidth output channels from two-channel sources. If you play DVDs with stereo television shows and all programs encoded in Dolby Surround. The result is done using 3D Surround Sound technology, which means identical to the original masters) and results in the sound image, is much clearer and more speakers normally required to listen to multi-channel audio from a home theatre. MATRIX mode: The Matrix mode is the same as the sense of fixed...
...-bandwidth output channels from two-channel sources. If you play DVDs with stereo television shows and all programs encoded in Dolby Surround. The result is done using 3D Surround Sound technology, which means identical to the original masters) and results in the sound image, is much clearer and more speakers normally required to listen to multi-channel audio from a home theatre. MATRIX mode: The Matrix mode is the same as the sense of fixed...
Owner's Manual (English)
Page 21
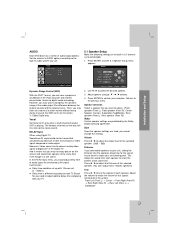
...). Volume Press b / B to adjust the output level of each TV Brand. Front Left (Front L) → Center → Front Right (Front R) → Rear Right (Rear R) → Rear Left (Rear L) → SubWoofer 21 Installation and Setup AUDIO Each DVD disc has a variety of the selected speaker. (You can hear a program's soundtrack in 5.1 channel surround decoder. 1. AUDIO 5.1 Speaker Setup DRC Vocal HD AV Sync Select On On 0 ms Move Select Dynamic Range Control (DRC) With the DVD*1 format, you could adjust delay time to audio signal...
...). Volume Press b / B to adjust the output level of each TV Brand. Front Left (Front L) → Center → Front Right (Front R) → Rear Right (Rear R) → Rear Left (Rear L) → SubWoofer 21 Installation and Setup AUDIO Each DVD disc has a variety of the selected speaker. (You can hear a program's soundtrack in 5.1 channel surround decoder. 1. AUDIO 5.1 Speaker Setup DRC Vocal HD AV Sync Select On On 0 ms Move Select Dynamic Range Control (DRC) With the DVD*1 format, you could adjust delay time to audio signal...

Owner's Manual (English)
Page 22
... the instructions and download the video onto a disc for playback on this unit. 3. LOCK (Parental Control) LOCK Rating Password Area Code Unlock **** US Move Select Rating Blocks playback of the area whose standards were used to rate the DVD video disc, based on the list on the LOCK menu then press B. 2. If you have not yet entered password, you can enter or change the password, press ENTER when the "Change" option...
... the instructions and download the video onto a disc for playback on this unit. 3. LOCK (Parental Control) LOCK Rating Password Area Code Unlock **** US Move Select Rating Blocks playback of the area whose standards were used to rate the DVD video disc, based on the list on the LOCK menu then press B. 2. If you have not yet entered password, you can enter or change the password, press ENTER when the "Change" option...
Owner's Manual (English)
Page 32
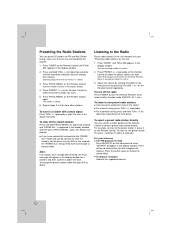
... the radio Press POWER to turn the DVD/CD Receiver off by itself and change to normal mode. For manual tuning, press TUN.(-/+) repeatedly. For automatic tuning, press and hold TUN.(-/+) for a moment and then a preset number will flash. For example, to listen to the preset station 4, press 4 on the front panel to select the preset station you want . 5. on the Remote Control. To improve reception Reorient the supplied antennas. 32 Before tuning, make "STEREO...
... the radio Press POWER to turn the DVD/CD Receiver off by itself and change to normal mode. For manual tuning, press TUN.(-/+) repeatedly. For automatic tuning, press and hold TUN.(-/+) for a moment and then a preset number will flash. For example, to listen to the preset station 4, press 4 on the front panel to select the preset station you want . 5. on the Remote Control. To improve reception Reorient the supplied antennas. 32 Before tuning, make "STEREO...
Owner's Manual (English)
Page 33
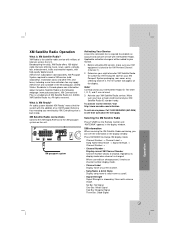
... -time activation fee will appear on channel number display mode. • Channel Label Display name of XM Satellite Radio Inc. ©2006 XM Satellite Radio Inc. All rights reserved. XM Satellite Radio connections Connect the XM Digital Antenna to change preset, it works on the display. DC 7V OUT FOR WIRELESS HDMI 1080i XM IN i Pod XM COAXIAL IN AUX IN R - Before activating XM service, make sure your eight-character XM Satellite...
... -time activation fee will appear on channel number display mode. • Channel Label Display name of XM Satellite Radio Inc. ©2006 XM Satellite Radio Inc. All rights reserved. XM Satellite Radio connections Connect the XM Digital Antenna to change preset, it works on the display. DC 7V OUT FOR WIRELESS HDMI 1080i XM IN i Pod XM COAXIAL IN AUX IN R - Before activating XM service, make sure your eight-character XM Satellite...
Owner's Manual (English)
Page 38
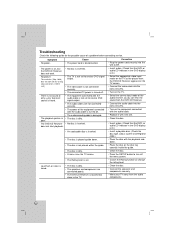
... sound or only a very low-level sound is heard. • The equipment connected with the audio cable is not set to receive DVD signal output. • The video cable is not connected securely. • The connected TV power is turned off. poor. Cause • The power cord is dirty. The power is inserted. The resolution (720p, 1080i) does not work . • No disc is on the TV screen. • Clean the disc. • Press the SETUP button...
... sound or only a very low-level sound is heard. • The equipment connected with the audio cable is not set to receive DVD signal output. • The video cable is not connected securely. • The connected TV power is turned off. poor. Cause • The power cord is dirty. The power is inserted. The resolution (720p, 1080i) does not work . • No disc is on the TV screen. • Clean the disc. • Press the SETUP button...

Owner's Manual (English)
Page 40
Specifications General CD/DVD Video FM Tuner Power supply Power consumption Mass External dimensions (W x H x D) Operating conditions Operating humidity Laser Signal system Frequency response (audio) Signal-to-noise ratio (audio) Dynamic range (audio) Harmonic distortion (audio) Video input Video output COMPONENT VIDEO OUT Tuning Range Intermediate Frequency Signal-to change without notice. ❋ This model may not be compatible with features and/or specifications that may be added in the future. 40 Input Power Net Dimensions (W x H x D) Net Weight Refer to main label Refer...
Specifications General CD/DVD Video FM Tuner Power supply Power consumption Mass External dimensions (W x H x D) Operating conditions Operating humidity Laser Signal system Frequency response (audio) Signal-to-noise ratio (audio) Dynamic range (audio) Harmonic distortion (audio) Video input Video output COMPONENT VIDEO OUT Tuning Range Intermediate Frequency Signal-to change without notice. ❋ This model may not be compatible with features and/or specifications that may be added in the future. 40 Input Power Net Dimensions (W x H x D) Net Weight Refer to main label Refer...

Specification (English)
Page 2
...; USB (A) Port (USB Media Plus) • Mini Stereo Jack Input (3.5mm) for Portable Audio • rear panel inputs/outputs HDMI™ Out • Component Video Out • Composite Video Out • FM Antenna Input • Optical Digital Audio In • Audio L/R In • AM Antenna Input • XM Radio Antenna Input • Speaker Output Type/Number Push-in/5 Subwoofer Output Type/Number Push-in/1 LG Made for iPod Connector Port • supplied accessories Remote Control Type Universal A/V Cable (RCA...
...; USB (A) Port (USB Media Plus) • Mini Stereo Jack Input (3.5mm) for Portable Audio • rear panel inputs/outputs HDMI™ Out • Component Video Out • Composite Video Out • FM Antenna Input • Optical Digital Audio In • Audio L/R In • AM Antenna Input • XM Radio Antenna Input • Speaker Output Type/Number Push-in/5 Subwoofer Output Type/Number Push-in/1 LG Made for iPod Connector Port • supplied accessories Remote Control Type Universal A/V Cable (RCA...


