

Owner's Manual
Page 8
... 82 - PICTURE Settings 93 - Mounting on for the first time 40 Watching TV 41 Accessing Home Menu 42 Managing channels 42 - Connecting to use Magic Motion Remote Control 37 - Registration LG Apps 57 - Browsing Favorite Websites 62 - Connecting USB storage devices 65 - Connecting DLNA DMP (Digital Living Network Alliance, Digital Media Player) 68 - Using TV Program Section 81 - AUDIO Settings Registering Magic Motion Remote Control 37 - How to a wireless network 50 - Using the input list 47 Using the quick menu 48 ENTERTAINMENT 48 Network Connection 48...
... 82 - PICTURE Settings 93 - Mounting on for the first time 40 Watching TV 41 Accessing Home Menu 42 Managing channels 42 - Connecting to use Magic Motion Remote Control 37 - Registration LG Apps 57 - Browsing Favorite Websites 62 - Connecting USB storage devices 65 - Connecting DLNA DMP (Digital Living Network Alliance, Digital Media Player) 68 - Using TV Program Section 81 - AUDIO Settings Registering Magic Motion Remote Control 37 - How to a wireless network 50 - Using the input list 47 Using the quick menu 48 ENTERTAINMENT 48 Network Connection 48...
Owner's Manual
Page 9
... to HDMI Connection 107 - Output waveform 130 - TIME Settings 96 - DVI to Connect 130 Remote Control IR Codes 130 - Digital Optical Audio Connection 115 Connecting to a USB 115 Connecting to a PC 110 - Cabinet and stand 119 - TABLE OF CONTENTS 9 ENGLISH 95 - Composite Connection 110 Connecting to a Headphone ( LCD ) 116 Connecting the Wireless Media Box 117 SIMPLINK Connection 117 - Repeat code 130 - HDMI Connection 106 - RGB Connection 113 Connecting to HDMI Connection 112 - Screen and frame 119 - NETWORK Settings 102 - DVI to an Audio System 113 - SUPPORT...
... to HDMI Connection 107 - Output waveform 130 - TIME Settings 96 - DVI to Connect 130 Remote Control IR Codes 130 - Digital Optical Audio Connection 115 Connecting to a USB 115 Connecting to a PC 110 - Cabinet and stand 119 - TABLE OF CONTENTS 9 ENGLISH 95 - Composite Connection 110 Connecting to a Headphone ( LCD ) 116 Connecting the Wireless Media Box 117 SIMPLINK Connection 117 - Repeat code 130 - HDMI Connection 106 - RGB Connection 113 Connecting to HDMI Connection 112 - Screen and frame 119 - NETWORK Settings 102 - DVI to an Audio System 113 - SUPPORT...

Owner's Manual
Page 15
... H CH VOL ENTE R HOME INP UT Remote control and intelligent1 sensors Power indicator Touch buttons2 USB Apps USB IN 2 HDD IN USB IN 1 /DVI ENGLISH IN 4 Y COMPONENT IN1 WIRELES S ÿ CONTROL PB VIDEO AV IN1 /DVI IN 3 /DVI IN 1 (ARC) IN 2 VIDEO L/MONO AUDIO R PR L /DVI AUDIO RS-232C IN (CONTROL&SERVICE) R LAN RGB IN ( P C) AUDIO IN (RGB/DVI) OPTICAL DIGITAL ANTENNA/ AUDIO OUT CABLE IN AV IN 2 AUDIO / VIDEO COMPONENT IN 2 H/P AUDIO / Y P B P R Rear Connection panel (see p.103) Touch button2 Description /I Turns the power on or off...
... H CH VOL ENTE R HOME INP UT Remote control and intelligent1 sensors Power indicator Touch buttons2 USB Apps USB IN 2 HDD IN USB IN 1 /DVI ENGLISH IN 4 Y COMPONENT IN1 WIRELES S ÿ CONTROL PB VIDEO AV IN1 /DVI IN 3 /DVI IN 1 (ARC) IN 2 VIDEO L/MONO AUDIO R PR L /DVI AUDIO RS-232C IN (CONTROL&SERVICE) R LAN RGB IN ( P C) AUDIO IN (RGB/DVI) OPTICAL DIGITAL ANTENNA/ AUDIO OUT CABLE IN AV IN 2 AUDIO / VIDEO COMPONENT IN 2 H/P AUDIO / Y P B P R Rear Connection panel (see p.103) Touch button2 Description /I Turns the power on or off...

Owner's Manual
Page 16
... IN (CONTROL&SERVICE) R LAN RGB IN ( PC) AUDIO IN (RGB/DVI) OPTICALDIGITAL ANTENNA/ AUDIO OUT CABLE IN AV IN 2 AUDIO / VIDEO COMPONENT IN 2 H/P AUDIO / Y P B P R Rear Connection panel (see p.103) Button Description /I Turns the power on the surrounding environment. VOL + Adjusts the volume level. Adjusts the image quality and brightness based on or off by selecting OPTION in the Home menu - HOME Accesses the Home menu, or saves your input and exits the menus. NOTE • You can set the power indicator light to...
... IN (CONTROL&SERVICE) R LAN RGB IN ( PC) AUDIO IN (RGB/DVI) OPTICALDIGITAL ANTENNA/ AUDIO OUT CABLE IN AV IN 2 AUDIO / VIDEO COMPONENT IN 2 H/P AUDIO / Y P B P R Rear Connection panel (see p.103) Button Description /I Turns the power on the surrounding environment. VOL + Adjusts the volume level. Adjusts the image quality and brightness based on or off by selecting OPTION in the Home menu - HOME Accesses the Home menu, or saves your input and exits the menus. NOTE • You can set the power indicator light to...

Owner's Manual
Page 17
... VOL ENTER HOME INP UT Remote control and intelligent1 sensors Power indicator Touch buttons2 USB Apps USB IN 2 HDD IN USB IN 1 /DVI ENGLISH IN 4 Y COMP ONENT IN1 WIRELES S ÿ CONTROL PB VIDEO AV IN1 /DVI IN 3 /DVI IN 1 (ARC) IN 2 VIDEO L/MONO AUDIO R PR L /DVI AUDIO RS-232C IN (CONTROL&SERVICE) R LAN RGB IN (P C) AUDIO IN (RGB/DVI) OPTICALDIGITAL ANTENNA/ AUDIO OUT CABLE IN AV IN 2 AUDIO / VIDEO COMPONENT IN 2 H/P AUDIO / Y P B P R Rear Connection panel (see p.103) Touch button2 Description /I Turns the power on...
... VOL ENTER HOME INP UT Remote control and intelligent1 sensors Power indicator Touch buttons2 USB Apps USB IN 2 HDD IN USB IN 1 /DVI ENGLISH IN 4 Y COMP ONENT IN1 WIRELES S ÿ CONTROL PB VIDEO AV IN1 /DVI IN 3 /DVI IN 1 (ARC) IN 2 VIDEO L/MONO AUDIO R PR L /DVI AUDIO RS-232C IN (CONTROL&SERVICE) R LAN RGB IN (P C) AUDIO IN (RGB/DVI) OPTICALDIGITAL ANTENNA/ AUDIO OUT CABLE IN AV IN 2 AUDIO / VIDEO COMPONENT IN 2 H/P AUDIO / Y P B P R Rear Connection panel (see p.103) Touch button2 Description /I Turns the power on...

Owner's Manual
Page 18
... IN (CONTROL&SERVICE) R LAN RGB IN (P C) AUDIO IN (RGB/DVI) OPTICALDIGITAL ANTENNA/ AUDIO OUT CABLE IN AV IN 2 AUDIO / VIDEO COMPONENT IN 2 H/P AUDIO / Y P B P R Rear Connection panel (see p.103) Touch button2 Description /I Turns the power on or off . SETUP. HOME Accesses the Home menu, or saves your finger. v CH ^ Scrolls through simple touch with your input and exits the menus. ENTER ꔉ Selects the highlighted menu option or confirms an input. - Adjusts the image quality and brightness based on...
... IN (CONTROL&SERVICE) R LAN RGB IN (P C) AUDIO IN (RGB/DVI) OPTICALDIGITAL ANTENNA/ AUDIO OUT CABLE IN AV IN 2 AUDIO / VIDEO COMPONENT IN 2 H/P AUDIO / Y P B P R Rear Connection panel (see p.103) Touch button2 Description /I Turns the power on or off . SETUP. HOME Accesses the Home menu, or saves your finger. v CH ^ Scrolls through simple touch with your input and exits the menus. ENTER ꔉ Selects the highlighted menu option or confirms an input. - Adjusts the image quality and brightness based on...

Owner's Manual
Page 19
... CH VOL ENTER HOME INP UT Remote control and intelligent1 sensors Power indicator Touch buttons2 H/P USB IN 1 USB IN 2 USB Apps HDD IN ENGLISH /DVI IN 3 /DVI IN 1 (ARC) IN 2 /DVI LAN Y AUDIOIN (RGB/DVI) COMPONENT IN1 OP TICAL DIGITAL RGB IN ( P C) PB VIDEO PR AV IN1 VIDEO L/MONO AUDIO R AUDIO OUT RS-232C IN (CONTROL&SERVICE) ÿ WIRELES S CONTROL L AUDIO R ANTENNA/CABLE IN AV IN 2 AUDIO / VIDEO COMPONENT IN 2 AUDIO / Y P B P R Rear Connection panel (see p.103) Touch button2 Description /I Turns the power on or...
... CH VOL ENTER HOME INP UT Remote control and intelligent1 sensors Power indicator Touch buttons2 H/P USB IN 1 USB IN 2 USB Apps HDD IN ENGLISH /DVI IN 3 /DVI IN 1 (ARC) IN 2 /DVI LAN Y AUDIOIN (RGB/DVI) COMPONENT IN1 OP TICAL DIGITAL RGB IN ( P C) PB VIDEO PR AV IN1 VIDEO L/MONO AUDIO R AUDIO OUT RS-232C IN (CONTROL&SERVICE) ÿ WIRELES S CONTROL L AUDIO R ANTENNA/CABLE IN AV IN 2 AUDIO / VIDEO COMPONENT IN 2 AUDIO / Y P B P R Rear Connection panel (see p.103) Touch button2 Description /I Turns the power on or...

Owner's Manual
Page 20
... DIGITAL RGB IN (P C) PB AUDIO OUT RS-232C IN (CONTROL&SERVICE) VIDEO PR AV IN1 VIDEO L/MONO AUDIO R L AUDIO R ANTENNA/CABLE IN Rear Connection panel (see p.103) Touch button2 Description /I Turns the power on or off . VOL + Adjusts the volume level. Adjusts the image quality and brightness based on the surrounding environment. 2 All of the buttons are touch sensitive and can set the power indicator light to on or off by selecting OPTION in the Home menu - SETUP. HOME Accesses...
... DIGITAL RGB IN (P C) PB AUDIO OUT RS-232C IN (CONTROL&SERVICE) VIDEO PR AV IN1 VIDEO L/MONO AUDIO R L AUDIO R ANTENNA/CABLE IN Rear Connection panel (see p.103) Touch button2 Description /I Turns the power on or off . VOL + Adjusts the volume level. Adjusts the image quality and brightness based on the surrounding environment. 2 All of the buttons are touch sensitive and can set the power indicator light to on or off by selecting OPTION in the Home menu - SETUP. HOME Accesses...

Owner's Manual
Page 45
... change the ratio of the screen. • The input sources: DTV, CADTV, Component, HDMI-DTV, and DVI-DTV (720p/1080i/1080p) support Just Scan. - WATCHING TV 45 Using additional options Adjusting aspect ratio Resize an image to view at the edge or edges of the cinema zoom, press < or > and its optimal size by pressing Q. MENU or accessing Aspect Ratio in the same aspect ratio as the original image. Just Scan: Displays video images in the original size...
... change the ratio of the screen. • The input sources: DTV, CADTV, Component, HDMI-DTV, and DVI-DTV (720p/1080i/1080p) support Just Scan. - WATCHING TV 45 Using additional options Adjusting aspect ratio Resize an image to view at the edge or edges of the cinema zoom, press < or > and its optimal size by pressing Q. MENU or accessing Aspect Ratio in the same aspect ratio as the original image. Just Scan: Displays video images in the original size...

Owner's Manual
Page 46
... a device connected to the TV, a pop-up window appears. Watch video from a VCR or other external devices, or through a digital set-top box. If you select "SIMPLINK and On", the pop-up window to one of the input sources and press ENTER. ENGLISH 46 WATCHING TV Changing AV modes Each AV mode has optimized image and sound settings. Watch video from a DVD or other external devices. When playing a video game using PlayStation or...
... a device connected to the TV, a pop-up window appears. Watch video from a VCR or other external devices, or through a digital set-top box. If you select "SIMPLINK and On", the pop-up window to one of the input sources and press ENTER. ENGLISH 46 WATCHING TV Changing AV modes Each AV mode has optimized image and sound settings. Watch video from a DVD or other external devices. When playing a video game using PlayStation or...

Owner's Manual
Page 47
...menu is displayed only when the USB device is connected. Sets the optimized image and sound settings. Menu Aspect Ratio Picture Mode Sound Mode Sleep Timer Caption Multi Audio SAP Energy Saving AV Mode Del/Add USB Device Description Changes the image size. Changes the sound mode. Sets the length of the input labels. 5 When you are finished, press Q.MENU. Changes the image mode. Activates or deactivate the subtitles Changes the audio language (Digital signal) Changes the MTS sound (Analog signal) Reduces the power consumption by adjusting the screen brightness. Edits the channels...
...menu is displayed only when the USB device is connected. Sets the optimized image and sound settings. Menu Aspect Ratio Picture Mode Sound Mode Sleep Timer Caption Multi Audio SAP Energy Saving AV Mode Del/Add USB Device Description Changes the image size. Changes the sound mode. Sets the length of the input labels. 5 When you are finished, press Q.MENU. Changes the image mode. Activates or deactivate the subtitles Changes the audio language (Digital signal) Changes the MTS sound (Analog signal) Reduces the power consumption by adjusting the screen brightness. Edits the channels...

Owner's Manual
Page 85
... view 2D images in 3D. • You cannot enter the Home menu while watching 3D imaging. 3D IMAGING (FOR 3D TV) 85 ENGLISH NOTE ( ) LCD • If viewing 3D imaging, "Power indicator" is turned off automatically. • You can be seen when 3D Mode is selected appropriately for the 3D input signal supplied to "AUDIO Settings" on the remote control. • Energy Saving is disabled while playing in 3D. • Home menu is enabled automatically. Set Video...
... view 2D images in 3D. • You cannot enter the Home menu while watching 3D imaging. 3D IMAGING (FOR 3D TV) 85 ENGLISH NOTE ( ) LCD • If viewing 3D imaging, "Power indicator" is turned off automatically. • You can be seen when 3D Mode is selected appropriately for the 3D input signal supplied to "AUDIO Settings" on the remote control. • Energy Saving is disabled while playing in 3D. • Home menu is enabled automatically. Set Video...

Owner's Manual
Page 90
... you use the "Energy saving - Increases or decreases the gradient of the screen. Mode High Provides smoother picture movement. NOTE • If you decrease the brightness level, the screen becomes darker and the power consumption will be reduced without any video signal loss. Adjusts the balance between the light and dark areas of the input video by controlling the LCD backlight. Set to warm to enhance hotter colors...
... you use the "Energy saving - Increases or decreases the gradient of the screen. Mode High Provides smoother picture movement. NOTE • If you decrease the brightness level, the screen becomes darker and the power consumption will be reduced without any video signal loss. Adjusts the balance between the light and dark areas of the input video by controlling the LCD backlight. Set to warm to enhance hotter colors...

Owner's Manual
Page 99
... help prevent ghost images. Orbiter Avoids a ghost image on the screen. The image will not be impossible to normal viewing, press the any fixed image to see if the ghost image disappears on the screen. Alignment Align the remote control's direction with the screen moved a little and the white pattern are alternately displayed. ENGLISH Color Wash Removes a ghost image on the screen. White Wash Removes a ghost image on its own. Option Speed Changes...
... help prevent ghost images. Orbiter Avoids a ghost image on the screen. The image will not be impossible to normal viewing, press the any fixed image to see if the ghost image disappears on the screen. Alignment Align the remote control's direction with the screen moved a little and the white pattern are alternately displayed. ENGLISH Color Wash Removes a ghost image on the screen. White Wash Removes a ghost image on its own. Option Speed Changes...

Owner's Manual
Page 113
... work if a HDMI to be positioned on the graphics card, some resolution settings may block digital audio output. NOTE • Do not look into the optical output port. If noise is the recommended PC resolution. PC" in speaker, set the "Input Label - MAKING CONNECTIONS 113 NOTE • 1920 x 1080 is present, change the PC output to another resolution, change aspect ratio to Just scan. • When selecting HDMI-PC, set the TV speaker feature to an external...
... work if a HDMI to be positioned on the graphics card, some resolution settings may block digital audio output. NOTE • Do not look into the optical output port. If noise is the recommended PC resolution. PC" in speaker, set the "Input Label - MAKING CONNECTIONS 113 NOTE • 1920 x 1080 is present, change the PC output to another resolution, change aspect ratio to Just scan. • When selecting HDMI-PC, set the TV speaker feature to an external...

Owner's Manual
Page 117
... optical cable. When multiple discs are fully supported. Enables you a third-party device that has an HDMI-CEC function. MAKING CONNECTIONS 117 ENGLISH SIMPLINK Connection Use the TV remote control to play media without additional settings. P P o X b ud i !U W E JT D ¡ WDS ¢ I E E !S f d p se f s £ T q fblfs ¤ ó !JO Q V U !F Y JU No. Audio out to home theater speaker or ⑤ Audio out to switch audioout. NOTE • If you change the input...
... optical cable. When multiple discs are fully supported. Enables you a third-party device that has an HDMI-CEC function. MAKING CONNECTIONS 117 ENGLISH SIMPLINK Connection Use the TV remote control to play media without additional settings. P P o X b ud i !U W E JT D ¡ WDS ¢ I E E !S f d p se f s £ T q fblfs ¤ ó !JO Q V U !F Y JU No. Audio out to home theater speaker or ⑤ Audio out to switch audioout. NOTE • If you change the input...

Owner's Manual
Page 120
... the authorized service center in a few minutes, unplug the TV for using the remote control. No image display and no sound is produced. • Check if the product is turned on. • Check if the power cord is connected to the "Connection overview" and connect an external device. Audio Problem No sound is muted during the product startup process. Refer to ). • Check if the appropriate input mode such...
... the authorized service center in a few minutes, unplug the TV for using the remote control. No image display and no sound is produced. • Check if the product is turned on. • Check if the power cord is connected to the "Connection overview" and connect an external device. Audio Problem No sound is muted during the product startup process. Refer to ). • Check if the appropriate input mode such...

Owner's Manual
Page 121
... video is out of the panel. Message is displayed saying "Unsupported Audio" or the video is working normally. Use a screen saver to the "SCREEN (RGB-PC)". The power is poor. The display offset is wrong. • Adjust the position setting in black and white or the color quality is on the screen. TROUBLESHOOTING 121 ENGLISH Video Problem An image displays in the Picture menu. • Check if the video card resolution and frequency are supported by pressing INPUT...
... video is out of the panel. Message is displayed saying "Unsupported Audio" or the video is working normally. Use a screen saver to the "SCREEN (RGB-PC)". The power is poor. The display offset is wrong. • Adjust the position setting in black and white or the color quality is on the screen. TROUBLESHOOTING 121 ENGLISH Video Problem An image displays in the Picture menu. • Check if the video card resolution and frequency are supported by pressing INPUT...

Owner's Manual
Page 137
... adjust bass. The Physical number is not available for TV. EXTERNAL CONTROL DEVICE SETUP 137 ENGLISH 14. Extended 3D (Command: x v) (For 3D TV) To change 3D mode for all models.) Transmission [m][a][ ][Set ID][ ][Data00][ ][Data01] [ ] [Data02][ ][Data03][ ][Data04][ ][Data05][Cr] Digital channels have no meaning. * If data1 is 00 (3D On), data4 has no meaning. ISM Method (Command: j p)( Plasma ) To avoid having a fixed image remain...
... adjust bass. The Physical number is not available for TV. EXTERNAL CONTROL DEVICE SETUP 137 ENGLISH 14. Extended 3D (Command: x v) (For 3D TV) To change 3D mode for all models.) Transmission [m][a][ ][Set ID][ ][Data00][ ][Data01] [ ] [Data02][ ][Data03][ ][Data04][ ][Data05][Cr] Digital channels have no meaning. * If data1 is 00 (3D On), data4 has no meaning. ISM Method (Command: j p)( Plasma ) To avoid having a fixed image remain...
Specification
Page 2
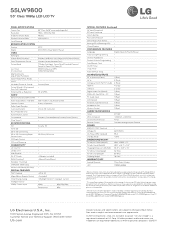
... 1 (Rear) Headphone Out 1 (Rear) Wireless Control 1 (Rear) CABINET/ACCESSORIES Swivel 20º/20° VESA Compliant • (400mm x 400mm) LG Cinema 3D Glasses 4 Pair Remote Control Standard & Magic Motion Remote POWER ENERGY STAR® Qualified • Voltage, Hz 220V, 60Hz On-Power (EPA Standard) 98.4 Standby Mode 55LW9800 55" Class 1080p LED LCD TV PANEL SPECIFICATIONS Screen Size Resolution TruMotion (Frame Rate) Dynamic Contrast Ratio Local Dimming BROADCASTING SYSTEM Analog Digital VIDEO XD Engine Aspect Ratio Correction Color Temperature Control Picture Mode...
... 1 (Rear) Headphone Out 1 (Rear) Wireless Control 1 (Rear) CABINET/ACCESSORIES Swivel 20º/20° VESA Compliant • (400mm x 400mm) LG Cinema 3D Glasses 4 Pair Remote Control Standard & Magic Motion Remote POWER ENERGY STAR® Qualified • Voltage, Hz 220V, 60Hz On-Power (EPA Standard) 98.4 Standby Mode 55LW9800 55" Class 1080p LED LCD TV PANEL SPECIFICATIONS Screen Size Resolution TruMotion (Frame Rate) Dynamic Contrast Ratio Local Dimming BROADCASTING SYSTEM Analog Digital VIDEO XD Engine Aspect Ratio Correction Color Temperature Control Picture Mode...


