

Owners Manual
Page 2
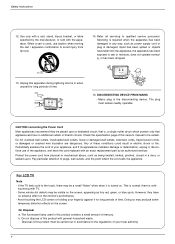
...exclamation point within the product's enclosure that the cable ground shall be determined by turning the equipment off and on a circuit different from LG Electronics Corporation. This equipment generates, uses and can be connected to the grounding system of the cable entry as close to operate the equipment... ELECTRIC SHOCK DO NOT OPEN WARNING: TO REDUCE THE RISK OF ELECTRIC SHOCK DO NOT REMOVE COVER (OR BACK). NO USER SERVICEABLE PARTS INSIDE. However, there is provided to call the CATV system installer's attention to operate this product's compliance is encouraged to try to...
...exclamation point within the product's enclosure that the cable ground shall be determined by turning the equipment off and on a circuit different from LG Electronics Corporation. This equipment generates, uses and can be connected to the grounding system of the cable entry as close to operate the equipment... ELECTRIC SHOCK DO NOT OPEN WARNING: TO REDUCE THE RISK OF ELECTRIC SHOCK DO NOT REMOVE COVER (OR BACK). NO USER SERVICEABLE PARTS INSIDE. However, there is provided to call the CATV system installer's attention to operate this product's compliance is encouraged to try to...
Owners Manual
Page 4
...- Unplug this product contains a small amount of mercury. CAUTION concerning the Power Cord Most appliances recommend they have the cord replaced with an exact replacement part by the manufacturer, or sold with a cart, stand, tripod, bracket, or table specified by an authorized servicer. Check the specification page of this owner's manual...
...- Unplug this product contains a small amount of mercury. CAUTION concerning the Power Cord Most appliances recommend they have the cord replaced with an exact replacement part by the manufacturer, or sold with a cart, stand, tripod, bracket, or table specified by an authorized servicer. Check the specification page of this owner's manual...
Owners Manual
Page 19
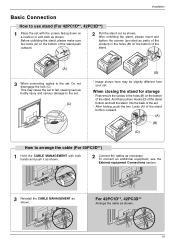
... with both hands and push it as shown. 2 Connect the cables as shown. After unfolding the stand, please insert and tighten the screws (provided as parts of the product) in the holes (B) on the bottom of the stand. Installation Basic Connection How to use stand (For 42PC1D**, 42PC3D**) 1 Place the set...
... with both hands and push it as shown. 2 Connect the cables as shown. After unfolding the stand, please insert and tighten the screws (provided as parts of the product) in the holes (B) on the bottom of the stand. Installation Basic Connection How to use stand (For 42PC1D**, 42PC3D**) 1 Place the set...
Owners Manual
Page 20
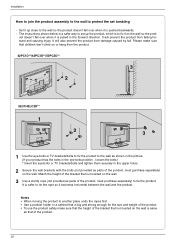
... the eye-bolts or TV brackets/bolts and tighten them securely in the forward direction. Notes • When moving the product to the wall as parts of the product, must purchase separately) on the wall is a safer way to set tumbling - Installation How to join the product assembly to the wall... ropes first. • Use a product holder or a cabinet that children don't climb on the wall so the prod- The instructions shown below is same as parts of the product, must purchase separately) to fix it on or hang from falling forward and causing injury.
... the eye-bolts or TV brackets/bolts and tighten them securely in the forward direction. Notes • When moving the product to the wall as parts of the product, must purchase separately) on the wall is a safer way to set tumbling - Installation How to join the product assembly to the wall... ropes first. • Use a product holder or a cabinet that children don't climb on the wall so the prod- The instructions shown below is same as parts of the product, must purchase separately) to fix it on or hang from falling forward and causing injury.
Owners Manual
Page 58
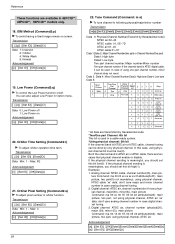
... pixel number in case analog channel tuning. 2. Data 3, Data 4: Minor Channel Number Data3: High byte Data4: Low byte Data 5: Main 7 Picture 0 Main 1 Two/One Using 4 6 Part Channel 5 Physical Reserv Channel ed 3 2 1 0 Two 0 Use x 0 00 1 One 1 No Use x 0 00 x 0 01 x 0 01 x 0 10 x 0 10 x 0 11 x 0...(physical(20), major (30), minor (5)), main picture Command: ma 00 14 00 1E 00 05 02 attribute(0x02): main picture, two part, using one part channel number, minor channel does not need. Orbiter Time Setting (Command2:r) G To adjust orbiter operation time term. x 1 1 1 1...
... pixel number in case analog channel tuning. 2. Data 3, Data 4: Minor Channel Number Data3: High byte Data4: Low byte Data 5: Main 7 Picture 0 Main 1 Two/One Using 4 6 Part Channel 5 Physical Reserv Channel ed 3 2 1 0 Two 0 Use x 0 00 1 One 1 No Use x 0 00 x 0 01 x 0 01 x 0 10 x 0 10 x 0 11 x 0...(physical(20), major (30), minor (5)), main picture Command: ma 00 14 00 1E 00 05 02 attribute(0x02): main picture, two part, using one part channel number, minor channel does not need. Orbiter Time Setting (Command2:r) G To adjust orbiter operation time term. x 1 1 1 1...


