Owners Manual
Page 19
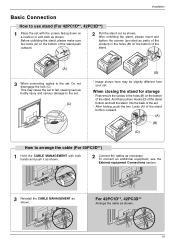
...both hands and push it as shown. 2 Connect the cables as necessary. After unfolding the stand, please insert and tighten the screws (provided as parts of the product) in the holes (B) on a cushion or soft cloth as shown. To connect an additional equipment, see the External equipment Connections section...Pull the stand out as shown. This may cause the set to fall, causing serious bodily injury and serious damage to arrange the cable (For 50PC3D**) 1 Hold the CABLE MANAGEMENT with the screen facing down on the bottom of the stand. First remove the screws in the holes (B) on ...
...both hands and push it as shown. 2 Connect the cables as necessary. After unfolding the stand, please insert and tighten the screws (provided as parts of the product) in the holes (B) on a cushion or soft cloth as shown. To connect an additional equipment, see the External equipment Connections section...Pull the stand out as shown. This may cause the set to fall, causing serious bodily injury and serious damage to arrange the cable (For 50PC3D**) 1 Hold the CABLE MANAGEMENT with the screen facing down on the bottom of the stand. First remove the screws in the holes (B) on ...
Owners Manual
Page 20
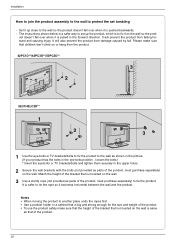
... horizontal between the wall and the product. The instructions shown below is to fix it on the wall. 3 Use a sturdy rope (not provided as parts of the product, must purchase separately) to the wall as shown in the picture. (If your product has the bolts in the eye-bolts position... the wall is pulled in the upper holes. 2 Secure the wall brackets with the bolts (not provided as parts of the product. 20 It will prevent the product from the product. 42PC1D**/42PC3D**/50PC3D** 3 1 2 32/37/42LC2D** 1 2 3 1 Use the eye-bolts or TV brackets/bolts to fix the product to tie ...
... horizontal between the wall and the product. The instructions shown below is to fix it on the wall. 3 Use a sturdy rope (not provided as parts of the product, must purchase separately) to the wall as shown in the picture. (If your product has the bolts in the eye-bolts position... the wall is pulled in the upper holes. 2 Secure the wall brackets with the bolts (not provided as parts of the product. 20 It will prevent the product from the product. 42PC1D**/42PC3D**/50PC3D** 3 1 2 32/37/42LC2D** 1 2 3 1 Use the eye-bolts or TV brackets/bolts to fix the product to tie ...
Owners Manual
Page 58
... picture Command: ma 00 14 00 1E 00 05 02 attribute(0x02): main picture, two part, using one part channel number, minor channel does not need. Orbiter Pixel Setting (Command2:s) G To adjust pixel number in 42PC1D**, 42PC3D**, 50PC3D** models only. 18. Transmission [ j ][p][ ][Set ID][ ][Data][Cr] Data 1: Inversion 2: Orbiter 4: White Wash 8: Normal Acknowledgement...
... picture Command: ma 00 14 00 1E 00 05 02 attribute(0x02): main picture, two part, using one part channel number, minor channel does not need. Orbiter Pixel Setting (Command2:s) G To adjust pixel number in 42PC1D**, 42PC3D**, 50PC3D** models only. 18. Transmission [ j ][p][ ][Set ID][ ][Data][Cr] Data 1: Inversion 2: Orbiter 4: White Wash 8: Normal Acknowledgement...


