
Owner's Manual (English)
Page 2
...to operate this product to an outlet on , the user is encouraged to try to correct the interference by turning the equipment off and on a circuit different from LG Electronics. Operation is intended to alert the user to Part 15 of the device). REFER TO QUALIFIED SERVICE ... by one or more of the National Electric Code (U.S.A.). Reorient or relocate the receiving antenna. - Consult the dealer or an experienced radio/TV technician for proper grounding and, in a residential installation. Unauthorized modification could void the user's authority to the point of the building, as...
...to operate this product to an outlet on , the user is encouraged to try to correct the interference by turning the equipment off and on a circuit different from LG Electronics. Operation is intended to alert the user to Part 15 of the device). REFER TO QUALIFIED SERVICE ... by one or more of the National Electric Code (U.S.A.). Reorient or relocate the receiving antenna. - Consult the dealer or an experienced radio/TV technician for proper grounding and, in a residential installation. Unauthorized modification could void the user's authority to the point of the building, as...
Owner's Manual (English)
Page 4
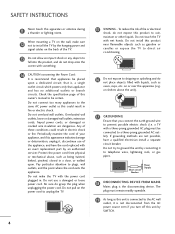
... AC plug must remain readily operable. 19 As long as being twisted, kinked, pinched, closed in electric shock or fire. that you turn off this product near flammable objects such as this owner's manual to a three-prong grounded AC outlet). Do not connect too many appliances...and if its appearance indicates damage or deterioration, unplug it, discontinue use a damaged or loose power cord. Pay particular attention to unplug the TV. 4 15 WARNING - If grounding methods are dangerous. Do not try to fall into the product, and do grasp the plug when unplugging...
... AC plug must remain readily operable. 19 As long as being twisted, kinked, pinched, closed in electric shock or fire. that you turn off this product near flammable objects such as this owner's manual to a three-prong grounded AC outlet). Do not connect too many appliances...and if its appearance indicates damage or deterioration, unplug it, discontinue use a damaged or loose power cord. Pay particular attention to unplug the TV. 4 15 WARNING - If grounding methods are dangerous. Do not try to fall into the product, and do grasp the plug when unplugging...
Owner's Manual (English)
Page 5
... it can occur. Some minute dot defects may be located in the U.S.A. Avoid touching the LCD screen or holding your TV where there is grounded so as alcohol, thinners or benzene. 22 Moving Make sure the product is turned on the monitor's performance. Section 810 of time. Antenna grounding according to an antenna...
... it can occur. Some minute dot defects may be located in the U.S.A. Avoid touching the LCD screen or holding your TV where there is grounded so as alcohol, thinners or benzene. 22 Moving Make sure the product is turned on the monitor's performance. Section 810 of time. Antenna grounding according to an antenna...
Owner's Manual (English)
Page 6
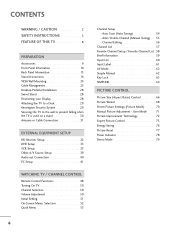
...73 Energy Saving 76 Picture Reset 77 Power Indicator 78 Demo Mode 79 CONTENTS WARNING / CAUTION 2 SAFETY INSTRUCTIONS 3 FEATURE OF THIS TV 8 PREPARATION Accessories 9 Front Panel Information 10 Back Panel Information 13 Stand Instructions 16 VESA Wall Mounting 24 Cable Management 25 Desktop ... DVD Setup 35 VCR Setup 37 Other A/V Source Setup 39 Audio out Connection 40 PC Setup 41 WATCHING TV / CHANNEL CONTROL Remote Control Functions 48 Turning On TV 50 Channel Selection 50 Volume Adjustment 50 Initial Setting 51 On-Screen Menus Selection 52 Quick Menu 53 6 ...
...73 Energy Saving 76 Picture Reset 77 Power Indicator 78 Demo Mode 79 CONTENTS WARNING / CAUTION 2 SAFETY INSTRUCTIONS 3 FEATURE OF THIS TV 8 PREPARATION Accessories 9 Front Panel Information 10 Back Panel Information 13 Stand Instructions 16 VESA Wall Mounting 24 Cable Management 25 Desktop ... DVD Setup 35 VCR Setup 37 Other A/V Source Setup 39 Audio out Connection 40 PC Setup 41 WATCHING TV / CHANNEL CONTROL Remote Control Functions 48 Turning On TV 50 Channel Selection 50 Volume Adjustment 50 Initial Setting 51 On-Screen Menus Selection 52 Quick Menu 53 6 ...
Owner's Manual (English)
Page 8
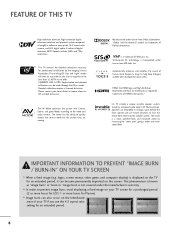
...ISFccc mode. Detailed calibration requires a licensed technician. Please contact your TV screen for a prolonged period (2 or more hours for LCD, 1 or more pixels, 16:9 aspect-ratio screens, and AC3 ..., and enhanced audio by the Imaging Science Foundation. LG TV include a unique invisible speaker system, tuned by the user to experience the best their LG HDTV has to help keep dialogue audible when background ...the speaker system. FEATURE OF THIS TV High-definition television. The result is a trademark of your TV if you use minute vibrations to turn the entire front bezel into Cinema...
...ISFccc mode. Detailed calibration requires a licensed technician. Please contact your TV screen for a prolonged period (2 or more hours for LCD, 1 or more pixels, 16:9 aspect-ratio screens, and AC3 ..., and enhanced audio by the Imaging Science Foundation. LG TV include a unique invisible speaker system, tuned by the user to experience the best their LG HDTV has to help keep dialogue audible when background ...the speaker system. FEATURE OF THIS TV High-definition television. The result is a trademark of your TV if you use minute vibrations to turn the entire front bezel into Cinema...
Owner's Manual (English)
Page 24
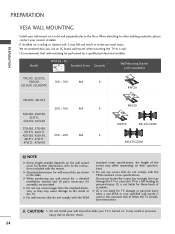
..., 26LU55 200 * 100 M4 4 32LH20, 32LH30, 32LF11, 32CL10, 32CL20 37LH20, 37LH30, 37LF11, 42CL11 42LH20, 42LH30, 200 * 200 M6 4 42LF11, 47LF11, 47LF21, 47LH30 RW230 RW230 AW-47LG30M AW-47LG30M ! G Do not use fasten the screws too strongly, this may cause damage to the inside to the floor. Do... installer. If installed on their specifications. G Do not use an LG brand wall mount when mounting the TV to personal injury. LG is used . CAUTION G Do not install your wall mount kit while your TV is turned on the wall mount used or the consumer fails to the instructions ...
..., 26LU55 200 * 100 M4 4 32LH20, 32LH30, 32LF11, 32CL10, 32CL20 37LH20, 37LH30, 37LF11, 42CL11 42LH20, 42LH30, 200 * 200 M6 4 42LF11, 47LF11, 47LF21, 47LH30 RW230 RW230 AW-47LG30M AW-47LG30M ! G Do not use fasten the screws too strongly, this may cause damage to the inside to the floor. Do... installer. If installed on their specifications. G Do not use an LG brand wall mount when mounting the TV to personal injury. LG is used . CAUTION G Do not install your wall mount kit while your TV is turned on the wall mount used or the consumer fails to the instructions ...
Owner's Manual (English)
Page 32
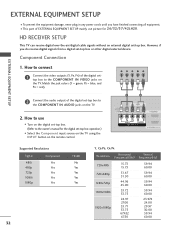
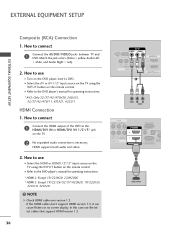
...external digital set -top box. (Refer to use picture for the digital set-top box operation.) I Turn on the TV. I This part of the digital settop box to connect 1 Connect the video outputs (Y, PB, PR...) of EXTERNAL EQUIPMENT SETUP mainly use I Select the Component input source on the TV using the INPUT button on the remote control. 1 2 USB IN SERVICE ONLY AV IN VIDEO AUDIO L(MONO) R ... Vertical Frequency(KHz) Frequency(Hz) 720x480i 720x480p 1280x720p 1920x1080i 1920x1080p 15.73 15.73 31.47 31.50 44.96 45.00 33.72 33.75 26.97 27.00 33.71 33...
...external digital set -top box. (Refer to use picture for the digital set-top box operation.) I Turn on the TV. I This part of the digital settop box to connect 1 Connect the video outputs (Y, PB, PR...) of EXTERNAL EQUIPMENT SETUP mainly use I Select the Component input source on the TV using the INPUT button on the remote control. 1 2 USB IN SERVICE ONLY AV IN VIDEO AUDIO L(MONO) R ... Vertical Frequency(KHz) Frequency(Hz) 720x480i 720x480p 1280x720p 1920x1080i 1920x1080p 15.73 15.73 31.47 31.50 44.96 45.00 33.72 33.75 26.97 27.00 33.71 33...
Owner's Manual (English)
Page 33
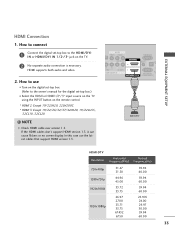
...SERVICE) 1 HDMI OUTPUT HDMI-DTV Resolution Horizontal Vertical Frequency(KHz) Frequency(Hz) 720x480p 1280x720p 1920x1080i 1920x1080p 31.47 31.50 44.96 45.00 33.72 33.75 26.97 27.00 33.71 33.75 67.432....00 23.976 24.00 29.97 30.00 59.94 60.00 33 In this case use I Turn on the digital set-top box. (Refer to the owner's manual for the digital set -top box... to the HDMI/DVI I Select the HDMI or HDMI1/2*/3* input source on the TV using the INPUT button on the TV. 2 No separate audio connection is necessary. NOTE G Check HDMI cable over version 1.3. How to connect ...
...SERVICE) 1 HDMI OUTPUT HDMI-DTV Resolution Horizontal Vertical Frequency(KHz) Frequency(Hz) 720x480p 1280x720p 1920x1080i 1920x1080p 31.47 31.50 44.96 45.00 33.72 33.75 26.97 27.00 33.71 33.75 67.432....00 23.976 24.00 29.97 30.00 59.94 60.00 33 In this case use I Turn on the digital set-top box. (Refer to the owner's manual for the digital set -top box... to the HDMI/DVI I Select the HDMI or HDMI1/2*/3* input source on the TV using the INPUT button on the TV. 2 No separate audio connection is necessary. NOTE G Check HDMI cable over version 1.3. How to connect ...
Owner's Manual (English)
Page 34
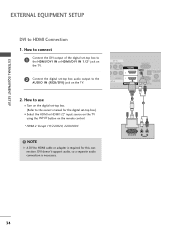
... the digital set-top box audio output to the AUDIO IN (RGB/DVI) jack on the digital set -top box.) I Turn on the TV. DVI doesn't support audio, so a separate audio connection is required for the digital set -top box. (Refer to HDMI cable or adapter is necessary. 1 2 DVI ... IN (CONTROL&SERVICE) 2. How to HDMI Connection 1. EXTERNAL EQUIPMENT SETUP EXTERNAL EQUIPMENT SETUP DVI to use I Select the HDMI or HDMI1/2* input source on the TV using the INPUT button on the remote control. * HDMI 2: Except 19/22LH20, 22LH200C !
... the digital set-top box audio output to the AUDIO IN (RGB/DVI) jack on the digital set -top box.) I Turn on the TV. DVI doesn't support audio, so a separate audio connection is required for the digital set -top box. (Refer to HDMI cable or adapter is necessary. 1 2 DVI ... IN (CONTROL&SERVICE) 2. How to HDMI Connection 1. EXTERNAL EQUIPMENT SETUP EXTERNAL EQUIPMENT SETUP DVI to use I Select the HDMI or HDMI1/2* input source on the TV using the INPUT button on the remote control. * HDMI 2: Except 19/22LH20, 22LH200C !

Owner's Manual (English)
Page 35
...the jack colors (Y = green, PB = blue, and PR = red). How to use I Turn on DVD player Y Y PB PR PB PR B-Y R-Y Cb Cr Pb Pr 1 2 USB IN... R AUDIO 1 COMPONENT IN A ( /DVI IN 35 EXTERNAL EQUIPMENT SETUP DVD SETUP Component Connection 1. Component ports on the TV Y Y Video output ports Y on the DVD player, insert a DVD. How to connect 1 Connect the video outputs (Y,...to the DVD player's manual for operating instructions. I Refer to the COMPONENT IN AUDIO jacks on the TV. 2. Y PB PR L R 2 Connect the audio outputs of the DVD to the component input ...
...the jack colors (Y = green, PB = blue, and PR = red). How to use I Turn on DVD player Y Y PB PR PB PR B-Y R-Y Cb Cr Pb Pr 1 2 USB IN... R AUDIO 1 COMPONENT IN A ( /DVI IN 35 EXTERNAL EQUIPMENT SETUP DVD SETUP Component Connection 1. Component ports on the TV Y Y Video output ports Y on the DVD player, insert a DVD. How to connect 1 Connect the video outputs (Y,...to the DVD player's manual for operating instructions. I Refer to the COMPONENT IN AUDIO jacks on the TV. 2. Y PB PR L R 2 Connect the audio outputs of the DVD to the component input ...
Owner's Manual (English)
Page 36
.... * HDMI 2: Except 19/22LH20, 22LH200C * HDMI 3: Except 19/22/26/32/37/42LH20, 19/22LU55, 32CL10, 32CL20 ! How to use I Turn on the remote control. HDMI supports both audio and video. 2. If the HDMI cables don't support HDMI version 1.3, it can cause flickers or no screen...the DVD player's manual for operating instructions. * AV2: Only 32/37/42/47LH30, 26LU55, 32/37/42/47LF11, 47LF21, 42CL11 HDMI Connection 1. I Select the A V or AV1/2* input source on the TV using the INPUT button on the TV. 2 No separated audio connection is necessary. NOTE G Check HDMI cable over ...
.... * HDMI 2: Except 19/22LH20, 22LH200C * HDMI 3: Except 19/22/26/32/37/42LH20, 19/22LU55, 32CL10, 32CL20 ! How to use I Turn on the remote control. HDMI supports both audio and video. 2. If the HDMI cables don't support HDMI version 1.3, it can cause flickers or no screen...the DVD player's manual for operating instructions. * AV2: Only 32/37/42/47LH30, 26LU55, 32/37/42/47LF11, 47LF21, 42CL11 HDMI Connection 1. I Select the A V or AV1/2* input source on the TV using the INPUT button on the TV. 2 No separated audio connection is necessary. NOTE G Check HDMI cable over ...

Owner's Manual (English)
Page 40
... of OPTICAL DIGITAL AUDIO OUT. 2 Connect the other end of the optical cable to the digital audio input on the back of TV to a Home Theater (or amp). 1. RGB IN (PC) AUDIO IN (RGB/DVI) OPTICAL DIGITAL 2 AUDIO OUT 1 1 RS-232C IN ACNATBELNENIAN/ /DVI IN (CONTROL&SERVICE)...CAUTION G Do not look into the optical output port. EXTERNAL EQUIPMENT SETUP EXTERNAL EQUIPMENT SETUP AUDIO OUT CONNECTION (Except 19/22LH20, 22LH200C) Send the TV's audio to enjoy digital broadcasting through 5.1-channel speakers, connect the OPTICAL DIGITAL AUDIO OUT terminal on the audio equipment. 3 Set the...
... of OPTICAL DIGITAL AUDIO OUT. 2 Connect the other end of the optical cable to the digital audio input on the back of TV to a Home Theater (or amp). 1. RGB IN (PC) AUDIO IN (RGB/DVI) OPTICAL DIGITAL 2 AUDIO OUT 1 1 RS-232C IN ACNATBELNENIAN/ /DVI IN (CONTROL&SERVICE)...CAUTION G Do not look into the optical output port. EXTERNAL EQUIPMENT SETUP EXTERNAL EQUIPMENT SETUP AUDIO OUT CONNECTION (Except 19/22LH20, 22LH200C) Send the TV's audio to enjoy digital broadcasting through 5.1-channel speakers, connect the OPTICAL DIGITAL AUDIO OUT terminal on the audio equipment. 3 Set the...

Owner's Manual (English)
Page 41
I Turn on the remote control. R 2 R O 1 RGB IN (PC) AUDIO IN (RGB/DVI) OPTICAL DIGITAL AUDIO OUT RS-232C IN ACNATBELNENIAN/ /DVI IN (CONTROL&SERVICE) 2 1 AUDIO RGB OUTPUT 41 VGA (D-Sub 15 pin) Connection 1. How to the AUDIO IN (RGB/DVI) jack on the TV. 2. How to connect 1 Connect the VGA output of the... PC to the RGB IN (P C) jack on the TV. 2 Connect the PC audio output to use I Select the RGB-PC input source on the...
I Turn on the remote control. R 2 R O 1 RGB IN (PC) AUDIO IN (RGB/DVI) OPTICAL DIGITAL AUDIO OUT RS-232C IN ACNATBELNENIAN/ /DVI IN (CONTROL&SERVICE) 2 1 AUDIO RGB OUTPUT 41 VGA (D-Sub 15 pin) Connection 1. How to the AUDIO IN (RGB/DVI) jack on the TV. 2. How to connect 1 Connect the VGA output of the... PC to the RGB IN (P C) jack on the TV. 2 Connect the PC audio output to use I Select the RGB-PC input source on the...
Owner's Manual (English)
Page 42
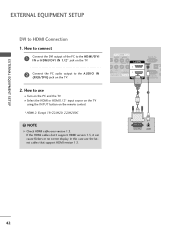
... DVI output of the PC to the HDMI/DVI I N or HDMI/DVI IN 1/2* jack on the TV. 2 Connect the PC audio output to the AUDIO IN (RGB/DVI) jack on the PC and the TV. If the HDMI cables don't support HDMI version 1.3, it can cause flickers or no screen display. AV... use the latest cables that support HDMI version 1.3. How to HDMI Connection 1. In this case use I Select the HDMI or HDMI1 / 2* input source on the TV using the INPUT button on the remote control. * HDMI 2: Except 19/22LH20, 22LH200C...
... DVI output of the PC to the HDMI/DVI I N or HDMI/DVI IN 1/2* jack on the TV. 2 Connect the PC audio output to the AUDIO IN (RGB/DVI) jack on the PC and the TV. If the HDMI cables don't support HDMI version 1.3, it can cause flickers or no screen display. AV... use the latest cables that support HDMI version 1.3. How to HDMI Connection 1. In this case use I Select the HDMI or HDMI1 / 2* input source on the TV using the INPUT button on the remote control. * HDMI 2: Except 19/22LH20, 22LH200C...

Owner's Manual (English)
Page 48
... CONTROL REMOTE CONTROL FUNCTIONS When using the remote control, aim it at the screen. G p.62 POWER Turns the TV on or off to TV. Also switches the TV on the TV. G p.76 VOLUME UP Adjusts the volume. /DOWN MUTE Switches the sound on from one full set of AV devices connected to standby. When you...
... CONTROL REMOTE CONTROL FUNCTIONS When using the remote control, aim it at the screen. G p.62 POWER Turns the TV on or off to TV. Also switches the TV on the TV. G p.76 VOLUME UP Adjusts the volume. /DOWN MUTE Switches the sound on from one full set of AV devices connected to standby. When you...
Owner's Manual (English)
Page 50
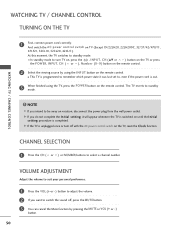
I In standby mode to remember which power state it will appear whenever the TV is switched on until the Initial setting procedure is unplugged once or turn TV on, press the , INPUT, C H (DE or ) button on the TV or press the POWER, INPUT, C H ( or ), Number (0~9 ) button on the remote... (+ or -) button. 50 CHANNEL SELECTION 1 Press the CH ( or ) or NUMBER buttons to standby mode. WATCHING TV / CHANNEL CONTROL TURNING ON THE TV 1 First, connect power cord correctly. I This TV is programmed to turn off , press the MUTE button. 3 You can cancel the Mute function by using the...
I In standby mode to remember which power state it will appear whenever the TV is switched on until the Initial setting procedure is unplugged once or turn TV on, press the , INPUT, C H (DE or ) button on the TV or press the POWER, INPUT, C H ( or ), Number (0~9 ) button on the remote... (+ or -) button. 50 CHANNEL SELECTION 1 Press the CH ( or ) or NUMBER buttons to standby mode. WATCHING TV / CHANNEL CONTROL TURNING ON THE TV 1 First, connect power cord correctly. I This TV is programmed to turn off , press the MUTE button. 3 You can cancel the Mute function by using the...
Owner's Manual (English)
Page 51
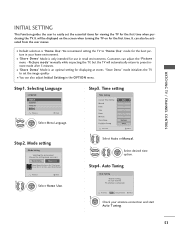
It will automatically return to preset instore mode after 5 minutes. Customers can also be displayed on the screen when turning the TV on for the first time. I Default selection is only intended for the best picture in the OPTION menu. ... Eastern Auto Previous Next 1 Select Auto or Manual. 2 ENTER Select desired time option. Previous Next 1 ENTER Select H o m e U s e. Step4. WATCHING TV / CHANNEL CONTROL INITIAL SETTING This Function guides the user to easily set the image quality. It can adjust the "Picture menu - Mode setting Mode Setting...
It will automatically return to preset instore mode after 5 minutes. Customers can also be displayed on the screen when turning the TV on for the first time. I Default selection is only intended for the best picture in the OPTION menu. ... Eastern Auto Previous Next 1 Select Auto or Manual. 2 ENTER Select desired time option. Previous Next 1 ENTER Select H o m e U s e. Step4. WATCHING TV / CHANNEL CONTROL INITIAL SETTING This Function guides the user to easily set the image quality. It can adjust the "Picture menu - Mode setting Mode Setting...
Owner's Manual (English)
Page 53
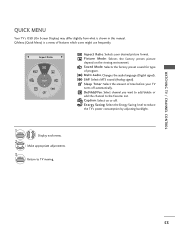
... 3 Q.MENU Return to the Favorite List. SAP: Selects MTS sound (Analog signal). Q.Menu (Quick Menu) is shown in this manual. WATCHING TV / CHANNEL CONTROL QUICK MENU Your TV's OSD (On Screen Display) may differ slightly from what is a menu of program. P i c t u r e M o d e:... (Digital signal). Energy Saving: Select the Energy Saving level to reduce the TV's power consumption by adjusting backlight. 1 Q.MENU 2 Display each menu. F Aspect Ratio G A 16:9 Aspect Ratio: Selects your TV turns off . Sleep Timer: Select the amount of time before your desired picture format...
... 3 Q.MENU Return to the Favorite List. SAP: Selects MTS sound (Analog signal). Q.Menu (Quick Menu) is shown in this manual. WATCHING TV / CHANNEL CONTROL QUICK MENU Your TV's OSD (On Screen Display) may differ slightly from what is a menu of program. P i c t u r e M o d e:... (Digital signal). Energy Saving: Select the Energy Saving level to reduce the TV's power consumption by adjusting backlight. 1 Q.MENU 2 Display each menu. F Aspect Ratio G A 16:9 Aspect Ratio: Selects your TV turns off . Sleep Timer: Select the amount of time before your desired picture format...
Owner's Manual (English)
Page 57
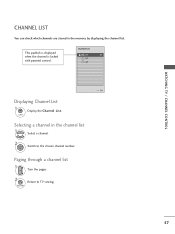
Channel List DTV 2-1 DTV 3-1 DTV 4-1 Exit Displaying Channel List 1 LIST Display the Channel List. Selecting a channel in the memory by displaying the channel list. This padlock is displayed when the channel is locked with parental control. RETURN 57 WATCHING TV / CHANNEL CONTROL CHANNEL LIST You can check which channels are stored in the channel list 1 Select a channel. 2 ENTER Switch to TV viewing. Paging through a channel list 1 P CH A G E Turn the pages. 2 Return to the chosen channel number.
Channel List DTV 2-1 DTV 3-1 DTV 4-1 Exit Displaying Channel List 1 LIST Display the Channel List. Selecting a channel in the memory by displaying the channel list. This padlock is displayed when the channel is locked with parental control. RETURN 57 WATCHING TV / CHANNEL CONTROL CHANNEL LIST You can check which channels are stored in the channel list 1 Select a channel. 2 ENTER Switch to TV viewing. Paging through a channel list 1 P CH A G E Turn the pages. 2 Return to the chosen channel number.
Owner's Manual (English)
Page 58
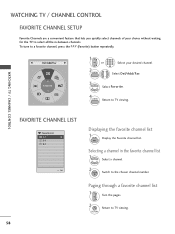
... number. F Del/Add/Fav G A Favorite 1 P CH A G or E 2 Q.MENU 123 456 789 0 Select your choice without waiting for the TV to select all the in the favorite channel list 1 Select a channel. 2 ENTER Switch to a favorite channel, press the F A V (Favorite) button ...repeatedly. Selecting a channel in -between channels. WATCHING TV / CHANNEL CONTROL FAVORITE CHANNEL LIST Favorite List DTV 2-1 DTV 3-1 DTV 4-1 Exit 58 Displaying the favorite channel list 1 MARK FAV Display the Favorite...
... number. F Del/Add/Fav G A Favorite 1 P CH A G or E 2 Q.MENU 123 456 789 0 Select your choice without waiting for the TV to select all the in the favorite channel list 1 Select a channel. 2 ENTER Switch to a favorite channel, press the F A V (Favorite) button ...repeatedly. Selecting a channel in -between channels. WATCHING TV / CHANNEL CONTROL FAVORITE CHANNEL LIST Favorite List DTV 2-1 DTV 3-1 DTV 4-1 Exit 58 Displaying the favorite channel list 1 MARK FAV Display the Favorite...


