Owner's Manual (English)
Page 1
...require service. LCD TV PLASMA TV OWNER'S MANUAL LCD TV MODELS 32LG30 37LG30 42LG30 42LGX 47LGX 32LG60 37LG60 42LG60 47LG60 52LG60 37LG50 42LG50 47LG50 52LG50 32LG70 42LG70 47LG70 52LG70 PLASMA TV MODELS 42PG25 50PG25 50PG60 60PG60 50PG70 60PG70 47LG90 Please read this information to your set . Record... meets the ENERGY STAR guidelines for future reference. ENERGY STAR is a set of the set . P/NO : SAC30708020 (0809-REV08) www.lgusa.com / www.lg.ca Retain it for energy efficiency. As an ENERGY STAR Partner LG Electronics USA, Inc. Environmental Protection Agency (EPA).
...require service. LCD TV PLASMA TV OWNER'S MANUAL LCD TV MODELS 32LG30 37LG30 42LG30 42LGX 47LGX 32LG60 37LG60 42LG60 47LG60 52LG60 37LG50 42LG50 47LG50 52LG50 32LG70 42LG70 47LG70 52LG70 PLASMA TV MODELS 42PG25 50PG25 50PG60 60PG60 50PG70 60PG70 47LG90 Please read this information to your set . Record... meets the ENERGY STAR guidelines for future reference. ENERGY STAR is a set of the set . P/NO : SAC30708020 (0809-REV08) www.lgusa.com / www.lg.ca Retain it for energy efficiency. As an ENERGY STAR Partner LG Electronics USA, Inc. Environmental Protection Agency (EPA).
Owner's Manual (English)
Page 6
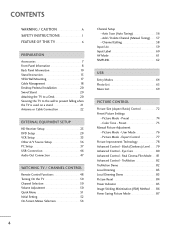
... prevent falling when the TV is used on a stand 21 Antenna or Cable Connection 22 EXTERNAL EQUIPMENT SETUP HD Receiver Setup 23 DVD Setup 29 VCR Setup 33 Other A/V Source Setup 36 PC Setup 37 USB Connection 46 Audio Out Connection 47 WATCHING TV / CHANNEL CONTROL Remote ...Control Functions 48 Turning On the TV 50 Channel Selection 50 Volume Adjustment 50 Quick Menu 51 Initial Setting 52 On-Screen Menus Selection 54 Channel Setup - Expert Control 77 Picture...
... prevent falling when the TV is used on a stand 21 Antenna or Cable Connection 22 EXTERNAL EQUIPMENT SETUP HD Receiver Setup 23 DVD Setup 29 VCR Setup 33 Other A/V Source Setup 36 PC Setup 37 USB Connection 46 Audio Out Connection 47 WATCHING TV / CHANNEL CONTROL Remote ...Control Functions 48 Turning On the TV 50 Channel Selection 50 Volume Adjustment 50 Quick Menu 51 Initial Setting 52 On-Screen Menus Selection 54 Channel Setup - Expert Control 77 Picture...

Owner's Manual (English)
Page 7
... 98 - Caption Option 100 TIME SETTING Clock Setting - Auto Clock Setup 101 Manual Clock Setup 102 Auto On/Off Time Setting 103 Sleep Timer Setting 104 Auto Shut-off Setting 105 PARENTAL CONTROL / RATINGS Set Password & Lock System 106 Channel Blocking 109 Movie & TV Rating 110 Downloadable Rating 115 External ...RS-232C 129 Open Source License 136 5 Digital Broadcasting System Captions 99 - User Mode 90 Clear Voice 91 Balance 92 TV Speakers On/Off Setup 93 Audio Reset 94 Stereo/SAP Broadcast Setup 95 Audio Language 96 On-Screen Menus Language Selection 97 Caption ...
... 98 - Caption Option 100 TIME SETTING Clock Setting - Auto Clock Setup 101 Manual Clock Setup 102 Auto On/Off Time Setting 103 Sleep Timer Setting 104 Auto Shut-off Setting 105 PARENTAL CONTROL / RATINGS Set Password & Lock System 106 Channel Blocking 109 Movie & TV Rating 110 Downloadable Rating 115 External ...RS-232C 129 Open Source License 136 5 Digital Broadcasting System Captions 99 - User Mode 90 Clear Voice 91 Balance 92 TV Speakers On/Off Setup 93 Audio Reset 94 Stereo/SAP Broadcast Setup 95 Audio Language 96 On-Screen Menus Language Selection 97 Caption ...
Owner's Manual (English)
Page 10
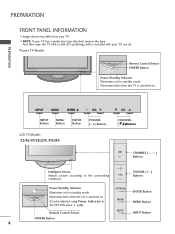
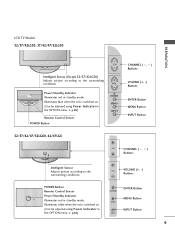
... standby mode. Illuminates blue when the set is switched on . (Can be adjusted using Power Indicator in the OPTION menu. INPUT INPUT MENU INPUT MENU ENTER VOL MENU ENTER INPUT Button ENTER VOL MENU Button VOL CH ENTER VOLUME Button (-, +) Buttons CH LCD TV Models 32/42/47/52LG70, 47LG90 CH CHANNEL (E,D)Buttons CH...
... standby mode. Illuminates blue when the set is switched on . (Can be adjusted using Power Indicator in the OPTION menu. INPUT INPUT MENU INPUT MENU ENTER VOL MENU ENTER INPUT Button ENTER VOL MENU Button VOL CH ENTER VOLUME Button (-, +) Buttons CH LCD TV Models 32/42/47/52LG70, 47LG90 CH CHANNEL (E,D)Buttons CH...
Owner's Manual (English)
Page 11
Illuminates white when the set is switched on . (Can be adjusted using Power Indicator in standby mode. LCD TV Models 32/37/42LG30, 37/42/47/52LG50 PREPARATION CH Intelligent Sensor (Except 32/37/42LG30) Adjusts picture according to the surrounding conditions. VOL ... Control Sensor POWER Button ENTER MENU INPUT CHANNEL ( , ) Buttons VOLUME (+, -) Buttons ENTER Button MENU Button INPUT Button 32/37/42/47/52LG60, 42/47LGX CH CHANNEL ( , ) Buttons Intelligent Sensor Adjusts picture according to the surrounding conditions VOL Power/Standby Indicator Illuminates red in...
Illuminates white when the set is switched on . (Can be adjusted using Power Indicator in standby mode. LCD TV Models 32/37/42LG30, 37/42/47/52LG50 PREPARATION CH Intelligent Sensor (Except 32/37/42LG30) Adjusts picture according to the surrounding conditions. VOL ... Control Sensor POWER Button ENTER MENU INPUT CHANNEL ( , ) Buttons VOLUME (+, -) Buttons ENTER Button MENU Button INPUT Button 32/37/42/47/52LG60, 42/47LGX CH CHANNEL ( , ) Buttons Intelligent Sensor Adjusts picture according to the surrounding conditions VOL Power/Standby Indicator Illuminates red in...
Owner's Manual (English)
Page 22
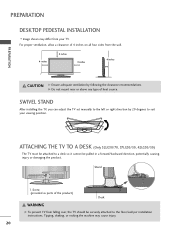
...any type of the product) Desk WARNING G To prevent TV from falling over, the TV should be pulled in a forward/backward direction, potentially causing injury or damaging the product. SWIVEL STAND After installing the TV, you can adjust the TV set manually to the left or right direction by following the... clearance recommendations. ATTACHING THE TV TO A DESK (Only 32LG30/70, 37LG30/50, 42LG30/50) The TV must be attached to a desk so it cannot ...
...any type of the product) Desk WARNING G To prevent TV from falling over, the TV should be pulled in a forward/backward direction, potentially causing injury or damaging the product. SWIVEL STAND After installing the TV, you can adjust the TV set manually to the left or right direction by following the... clearance recommendations. ATTACHING THE TV TO A DESK (Only 32LG30/70, 37LG30/50, 42LG30/50) The TV must be attached to a desk so it cannot ...
Owner's Manual (English)
Page 23
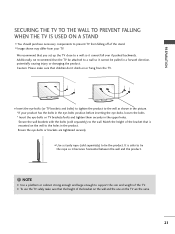
We recommend that you set up the TV close to a wall so it cannot be pulled in the picture. * If your TV. Additionally, we recommend that is safer to tie the product. Match the height of the TV. It is mounted on the TV are tightened securely. I Use a sturdy rope (sold separately) to support.... Secure the wall brackets with the bolts (sold separately) to tie the rope so it cannot fall over if pushed backwards. G To use the TV safely make sure that the height of the stand. NOTE G Use a platform or cabinet strong enough and large enough to the wall. Caution: Please...
We recommend that you set up the TV close to a wall so it cannot be pulled in the picture. * If your TV. Additionally, we recommend that is safer to tie the product. Match the height of the TV. It is mounted on the TV are tightened securely. I Use a sturdy rope (sold separately) to support.... Secure the wall brackets with the bolts (sold separately) to tie the rope so it cannot fall over if pushed backwards. G To use the TV safely make sure that the height of the stand. NOTE G Use a platform or cabinet strong enough and large enough to the wall. Caution: Please...
Owner's Manual (English)
Page 25
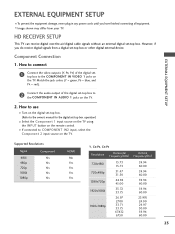
... all equipment. How to use I Turn on the digital set -top box or other digital external device. I Select the Component 1 input source on the TV using the INPUT button on the remote control. I To ...= red). 2 Connect the audio output of the digital settop box to the owner's manual for the digital set -top box. Supported Resolutions Signal Component 480i Yes 480p Yes 720p Yes 1080i Yes 1080p Yes HDMI No Yes ... Vertical Frequency(KHz) Frequency(Hz) 720x480i 720x480p 1280x720p 1920x1080i 1920x1080p 15.73 15.73 31.47 31.50 44.96 45.00 33.72 33.75 26.97 27.00 33.71 33...
... all equipment. How to use I Turn on the digital set -top box or other digital external device. I Select the Component 1 input source on the TV using the INPUT button on the remote control. I To ...= red). 2 Connect the audio output of the digital settop box to the owner's manual for the digital set -top box. Supported Resolutions Signal Component 480i Yes 480p Yes 720p Yes 1080i Yes 1080p Yes HDMI No Yes ... Vertical Frequency(KHz) Frequency(Hz) 720x480i 720x480p 1280x720p 1920x1080i 1920x1080p 15.73 15.73 31.47 31.50 44.96 45.00 33.72 33.75 26.97 27.00 33.71 33...
Owner's Manual (English)
Page 27
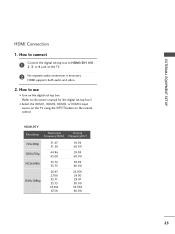
...owner's manual for the digital set-top box.) I Turn on the digital set-top box. (Refer to HDMI/DVI IN1, 2, 3, or 4 jack on the remote control. How to use I Select the HDMI1, HDMI2, HDMI3, or HDMI4 input source on the TV using the INPUT button on the TV. 2 No separate audio ...connection is necessary. HDMI supports both audio and video. 2. HDMI-DTV Resolution Horizontal Vertical Frequency(KHz) Frequency(Hz) 720x480p 1280x720p 1920x1080i 1920x1080p 31.47 31.50 44.96 45.00 33.72 ...
...owner's manual for the digital set-top box.) I Turn on the digital set-top box. (Refer to HDMI/DVI IN1, 2, 3, or 4 jack on the remote control. How to use I Select the HDMI1, HDMI2, HDMI3, or HDMI4 input source on the TV using the INPUT button on the TV. 2 No separate audio ...connection is necessary. HDMI supports both audio and video. 2. HDMI-DTV Resolution Horizontal Vertical Frequency(KHz) Frequency(Hz) 720x480p 1280x720p 1920x1080i 1920x1080p 31.47 31.50 44.96 45.00 33.72 ...
Owner's Manual (English)
Page 29
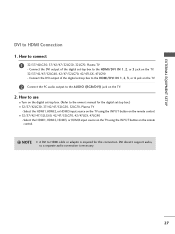
...Connect the DVI output of the digital set -top box.) I 32/37/42/47/52LG60, 42/47/52LG70, 42/47LGX, 47LG90 - EXTERNAL EQUIPMENT SETUP DVI to connect 1 32/37/42LG30, 37/42/47/52LG50, 32LG70, Plasma TV - Select the HDMI1, HDMI2, or HDMI3 input source on the TV using the INPUT button on the ... the remote control. I 32/37/42LG30, 37/42/47/52LG50, 32LG70, Plasma TV - DVI doesn't support audio, so a separate audio connection is required for the digital set -top box to the AUDIO (RGB/DVI) jack on the TV. 32/37/42/47/52LG60, 42/47/52LG70, 42/47LGX, 47LG90 - Connect the DVI output...
...Connect the DVI output of the digital set -top box.) I 32/37/42/47/52LG60, 42/47/52LG70, 42/47LGX, 47LG90 - EXTERNAL EQUIPMENT SETUP DVI to connect 1 32/37/42LG30, 37/42/47/52LG50, 32LG70, Plasma TV - Select the HDMI1, HDMI2, or HDMI3 input source on the TV using the INPUT button on the ... the remote control. I 32/37/42LG30, 37/42/47/52LG50, 32LG70, Plasma TV - DVI doesn't support audio, so a separate audio connection is required for the digital set -top box to the AUDIO (RGB/DVI) jack on the TV. 32/37/42/47/52LG60, 42/47/52LG70, 42/47LGX, 47LG90 - Connect the DVI output...
Owner's Manual (English)
Page 35
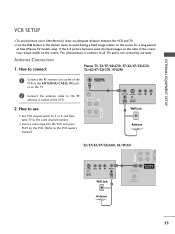
... OUT COAXIAL 1 2 Connect the antenna cable to avoid having a fixed image remain on the VCR. (Refer to the same channel number. I Set VCR output switch to 3 or 4 and then tune TV to the VCR owner's manual.) EO L(MONO) AUDIO R ANT OUT S-VIDEO VIDEO L R ANT IN OUTPUT SWITCH Wall Jack 2 Antenna AV IN... not covered by warranty. How to the ANTENNA/CABLE IN sock- AUDIO OUT E) 2. the fixed images on the sides of the VCR to connect Plasma TV, 32/37/42LG30, 37/42/47/52LG50, 32/42/47/52LG70, 47LG90 1 Connect the RF antenna out socket of the screen may remain visible on the...
... OUT COAXIAL 1 2 Connect the antenna cable to avoid having a fixed image remain on the VCR. (Refer to the same channel number. I Set VCR output switch to 3 or 4 and then tune TV to the VCR owner's manual.) EO L(MONO) AUDIO R ANT OUT S-VIDEO VIDEO L R ANT IN OUTPUT SWITCH Wall Jack 2 Antenna AV IN... not covered by warranty. How to the ANTENNA/CABLE IN sock- AUDIO OUT E) 2. the fixed images on the sides of the VCR to connect Plasma TV, 32/37/42LG30, 37/42/47/52LG50, 32/42/47/52LG70, 47LG90 1 Connect the RF antenna out socket of the screen may remain visible on the...

Owner's Manual (English)
Page 38
I Select the A V 2 input source on the TV using the INPUT button on the TV. VIDEO L/MONO AUDIO R HDMI IN 3 USB IN EXTERNAL EQUIPMENT SETUP EXTERNAL EQUIPMENT SETUP OTHER A/V SOURCE SETUP 1. How to use I Operate the corresponding external equipment. Camcorder Video Game Set VIDEO L R 1 36 Match the jack colors. (Video = yellow, Audio Left = white, and Audio Right = red) 2. How to AV IN1 input, select the A V 1 input source on the remote control. I If connected to connect 1 Connect the AUDIO/VIDEO jacks between TV and external equipment.
I Select the A V 2 input source on the TV using the INPUT button on the TV. VIDEO L/MONO AUDIO R HDMI IN 3 USB IN EXTERNAL EQUIPMENT SETUP EXTERNAL EQUIPMENT SETUP OTHER A/V SOURCE SETUP 1. How to use I Operate the corresponding external equipment. Camcorder Video Game Set VIDEO L R 1 36 Match the jack colors. (Video = yellow, Audio Left = white, and Audio Right = red) 2. How to AV IN1 input, select the A V 1 input source on the remote control. I If connected to connect 1 Connect the AUDIO/VIDEO jacks between TV and external equipment.
Owner's Manual (English)
Page 39
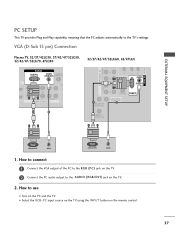
How to the TV's settings. I Turn on the PC and the TV. VGA (D-Sub 15 pin) Connection Plasma TV, 32/37/42LG30, 37/42/47/52LG50, 32/42/47/52LG70, 47LG90 32/37/42/47/52LG60, 42/47LGX RGB IN HDMI/D VIDEO COMPONENT IN RGB IN RGB(PC) AUDIO REMOTE (RGB/DVI) CONTROL IN N (CO 2 Y 1 PB PR L R VIDEO... 23 AUDIO (RGB/DVI) OPTICAL RGB(PC) ANTENNA/ CABLE IN 2 REMOTE CONTROL IN RGB OUTPUT AUDIO RGB OUTPUT AUDIO 1. EXTERNAL EQUIPMENT SETUP PC SETUP This TV provides Plug and Play capability, meaning that the PC adjusts automatically to use I Select the RGB-PC input source on the...
How to the TV's settings. I Turn on the PC and the TV. VGA (D-Sub 15 pin) Connection Plasma TV, 32/37/42LG30, 37/42/47/52LG50, 32/42/47/52LG70, 47LG90 32/37/42/47/52LG60, 42/47LGX RGB IN HDMI/D VIDEO COMPONENT IN RGB IN RGB(PC) AUDIO REMOTE (RGB/DVI) CONTROL IN N (CO 2 Y 1 PB PR L R VIDEO... 23 AUDIO (RGB/DVI) OPTICAL RGB(PC) ANTENNA/ CABLE IN 2 REMOTE CONTROL IN RGB OUTPUT AUDIO RGB OUTPUT AUDIO 1. EXTERNAL EQUIPMENT SETUP PC SETUP This TV provides Plug and Play capability, meaning that the PC adjusts automatically to use I Select the RGB-PC input source on the...
Owner's Manual (English)
Page 42
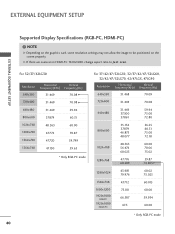
... 59.94 800x600 37.879 60.31 1024x768 48.363 60.00 1280x768 47.776 59.87 1360x768 47.720 59.799 1366x768 47.130 59.65 * Only RGB-PC mode For 37/42/47/52LG50, 32/37/42/47/52LG60, 32/42/47/52LG70, 42/47LGX, 47LG90 Resolution Horizontal Vertical Frequency(KHz) Frequency(Hz) 640x350....981 79.976 60.02 75.025 1360x768 47.712 60.015 1600x1200 1920x1080 RGB-PC 1920x1080 HDMI-PC 75.00 66.587 67.5 60.00 59.934 60.00 * Only RGB-PC mode 40 NOTE G Depending on the graphics card, some resolution settings may not allow the image to Just scan...
... 59.94 800x600 37.879 60.31 1024x768 48.363 60.00 1280x768 47.776 59.87 1360x768 47.720 59.799 1366x768 47.130 59.65 * Only RGB-PC mode For 37/42/47/52LG50, 32/37/42/47/52LG60, 32/42/47/52LG70, 42/47LGX, 47LG90 Resolution Horizontal Vertical Frequency(KHz) Frequency(Hz) 640x350....981 79.976 60.02 75.025 1360x768 47.712 60.015 1600x1200 1920x1080 RGB-PC 1920x1080 HDMI-PC 75.00 66.587 67.5 60.00 59.934 60.00 * Only RGB-PC mode 40 NOTE G Depending on the graphics card, some resolution settings may not allow the image to Just scan...
Owner's Manual (English)
Page 45
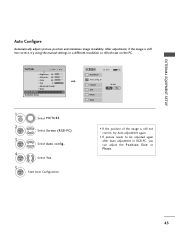
... a different resolution or refresh rate on the PC. G Position Size Phase Reset Move MENU Prev. Select Screen (RGB-PC). To Set Yes No • If the position of the image is still not correct, try Auto adjustment again. • If picture needs to be adjusted again ...
... a different resolution or refresh rate on the PC. G Position Size Phase Reset Move MENU Prev. Select Screen (RGB-PC). To Set Yes No • If the position of the image is still not correct, try Auto adjustment again. • If picture needs to be adjusted again ...
Owner's Manual (English)
Page 47
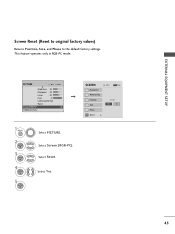
PICTURE Move Enter E • Brightness 50 • Sharpness 60 • Color 60 • Tint 0R G • Advanced Control • Reset Screen (RGB-PC) TruMotion Demo 1 MENU 2 ENTER 3 ENTER 4 ENTER 5 ENTER Select PICTURE. Select Reset. This feature operates only in RGB-PC mode. Select Y e s. EXTERNAL EQUIPMENT SETUP Screen Reset (Reset to original factory values) Returns Position, S i z e, and Phase to the default factory settings. To Set Yes No 45 SCREEN Resolution Auto config. Position Size Phase Reset G Move MENU Prev. Select Screen (RGB-PC).
PICTURE Move Enter E • Brightness 50 • Sharpness 60 • Color 60 • Tint 0R G • Advanced Control • Reset Screen (RGB-PC) TruMotion Demo 1 MENU 2 ENTER 3 ENTER 4 ENTER 5 ENTER Select PICTURE. Select Reset. This feature operates only in RGB-PC mode. Select Y e s. EXTERNAL EQUIPMENT SETUP Screen Reset (Reset to original factory values) Returns Position, S i z e, and Phase to the default factory settings. To Set Yes No 45 SCREEN Resolution Auto config. Position Size Phase Reset G Move MENU Prev. Select Screen (RGB-PC).
Owner's Manual (English)
Page 49
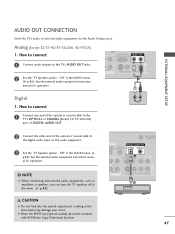
... L(MONO) AUDIO R 1 Digital L R AUDIO 1. AV IN 1 EXTERNAL EQUIPMENT SETUP AUDIO OUT CONNECTION Send the TV's audio to the digital audio input on the audio equipment. 3 Set the "TV Speaker option - How to connect RS-232C IN AUDIO OUT (CONTROL & SERVICE) 1 Connect audio outputs to the... TV's AUDIO OUT jacks. 2 Set the "TV Speaker option - See the external audio equipment instruction manual for operation. ! Analog (Except 32/37/42/47/52LG60, ...
... L(MONO) AUDIO R 1 Digital L R AUDIO 1. AV IN 1 EXTERNAL EQUIPMENT SETUP AUDIO OUT CONNECTION Send the TV's audio to the digital audio input on the audio equipment. 3 Set the "TV Speaker option - How to connect RS-232C IN AUDIO OUT (CONTROL & SERVICE) 1 Connect audio outputs to the... TV's AUDIO OUT jacks. 2 Set the "TV Speaker option - See the external audio equipment instruction manual for operation. ! Analog (Except 32/37/42/47/52LG60, ...
Owner's Manual (English)
Page 50
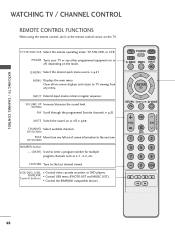
... P A CH G E 3 456 789 0 FLASHBK 48 G p.51 MUTE Switch the sound on or off , depending on -screen displays and return to TV viewing from one full set of screen information to the next one. UP/DOWN NUMBER button - (DASH) Used to the last channel viewed. VCR/DVD, USB, SIMPLINK Control...Control the SIMPLINK compatible devices. Q.MENU Select the desired quick menu source. UP/DOWN PAGE Move from any other programmed equipment on the TV. VOLUME UP Increase/decrease the sound level. /DOWN FAV Scroll through the programmed Favorite channels. G p.51 MENU Displays the main menu...
... P A CH G E 3 456 789 0 FLASHBK 48 G p.51 MUTE Switch the sound on or off , depending on -screen displays and return to TV viewing from one full set of screen information to the next one. UP/DOWN NUMBER button - (DASH) Used to the last channel viewed. VCR/DVD, USB, SIMPLINK Control...Control the SIMPLINK compatible devices. Q.MENU Select the desired quick menu source. UP/DOWN PAGE Move from any other programmed equipment on the TV. VOLUME UP Increase/decrease the sound level. /DOWN FAV Scroll through the programmed Favorite channels. G p.51 MENU Displays the main menu...

Owner's Manual (English)
Page 51
... CONTROL Installing Batteries I Open the battery compartment cover on -screen menus and adjust the system settings to your preference. (Up/Down/Left Right/ENTER) RETURN Allows the user to TV. I Install two 1.5V AAA batteries. I Close cover. 49 G p.62-63 AV MODE It helps you toggle this ...button, the SIMPLINK menu appears at the screen. Don't mix old or used batteries with -). When you select and set images and sounds. THUMBSTICK Navigate...
... CONTROL Installing Batteries I Open the battery compartment cover on -screen menus and adjust the system settings to your preference. (Up/Down/Left Right/ENTER) RETURN Allows the user to TV. I Install two 1.5V AAA batteries. I Close cover. 49 G p.62-63 AV MODE It helps you toggle this ...button, the SIMPLINK menu appears at the screen. Don't mix old or used batteries with -). When you select and set images and sounds. THUMBSTICK Navigate...
Owner's Manual (English)
Page 52
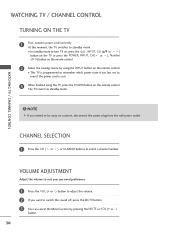
... adjust the volume. 2 If you intend to select a channel number. NOTE G If you want to standby mode. ! WATCHING TV / CHANNEL CONTROL WATCHING TV / CHANNEL CONTROL TURNING ON THE TV 1 First, connect power cord correctly. CHANNEL SELECTION 1 Press the CH ( or ) or NUMBER buttons to be away on the... or ), Number (0~9) button on the remote control. At this moment, the TV switches to , even if the power cord is programmed to remember which power state it was last set to standby mode. I This TV is out. 3 When finished using the INPUT button on vacation, disconnect the ...
... adjust the volume. 2 If you intend to select a channel number. NOTE G If you want to standby mode. ! WATCHING TV / CHANNEL CONTROL WATCHING TV / CHANNEL CONTROL TURNING ON THE TV 1 First, connect power cord correctly. CHANNEL SELECTION 1 Press the CH ( or ) or NUMBER buttons to be away on the... or ), Number (0~9) button on the remote control. At this moment, the TV switches to , even if the power cord is programmed to remember which power state it was last set to standby mode. I This TV is out. 3 When finished using the INPUT button on vacation, disconnect the ...


