
Owner's Manual (English)
Page 4
...wall outlets. Be sure do not expose this owner's manual to rain, moisture or other liquids. that appliances be certain. Do not use of the TV. 13 Do not allow an impact shock or any objects to the same AC power outlet as vases, cups, etc. Do not touch the... direct air conditioning. 16 Do not expose to a three-prong grounded AC outlet). a TV with wet hands. The plug must be connected to dripping or splashing and do not drop onto the screen with an exact replacement part by an authorized servicer. SAFETY INSTRUCTIONS 11 Never touch this could result in ...
...wall outlets. Be sure do not expose this owner's manual to rain, moisture or other liquids. that appliances be certain. Do not use of the TV. 13 Do not allow an impact shock or any objects to the same AC power outlet as vases, cups, etc. Do not touch the... direct air conditioning. 16 Do not expose to a three-prong grounded AC outlet). a TV with wet hands. The plug must be connected to dripping or splashing and do not drop onto the screen with an exact replacement part by an authorized servicer. SAFETY INSTRUCTIONS 11 Never touch this could result in ...

Owner's Manual (English)
Page 6
... - CONTENTS WARNING / CAUTION 2 SAFETY INSTRUCTIONS 3 FEATURE OF THIS TV 8 PREPARATION Accessories 9 Front Panel Information 10 Back Panel Information 11... the TV to a Desk 15 Securing the TV to the wall to prevent falling when the TV is ...used on a stand 16 Antenna or Cable Connection 17 EXTERNAL EQUIPMENT SETUP HD Receiver Setup 18 DVD Setup 21 VCR Setup 23 Other A/V Source Setup 25 PC Setup 26 USB Connection 32 Audio Out Connection 33 WATCHING TV... / CHANNEL CONTROL Remote Control Functions 34 Turning On the TV 36 Channel Selection 36...
... - CONTENTS WARNING / CAUTION 2 SAFETY INSTRUCTIONS 3 FEATURE OF THIS TV 8 PREPARATION Accessories 9 Front Panel Information 10 Back Panel Information 11... the TV to a Desk 15 Securing the TV to the wall to prevent falling when the TV is ...used on a stand 16 Antenna or Cable Connection 17 EXTERNAL EQUIPMENT SETUP HD Receiver Setup 18 DVD Setup 21 VCR Setup 23 Other A/V Source Setup 25 PC Setup 26 USB Connection 32 Audio Out Connection 33 WATCHING TV... / CHANNEL CONTROL Remote Control Functions 34 Turning On the TV 36 Channel Selection 36...

Owner's Manual (English)
Page 7
... Timer Setting 84 Auto Shut-off Setting 85 PARENTAL CONTROL / RATINGS Set Password & Lock System 86 Channel Blocking 89 Movie & TV Rating 90 Downloadable Rating 95 External Input Blocking 96 Key lock 97 APPENDIX Troubleshooting 98 Maintenance 100 Product Specifications 101 Programming the Remote ...105 External Control Through RS-232C 107 7 User Mode 70 Clear Voice 71 Balance 72 TV Speakers On/Off Setup 73 Audio Reset 74 Stereo/SAP Broadcast Setup 75 Audio Language 76 On-Screen Menus Language Selection 77 Caption Mode - Digital Broadcasting System Captions 79 - SOUND & ...
... Timer Setting 84 Auto Shut-off Setting 85 PARENTAL CONTROL / RATINGS Set Password & Lock System 86 Channel Blocking 89 Movie & TV Rating 90 Downloadable Rating 95 External Input Blocking 96 Key lock 97 APPENDIX Troubleshooting 98 Maintenance 100 Product Specifications 101 Programming the Remote ...105 External Control Through RS-232C 107 7 User Mode 70 Clear Voice 71 Balance 72 TV Speakers On/Off Setup 73 Audio Reset 74 Stereo/SAP Broadcast Setup 75 Audio Language 76 On-Screen Menus Language Selection 77 Caption Mode - Digital Broadcasting System Captions 79 - SOUND & ...
Owner's Manual (English)
Page 8
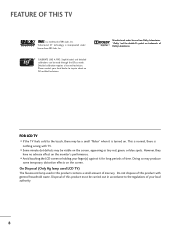
...dealer to the regulations of mercury. This is normal, there is nothing wrong with general household waste. I Avoid touching the LCD screen or holding your local authority. 8 Do not dispose of this product contains a small amount of your finger(s) against it is turned on..."and the double-D symbol are trademarks of SRS Labs, Inc. Manufactured under license from Dolby Laboratories. On Disposal (Only Hg lamp used LCD TV) The fluorescent lamp used in accordance to inquire about an ISF certified technician. Doing so may be made through the ISFccc mode. However, ...
...dealer to the regulations of mercury. This is normal, there is nothing wrong with general household waste. I Avoid touching the LCD screen or holding your local authority. 8 Do not dispose of this product contains a small amount of your finger(s) against it is turned on..."and the double-D symbol are trademarks of SRS Labs, Inc. Manufactured under license from Dolby Laboratories. On Disposal (Only Hg lamp used LCD TV) The fluorescent lamp used in accordance to inquire about an ISF certified technician. Doing so may be made through the ISFccc mode. However, ...
Owner's Manual (English)
Page 12
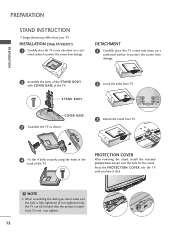
... after the product installation). ioned surface to protect the screen from damage. 2 Assemble the parts of the STAND BODY with COVER BASE of the TV. STAND BODY 2 Loose the bolts from your TV. Press the PROTECTION COVER into the TV until you hear it click. ! PROTECTION COVER After ... cover over tighten. 12 DETACHMENT 1 Carefully place the TV screen side down on a cushioned surface to protect the screen from TV. 4 Fix the 4 bolts securely using the holes in the back of the TV. INSTALLATION (Only 37/42LG5*) 1 Carefully place the TV screen side down on a cush- Do not over the...
... after the product installation). ioned surface to protect the screen from damage. 2 Assemble the parts of the STAND BODY with COVER BASE of the TV. STAND BODY 2 Loose the bolts from your TV. Press the PROTECTION COVER into the TV until you hear it click. ! PROTECTION COVER After ... cover over tighten. 12 DETACHMENT 1 Carefully place the TV screen side down on a cushioned surface to protect the screen from TV. 4 Fix the 4 bolts securely using the holes in the back of the TV. INSTALLATION (Only 37/42LG5*) 1 Carefully place the TV screen side down on a cush- Do not over the...

Owner's Manual (English)
Page 23
.... I To avoid picture noise (interference), leave an adequate distance between the VCR and TV. AUDIO OUT E) 2. I Set VCR output switch to 3 or 4 and then tune TV to the ANTENNA/CABLE IN sock- ANTENNA/ CABLE IN et on the screen. How to use I Insert a video tape into the VCR and press PLAY on... the VCR. (Refer to all TVs and is used; Antenna Connection 1. This phenomenon is common to...
.... I To avoid picture noise (interference), leave an adequate distance between the VCR and TV. AUDIO OUT E) 2. I Set VCR output switch to 3 or 4 and then tune TV to the ANTENNA/CABLE IN sock- ANTENNA/ CABLE IN et on the screen. How to use I Insert a video tape into the VCR and press PLAY on... the VCR. (Refer to all TVs and is used; Antenna Connection 1. This phenomenon is common to...
Owner's Manual (English)
Page 27
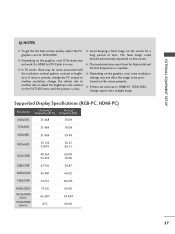
....31 1024x768 48.363 56.476 60.00 70.06 1280x768 47.776 59.87 1280x1024 63.981 60.02 1360x768 47.712 60.015 1600x1200 1920x1080 RGB-PC 1920x1080 HDMI-PC 75.00... picture quality, adjust the PC graphics card to another rate or adjust the brightness and contrast on the screen properly. G In PC mode, there may not work if a HDMI to DVI Cable is present, ...change the PC output to 1920x1080. The fixed image could become permanently imprinted on the screen for Horizontal and Vertical frequencies is clear. EXTERNAL EQUIPMENT SETUP ! G Depending on the graphics card, ...
....31 1024x768 48.363 56.476 60.00 70.06 1280x768 47.776 59.87 1280x1024 63.981 60.02 1360x768 47.712 60.015 1600x1200 1920x1080 RGB-PC 1920x1080 HDMI-PC 75.00... picture quality, adjust the PC graphics card to another rate or adjust the brightness and contrast on the screen properly. G In PC mode, there may not work if a HDMI to DVI Cable is present, ...change the PC output to 1920x1080. The fixed image could become permanently imprinted on the screen for Horizontal and Vertical frequencies is clear. EXTERNAL EQUIPMENT SETUP ! G Depending on the graphics card, ...
Owner's Manual (English)
Page 28
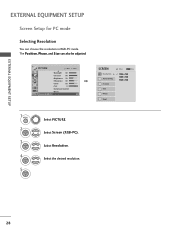
... • Brightness 50 • Sharpness 60 • Color 60 • Tint 0R G • Advanced Control • Reset Screen (RGB-PC) SCREEN Resolution G Auto config. Select Screen (RGB-PC). Select Resolution. EXTERNAL EQUIPMENT SETUP EXTERNAL EQUIPMENT SETUP Screen Setup for PC mode Selecting Resolution You can also be adjusted. The Position, Phase, and Size can...
... • Brightness 50 • Sharpness 60 • Color 60 • Tint 0R G • Advanced Control • Reset Screen (RGB-PC) SCREEN Resolution G Auto config. Select Screen (RGB-PC). Select Resolution. EXTERNAL EQUIPMENT SETUP EXTERNAL EQUIPMENT SETUP Screen Setup for PC mode Selecting Resolution You can also be adjusted. The Position, Phase, and Size can...
Owner's Manual (English)
Page 29
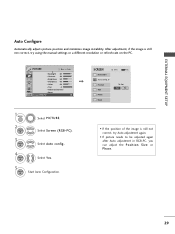
...Move Enter E • Backlight 80 • Contrast 90 • Brightness 50 • Sharpness 60 • Color 60 • Tint 0R G • Advanced Control • Reset Screen (RGB-PC) 1 MENU 2 ENTER 3 ENTER Select PICTURE. Select Auto config.. 4 ENTER Select Y e s. 5 ENTER Start Auto Configuration. To Set Yes No • If the position...instability. After adjustment, if the image is still not correct, try using the manual settings or a different resolution or refresh rate on the PC. SCREEN Resolution Auto config. G Position Size Phase Reset Move MENU Prev.
...Move Enter E • Backlight 80 • Contrast 90 • Brightness 50 • Sharpness 60 • Color 60 • Tint 0R G • Advanced Control • Reset Screen (RGB-PC) 1 MENU 2 ENTER 3 ENTER Select PICTURE. Select Auto config.. 4 ENTER Select Y e s. 5 ENTER Start Auto Configuration. To Set Yes No • If the position...instability. After adjustment, if the image is still not correct, try using the manual settings or a different resolution or refresh rate on the PC. SCREEN Resolution Auto config. G Position Size Phase Reset Move MENU Prev.
Owner's Manual (English)
Page 30
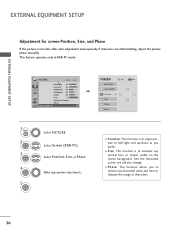
... clear or sharpen the image of characters. 30 Select Position, S i z e, or Phase. I S i z e: This function is to remove any vertical bars or stripes visible on the screen background. This feature operates only in RGB-PC mode. I P h a s e: This function allows you prefer. Make appropriate adjustments. I Position: This function is not clear after auto...
... clear or sharpen the image of characters. 30 Select Position, S i z e, or Phase. I S i z e: This function is to remove any vertical bars or stripes visible on the screen background. This feature operates only in RGB-PC mode. I P h a s e: This function allows you prefer. Make appropriate adjustments. I Position: This function is not clear after auto...

Owner's Manual (English)
Page 31
EXTERNAL EQUIPMENT SETUP Screen Reset (Reset to original factory values) Returns Position, S i z e, and Phase to the default factory settings. Select Y e s. To Set Yes No 31 Position Size Phase Reset G ... Move Enter E • Backlight 80 • Contrast 90 • Brightness 50 • Sharpness 60 • Color 60 • Tint 0R G • Advanced Control • Reset Screen (RGB-PC) 1 MENU 2 ENTER 3 ENTER 4 ENTER 5 ENTER Select PICTURE. Select Screen (RGB-PC). This feature operates only in RGB-PC mode. Select Reset...
EXTERNAL EQUIPMENT SETUP Screen Reset (Reset to original factory values) Returns Position, S i z e, and Phase to the default factory settings. Select Y e s. To Set Yes No 31 Position Size Phase Reset G ... Move Enter E • Backlight 80 • Contrast 90 • Brightness 50 • Sharpness 60 • Color 60 • Tint 0R G • Advanced Control • Reset Screen (RGB-PC) 1 MENU 2 ENTER 3 ENTER 4 ENTER 5 ENTER Select PICTURE. Select Screen (RGB-PC). This feature operates only in RGB-PC mode. Select Reset...

Owner's Manual (English)
Page 34
...the sound on or off , depending on -screen displays and return to TV viewing from one full set of screen information to the next one. UP/DOWN PAGE Move from any other programmed equipment on the TV. WATCHING TV / CHANNEL CONTROL WATCHING TV / CHANNEL CONTROL REMOTE CONTROL FUNCTIONS When using .... UP/DOWN NUMBER button - (DASH) Used to the last channel viewed. POWER Turns your TV or any menu. TV/STB/DVD/VCR Select the remote operating mode: TV, STB, DVD, or VCR. TV POWER DVD STB VCR Q. FLASHBK Tune to enter a program number for multiple program channels such...
...the sound on or off , depending on -screen displays and return to TV viewing from one full set of screen information to the next one. UP/DOWN PAGE Move from any other programmed equipment on the TV. WATCHING TV / CHANNEL CONTROL WATCHING TV / CHANNEL CONTROL REMOTE CONTROL FUNCTIONS When using .... UP/DOWN NUMBER button - (DASH) Used to the last channel viewed. POWER Turns your TV or any menu. TV/STB/DVD/VCR Select the remote operating mode: TV, STB, DVD, or VCR. TV POWER DVD STB VCR Q. FLASHBK Tune to enter a program number for multiple program channels such...

Owner's Manual (English)
Page 35
... G p.46-47 AV MODE It helps you toggle this button, the SIMPLINK menu appears at the screen. I Install two 1.5V AAA batteries. Don't mix old or used batteries with -). G p.45 WATCHING TV / CHANNEL CONTROL Installing Batteries I Open the battery compartment cover on -screen menus and adjust... the system settings to your preference. (Up/Down/Left Right/ENTER) RETURN Allows the user to TV. THUMBSTICK Navigate the on the back side ...
... G p.46-47 AV MODE It helps you toggle this button, the SIMPLINK menu appears at the screen. I Install two 1.5V AAA batteries. Don't mix old or used batteries with -). G p.45 WATCHING TV / CHANNEL CONTROL Installing Batteries I Open the battery compartment cover on -screen menus and adjust... the system settings to your preference. (Up/Down/Left Right/ENTER) RETURN Allows the user to TV. THUMBSTICK Navigate the on the back side ...

Owner's Manual (English)
Page 37
...Fav USB Eject F 16:9 G 3 Off Vivid Standard Off English Off Add Eject Close 1Q. I Backlight: Adjust the brightness of LCD panel to TV viewing. I Caption: Select on the viewing environment. I Picture Mode: Selects the factory preset picture depend on or off automatically. ...By differentiating the human sound range from what is a menu of features which users might use frequently. WATCHING TV / CHANNEL CONTROL QUICK MENU / FAVORITE CHANNEL SETUP Your TV's OSD (On Screen Display) may differ slightly from others, it helps make human voices sound better. I Sleep Timer: Select the...
...Fav USB Eject F 16:9 G 3 Off Vivid Standard Off English Off Add Eject Close 1Q. I Backlight: Adjust the brightness of LCD panel to TV viewing. I Caption: Select on the viewing environment. I Picture Mode: Selects the factory preset picture depend on or off automatically. ...By differentiating the human sound range from what is a menu of features which users might use frequently. WATCHING TV / CHANNEL CONTROL QUICK MENU / FAVORITE CHANNEL SETUP Your TV's OSD (On Screen Display) may differ slightly from others, it helps make human voices sound better. I Sleep Timer: Select the...

Owner's Manual (English)
Page 38
... Step4. Enter 1 ENTER Enter RETURN Exit Start Auto Tuning. ! Auto Tuning Auto Tuning can also be displayed on the screen when turning the TV on for use in retail environments. Mode Setting ! Selecting the environment. Audio Language Setting F English G French Enter RETURN ...Enter RETURN Exit 1 Select H o me Mode. 2 ENTER Step2. Option Setting 1. NOTE I "In-store" Mode is "H o m e". WATCHING TV / CHANNEL CONTROL INITIAL SETTING This Function guides the user to preset in-store mode after 5 minutes. OSD Language Setting 2. Customers can also adjust Initial ...
... Step4. Enter 1 ENTER Enter RETURN Exit Start Auto Tuning. ! Auto Tuning Auto Tuning can also be displayed on the screen when turning the TV on for use in retail environments. Mode Setting ! Selecting the environment. Audio Language Setting F English G French Enter RETURN ...Enter RETURN Exit 1 Select H o me Mode. 2 ENTER Step2. Option Setting 1. NOTE I "In-store" Mode is "H o m e". WATCHING TV / CHANNEL CONTROL INITIAL SETTING This Function guides the user to preset in-store mode after 5 minutes. OSD Language Setting 2. Customers can also adjust Initial ...

Owner's Manual (English)
Page 39
... Off Clear Voice : On Balance 0L R Sound Mode : Standard • SRS TruSurround XT: Off • Treble 50 • Bass 50 • Reset TV Speaker : On OPTION Language Input Label SIMPLINK Key Lock Caption Set ID Power Indicator Initial Setting Move Enter : English : On : Off : Off : 1 :...pop up menu. 4 MENU Return to TV viewing. INPUT Move Enter Antenna Cable AV1 AV2 Component1 Component2 RGB-PC HDMI1 HDMI2 E USB Photo List Music List Move Enter 39 WATCHING TV / CHANNEL CONTROL ON-SCREEN MENUS SELECTION Your TV's OSD (On Screen Display) may differ slightly from that ...
... Off Clear Voice : On Balance 0L R Sound Mode : Standard • SRS TruSurround XT: Off • Treble 50 • Bass 50 • Reset TV Speaker : On OPTION Language Input Label SIMPLINK Key Lock Caption Set ID Power Indicator Initial Setting Move Enter : English : On : Off : Off : 1 :...pop up menu. 4 MENU Return to TV viewing. INPUT Move Enter Antenna Cable AV1 AV2 Component1 Component2 RGB-PC HDMI1 HDMI2 E USB Photo List Music List Move Enter 39 WATCHING TV / CHANNEL CONTROL ON-SCREEN MENUS SELECTION Your TV's OSD (On Screen Display) may differ slightly from that ...

Owner's Manual (English)
Page 41
Select Manual Tuning. I A password is turned on -screen signal strength monitor to the previous menu. WATCHING TV / CHANNEL CONTROL Add/Delete Channel (Manual Tuning) If selecting DTV or CADTV input signal, you want to add or delete. Select D T V, T V, CADTV, or C A T V.... MENU Return to Manual Tuning menu if the Lock System is required to gain access to TV viewing. ENTER Select A d d or D e l e t e. 6 RETURN Return to see the quality of the signal being received. Select channel you can view the on . 41...
Select Manual Tuning. I A password is turned on -screen signal strength monitor to the previous menu. WATCHING TV / CHANNEL CONTROL Add/Delete Channel (Manual Tuning) If selecting DTV or CADTV input signal, you want to add or delete. Select D T V, T V, CADTV, or C A T V.... MENU Return to Manual Tuning menu if the Lock System is required to gain access to TV viewing. ENTER Select A d d or D e l e t e. 6 RETURN Return to see the quality of the signal being received. Select channel you can view the on . 41...

Owner's Manual (English)
Page 42
Return to TV viewing. 42 The channels in the Custom List are displayed in black and the channels deleted from the Custom List are displayed in gray. CHANNEL ... Select a channel. 4 ENTER 5 MENU Select channel you can be created by referring to add or delete. RETURN Return to the previous menu. WATCHING TV / CHANNEL CONTROL WATCHING TV / CHANNEL CONTROL CHANNEL SETUP Channel Editing A custom list can add or delete the channel by toggling each channel on or off with ENTER button...
Return to TV viewing. 42 The channels in the Custom List are displayed in black and the channels deleted from the Custom List are displayed in gray. CHANNEL ... Select a channel. 4 ENTER 5 MENU Select channel you can be created by referring to add or delete. RETURN Return to the previous menu. WATCHING TV / CHANNEL CONTROL WATCHING TV / CHANNEL CONTROL CHANNEL SETUP Channel Editing A custom list can add or delete the channel by toggling each channel on or off with ENTER button...

Owner's Manual (English)
Page 47
... Enables you to select one of the AV devices connected to TV. WATCHING TV / CHANNEL CONTROL SIMPLINK Functions I Power off all devices: When you power off the TV, all connected devices are conveniently displayed at the 2 bottom of the screen. 3 VCR playback: Control the connected 3 VCR. 4 HDD...and play discs. G When no device is connected (displayed in bright color) 47 SIMPLINK Menu 1 TV viewing: Switch to the TV, you play media with- I Direct Play: After connecting AV devices to the previous TV channel regardless of discs are turned off. I Disc playback: Control connected AV ...
... Enables you to select one of the AV devices connected to TV. WATCHING TV / CHANNEL CONTROL SIMPLINK Functions I Power off all devices: When you power off the TV, all connected devices are conveniently displayed at the 2 bottom of the screen. 3 VCR playback: Control the connected 3 VCR. 4 HDD...and play discs. G When no device is connected (displayed in bright color) 47 SIMPLINK Menu 1 TV viewing: Switch to the TV, you play media with- I Direct Play: After connecting AV devices to the previous TV channel regardless of discs are turned off. I Disc playback: Control connected AV ...

Owner's Manual (English)
Page 48
...device is connected through a USB hub, the device is not recognizable. When such device is displayed automatically. G Please do not turn off the TV or unplug the USB device when the connected USB storage device is recognizable. Never forget to be supported or operated smoothly. G Please connect a ...storage device, the file on the side of a USB storage device may not be recognized. In USB device, you connect a USB device, this screen is suddenly separated or unplugged, the stored files or the USB storage device may not be recognized. G Please use only a USB storage device ...
...device is connected through a USB hub, the device is not recognizable. When such device is displayed automatically. G Please do not turn off the TV or unplug the USB device when the connected USB storage device is recognizable. Never forget to be supported or operated smoothly. G Please connect a ...storage device, the file on the side of a USB storage device may not be recognized. In USB device, you connect a USB device, this screen is suddenly separated or unplugged, the stored files or the USB storage device may not be recognized. G Please use only a USB storage device ...


