
Owners Manual
Page 3
... avoid injury from the apporatus. Do not use at plugs, convenience receptacles, and the point where they exit from tip-over. _RTA_t_r_ CA_ WARNtlXG J Owner's Manual 3 Use only with the apparatus. At the _nufacturer's option, a picture or drawing that safety instrt_ction : 1. Additional safety information may be included by adding statements after...
... avoid injury from the apporatus. Do not use at plugs, convenience receptacles, and the point where they exit from tip-over. _RTA_t_r_ CA_ WARNtlXG J Owner's Manual 3 Use only with the apparatus. At the _nufacturer's option, a picture or drawing that safety instrt_ction : 1. Additional safety information may be included by adding statements after...
Owners Manual
Page 4
... been damaged in any way, such as vases, shall 4 Plasma TV Pay particular attention to qualHted service personnel. Safety fnstrucdons I ni nl s 1;3,Unplug this owner's manual to be placed on the appa_us.
... been damaged in any way, such as vases, shall 4 Plasma TV Pay particular attention to qualHted service personnel. Safety fnstrucdons I ni nl s 1;3,Unplug this owner's manual to be placed on the appa_us.
Owners Manual
Page 5
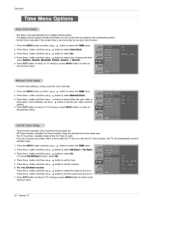
... Search Channet Edit DTV Signal Strength 21 Channel Label Setup 21 Main Picture Source Selection ......... 21 Video Menu Options EZ Picture 22 Manual Picture Contro_ (Off Option) ......... 22 Color Temperature Control 22 Video Preset 22 Audio Menu Options Audio Language 23 EZ SoundRite / ...Stereo/SAP Broadcasts Setup 24 Front Surround 24 TV Speakers On!Off Setup 25 BBE 25 Time Menu Options Auto Clock Setup 26 Manual C}ock Setup 26 On/Off "Timer Setup 26 Sleep Timer / Auto Off 27 Option Menu Features Aspect Ratio 28 Caption /...
... Search Channet Edit DTV Signal Strength 21 Channel Label Setup 21 Main Picture Source Selection ......... 21 Video Menu Options EZ Picture 22 Manual Picture Contro_ (Off Option) ......... 22 Color Temperature Control 22 Video Preset 22 Audio Menu Options Audio Language 23 EZ SoundRite / ...Stereo/SAP Broadcasts Setup 24 Front Surround 24 TV Speakers On!Off Setup 25 BBE 25 Time Menu Options Auto Clock Setup 26 Manual C}ock Setup 26 On/Off "Timer Setup 26 Sleep Timer / Auto Off 27 Option Menu Features Aspect Ratio 28 Caption /...
Owners Manual
Page 7
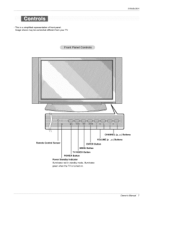
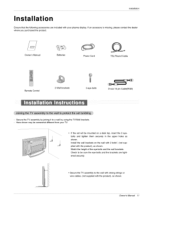
= This is a simplified representation of front pane_ Image shown may be somewhat different from your TV, Introduction CHANNEL (m, D ) Buttons Remote Control Sensor VOLUME (r , e ) Buttons ENTER Button MENU Button TVtVIDEO POWER Button Button Power Standby indicator illuminates red in s_dby mode, [_luminates green w_hen the TV is turned on, Owner's Manual 7
= This is a simplified representation of front pane_ Image shown may be somewhat different from your TV, Introduction CHANNEL (m, D ) Buttons Remote Control Sensor VOLUME (r , e ) Buttons ENTER Button MENU Button TVtVIDEO POWER Button Button Power Standby indicator illuminates red in s_dby mode, [_luminates green w_hen the TV is turned on, Owner's Manual 7

Owners Manual
Page 9
... aatoma_caliy only if these are connected ) RAllO Changes the aspect ratio, Lets you semect the amount of time before you r TV tums i_etf off . Owner's Manual 9 FREEZE Freezes the currently-viewed Main picture is frozen. picture. Don't mix old or used batteries with +, - Selects the remote o_rating mode: TV, DVD, VCR...
... aatoma_caliy only if these are connected ) RAllO Changes the aspect ratio, Lets you semect the amount of time before you r TV tums i_etf off . Owner's Manual 9 FREEZE Freezes the currently-viewed Main picture is frozen. picture. Don't mix old or used batteries with +, - Selects the remote o_rating mode: TV, DVD, VCR...
Owners Manual
Page 11
Here shown may be sure the eye-belts and the brackets are included with the product)_ as shown Owner's Manual 11 be mounted on a desk top, insert the 2 eyeboi_ and tighten them securely in the upper holes as shown, _nstali the wail brackets on the ...
Here shown may be sure the eye-belts and the brackets are included with the product)_ as shown Owner's Manual 11 be mounted on a desk top, insert the 2 eyeboi_ and tighten them securely in the upper holes as shown, _nstali the wail brackets on the ...
Owners Manual
Page 13
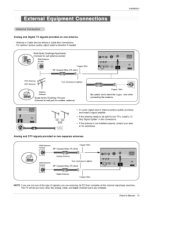
..., let _ Scan complete air the channel signaFtype searches, The TV will let you know when the analcg, cable, and digitat channe_ scans are complete Owner's Manual 13 Installation Analog and Digital TV signals provided; on two separate antennas Walt Antenna Socket Co#r RF Coaxial Wire (75 ohm) Wife Wall;
..., let _ Scan complete air the channel signaFtype searches, The TV will let you know when the analcg, cable, and digitat channe_ scans are complete Owner's Manual 13 Installation Analog and Digital TV signals provided; on two separate antennas Walt Antenna Socket Co#r RF Coaxial Wire (75 ohm) Wife Wall;
Owners Manual
Page 14
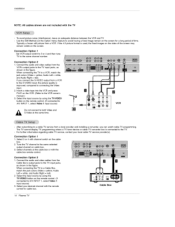
... _vice or ceb[e TV converter box is improved; insert a video tape into the VCR and press [] PLAY on the VCR. (Refer to the VCR owner's manual,) 3 Select the input source by using the TVTVIDEO button on the remote control (ff connected to A!V iNPUT 1, set_ Video 1 input source) [] VCR Do not connect...
... _vice or ceb[e TV converter box is improved; insert a video tape into the VCR and press [] PLAY on the VCR. (Refer to the VCR owner's manual,) 3 Select the input source by using the TVTVIDEO button on the remote control (ff connected to A!V iNPUT 1, set_ Video 1 input source) [] VCR Do not connect...
Owners Manual
Page 15
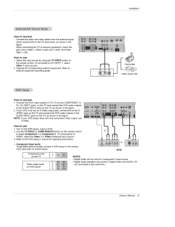
... use 1. Operate the corresponding external equipment. How to connect Connect the audio and video cabtes from the external equipment"s output jacks to the DVD p_ayer s manual for Com_nent 2 input source • Digi_l Audio operation has priority ff Digi_ Audio and AUDIO L/R are connected at the same time, Owner...
... use 1. Operate the corresponding external equipment. How to connect Connect the audio and video cabtes from the external equipment"s output jacks to the DVD p_ayer s manual for Com_nent 2 input source • Digi_l Audio operation has priority ff Digi_ Audio and AUDIO L/R are connected at the same time, Owner...
Owners Manual
Page 16
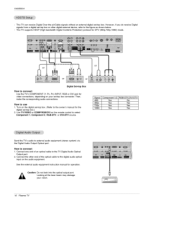
Digital or or Dtgilal Set-top Box How to the TV D,igita_ Audio Optical Output port. 2. See the external audio equipment instruction manual for DTV (480p,720p,1080i) mode. Ins_!lation This TV can receive Digital Over4he-alr!Cable signals without an external digita_ set4op box. Connect one ...
Digital or or Dtgilal Set-top Box How to the TV D,igita_ Audio Optical Output port. 2. See the external audio equipment instruction manual for DTV (480p,720p,1080i) mode. Ins_!lation This TV can receive Digital Over4he-alr!Cable signals without an external digita_ set4op box. Connect one ...
Owners Manual
Page 17
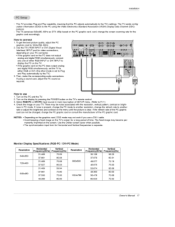
...,875 53,674 48,363 56.476 60,023 Vert|ca| Frequency(Hz) 5&25 60,31 72.18 75,_ 85._ 60._ 70._ 75.02 Owner's Manual 17 How to 1024x768, 60Hz. 2. tf using the Video E_ectronics Standard Asseda_ion (VESA) Display Data Channet (DDC) protoco_ o The TV perceives 640x480_ 60Hz as req...
...,875 53,674 48,363 56.476 60,023 Vert|ca| Frequency(Hz) 5&25 60,31 72.18 75,_ 85._ 60._ 70._ 75.02 Owner's Manual 17 How to 1024x768, 60Hz. 2. tf using the Video E_ectronics Standard Asseda_ion (VESA) Display Data Channet (DDC) protoco_ o The TV perceives 640x480_ 60Hz as req...
Owners Manual
Page 18
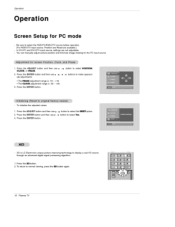
... (For RGB-DTV input source_ Position and Reset are avai_able_) In DVFPC and DVFDTV input source_ settings are not adjustable You can manually adjust picture position and minimize imam shaking for the PC input source. 1 Press the ADJUST button and then use D Pl button...use # iz / r /e buttons to make appropriate adjustments. ,The _ adjusf_ment ran_ is -16 -- +16. , The (:.'LOCK adiusVnent range is LG Electronics unique picture improving technology to display a real HD source through an advanced digita_ signal pr_essing a_gorithm. 1. To initialize the adjusted values 1. Press the XD...
... (For RGB-DTV input source_ Position and Reset are avai_able_) In DVFPC and DVFDTV input source_ settings are not adjustable You can manually adjust picture position and minimize imam shaking for the PC input source. 1 Press the ADJUST button and then use D Pl button...use # iz / r /e buttons to make appropriate adjustments. ,The _ adjusf_ment ran_ is -16 -- +16. , The (:.'LOCK adiusVnent range is LG Electronics unique picture improving technology to display a real HD source through an advanced digita_ signal pr_essing a_gorithm. 1. To initialize the adjusted values 1. Press the XD...
Owners Manual
Page 19
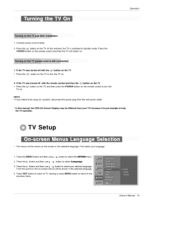
... shown in the setected language. First select your TV's because _ is switched to turn the TV on the TV to the previous rr'enu, Owner's Manual 19 Press the POWER button on the remote contro_ and then the TV wiEt switch on the TV. The menus will be shown on vacation...
... shown in the setected language. First select your TV's because _ is switched to turn the TV on the TV to the previous rr'enu, Owner's Manual 19 Press the POWER button on the remote contro_ and then the TV wiEt switch on the TV. The menus will be shown on vacation...
Owners Manual
Page 21
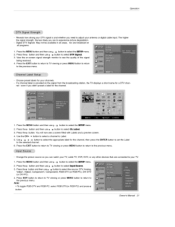
... can watch your TV cable TV, VCR, DVD, or any other devices that are broadcast on alt programs. or digital cable input, The higher 1. Owner's Manual 21 Press EXIT button to return to select the _U'P menu. 2. If a channel labem is and whether you need to adjust your antenna the signal...
... can watch your TV cable TV, VCR, DVD, or any other devices that are broadcast on alt programs. or digital cable input, The higher 1. Owner's Manual 21 Press EXIT button to return to select the _U'P menu. 2. If a channel labem is and whether you need to adjust your antenna the signal...
Owners Manual
Page 22
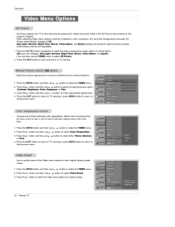
... TV for optimum picture quality 1. program cate_ry. - Select the preset value in the EZ Picture menu based on the color, sharpness, tint, _d color temperature) manually, and Sports settings are not adjustable. Press the EXIT button to save and return to original values. Press the e button and then use D / z button to...
... TV for optimum picture quality 1. program cate_ry. - Select the preset value in the EZ Picture menu based on the color, sharpness, tint, _d color temperature) manually, and Sports settings are not adjustable. Press the EXIT button to save and return to original values. Press the e button and then use D / z button to...
Owners Manual
Page 23
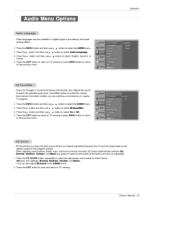
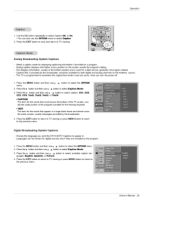
... and return to the previous menu Scans for good sound quality at the factory and are watching a comrr_rcia] TV program. setup as shown below: 2. Owner's Manual 23 Operation Other languages may be available if a digita_ signal is provided b,y the breadcasting station. 1.
... and return to the previous menu Scans for good sound quality at the factory and are watching a comrr_rcia] TV program. setup as shown below: 2. Owner's Manual 23 Operation Other languages may be available if a digita_ signal is provided b,y the breadcasting station. 1.
Owners Manual
Page 25
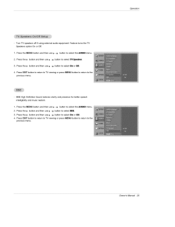
... TV viewing or press MENU button to return to select _K. 3. Press the e button and then use D _R button to the previous menu. Operation Owner's Manual 25 Turn TV speakers off if using extema_ audio equipment Speakers option On or Off, Fea_re turns the TV 1, Press the MENU button and then...
... TV viewing or press MENU button to return to select _K. 3. Press the e button and then use D _R button to the previous menu. Operation Owner's Manual 25 Turn TV speakers off if using extema_ audio equipment Speakers option On or Off, Fea_re turns the TV 1, Press the MENU button and then...
Owners Manual
Page 26
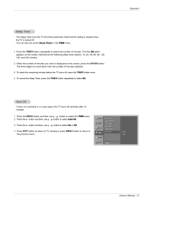
... set both set to the same time, The "IFv'must be in standby mode for the current time provided by the broa_asting Set the clock manually, if the current time is set incorrectly by the auto crock function, station, 1. button to select the _ menu 2 Press the • button and ...then use _ / i button to setect Manual Clock 3, Press the e button and then use r /e button to _eiect either the year, date, or _me option, Once selected, use 9 _! The tim_ is set ...
... set both set to the same time, The "IFv'must be in standby mode for the current time provided by the broa_asting Set the clock manually, if the current time is set incorrectly by the auto crock function, station, 1. button to select the _ menu 2 Press the • button and ...then use _ / i button to setect Manual Clock 3, Press the e button and then use r /e button to _eiect either the year, date, or _me option, Once selected, use 9 _! The tim_ is set ...
Owners Manual
Page 27
You can _so set up the Sleep Timer in the T_ menu 1. Note that thisse_ng _ c_eared when the TV is dispEayed on the screen, press the ENTER button. To check the rem_ning minutes before the TV turns off at the preset time. To c Press the TIMER button repeatedly to count down from the number of minutes you want is turned off. - De timer begins to select the number of minutes First the Off option appears on the screen_ followed by the feilowing sleep timer options: 10, 20_ 30, 60, 90_ 120, 180, and 240 minutes, 2 When the number of minutes selected, 3. Operation - The SIeep ...
You can _so set up the Sleep Timer in the T_ menu 1. Note that thisse_ng _ c_eared when the TV is dispEayed on the screen, press the ENTER button. To check the rem_ning minutes before the TV turns off at the preset time. To c Press the TIMER button repeatedly to count down from the number of minutes you want is turned off. - De timer begins to select the number of minutes First the Off option appears on the screen_ followed by the feilowing sleep timer options: 10, 20_ 30, 60, 90_ 120, 180, and 240 minutes, 2 When the number of minutes selected, 3. Operation - The SIeep ...
Owners Manual
Page 29
... that appear in - Use the CC button repeatedly to select Caption Off, or On. • You can also use :D / R button to the previous menu, Owner's Manual 29
... that appear in - Use the CC button repeatedly to select Caption Off, or On. • You can also use :D / R button to the previous menu, Owner's Manual 29


