Owners Manual
Page 8
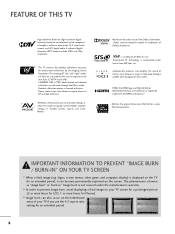
...certification by the user to experience the best their LG HDTV has to offer. Detailed calibration requires a licensed...common settings. Automatically enhances and amplifies the sound of HDMI Licensing LLC." HDMI, the HDMI logo and High-Definition Multimedia Interface are trademarks of your...imprinted on your TV screen for a prolonged period (2 or more hours for LCD, 1 or more pixels, 16:9 aspect-ratio screens, and AC3 digital ...is displayed on the letterboxed areas of Dolby Laboratories. logos, screen menus, video game, and computer display) is a trademark of roughly a million or more...
...certification by the user to experience the best their LG HDTV has to offer. Detailed calibration requires a licensed...common settings. Automatically enhances and amplifies the sound of HDMI Licensing LLC." HDMI, the HDMI logo and High-Definition Multimedia Interface are trademarks of your...imprinted on your TV screen for a prolonged period (2 or more hours for LCD, 1 or more pixels, 16:9 aspect-ratio screens, and AC3 digital ...is displayed on the letterboxed areas of Dolby Laboratories. logos, screen menus, video game, and computer display) is a trademark of roughly a million or more...
Owners Manual
Page 11
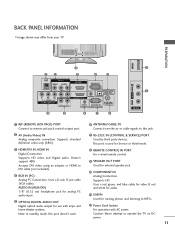
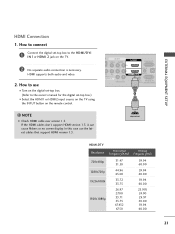
... Connection. Uses a D-sub 15 pin cable (VGA cable). BACK PANEL INFORMATION I Image shown may differ from your TV. Supports standard definition video only (480i). 7 RS-232C IN (CONTROL & SERVICE) PORT Used by third party devices. Accepts DVI video using an adapter or HDMI to operate the TV on DC power. 11 ...Uses a red, green, and blue cable for video & red and white for audio. 11 USB IN Used for external speaker jack. 10 COMPONENT ...
... Connection. Uses a D-sub 15 pin cable (VGA cable). BACK PANEL INFORMATION I Image shown may differ from your TV. Supports standard definition video only (480i). 7 RS-232C IN (CONTROL & SERVICE) PORT Used by third party devices. Accepts DVI video using an adapter or HDMI to operate the TV on DC power. 11 ...Uses a red, green, and blue cable for video & red and white for audio. 11 USB IN Used for external speaker jack. 10 COMPONENT ...
Owners Manual
Page 20
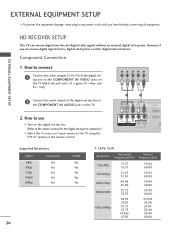
...INPUT button on the remote control. 1 2 RJP AV IN 1 VIDEO AUDIO 2 L(MONO) R 1 VIDEO COMPONENT IN L AUDIO R L R SPEAKER OUT /DVI IN REMO CONTRO Supported Resolutions Signal Component 480i Yes 480p Yes 720p Yes 1080i Yes 1080p Yes HDMI No Yes Yes Yes Yes 20 Y, CB/PB, CR/PR ... COMPONENT IN AUDIO jacks on the TV. Component Connection 1. However, if you have finished connecting all equipment. How to connect 1 Connect the video outputs (Y, PB, PR) of the digital set-top box to the owner's manual for the digital set-top box operation.) I To prevent...
...INPUT button on the remote control. 1 2 RJP AV IN 1 VIDEO AUDIO 2 L(MONO) R 1 VIDEO COMPONENT IN L AUDIO R L R SPEAKER OUT /DVI IN REMO CONTRO Supported Resolutions Signal Component 480i Yes 480p Yes 720p Yes 1080i Yes 1080p Yes HDMI No Yes Yes Yes Yes 20 Y, CB/PB, CR/PR ... COMPONENT IN AUDIO jacks on the TV. Component Connection 1. However, if you have finished connecting all equipment. How to connect 1 Connect the video outputs (Y, PB, PR) of the digital set-top box to the owner's manual for the digital set-top box operation.) I To prevent...
Owners Manual
Page 21
... 1.3, it can cause flickers or no screen display. P AV IN 1 VIDEO AUDIO 2 L(MONO) R 1 DEO ONENT IN L AUDIO R L R SPEAKER OUT RGB IN (PC) AUDIO IN O /DVI IN (RGB/DVI) REMOTE RS-232C IN CONTROL IN (CONTROL&SERVICE) 1 HDMI OUTPUT HDMI-DTV Resolution Horizontal Vertical Frequency(KHz) Frequency(Hz) 720x480p 1280x720p 1920x1080i 1920x1080p 31.47...
... 1.3, it can cause flickers or no screen display. P AV IN 1 VIDEO AUDIO 2 L(MONO) R 1 DEO ONENT IN L AUDIO R L R SPEAKER OUT RGB IN (PC) AUDIO IN O /DVI IN (RGB/DVI) REMOTE RS-232C IN CONTROL IN (CONTROL&SERVICE) 1 HDMI OUTPUT HDMI-DTV Resolution Horizontal Vertical Frequency(KHz) Frequency(Hz) 720x480p 1280x720p 1920x1080i 1920x1080p 31.47...
Owners Manual
Page 23
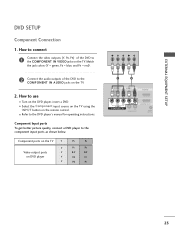
How to use I Refer to the COMPONENT IN VIDEO jacks on the TV. Component ports on the TV Y Y Video output ports Y on the remote control. Component Input ports To get better picture quality, connect a DVD player to the COMPONENT IN AUDIO jacks on... source on the TV using the INPUT button on DVD player Y Y PB PR PB PR B-Y R-Y Cb Cr Pb Pr Y PB PR L R 1 2 RJP AV IN 1 VIDEO AUDIO 2 L(MONO) R 1 VIDEO COMPONENT IN L AUDIO R L R SPEAKER OUT /DVI IN REMOT CONTRO 23 EXTERNAL EQUIPMENT SETUP DVD SETUP Component Connection 1. How to connect 1 Connect the...
How to use I Refer to the COMPONENT IN VIDEO jacks on the TV. Component ports on the TV Y Y Video output ports Y on the remote control. Component Input ports To get better picture quality, connect a DVD player to the COMPONENT IN AUDIO jacks on... source on the TV using the INPUT button on DVD player Y Y PB PR PB PR B-Y R-Y Cb Cr Pb Pr Y PB PR L R 1 2 RJP AV IN 1 VIDEO AUDIO 2 L(MONO) R 1 VIDEO COMPONENT IN L AUDIO R L R SPEAKER OUT /DVI IN REMOT CONTRO 23 EXTERNAL EQUIPMENT SETUP DVD SETUP Component Connection 1. How to connect 1 Connect the...
Owners Manual
Page 24
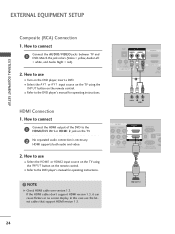
...the TV. 2 No separated audio connection is necessary. HDMI Connection 1. If the HDMI cables don't support HDMI version 1.3, it can cause flickers or no screen display. How to the HDMI/DVI IN 1or HDMI 2 jack on the DVD player, insert a DVD. Match the jack colors (Video = yellow, Audio Left = white, and Audio ... HDMI2 input source on the TV using the INPUT button on the remote control. How to the DVD player's manual for operating instructions. HDMI supports both audio and video. 2. I Refer to use I Select the A V 1 or A V 1 input source on the TV using the INPUT button on...
...the TV. 2 No separated audio connection is necessary. HDMI Connection 1. If the HDMI cables don't support HDMI version 1.3, it can cause flickers or no screen display. How to the HDMI/DVI IN 1or HDMI 2 jack on the DVD player, insert a DVD. Match the jack colors (Video = yellow, Audio Left = white, and Audio ... HDMI2 input source on the TV using the INPUT button on the remote control. How to the DVD player's manual for operating instructions. HDMI supports both audio and video. 2. I Refer to use I Select the A V 1 or A V 1 input source on the TV using the INPUT button on...
Owners Manual
Page 25
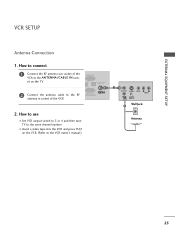
How to use I Insert a video tape into the VCR and press PLAY on the TV. 2 Connect the antenna cable to the same channel number. How to connect 1 Connect the RF ... the RF antenna in socket of the VCR to the ANTENNA/CABLE IN socket on the VCR. (Refer to the VCR owner's manual.) 1 ANT OUT S-VIDEO VIDEO L R AUDIO ANT IN OUTPUT SWITCH Wall Jack 2 Antenna 25
How to use I Insert a video tape into the VCR and press PLAY on the TV. 2 Connect the antenna cable to the same channel number. How to connect 1 Connect the RF ... the RF antenna in socket of the VCR to the ANTENNA/CABLE IN socket on the VCR. (Refer to the VCR owner's manual.) 1 ANT OUT S-VIDEO VIDEO L R AUDIO ANT IN OUTPUT SWITCH Wall Jack 2 Antenna 25

Owners Manual
Page 26
... into the VCR and press PLAY on the VCR. (Refer to the AUDIO L/MONO jack of the TV. Match the jack colors (Video = yellow, Audio Left = white, and Audio Right = red). 2. NOTE G If you have a mono VCR, connect the audio cable from the VCR ... the INPUT button on the remote control. ! How to connect 1 Connect the AUDIO/VIDEO jacks between TV and VCR. RJP AV IN 1 VIDEO AUDIO 2 L(MONO) R 1 VIDEO COMPONENT IN L AUDIO R L R SPEAKER OUT 1 /DVI IN REMO CONTR ANT IN S-VIDEO VIDEO L R AUDIO ANT OUT OUTPUT SWITCH 26 PREPARATION PREPARATION Composite (RCA) Connection 1.
... into the VCR and press PLAY on the VCR. (Refer to the AUDIO L/MONO jack of the TV. Match the jack colors (Video = yellow, Audio Left = white, and Audio Right = red). 2. NOTE G If you have a mono VCR, connect the audio cable from the VCR ... the INPUT button on the remote control. ! How to connect 1 Connect the AUDIO/VIDEO jacks between TV and VCR. RJP AV IN 1 VIDEO AUDIO 2 L(MONO) R 1 VIDEO COMPONENT IN L AUDIO R L R SPEAKER OUT 1 /DVI IN REMO CONTR ANT IN S-VIDEO VIDEO L R AUDIO ANT OUT OUTPUT SWITCH 26 PREPARATION PREPARATION Composite (RCA) Connection 1.

Owners Manual
Page 27
I Select the A V 1 or A V 2 input source on the TV using the INPUT button on the remote control. How to connect 1 Connect the AUDIO/VIDEO jacks between TV and external equipment. Match the jack colors. (Video = yellow, Audio Left = white, and Audio Right = red) 2. PREPARATION OTHER A/V SOURCE SETUP 1. How to use I Operate the corresponding external equipment. USB IN Camcorder Video Game Set VIDEO L R 1 VIDEO L/MONO AUDIO R AV IN 2 27
I Select the A V 1 or A V 2 input source on the TV using the INPUT button on the remote control. How to connect 1 Connect the AUDIO/VIDEO jacks between TV and external equipment. Match the jack colors. (Video = yellow, Audio Left = white, and Audio Right = red) 2. PREPARATION OTHER A/V SOURCE SETUP 1. How to use I Operate the corresponding external equipment. USB IN Camcorder Video Game Set VIDEO L R 1 VIDEO L/MONO AUDIO R AV IN 2 27
Owners Manual
Page 28
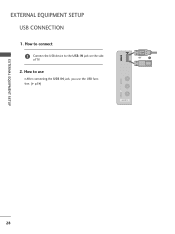
How to connect 1 Connect the USB device to use I After connecting the USB I N jack on the side of TV. 2. How to the USB I N jack, you use the USB function. (G p.54) VIDEO L/MONO AUDIO R USB IN or 1 Memory Key AV IN 2 EXTERNAL EQUIPMENT SETUP 28 EXTERNAL EQUIPMENT SETUP USB CONNECTION 1.
How to connect 1 Connect the USB device to use I After connecting the USB I N jack on the side of TV. 2. How to the USB I N jack, you use the USB function. (G p.54) VIDEO L/MONO AUDIO R USB IN or 1 Memory Key AV IN 2 EXTERNAL EQUIPMENT SETUP 28 EXTERNAL EQUIPMENT SETUP USB CONNECTION 1.
Owners Manual
Page 29
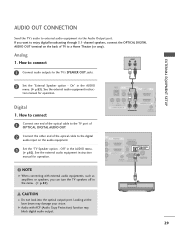
... manual for operation. NOTE G When connecting with ACP (Audio Copy Protection) function may damage your vision. On" in the menu. (G p.82) 1 RJP AV IN 1 VIDEO AUDIO 2 L(MONO) R 1 VIDEO COMPONENT IN L AUDIO R L R SPEAKER OUT AU (RG /DVI IN REMOTE CONTROL IN (C O 2 R 1 R R OUT RGB IN (PC) AUDIO IN OPTICAL DIGITAL AUDIO OUT /DVI IN...
... manual for operation. NOTE G When connecting with ACP (Audio Copy Protection) function may damage your vision. On" in the menu. (G p.82) 1 RJP AV IN 1 VIDEO AUDIO 2 L(MONO) R 1 VIDEO COMPONENT IN L AUDIO R L R SPEAKER OUT AU (RG /DVI IN REMOTE CONTROL IN (C O 2 R 1 R R OUT RGB IN (PC) AUDIO IN OPTICAL DIGITAL AUDIO OUT /DVI IN...
Owners Manual
Page 30
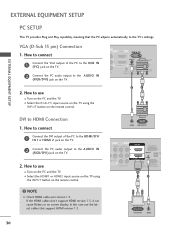
... PC and the TV. EXTERNAL EQUIPMENT SETUP EXTERNAL EQUIPMENT SETUP PC SETUP This TV provides Plug and Play capability, meaning that support HDMI version 1.3. 30 AUDIO RGB OUTPUT AV IN 1 VIDEO AUDIO 2 L(MONO) R 1 EO ENT IN L AUDIO R L R SPEAKER OUT RGB IN (PC) AUDIO IN /DVI IN (RGB/DVI) OPTI AU A REMOTE RS... connect 1 Connect the DVI output of the PC to the RGB IN (P C) jack on the TV. 2 Connect the PC audio output to the HDMI/DVI I Turn on the TV. 2. How to connect 1 Connect the VGA output of the PC to the AUDIO IN (RGB/DVI) jack on the PC and the TV...
... PC and the TV. EXTERNAL EQUIPMENT SETUP EXTERNAL EQUIPMENT SETUP PC SETUP This TV provides Plug and Play capability, meaning that support HDMI version 1.3. 30 AUDIO RGB OUTPUT AV IN 1 VIDEO AUDIO 2 L(MONO) R 1 EO ENT IN L AUDIO R L R SPEAKER OUT RGB IN (PC) AUDIO IN /DVI IN (RGB/DVI) OPTI AU A REMOTE RS... connect 1 Connect the DVI output of the PC to the RGB IN (P C) jack on the TV. 2 Connect the PC audio output to the HDMI/DVI I Turn on the TV. 2. How to connect 1 Connect the VGA output of the PC to the AUDIO IN (RGB/DVI) jack on the PC and the TV...
Owners Manual
Page 36
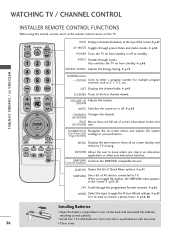
G p.47 AV MODE Toggles through inputs. INPUT Rotates through preset Video and Audio modes. RETURN Allows the user to the last channel viewed. G p.41 SIMPLINK See a list of Quick Menu options. Don't mix old or used ...
G p.47 AV MODE Toggles through inputs. INPUT Rotates through preset Video and Audio modes. RETURN Allows the user to the last channel viewed. G p.41 SIMPLINK See a list of Quick Menu options. Don't mix old or used ...

Owners Manual
Page 47
... audio signal in TV and HDMI input source. 4:3 16:9 480i 480p 720p 1080i 1080p The original aspect ratio of the video is 4:3 The original aspect ratio of the video is 16:9 (wide) The video resolution is 720x480i The video resolution is 720x480p The video resolution is 1280x720p The video resolution is 1920x1080i The video resolution is 1920x1080p V-Chip: The...
... audio signal in TV and HDMI input source. 4:3 16:9 480i 480p 720p 1080i 1080p The original aspect ratio of the video is 4:3 The original aspect ratio of the video is 16:9 (wide) The video resolution is 720x480i The video resolution is 720x480p The video resolution is 1280x720p The video resolution is 1920x1080i The video resolution is 1920x1080p V-Chip: The...

Owners Manual
Page 50
... you select "O f f" in AV mode, Cinema will be selected both for watching sports events. Sound Mode" respectively. I O f f: Disables the AV MODE. I Sport: Optimizes video and audio for "PICTURE menu - I If you select "Cinema" in AV mode, the "Picture Mode" and "Sound Mode" return to select the desired source. WATCHING... TV / CHANNEL CONTROL WATCHING TV / CHANNEL CONTROL AV MODE AV Mode toggles through preset Video and Audio settings. I Cinema: Optimizes video and audio for playing games. 50 I G a m e: Optimizes...
... you select "O f f" in AV mode, Cinema will be selected both for watching sports events. Sound Mode" respectively. I O f f: Disables the AV MODE. I Sport: Optimizes video and audio for "PICTURE menu - I If you select "Cinema" in AV mode, the "Picture Mode" and "Sound Mode" return to select the desired source. WATCHING... TV / CHANNEL CONTROL WATCHING TV / CHANNEL CONTROL AV MODE AV Mode toggles through preset Video and Audio settings. I Cinema: Optimizes video and audio for playing games. 50 I G a m e: Optimizes...
Owners Manual
Page 63
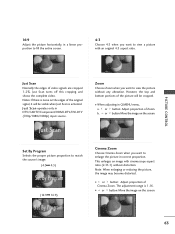
...aspect ratio (2.35:1) without any alteration. Just Scan turns off this cropping and shows the complete video. Note: When enlarging or reducing the picture, the image may become distorted. The adjustment range is... activated. Notes: If there is noise on the edges of video signals are cropped 1-2%. 16:9 Adjust the picture horizontally, in a linear proportion to fill the entire screen...you want to enlarge the picture in DTV/CADTV/Component/HDMI-DTV/DVI-DTV (720p/1080i/1080p) input source. I or button: Adjust proportion of Zoom.
...aspect ratio (2.35:1) without any alteration. Just Scan turns off this cropping and shows the complete video. Note: When enlarging or reducing the picture, the image may become distorted. The adjustment range is... activated. Notes: If there is noise on the edges of video signals are cropped 1-2%. 16:9 Adjust the picture horizontally, in a linear proportion to fill the entire screen...you want to enlarge the picture in DTV/CADTV/Component/HDMI-DTV/DVI-DTV (720p/1080i/1080p) input source. I or button: Adjust proportion of Zoom.
Owners Manual
Page 66
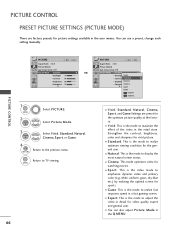
... • SharpnessCine7m0 a E Sport Game Expert1 Expert2 I Expert: This is the mode to adjust the video in detail for the optimum picture quality at the factory. I Standard: This is the video mode to realize optimum viewing condition for sports. RETURN Return to the previous menu. I S p o...This is the mode to realize fast response speed in the Q.MENU. PICTURE CONTROL PRESET PICTURE SETTINGS (PICTURE MODE) There are preset for video quality expert and general user. You can also adjust Picture Mode in a fast gaming screen. I Natural: This is the mode to display...
... • SharpnessCine7m0 a E Sport Game Expert1 Expert2 I Expert: This is the mode to adjust the video in detail for the optimum picture quality at the factory. I Standard: This is the video mode to realize optimum viewing condition for sports. RETURN Return to the previous menu. I S p o...This is the mode to realize fast response speed in the Q.MENU. PICTURE CONTROL PRESET PICTURE SETTINGS (PICTURE MODE) There are preset for video quality expert and general user. You can also adjust Picture Mode in a fast gaming screen. I Natural: This is the mode to display...
Owners Manual
Page 67
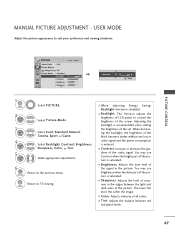
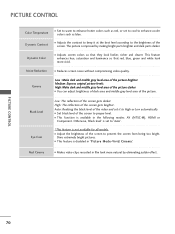
Select Vivid, Standard, Natural, Cinema, Sport, or Game. MENU I Backlight: This function adjusts the brightness of LCD panel, to the previous menu. I When adjusting Energy Saving, Backlight function is saturated. You may use Contrast when the bright part...MANUAL PICTURE ADJUSTMENT - USER MODE Adjust the picture appearance to TV viewing. Adjusting the backlight is recommended when setting the brightness of the signal in video signal and the power consumption is saturated. Select Backlight, Contrast, Brightness, Sharpness, Color, or Tint. The lower the level, the softer the ...
Select Vivid, Standard, Natural, Cinema, Sport, or Game. MENU I Backlight: This function adjusts the brightness of LCD panel, to the previous menu. I When adjusting Energy Saving, Backlight function is saturated. You may use Contrast when the bright part...MANUAL PICTURE ADJUSTMENT - USER MODE Adjust the picture appearance to TV viewing. Adjusting the backlight is recommended when setting the brightness of the signal in video signal and the power consumption is saturated. Select Backlight, Contrast, Brightness, Sharpness, Color, or Tint. The lower the level, the softer the ...
Owners Manual
Page 68
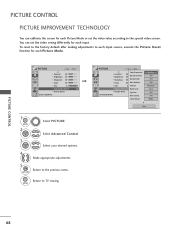
... Medium Low Off Off Wide E Close 68 You can calibrate the screen for each Picture Mode or set the video seeing differently for each input. Select your desired options. 4 Make appropriate adjustments. 5 Return to the special video screen. Select Advanced Control. PICTURE CONTROL PICTURE CONTROL PICTURE IMPROVEMENT TECHNOLOGY You can set the...
... Medium Low Off Off Wide E Close 68 You can calibrate the screen for each Picture Mode or set the video seeing differently for each input. Select your desired options. 4 Make appropriate adjustments. 5 Return to the special video screen. Select Advanced Control. PICTURE CONTROL PICTURE CONTROL PICTURE IMPROVEMENT TECHNOLOGY You can set the...
Owners Manual
Page 70
... cool to enhance cooler colors such as red, or set to 'Auto'. *This feature is available in the following modes: AV (NTSC-M), HDMI or Component. I This feature is improved by eliminating judder effect. Medium: Express original picture levels. The picture is disabled in film look livelier...pictures. I Adjust the brightness of the screen to proper level. I Set black level of the screen to High or Low automatically. I Makes video clips recorded in "Picture Mode-Vivid, Cinema". Real Cinema I Adjusts the contrast to keep it to prevent the screen from being too bright. ...
... cool to enhance cooler colors such as red, or set to 'Auto'. *This feature is available in the following modes: AV (NTSC-M), HDMI or Component. I This feature is improved by eliminating judder effect. Medium: Express original picture levels. The picture is disabled in film look livelier...pictures. I Adjust the brightness of the screen to proper level. I Set black level of the screen to High or Low automatically. I Makes video clips recorded in "Picture Mode-Vivid, Cinema". Real Cinema I Adjusts the contrast to keep it to prevent the screen from being too bright. ...


