Owners Manual
Page 2
... USER SERVICEABLE PARTS INSIDE. Reorient or relocate the receiving antenna. - Consult the dealer or an experienced radio/TV technician for compliance could void the user's authority to Article 820-40 of the following two conditions: (1) This device may cause harmful interference to correct the interference by turning the equipment off and on a circuit different from LG Electronics. The code...
... USER SERVICEABLE PARTS INSIDE. Reorient or relocate the receiving antenna. - Consult the dealer or an experienced radio/TV technician for compliance could void the user's authority to Article 820-40 of the following two conditions: (1) This device may cause harmful interference to correct the interference by turning the equipment off and on a circuit different from LG Electronics. The code...
Owners Manual
Page 4
... onto the screen with wet hands. When mounting a TV on the wall, make the TV with a three-prong grounded AC plug must remain readily operable. 19 As long as being twisted, kinked, pinched, closed in . Check the specification page of fire or electrical shock, do not place objects filled with an exact replacement part by the hanging power and signal cables on...
... onto the screen with wet hands. When mounting a TV on the wall, make the TV with a three-prong grounded AC plug must remain readily operable. 19 As long as being twisted, kinked, pinched, closed in . Check the specification page of fire or electrical shock, do not place objects filled with an exact replacement part by the hanging power and signal cables on...
Owners Manual
Page 5
... on the screen. Do not spray water or other odors coming from the TV or hear strange sounds, unplug the power cord contact an authorized service center. 25 Do not press strongly upon the panel with such power lines or circuits as death or serious injury can occur. Do not install in . Be sure the antenna system is installed, follow...
... on the screen. Do not spray water or other odors coming from the TV or hear strange sounds, unplug the power cord contact an authorized service center. 25 Do not press strongly upon the panel with such power lines or circuits as death or serious injury can occur. Do not install in . Be sure the antenna system is installed, follow...
Owners Manual
Page 6
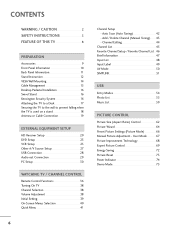
... used on a stand 18 Antenna or Cable Connection 19 EXTERNAL EQUIPMENT SETUP HD Receiver Setup 20 DVD Setup 23 VCR Setup 25 Other A/V Source Setup 27 USB Connection 28 Audio out Connection 29 PC Setup 30 WATCHING TV / CHANNEL CONTROL Remote Control Functions 36 Turning On TV 38 Channel Selection 38 Volume Adjustment 38 Initial Setting 39 On-Screen Menus Selection 40 Quick Menu 41 6 Channel Setup - Channel Editing 44 Channel List 45 Favorite Channel Setup / Favorite Channel List . . 46 Brief Information 47 Input List 48 Input Label 49 AV Mode 50 SIMPLINK 51 USB...
... used on a stand 18 Antenna or Cable Connection 19 EXTERNAL EQUIPMENT SETUP HD Receiver Setup 20 DVD Setup 23 VCR Setup 25 Other A/V Source Setup 27 USB Connection 28 Audio out Connection 29 PC Setup 30 WATCHING TV / CHANNEL CONTROL Remote Control Functions 36 Turning On TV 38 Channel Selection 38 Volume Adjustment 38 Initial Setting 39 On-Screen Menus Selection 40 Quick Menu 41 6 Channel Setup - Channel Editing 44 Channel List 45 Favorite Channel Setup / Favorite Channel List . . 46 Brief Information 47 Input List 48 Input Label 49 AV Mode 50 SIMPLINK 51 USB...

Owners Manual
Page 7
Analog Broadcasting System Captions 87 - Auto Clock Setup 90 Manual Clock Setup 91 Auto On/Off Time Setting 92 Sleep Timer Setting 93 PARENTAL CONTROL / RATINGS Set Password & Lock System 94 Channel Blocking 97 Movie & TV Rating 98 Downloadable Rating 101 External Input Blocking 102 Key Lock 103 APPENDIX Troubleshooting 104 Maintenance 106 Product Specifications 107 IR Codes 108 External Control Through RS-232C 110 Open Source License 116 7 Caption Option 89 TIME SETTING Clock Setting - User Mode 79 Balance 80 Audio Reset 81 TV Speakers On/Off...
Analog Broadcasting System Captions 87 - Auto Clock Setup 90 Manual Clock Setup 91 Auto On/Off Time Setting 92 Sleep Timer Setting 93 PARENTAL CONTROL / RATINGS Set Password & Lock System 94 Channel Blocking 97 Movie & TV Rating 98 Downloadable Rating 101 External Input Blocking 102 Key Lock 103 APPENDIX Troubleshooting 104 Maintenance 106 Product Specifications 107 IR Codes 108 External Control Through RS-232C 110 Open Source License 116 7 Caption Option 89 TIME SETTING Clock Setting - User Mode 79 Balance 80 Audio Reset 81 TV Speakers On/Off...
Owners Manual
Page 20
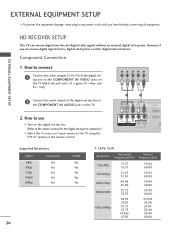
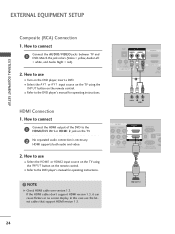
... have finished connecting all equipment. Match the jack colors (Y = green, PB = blue, and PR = red). How to connect 1 Connect the video outputs (Y, PB, PR) of the digital set-top box to the owner's manual for the digital set-top box operation.) I Select the Component input source on the TV using the INPUT button on the TV. EXTERNAL EQUIPMENT SETUP I To prevent the equipment damage, never plug in any power cords until you do receive digital signals from a digital set-top box or other digital external device.
... have finished connecting all equipment. Match the jack colors (Y = green, PB = blue, and PR = red). How to connect 1 Connect the video outputs (Y, PB, PR) of the digital set-top box to the owner's manual for the digital set-top box operation.) I Select the Component input source on the TV using the INPUT button on the TV. EXTERNAL EQUIPMENT SETUP I To prevent the equipment damage, never plug in any power cords until you do receive digital signals from a digital set-top box or other digital external device.
Owners Manual
Page 21
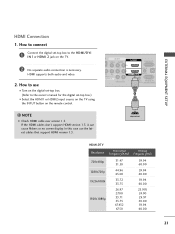
... case use I Turn on the digital set -top box.) I N 1or HDMI 2 jack on the remote control. ! EXTERNAL EQUIPMENT SETUP HDMI Connection 1. If the HDMI cables don't support HDMI version 1.3, it can cause flickers or no screen display. How to connect 1 Connect the digital set-top box to the owner's manual for the digital set -top box. (Refer to the HDMI/DVI I Select the HDMI1 or HDMI2 input source on the TV using the INPUT button on the TV. 2 No separate audio connection is necessary. HDMI supports both audio and video...
... case use I Turn on the digital set -top box.) I N 1or HDMI 2 jack on the remote control. ! EXTERNAL EQUIPMENT SETUP HDMI Connection 1. If the HDMI cables don't support HDMI version 1.3, it can cause flickers or no screen display. How to connect 1 Connect the digital set-top box to the owner's manual for the digital set -top box. (Refer to the HDMI/DVI I Select the HDMI1 or HDMI2 input source on the TV using the INPUT button on the TV. 2 No separate audio connection is necessary. HDMI supports both audio and video...
Owners Manual
Page 22
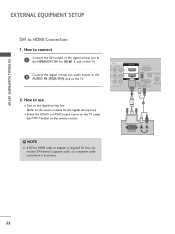
... TV using the INPUT button on the TV. 2. NOTE G A DVI to the AUDIO IN (RGB/DVI) jack on the remote control. AV IN 1 O AUDIO 2 L(MONO) R 1 L AUDIO R L R SPEAKER OUT RGB IN (PC) AUDIO IN /DVI IN (RGB/DVI) OPTICAL DIGIT AUDIO OUT REMOTE RS-232C IN ACNATBELNENIAN CONTROL IN (CONTROL&SERVICE) 1 2 ! DVI doesn't support audio, so a separate audio connection is required for the digital set -top box audio output to HDMI cable or adapter is necessary. DVI OUTPUT L R AUDIO 22 How to connect 1 Connect...
... TV using the INPUT button on the TV. 2. NOTE G A DVI to the AUDIO IN (RGB/DVI) jack on the remote control. AV IN 1 O AUDIO 2 L(MONO) R 1 L AUDIO R L R SPEAKER OUT RGB IN (PC) AUDIO IN /DVI IN (RGB/DVI) OPTICAL DIGIT AUDIO OUT REMOTE RS-232C IN ACNATBELNENIAN CONTROL IN (CONTROL&SERVICE) 1 2 ! DVI doesn't support audio, so a separate audio connection is required for the digital set -top box audio output to HDMI cable or adapter is necessary. DVI OUTPUT L R AUDIO 22 How to connect 1 Connect...
Owners Manual
Page 24
...L(MONO) R 1 VIDEO COMPONENT IN L AUDIO R L R SPEAKER OUT 1 /DVI IN REMOTE CONTROL VIDEO L R AUDIO AV IN 1 VIDEO AUDIO 2 L(MONO) R 1 L AUDIO R IN L R SPEAKER OUT RGB IN (PC) AUDIO IN /DVI IN (RGB/DVI) OPTICAL AUDIO REMOTE RS-232C IN ACNATB CONTROL IN (CONTROL&SERVICE) 1 ! NOTE G Check HDMI cable over version 1.3. HDMI OUTPUT 24 How to connect 1 Connect the HDMI output of the DVD to the DVD player's manual for operating instructions. HDMI supports both audio and video. 2. I Select the A V 1 or A V 1 input source on the TV using the INPUT button on...
...L(MONO) R 1 VIDEO COMPONENT IN L AUDIO R L R SPEAKER OUT 1 /DVI IN REMOTE CONTROL VIDEO L R AUDIO AV IN 1 VIDEO AUDIO 2 L(MONO) R 1 L AUDIO R IN L R SPEAKER OUT RGB IN (PC) AUDIO IN /DVI IN (RGB/DVI) OPTICAL AUDIO REMOTE RS-232C IN ACNATB CONTROL IN (CONTROL&SERVICE) 1 ! NOTE G Check HDMI cable over version 1.3. HDMI OUTPUT 24 How to connect 1 Connect the HDMI output of the DVD to the DVD player's manual for operating instructions. HDMI supports both audio and video. 2. I Select the A V 1 or A V 1 input source on the TV using the INPUT button on...
Owners Manual
Page 29
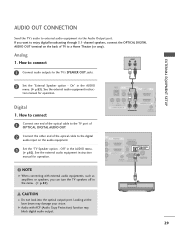
... the optical cable to the digital audio input on the back of TV to enjoy digital broadcasting through 5.1-channel speakers, connect the OPTICAL DIGITAL AUDIO OUT terminal on the audio equipment. 3 Set the "TV Speaker option - How to connect L R 1 Connect audio outputs to external audio equipment via the Audio Output port. Off " in the AUDIO menu. (G p.82). tion manual for operation. ! Digital 1. EXTERNAL EQUIPMENT SETUP AUDIO OUT CONNECTION Send the TV's audio to the TV's SPEAKER OUT jacks. 2 Set the "External Speaker option - If you can turn the TV speakers...
... the optical cable to the digital audio input on the back of TV to enjoy digital broadcasting through 5.1-channel speakers, connect the OPTICAL DIGITAL AUDIO OUT terminal on the audio equipment. 3 Set the "TV Speaker option - How to connect L R 1 Connect audio outputs to external audio equipment via the Audio Output port. Off " in the AUDIO menu. (G p.82). tion manual for operation. ! Digital 1. EXTERNAL EQUIPMENT SETUP AUDIO OUT CONNECTION Send the TV's audio to the TV's SPEAKER OUT jacks. 2 Set the "External Speaker option - If you can turn the TV speakers...
Owners Manual
Page 30
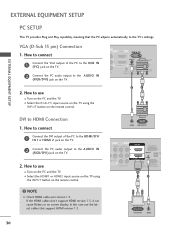
... using the INPUT button on the PC and the TV. I Turn on the remote control. ! I Turn on the remote control. 2 1 DVI to the AUDIO IN (RGB/DVI) jack on the TV. 2 R 1 R R UT RGB IN (PC) AUDIO IN /DVI IN (RGB/DVI) OPTICAL DIGITAL AUDIO OUT REMOTE RS-232C IN ANTENNA/ CABLE IN CONTROL IN (CONTROL&SERVICE) 2. How to the TV's settings. EXTERNAL EQUIPMENT SETUP EXTERNAL EQUIPMENT SETUP PC SETUP This TV provides Plug and Play capability, meaning that support HDMI...
... using the INPUT button on the PC and the TV. I Turn on the remote control. ! I Turn on the remote control. 2 1 DVI to the AUDIO IN (RGB/DVI) jack on the TV. 2 R 1 R R UT RGB IN (PC) AUDIO IN /DVI IN (RGB/DVI) OPTICAL DIGITAL AUDIO OUT REMOTE RS-232C IN ANTENNA/ CABLE IN CONTROL IN (CONTROL&SERVICE) 2. How to the TV's settings. EXTERNAL EQUIPMENT SETUP EXTERNAL EQUIPMENT SETUP PC SETUP This TV provides Plug and Play capability, meaning that support HDMI...
Owners Manual
Page 36
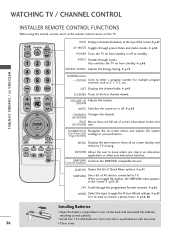
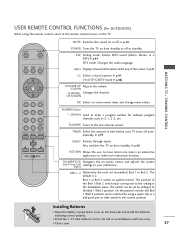
... -screen displays and return to apply the Picture Wizard settings. LIST Displays the channel table. UP/DOWN PAGE Moves from one full set of the screen. MENU Displays the main menu or clears all on from standby or off . G p.46 MARK Select the input to TV viewing. RETURN Allows the user to standby. G p.41 SIMPLINK See a list of Quick Menu options. G p.65 Use to the last channel viewed. G p.47 AV MODE Toggles through preset Video and Audio modes...
... -screen displays and return to apply the Picture Wizard settings. LIST Displays the channel table. UP/DOWN PAGE Moves from one full set of the screen. MENU Displays the main menu or clears all on from standby or off . G p.46 MARK Select the input to TV viewing. RETURN Allows the user to standby. G p.41 SIMPLINK See a list of Quick Menu options. G p.65 Use to the last channel viewed. G p.47 AV MODE Toggles through preset Video and Audio modes...
Owners Manual
Page 37
... through inputs. BED1, 2 Determines the code set by using the remote control, aim it to move return one step in the Installation menu. G p.47 CC Select a closed caption. NUMBER button - (DASH) Used to the correct position. TIMER Select the amount of time before your preference. THUMBSTICK Navigates the on the TV. I Install two 1.5V AAA batteries. SAP Analog mode: Selects MTS sound (Mono, Stereo, or a SAP) G p.84 DTV mode: Changes the audio...
... through inputs. BED1, 2 Determines the code set by using the remote control, aim it to move return one step in the Installation menu. G p.47 CC Select a closed caption. NUMBER button - (DASH) Used to the correct position. TIMER Select the amount of time before your preference. THUMBSTICK Navigates the on the TV. I Install two 1.5V AAA batteries. SAP Analog mode: Selects MTS sound (Mono, Stereo, or a SAP) G p.84 DTV mode: Changes the audio...

Owners Manual
Page 47
... more audio services. Use the Q.MENU menu to TV viewing. BRIEF INFORMATION Brief Info shows the present screen information. 1 INFO i Show the Brief Info on the screen. 2 Return to select wanted Closed caption. RETURN WATCHING TV / CHANNEL CONTROL 7 DOLBY DIGITAL CNN 1 2 3 4 5 6 Brief Info Title Test.. D Dolby Digital: The program contains a Dolby Digital audio signal in TV and HDMI input source. 4:3 16:9 480i 480p 720p 1080i 1080p The original aspect ratio of the video...
... more audio services. Use the Q.MENU menu to TV viewing. BRIEF INFORMATION Brief Info shows the present screen information. 1 INFO i Show the Brief Info on the screen. 2 Return to select wanted Closed caption. RETURN WATCHING TV / CHANNEL CONTROL 7 DOLBY DIGITAL CNN 1 2 3 4 5 6 Brief Info Title Test.. D Dolby Digital: The program contains a Dolby Digital audio signal in TV and HDMI input source. 4:3 16:9 480i 480p 720p 1080i 1080p The original aspect ratio of the video...
Owners Manual
Page 51
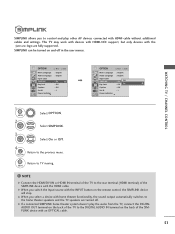
... TV viewing. MENU ! G When you select a device with HDMI cable without additional cables and settings. G When you switch the Input source with the HDMI cable. This TV may work with devices with HDMI-CEC support, but only devices with an OPTICAL cable. 51 NOTE G Connect the HDMI/DVI IN or HDMI IN terminal of the TV to the rear terminal (HDMI terminal) of the SIMPLINK device with the logo are turned off...
... TV viewing. MENU ! G When you select a device with HDMI cable without additional cables and settings. G When you switch the Input source with the HDMI cable. This TV may work with devices with HDMI-CEC support, but only devices with an OPTICAL cable. 51 NOTE G Connect the HDMI/DVI IN or HDMI IN terminal of the TV to the rear terminal (HDMI terminal) of the SIMPLINK device with the logo are turned off...

Owners Manual
Page 94
...-General Downloadable Rating Input Block Enter Password **** Close PARENTAL CONTROL / RATING 1 MENU ENTER Select L O C K. 21 2 3 456 789 0 Input the password. 94 I TV-Y7 (Children 7 years older) SET PASSWORD & LOCK SYSTEM Setting up Your Password Set up with the initial password "0-0-0-0". Set ratings and categories to be used to block specific channels, ratings, and external viewing sources. I The TV is set up blocking schemes to block program viewing based on the ratings sent by broadcasting stations. Specify a password 3. PARENTAL CONTROL / RATINGS Parental Control...
...-General Downloadable Rating Input Block Enter Password **** Close PARENTAL CONTROL / RATING 1 MENU ENTER Select L O C K. 21 2 3 456 789 0 Input the password. 94 I TV-Y7 (Children 7 years older) SET PASSWORD & LOCK SYSTEM Setting up Your Password Set up with the initial password "0-0-0-0". Set ratings and categories to be used to block specific channels, ratings, and external viewing sources. I The TV is set up blocking schemes to block program viewing based on the ratings sent by broadcasting stations. Specify a password 3. PARENTAL CONTROL / RATINGS Parental Control...
Owners Manual
Page 104
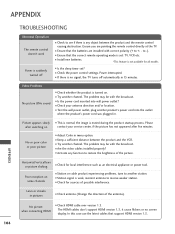
... remote control causing obstruction. I Ensure that the correct remote operating mode is no screen display. Please after five minutes. I Adjust Color in menu option. Lines or streaks in pictures I Check the power control settings. APPENDIX APPENDIX 104 TROUBLESHOOTING Abnormal Operation The remote control doesn't work Power is suddenly turned off automatically in 15 minutes. I Check your service center, if the picture has not appeared after switching on some channels I Is the sleep timer set : TV, VCR etc. I Check antenna (Change...
... remote control causing obstruction. I Ensure that the correct remote operating mode is no screen display. Please after five minutes. I Adjust Color in menu option. Lines or streaks in pictures I Check the power control settings. APPENDIX APPENDIX 104 TROUBLESHOOTING Abnormal Operation The remote control doesn't work Power is suddenly turned off automatically in 15 minutes. I Check your service center, if the picture has not appeared after switching on some channels I Is the sleep timer set : TV, VCR etc. I Check antenna (Change...

Owners Manual
Page 105
... video card. The problem may result in menu option. No sound when connecting HDMI/USB I Check USB cable over version 1.3. or single color I Press the VOL or VOLUME button. Press MUTE button. I Try another channel. I Check HDMI cable over version 2.0. The signal is no audio. I Adjust resolution, horizontal frequency, or vertical frequency on or off and does not indicate a fault with the broadcast. APPENDIX 105 PC Mode Problems I Check the manual for all models...
... video card. The problem may result in menu option. No sound when connecting HDMI/USB I Check USB cable over version 1.3. or single color I Press the VOL or VOLUME button. Press MUTE button. I Try another channel. I Check HDMI cable over version 2.0. The signal is no audio. I Adjust resolution, horizontal frequency, or vertical frequency on or off and does not indicate a fault with the broadcast. APPENDIX 105 PC Mode Problems I Check the manual for all models...
Owners Manual
Page 107
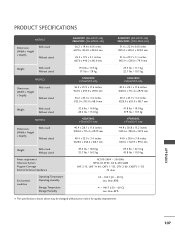
....0 kg 42LH300C (42LH300C-UA) 40.4 x 28.1 x 11.6 inches 1028.0 x 715.4 x 297.0 mm 40.4 x 25.9 x 3.4 inches 1028.0 x 658.6 x 88.7 mm 41.8 lbs / 19.0 kg 37.9 lbs / 17.2 kg 47LH300C (47LH300C-UA) 44.9 x 30.8 x 13.2 inches 1140.6 x 784.8 x 337.4 mm 44.9 x 28.4 x 3.8 inches 1140.6 x 722.9 x 99.0 mm Weight With stand Without stand Power requirement Television System Program Coverage External Antenna Impedance Environment condition Operating Temperature Operating Humidity Storage...
....0 kg 42LH300C (42LH300C-UA) 40.4 x 28.1 x 11.6 inches 1028.0 x 715.4 x 297.0 mm 40.4 x 25.9 x 3.4 inches 1028.0 x 658.6 x 88.7 mm 41.8 lbs / 19.0 kg 37.9 lbs / 17.2 kg 47LH300C (47LH300C-UA) 44.9 x 30.8 x 13.2 inches 1140.6 x 784.8 x 337.4 mm 44.9 x 28.4 x 3.8 inches 1140.6 x 722.9 x 99.0 mm Weight With stand Without stand Power requirement Television System Program Coverage External Antenna Impedance Environment condition Operating Temperature Operating Humidity Storage...
Owners Manual
Page 112
... is 0 x ab, it will not send the status during the standby mode. Aspect Ratio k 04. Remote Control Lock Mode k a 00 ~ 01 14. Channel Add/Del m h 00 ~ 64 22. When selecting Set ID '0', every connected the TV is 1~ 99. Data1: Illegal Code Data2: Not supported function Data3: Wait more time * In this format when receiving normal data. Tint k 11. Sharpness k 12. Balance k d (G p.113) 17. Backlight...
... is 0 x ab, it will not send the status during the standby mode. Aspect Ratio k 04. Remote Control Lock Mode k a 00 ~ 01 14. Channel Add/Del m h 00 ~ 64 22. When selecting Set ID '0', every connected the TV is 1~ 99. Data1: Illegal Code Data2: Not supported function Data3: Wait more time * In this format when receiving normal data. Tint k 11. Sharpness k 12. Balance k d (G p.113) 17. Backlight...


