Owner's Manual
Page 6
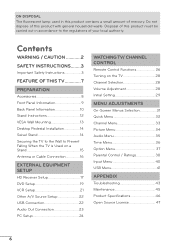
... 17 DVD Setup 19 VCR Setup 21 Other A/V Source Setup 22 USB Connection 22 Audio Out Connection 23 PC Setup 24 WATCHING TV/ CHANNEL CONTROL Remote Control Functions 26 Turning on the TV 28 Channel Selection 28 Volume Adjustment 28 Initial Setting 29 MENU ADJUSTMENTS On-Screen Menus Selection 31 Quick...
... 17 DVD Setup 19 VCR Setup 21 Other A/V Source Setup 22 USB Connection 22 Audio Out Connection 23 PC Setup 24 WATCHING TV/ CHANNEL CONTROL Remote Control Functions 26 Turning on the TV 28 Channel Selection 28 Volume Adjustment 28 Initial Setting 29 MENU ADJUSTMENTS On-Screen Menus Selection 31 Quick...
Owner's Manual
Page 8
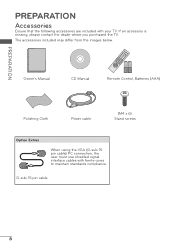
D-sub 15 pin cable 8 Owner's Manual CD Manual 1.5V 1.5V Remote Control, Batteries (AAA) Polishing Cloth Power cable (M4 x 6) Stand screws Option Extras When using the VGA (D-sub 15 pin cable) PC connection, the user must use shielded signal interface cables with your TV. PREPARATION PREPARATION Accessories Ensure that the following accessories are included with ferrite cores to maintain standards compliance. The accessories included may differ from the images below. If an accessory is missing, please contact the dealer where you purchased the TV.
D-sub 15 pin cable 8 Owner's Manual CD Manual 1.5V 1.5V Remote Control, Batteries (AAA) Polishing Cloth Power cable (M4 x 6) Stand screws Option Extras When using the VGA (D-sub 15 pin cable) PC connection, the user must use shielded signal interface cables with your TV. PREPARATION PREPARATION Accessories Ensure that the following accessories are included with ferrite cores to maintain standards compliance. The accessories included may differ from the images below. If an accessory is missing, please contact the dealer where you purchased the TV.
Owner's Manual
Page 9
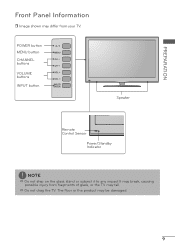
POWER button MENU button CHANNEL buttons VOLUME buttons INPUT button Speaker Remote Control Sensor Power/Standby Indicator NOTE a Do not step on the glass stand or subject it to any impact.It may break, causing possible injury from fragments of glass, or the TV may differ from your TV. PREPARATION Front Panel Information r Image shown may fall. a Do not drag the TV. The floor or the product may be damaged. 9
POWER button MENU button CHANNEL buttons VOLUME buttons INPUT button Speaker Remote Control Sensor Power/Standby Indicator NOTE a Do not step on the glass stand or subject it to any impact.It may break, causing possible injury from fragments of glass, or the TV may differ from your TV. PREPARATION Front Panel Information r Image shown may fall. a Do not drag the TV. The floor or the product may be damaged. 9

Owner's Manual
Page 17
.../digital cable signals without an external digital set -top box operation.) r Select the Component input source on the TV using the INPUT button on the remote control. Match the jack colors (Y = green, PB = blue, and PR = red). Y, CB/PB, CR/PR Resolution 720x480i 720x480p 1280x720p 1920x1080i 1920x1080p Horizontal Frequency(kHz) 15...
.../digital cable signals without an external digital set -top box operation.) r Select the Component input source on the TV using the INPUT button on the remote control. Match the jack colors (Y = green, PB = blue, and PR = red). Y, CB/PB, CR/PR Resolution 720x480i 720x480p 1280x720p 1920x1080i 1920x1080p Horizontal Frequency(kHz) 15...

Owner's Manual
Page 18
How to connect 1 Connect the digital set-top box to HDMI/DVI IN 1, 2, or 3* jack on the remote control. * HDMI 3: For 47LD500 / DVI IN RGB IN RGB (PC) AUDIO 1 AV IN VIDEO AUDIO ANTENNA/ CABLE IN OPTICAL DIGITAL AUDIO OUT COMPONENT IN 2 DVI ...
How to connect 1 Connect the digital set-top box to HDMI/DVI IN 1, 2, or 3* jack on the remote control. * HDMI 3: For 47LD500 / DVI IN RGB IN RGB (PC) AUDIO 1 AV IN VIDEO AUDIO ANTENNA/ CABLE IN OPTICAL DIGITAL AUDIO OUT COMPONENT IN 2 DVI ...

Owner's Manual
Page 19
How to use DVI AUDIO Y PB PR VIDEO AUDIO AUDIO OUT r Turn on the remote control. How to the COMPONENT IN AUDIO jack on the TV. 2. How to connect 1 Connect the digital set-top box to HDMI/DVI IN 1 or 2 ... on the digital set-top box. (Refer to the owner's manual for the digital set -top box to the COMPONENT IN VIDEO jack on the remote control. / DVI IN RGB IN RGB (PC) AUDIO 1 AV IN VIDEO AUDIO ANTENNA/ CABLE IN OPTICAL DIGITAL AUDIO OUT COMPONENT IN 2 DVI AUDIO Y PB PR...
How to use DVI AUDIO Y PB PR VIDEO AUDIO AUDIO OUT r Turn on the remote control. How to the COMPONENT IN AUDIO jack on the TV. 2. How to connect 1 Connect the digital set-top box to HDMI/DVI IN 1 or 2 ... on the digital set-top box. (Refer to the owner's manual for the digital set -top box to the COMPONENT IN VIDEO jack on the remote control. / DVI IN RGB IN RGB (PC) AUDIO 1 AV IN VIDEO AUDIO ANTENNA/ CABLE IN OPTICAL DIGITAL AUDIO OUT COMPONENT IN 2 DVI AUDIO Y PB PR...
Owner's Manual
Page 20
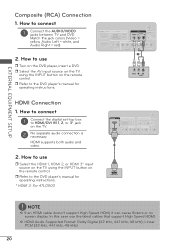
... TV using the INPUT button on the DVD player, insert a DVD. How to connect 1 Connect the digital set-top box to use r Turn on the remote control. In this case use r Select the HDMI 1, HDMI 2, or HDMI 3* input source on the TV using the INPUT button on the TV. 2 No... OUT COMPONENT IN 2 DVI AUDIO Y PB PR VIDEO AUDIO AUDIO OUT 1 VIDEO L R AUDIO HDMI Connection 1. How to HDMI/DVI IN 1, 2, or 3* jack on the remote control. How to the DVD player's manual for operating instructions. * HDMI 3: For 47LD500 / DVI IN RGB IN RGB (PC) AUDIO 1 AV IN VIDEO AUDIO ANTENNA...
... TV using the INPUT button on the DVD player, insert a DVD. How to connect 1 Connect the digital set-top box to use r Turn on the remote control. In this case use r Select the HDMI 1, HDMI 2, or HDMI 3* input source on the TV using the INPUT button on the TV. 2 No... OUT COMPONENT IN 2 DVI AUDIO Y PB PR VIDEO AUDIO AUDIO OUT 1 VIDEO L R AUDIO HDMI Connection 1. How to HDMI/DVI IN 1, 2, or 3* jack on the remote control. How to the DVD player's manual for operating instructions. * HDMI 3: For 47LD500 / DVI IN RGB IN RGB (PC) AUDIO 1 AV IN VIDEO AUDIO ANTENNA...

Owner's Manual
Page 21
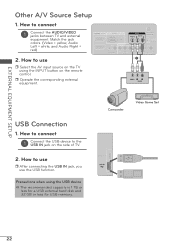
... press PLAY on the VCR. (Refer to the VCR owner's manual.) r Select the AV input source on the TV using the INPUT button on the remote control. / DVI IN RGB IN RGB (PC) AUDIO 1 AV IN VIDEO AUDIO ANTENNA/ CABLE IN OPTICAL DIGITAL AUDIO OUT COMPONENT IN 2 DVI AUDIO Y PB PR...
... press PLAY on the VCR. (Refer to the VCR owner's manual.) r Select the AV input source on the TV using the INPUT button on the remote control. / DVI IN RGB IN RGB (PC) AUDIO 1 AV IN VIDEO AUDIO ANTENNA/ CABLE IN OPTICAL DIGITAL AUDIO OUT COMPONENT IN 2 DVI AUDIO Y PB PR...
Owner's Manual
Page 22
... AUDIO AUDIO OUT 1 VIDEO L R AUDIO USB Connection 1. How to use r After connecting the USB IN jack, you use r Select the AV input source on the remote control. How to use the USB function. Precautions when using the INPUT button on the TV using the USB device a The recommended capacity is 1 TB...
... AUDIO AUDIO OUT 1 VIDEO L R AUDIO USB Connection 1. How to use r After connecting the USB IN jack, you use r Select the AV input source on the remote control. How to use the USB function. Precautions when using the INPUT button on the TV using the USB device a The recommended capacity is 1 TB...
Owner's Manual
Page 24
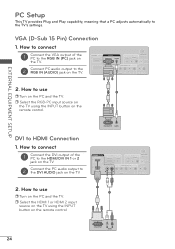
... EQUIPMENT SETUP PC Setup This TV provides Plug and Play capability, meaning that a PC adjusts automatically to HDMI Connection 1. How to use r Turn on the remote control. 1 2 24 DVI OUTPUT L R AUDIO RGB OUTPUT AUDIO / DVI IN RGB IN RGB (PC) AUDIO 1 AV IN VIDEO AUDIO ANTENNA/ CABLE IN OPTICAL DIGITAL AUDIO... the HDMI 1 or HDMI 2 input source on the TV using the INPUT button on the PC and the TV. How to use r Turn on the remote control. 1 2 DVI to the TV's settings.
... EQUIPMENT SETUP PC Setup This TV provides Plug and Play capability, meaning that a PC adjusts automatically to HDMI Connection 1. How to use r Turn on the remote control. 1 2 24 DVI OUTPUT L R AUDIO RGB OUTPUT AUDIO / DVI IN RGB IN RGB (PC) AUDIO 1 AV IN VIDEO AUDIO ANTENNA/ CABLE IN OPTICAL DIGITAL AUDIO... the HDMI 1 or HDMI 2 input source on the TV using the INPUT button on the PC and the TV. How to use r Turn on the remote control. 1 2 DVI to the TV's settings.

Owner's Manual
Page 26
WATCHING TV/ CHANNEL CONTROL Remote Control Functions When using the remote control, aim it at the remote control sensor on from the images below. The remote control may differ from standby or off to standby. POWER TV INPUT 1 PICTURE SOUND SAP RATIO 123 456 2 789 - 0 FLASHBK FAV VOL CC CH 3 MUTE Q....
WATCHING TV/ CHANNEL CONTROL Remote Control Functions When using the remote control, aim it at the remote control sensor on from the images below. The remote control may differ from standby or off to standby. POWER TV INPUT 1 PICTURE SOUND SAP RATIO 123 456 2 789 - 0 FLASHBK FAV VOL CC CH 3 MUTE Q....

Owner's Manual
Page 28
NOTE a If you want to be away on the remote control. Channel Selection 1 Press the CHANNEL or NUMBER buttons to standby mode. At this moment, the TV switches to select a channel number. The TV reverts .... 2 If you intend to switch the sound off, press the MUTE button. 3 You can cancel the Mute function by using the INPUT button on the remote control. 3 When finished using the TV, press press the POWER button on vacation, disconnect the power plug from the wall power outlet. a In standby mode...
NOTE a If you want to be away on the remote control. Channel Selection 1 Press the CHANNEL or NUMBER buttons to standby mode. At this moment, the TV switches to select a channel number. The TV reverts .... 2 If you intend to switch the sound off, press the MUTE button. 3 You can cancel the Mute function by using the INPUT button on the remote control. 3 When finished using the TV, press press the POWER button on vacation, disconnect the power plug from the wall power outlet. a In standby mode...
Owner's Manual
Page 34
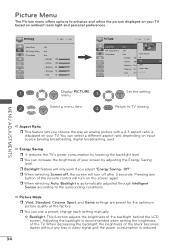
... to TV viewing. a Energy Saving r It reduces the TV's power consumption by adjusting the Energy Saving level. a Backlight: This function adjusts the brightness of the remote control will only work if you choose the way an analog picture with a 4:3 aspect ratio is reduced. 34
... to TV viewing. a Energy Saving r It reduces the TV's power consumption by adjusting the Energy Saving level. a Backlight: This function adjusts the brightness of the remote control will only work if you choose the way an analog picture with a 4:3 aspect ratio is reduced. 34
Owner's Manual
Page 43
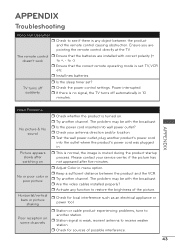
... inserted into the outlet where the product's power cord was plugged in menu option. r Keep a sufficient distance between the product and the remote control causing obstruction. Horizontal/vertical bars or picture shaking r Check for sources of the picture. r Check for local interference such as an... to see if there is turned on. to another product's power cord into wall power outlet? r Ensure that the batteries are pointing the remote control directly at the TV. r If there is set ? r Test the wall power outlet, plug another station. Picture appears slowly after five...
... inserted into the outlet where the product's power cord was plugged in menu option. r Keep a sufficient distance between the product and the remote control causing obstruction. Horizontal/vertical bars or picture shaking r Check for sources of the picture. r Check for local interference such as an... to see if there is turned on. to another product's power cord into wall power outlet? r Ensure that the batteries are pointing the remote control directly at the TV. r If there is set ? r Test the wall power outlet, plug another station. Picture appears slowly after five...
Specification
Page 2
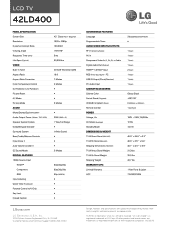
...8226; Parental Control w/V-Chip • Key Lock • Closed Caption • LGusa.com LG Electronics U.S.A., Inc. 1000 Sylvan Avenue Englewood Cliffs, NJ 07632 Customer Service and Technical Support: ...) 1 (rear) HDMI™ 1.3/HDCP Input 2 (rear) RGB In (D-Sub 15pin) - LCD TV 42LD400 PANEL SPECIFICATION Screen Size 42" Class (42.0" diagonal) Resolution 1920 x 1080p Dynamic Contrast Ratio 100,000:1 Viewing...) • (200mm x 200mm) Remote Control 1 (Unified) Power Voltage, Hz 100V ~ 240V, 50/60Hz On Mode (Average) 115W Standby Mode
...8226; Parental Control w/V-Chip • Key Lock • Closed Caption • LGusa.com LG Electronics U.S.A., Inc. 1000 Sylvan Avenue Englewood Cliffs, NJ 07632 Customer Service and Technical Support: ...) 1 (rear) HDMI™ 1.3/HDCP Input 2 (rear) RGB In (D-Sub 15pin) - LCD TV 42LD400 PANEL SPECIFICATION Screen Size 42" Class (42.0" diagonal) Resolution 1920 x 1080p Dynamic Contrast Ratio 100,000:1 Viewing...) • (200mm x 200mm) Remote Control 1 (Unified) Power Voltage, Hz 100V ~ 240V, 50/60Hz On Mode (Average) 115W Standby Mode


