
User Manual
Page 1
Record model number and serial number of the set . www.lgcommercial.com See the label attached on the back cover and quote this manual carefully before operating your dealer when you require service. Retain it for future reference. LCD TV PLASMA TV OWNER'S MANUAL LCD TV MODELS PLASMA TV MODEL 32LC5DC 32LC50C 42PX8DC 32LC5DCS 32LC50CS 42PG65C 32LC5DCB 32LC50CB 42PG60C 37LC5DC 32LX50C 37LC5DCB 32LX50CS 37LC5DC1 37LC50C 42LC5DC 37LC50CB 32LX5DC 42LB50C 32LX5DCS 42LC50C 42LB5DC Please read this information to your set .
Record model number and serial number of the set . www.lgcommercial.com See the label attached on the back cover and quote this manual carefully before operating your dealer when you require service. Retain it for future reference. LCD TV PLASMA TV OWNER'S MANUAL LCD TV MODELS PLASMA TV MODEL 32LC5DC 32LC50C 42PX8DC 32LC5DCS 32LC50CS 42PG65C 32LC5DCB 32LC50CB 42PG60C 37LC5DC 32LX50C 37LC5DCB 32LX50CS 37LC5DC1 37LC50C 42LC5DC 37LC50CB 32LX5DC 42LB50C 32LX5DCS 42LC50C 42LB5DC Please read this information to your set .

User Manual
Page 5
... this could result in electric shock or fire. on the power cord to unplug the TV. 15 WARNING - Check the specification page of this owner's manual to be placed upon . that is, a single outlet circuit which powers only that you connect the earth ground wire to prevent possible electric shock. (i.e. Do...
... this could result in electric shock or fire. on the power cord to unplug the TV. 15 WARNING - Check the specification page of this owner's manual to be placed upon . that is, a single outlet circuit which powers only that you connect the earth ground wire to prevent possible electric shock. (i.e. Do...
User Manual
Page 7
...On/Off Timer Setting 67 Auto Shut-off Setting 68 Sleep Timer Setting 69 SCREEN ADJUSTMENT Auto Configure (RGB(PC) Mode only 70 Manual Configure 71 Selecting XGA Mode 72 Initializing (Reset to a Desk 17 Stand Installation 18 VESA Wall Mounting 19 Desktop Pedestal Installation 19... Remote Control Functions 32 Turning On TV 34 Channel Selection 34 Volume Adjustment 34 On-Screen Menus Selection 35 Channel Setup 36 - Preset 46 Manual Picture Adjustment - Black (Darkness) Level 51 Picture Reset 52 Low-Power Picture Mode 52 Image Sticking Minimization( ISM) Method 53 SOUND &...
...On/Off Timer Setting 67 Auto Shut-off Setting 68 Sleep Timer Setting 69 SCREEN ADJUSTMENT Auto Configure (RGB(PC) Mode only 70 Manual Configure 71 Selecting XGA Mode 72 Initializing (Reset to a Desk 17 Stand Installation 18 VESA Wall Mounting 19 Desktop Pedestal Installation 19... Remote Control Functions 32 Turning On TV 34 Channel Selection 34 Volume Adjustment 34 On-Screen Menus Selection 35 Channel Setup 36 - Preset 46 Manual Picture Adjustment - Black (Darkness) Level 51 Picture Reset 52 Low-Power Picture Mode 52 Image Sticking Minimization( ISM) Method 53 SOUND &...

User Manual
Page 8
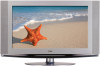
However, they have no adverse effect on the screen. LCD TV PLASMA TV Owner's Manual http://www.lgusa.com www.lg.ca Copyright© 2007 LGE, All Rights Reserved. PREPARATION ACCESSORIES Ensure that excessive pressure for the product exteri- or...+ PIP SWAP SAP PIP INPUT 9 FLASHBK VOL TIMER MUTE 1 4 2 7 5 3 8 6 CH PAGE 0 9 BAFCLKASH 1.5V 1.5V Owner's Manual, Setup & Operation Guide for Commercial Mode CD Manual Remote Control, Batteries Power Cord * Slightly wipe stained spot on the exterior only with the polishing cloth for all models. FEATURES OF...
However, they have no adverse effect on the screen. LCD TV PLASMA TV Owner's Manual http://www.lgusa.com www.lg.ca Copyright© 2007 LGE, All Rights Reserved. PREPARATION ACCESSORIES Ensure that excessive pressure for the product exteri- or...+ PIP SWAP SAP PIP INPUT 9 FLASHBK VOL TIMER MUTE 1 4 2 7 5 3 8 6 CH PAGE 0 9 BAFCLKASH 1.5V 1.5V Owner's Manual, Setup & Operation Guide for Commercial Mode CD Manual Remote Control, Batteries Power Cord * Slightly wipe stained spot on the exterior only with the polishing cloth for all models. FEATURES OF...
User Manual
Page 23
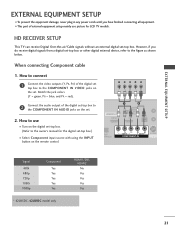
... plug in any power cords until you do receive digital signals from a digital set-top box or other digital external device, refer to the owner's manual for LCD TV models. HD RECEIVER SETUP This TV can receive Digital Over-the-air/Cable signals without an external digital set . 2. Y PB PR L R Connect...
... plug in any power cords until you do receive digital signals from a digital set-top box or other digital external device, refer to the owner's manual for LCD TV models. HD RECEIVER SETUP This TV can receive Digital Over-the-air/Cable signals without an external digital set . 2. Y PB PR L R Connect...
User Manual
Page 24
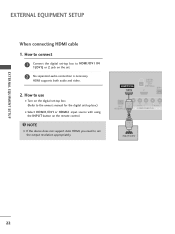
HDMI supports both audio and video. 2. How to use ■ Turn on the digital set-top box. ( ) (Refer to the owner's manual for the digital set-top box.) ■ Select HDMI1/DVI or HDMI2 input source with using the INPUT button on the set. 2 No separated audio ...
HDMI supports both audio and video. 2. How to use ■ Turn on the digital set-top box. ( ) (Refer to the owner's manual for the digital set-top box.) ■ Select HDMI1/DVI or HDMI2 input source with using the INPUT button on the set. 2 No separated audio ...
User Manual
Page 25
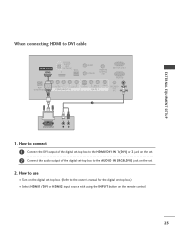
EXTERNAL EQUIPMENT SETUP When connecting HDMI to the owner's manual for the digital set-top box.) ■ Select HDMI1/DVI or HDMI2 input source with using the INPUT button on the set. 2. RESET UPDATE REMOTE ...
EXTERNAL EQUIPMENT SETUP When connecting HDMI to the owner's manual for the digital set-top box.) ■ Select HDMI1/DVI or HDMI2 input source with using the INPUT button on the set. 2. RESET UPDATE REMOTE ...

User Manual
Page 26
... shown below. Match the jack colors (Y = green, PB = blue, and PR = red). Y PB PR L R Connect the audio outputs of the DVD to the DVD player's manual for operating instructions. How to connect 1 Connect the video outputs (Y, PB, PR) of the DVD to the 2 COMPONENT IN AUDIO jacks on the DVD player...
... shown below. Match the jack colors (Y = green, PB = blue, and PR = red). Y PB PR L R Connect the audio outputs of the DVD to the DVD player's manual for operating instructions. How to connect 1 Connect the video outputs (Y, PB, PR) of the DVD to the 2 COMPONENT IN AUDIO jacks on the DVD player...
User Manual
Page 27
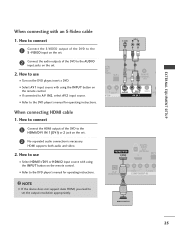
... input jacks on the remote control. ■ If connected to AV IN2, select A V 2 input source. ■ Refer to the DVD player's manual for operating instructions. When connecting with using the INPUT button on the remote control. ( ) ( ■ Refer to the DVD player...'s manual for operating instructions. 1 2 GITAL UDIO OUT RESET TICAL) M.P.I ■ Select HDMI1/DVI or HDMI2 input source with an S-Video cable 1. S-VIDEO AUDIO L R ...
... input jacks on the remote control. ■ If connected to AV IN2, select A V 2 input source. ■ Refer to the DVD player's manual for operating instructions. When connecting with using the INPUT button on the remote control. ( ) ( ■ Refer to the DVD player...'s manual for operating instructions. 1 2 GITAL UDIO OUT RESET TICAL) M.P.I ■ Select HDMI1/DVI or HDMI2 input source with an S-Video cable 1. S-VIDEO AUDIO L R ...

User Manual
Page 28
... the screen. the fixed images on the sides of the screen may remain visible on the set. 2 Connect the antenna cable to the VCR owner's manual.) 26
... the screen. the fixed images on the sides of the screen may remain visible on the set. 2 Connect the antenna cable to the VCR owner's manual.) 26

User Manual
Page 29
... same time. SER REMOTE CONTROL UPDATE OUT ■ Insert a video tape into the VCR and press PLAY on the VCR. (Refer to the VCR owner's manual.) ■ Select A V 1 input source with an S-Video cable ANT OUT OUTPUT SWITCH TAL DIO UT CAL) M.P.I . 1 Connect the S-VIDEO output of the VCR to the... between TV and VCR. How to use ■ Insert a video tape into the VCR and press PLAY on the VCR. (Refer to the VCR owner's manual.) ■ Select A V 1 input source with a RCA cable ANT IN S-VIDEO L R VIDEO EXTERNAL EQUIPMENT SETUP 1.
... same time. SER REMOTE CONTROL UPDATE OUT ■ Insert a video tape into the VCR and press PLAY on the VCR. (Refer to the VCR owner's manual.) ■ Select A V 1 input source with an S-Video cable ANT OUT OUTPUT SWITCH TAL DIO UT CAL) M.P.I . 1 Connect the S-VIDEO output of the VCR to the... between TV and VCR. How to use ■ Insert a video tape into the VCR and press PLAY on the VCR. (Refer to the VCR owner's manual.) ■ Select A V 1 input source with a RCA cable ANT IN S-VIDEO L R VIDEO EXTERNAL EQUIPMENT SETUP 1.

User Manual
Page 30
.../42LC50C*, 42LB5DC, 42LB50C Send the TV's audio to connect 1 Connect the AUDIO/VIDEO jacks between TV and external equipment. See the external audio equipment instruction manual for operation. How to connect 1 Connect one end of an optical cable to the TV Digital Audio (Optical) Output port. 2 Connect the other end of...
.../42LC50C*, 42LB5DC, 42LB50C Send the TV's audio to connect 1 Connect the AUDIO/VIDEO jacks between TV and external equipment. See the external audio equipment instruction manual for operation. How to connect 1 Connect one end of an optical cable to the TV Digital Audio (Optical) Output port. 2 Connect the other end of...

User Manual
Page 37
...Set Password Block Channel TV Rating-English TV Rating-French Aux. XGA Mode Reset TIME SETUP VIDEO AUDIO TIME OPTION SCREEN LOCK Auto Clock Manual Clock Off Timer On Timer Auto Off OPTION SETUP VIDEO AUDIO TIME OPTION SCREEN LOCK Aspect Ratio Caption/Text Caption Options Language ISM Method... Low Power Set ID Only 42PX8DC model 35 Manual config. or button to display the SETUP SETUP VIDEO AUDIO TIME OPTION SCREEN LOCK EZ Scan Manual Scan Channel Edit DTV Signal Channel Label VIDEO SETUP VIDEO AUDIO TIME OPTION SCREEN LOCK EZ...
...Set Password Block Channel TV Rating-English TV Rating-French Aux. XGA Mode Reset TIME SETUP VIDEO AUDIO TIME OPTION SCREEN LOCK Auto Clock Manual Clock Off Timer On Timer Auto Off OPTION SETUP VIDEO AUDIO TIME OPTION SCREEN LOCK Aspect Ratio Caption/Text Caption Options Language ISM Method... Low Power Set ID Only 42PX8DC model 35 Manual config. or button to display the SETUP SETUP VIDEO AUDIO TIME OPTION SCREEN LOCK EZ Scan Manual Scan Channel Edit DTV Signal Channel Label VIDEO SETUP VIDEO AUDIO TIME OPTION SCREEN LOCK EZ...

User Manual
Page 38
... Channel Edit DTV Signal Channel Label SETUP VIDEO AUDIO TIME OPTION SCREEN LOCK EZ Scan Manual Scan Channel Edit DTV Signal Channel Label 1 G Selection ( G or ) leads you to begin the channel search. LOG 9 Found Channel(s) 4 Next MENU Prev. 3 36 Allow EZ ...Scan to the EZ scan screen. 2 SETUP VIDEO AUDIO TIME OPTION SCREEN LOCK EZ Scan Manual Scan Channel Edit DTV Signal Channel Label G Processing EZ scan... A password is required to gain access to EZ Scan menu if the Lock System is...
... Channel Edit DTV Signal Channel Label SETUP VIDEO AUDIO TIME OPTION SCREEN LOCK EZ Scan Manual Scan Channel Edit DTV Signal Channel Label 1 G Selection ( G or ) leads you to begin the channel search. LOG 9 Found Channel(s) 4 Next MENU Prev. 3 36 Allow EZ ...Scan to the EZ scan screen. 2 SETUP VIDEO AUDIO TIME OPTION SCREEN LOCK EZ Scan Manual Scan Channel Edit DTV Signal Channel Label G Processing EZ scan... A password is required to gain access to EZ Scan menu if the Lock System is...

User Manual
Page 39
... and then use D or E or or button to select the SETUP menu. 2 Press the G or button and then use D or E or or button to select Manual Scan. 3 Press the G or button and then use D or E or or button to select Analog(T V, CATV), Digital(D T V, CADTV). 4 Press the G or button and then use... button to add or delete the channel. 6 Press the EXIT or RETURN button to return to TV viewing or press MENU button to return to Manual Scan menu if the Lock System is turned on. ous menu. SETUP VIDEO AUDIO TIME OPTION SCREEN LOCK EZ Scan...
... and then use D or E or or button to select the SETUP menu. 2 Press the G or button and then use D or E or or button to select Manual Scan. 3 Press the G or button and then use D or E or or button to select Analog(T V, CATV), Digital(D T V, CADTV). 4 Press the G or button and then use... button to add or delete the channel. 6 Press the EXIT or RETURN button to return to TV viewing or press MENU button to return to Manual Scan menu if the Lock System is turned on. ous menu. SETUP VIDEO AUDIO TIME OPTION SCREEN LOCK EZ Scan...

User Manual
Page 40
...left corner of the screen. Once a channel is turned on or off with ENTER button. A password is required to gain access to Manual Scan menu if the Lock System is highlighted you can be created by referring to the previous menu. SETUP VIDEO AUDIO TIME OPTION SCREEN ...LOCK EZ Scan Manual Scan Channel Edit DTV Signal Channel Label 1 SETUP EZ Scan ANALOG VIDEO Manual Scan 2-0 D AUDIO Channel Edit G 4-0 TIME DTV Signal 6-0 OPTION Channel Label 9-0 SCREEN 11-0 LOCK 13-0 14-0 ...
...left corner of the screen. Once a channel is turned on or off with ENTER button. A password is required to gain access to Manual Scan menu if the Lock System is highlighted you can be created by referring to the previous menu. SETUP VIDEO AUDIO TIME OPTION SCREEN ...LOCK EZ Scan Manual Scan Channel Edit DTV Signal Channel Label 1 SETUP EZ Scan ANALOG VIDEO Manual Scan 2-0 D AUDIO Channel Edit G 4-0 TIME DTV Signal 6-0 OPTION Channel Label 9-0 SCREEN 11-0 LOCK 13-0 14-0 ...
User Manual
Page 41
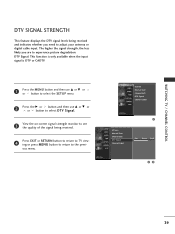
... and indicates whether you are to the previ- SETUP VIDEO AUDIO TIME OPTION SCREEN LOCK EZ Scan Manual Scan Channel Edit DTV Signal Channel Label SETUP VIDEO AUDIO TIME OPTION SCREEN LOCK EZ Scan Manual Scan Channel Edit DTV Signal Channel Label 1 Bad Normal Good 23 39 WATCHING TV / CHANNEL CONTROL DTV...
... and indicates whether you are to the previ- SETUP VIDEO AUDIO TIME OPTION SCREEN LOCK EZ Scan Manual Scan Channel Edit DTV Signal Channel Label SETUP VIDEO AUDIO TIME OPTION SCREEN LOCK EZ Scan Manual Scan Channel Edit DTV Signal Channel Label 1 Bad Normal Good 23 39 WATCHING TV / CHANNEL CONTROL DTV...
User Manual
Page 42
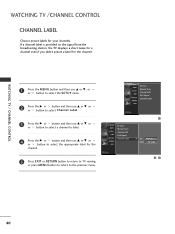
... D or E or or button to the previous menu. SETUP VIDEO AUDIO TIME OPTION SCREEN LOCK EZ Scan Manual Scan Channel Edit DTV Signal Channel Label SETUP VIDEO AUDIO TIME OPTION SCREEN LOCK EZ Scan Manual Scan Channel Edit DTV Signal Channel Label 1 G Ch. WATCHING TV / CHANNEL CONTROL WATCHING TV /CHANNEL CONTROL CHANNEL...
... D or E or or button to the previous menu. SETUP VIDEO AUDIO TIME OPTION SCREEN LOCK EZ Scan Manual Scan Channel Edit DTV Signal Channel Label SETUP VIDEO AUDIO TIME OPTION SCREEN LOCK EZ Scan Manual Scan Channel Edit DTV Signal Channel Label 1 G Ch. WATCHING TV / CHANNEL CONTROL WATCHING TV /CHANNEL CONTROL CHANNEL...
User Manual
Page 49
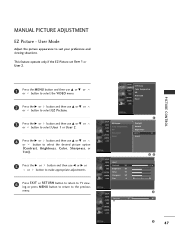
... AUDIO Contrast 85 TIME Brightness 50 OPTION Color 50 SCREEN Sharpness 50 LOCK Tint 0 R 23 G G SETUP VIDEO AUDIO TIME OPTION SCREEN LOCK Contrast E 85 F 4 G 5 47 MANUAL PICTURE ADJUSTMENT EZ Picture -
... AUDIO Contrast 85 TIME Brightness 50 OPTION Color 50 SCREEN Sharpness 50 LOCK Tint 0 R 23 G G SETUP VIDEO AUDIO TIME OPTION SCREEN LOCK Contrast E 85 F 4 G 5 47 MANUAL PICTURE ADJUSTMENT EZ Picture -
User Manual
Page 51
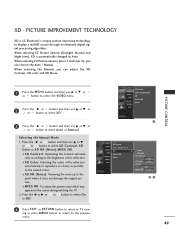
...On XD NR Off MPEG NR 0 23 49 PICTURE IMPROVEMENT TECHNOLOGY XD is automatically changed to select Auto or Manual. When selecting EZ Picture options (Daylight, Normal and Night time), XD is LG Electronic's unique picture improving technology to the previous menu. Press the F or G or or button to select... TV. 2. ing or press MENU button to return to display a real HD source through an advanced digital signal processing algorithm. When selecting the Manual, you can adjust the XD Contrast, XD color and XD Noise. 1 Press the MENU button and then use D or E or or button...
...On XD NR Off MPEG NR 0 23 49 PICTURE IMPROVEMENT TECHNOLOGY XD is automatically changed to select Auto or Manual. When selecting EZ Picture options (Daylight, Normal and Night time), XD is LG Electronic's unique picture improving technology to the previous menu. Press the F or G or or button to select... TV. 2. ing or press MENU button to return to display a real HD source through an advanced digital signal processing algorithm. When selecting the Manual, you can adjust the XD Contrast, XD color and XD Noise. 1 Press the MENU button and then use D or E or or button...


