User Manual
Page 7
...77 Downloadable Rating 77 TV Rating Children & General 78 TV Rating English & French 79 APPENDIX Troubleshooting 80 Maintenance 82 Product Specifications 83 Programming the Remote Control 84 Set ID 86 IR Codes 87 5 Preset 45 - Cinema Mode 50 Advanced - Black (Darkness) Level 51 Picture Reset 52 ...21 DVD Setup 24 VCR Setup 26 Other A/V Source Setup 28 Digital Audio Output 28 PC Setup 29 WATCHING TV / CHANNEL CONTROL Remote Control Functions 32 Turning On TV 34 Channel Selection 34 Volume Adjustment 34 On-Screen Menus Selection 35 Channel Setup 36 - EZ Picture...
...77 Downloadable Rating 77 TV Rating Children & General 78 TV Rating English & French 79 APPENDIX Troubleshooting 80 Maintenance 82 Product Specifications 83 Programming the Remote Control 84 Set ID 86 IR Codes 87 5 Preset 45 - Cinema Mode 50 Advanced - Black (Darkness) Level 51 Picture Reset 52 ...21 DVD Setup 24 VCR Setup 26 Other A/V Source Setup 28 Digital Audio Output 28 PC Setup 29 WATCHING TV / CHANNEL CONTROL Remote Control Functions 32 Turning On TV 34 Channel Selection 34 Volume Adjustment 34 On-Screen Menus Selection 35 Channel Setup 36 - EZ Picture...

User Manual
Page 8
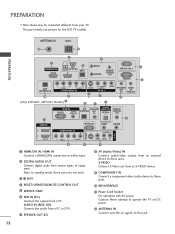
...9 FLASHBK VOL TIMER MUTE 1 4 2 7 5 3 8 6 CH PAGE 0 9 BAFCLKASH 1.5V 1.5V Owner's Manual, Setup & Operation Guide for Commercial Mode CD Manual Remote Control, Batteries Power Cord * Slightly wipe stained spot on the screen. PREPARATION ACCESSORIES Ensure that excessive pressure for the product. This is normal, there is... it is nothing wrong with your product. LCD TV PLASMA TV Owner's Manual http://www.lgusa.com www.lg.ca Copyright© 2007 LGE, All Rights Reserved. This feature is missing, please contact the dealer where you purchased the product.
...9 FLASHBK VOL TIMER MUTE 1 4 2 7 5 3 8 6 CH PAGE 0 9 BAFCLKASH 1.5V 1.5V Owner's Manual, Setup & Operation Guide for Commercial Mode CD Manual Remote Control, Batteries Power Cord * Slightly wipe stained spot on the screen. PREPARATION ACCESSORIES Ensure that excessive pressure for the product. This is normal, there is... it is nothing wrong with your product. LCD TV PLASMA TV Owner's Manual http://www.lgusa.com www.lg.ca Copyright© 2007 LGE, All Rights Reserved. This feature is missing, please contact the dealer where you purchased the product.

User Manual
Page 10
... ■ Here shown may be somewhat different from your TV. ■ If your product, use it). 32/37/42LC5DC*,32/37/42LC50C*, 42LB5DC, 42LB50C PREPARATION Remote Control Sensor Power/Standby Indicator Illuminates red when the TV is in standby mode. Illuminates green when the TV is included with a star head driver...
... ■ Here shown may be somewhat different from your TV. ■ If your product, use it). 32/37/42LC5DC*,32/37/42LC50C*, 42LB5DC, 42LB50C PREPARATION Remote Control Sensor Power/Standby Indicator Illuminates red when the TV is in standby mode. Illuminates green when the TV is included with a star head driver...

User Manual
Page 11
CH VOL ENTER MENU INPUT ON/OFF ON/OFF Button INPUT Button MENU Button ENTER Button VOLUME Buttons CHANNEL Buttons 9 Illuminates green when the TV is in standby mode. PREPARATION 32LX5DC*, 32LX50C* Remote Control Sensor Power/Standby Indicator Illuminates red when the TV is switched on.
CH VOL ENTER MENU INPUT ON/OFF ON/OFF Button INPUT Button MENU Button ENTER Button VOLUME Buttons CHANNEL Buttons 9 Illuminates green when the TV is in standby mode. PREPARATION 32LX5DC*, 32LX50C* Remote Control Sensor Power/Standby Indicator Illuminates red when the TV is switched on.

User Manual
Page 12
POWER Button INPUT Button MENU Button ENTER Button VOLUME Buttons CHANNEL Buttons 42PG60C, 42PG65C Stand (Only 42PG65C model) Remote Control Sensor POWER Button Power/Standby Indicator Illuminates red in standby mode. INPUT ENTER Illuminates blue when the set is sold, separately. PREPARATION 42PX8DC PREPARATION ... MENU ENTER VOL CH INPUT MENU ENTER VOL CH INPUT Button MENU Button ENTER Button VOLUME (-,+) Buttons CHANNEL (E, D) Buttons 10 INPUT MENU ENTER VOL CH Remote Control Sensor Power/Standby Indicator Illuminates red when the TV is switched on .
POWER Button INPUT Button MENU Button ENTER Button VOLUME Buttons CHANNEL Buttons 42PG60C, 42PG65C Stand (Only 42PG65C model) Remote Control Sensor POWER Button Power/Standby Indicator Illuminates red in standby mode. INPUT ENTER Illuminates blue when the set is sold, separately. PREPARATION 42PX8DC PREPARATION ... MENU ENTER VOL CH INPUT MENU ENTER VOL CH INPUT Button MENU Button ENTER Button VOLUME (-,+) Buttons CHANNEL (E, D) Buttons 10 INPUT MENU ENTER VOL CH Remote Control Sensor Power/Standby Indicator Illuminates red when the TV is switched on .
User Manual
Page 14
... AUDIO OUT Connect digital audio from your TV. Note: In standby mode, these ports do not work. 3 13 M.P.I . 4 RESET 5 SERVICE ONLY REMOTE CONTROL UPDATE OUT RGB IN 6 RJP INTERFACE 10 VIDEO AUDIO COMPONENT IN 9 S-VIDEO 4 (MONO) AUDIO AV IN 1 8 VIDEO SPEAKER AUDIO OUT IN... (RGB, DVI) 7 (Only 42PG60C, 42PG65C Models) 6 10 7 2 RGB IN RGB(PC) AUDIO (RGB / DVI) RJP SPEAKER INTERFACE OUT 8 DIGITAL AUDIO OUT REMOTE CONTROL OPTICAL OUT 1 4 HDMI IN SERVICE ONLY RESET UPDATE S-VIDEO AV IN 1 2 1 DVI IN COMPONENT IN L R VIDEO 9 AUDIO 5 AUDIO VIDEO L(MONO) ...
... AUDIO OUT Connect digital audio from your TV. Note: In standby mode, these ports do not work. 3 13 M.P.I . 4 RESET 5 SERVICE ONLY REMOTE CONTROL UPDATE OUT RGB IN 6 RJP INTERFACE 10 VIDEO AUDIO COMPONENT IN 9 S-VIDEO 4 (MONO) AUDIO AV IN 1 8 VIDEO SPEAKER AUDIO OUT IN... (RGB, DVI) 7 (Only 42PG60C, 42PG65C Models) 6 10 7 2 RGB IN RGB(PC) AUDIO (RGB / DVI) RJP SPEAKER INTERFACE OUT 8 DIGITAL AUDIO OUT REMOTE CONTROL OPTICAL OUT 1 4 HDMI IN SERVICE ONLY RESET UPDATE S-VIDEO AV IN 1 2 1 DVI IN COMPONENT IN L R VIDEO 9 AUDIO 5 AUDIO VIDEO L(MONO) ...
User Manual
Page 23
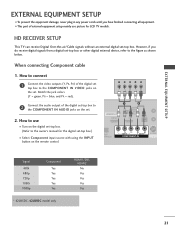
... external device, refer to the figure as shown below. Y PB PR L R Connect the audio output of external equipment setup mainly use ■ Turn on the remote control. RJP RFACE VIDEO AUDIO S-VIDEO ( ) COMPONENT IN Signal 480i 480p 720p 1080i 1080p Component Yes Yes Yes Yes Yes * 42LB5DC, 42LB50C model only HDMI1...
... external device, refer to the figure as shown below. Y PB PR L R Connect the audio output of external equipment setup mainly use ■ Turn on the remote control. RJP RFACE VIDEO AUDIO S-VIDEO ( ) COMPONENT IN Signal 480i 480p 720p 1080i 1080p Component Yes Yes Yes Yes Yes * 42LB5DC, 42LB50C model only HDMI1...
User Manual
Page 24
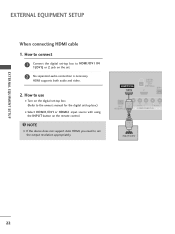
... When connecting HDMI cable 1. How to use ■ Turn on the digital set-top box. ( ) (Refer to HDMI/DVI IN 1(DVI) or 2 jack on the remote control. HDMI/DVI IN 1(DVI) DIGITAL AUDIO OUT (OPTICAL) 2 M.P.I RJP INTERFACE 1 VIDEO AUDIO COMPONENT IN HDMI-DTV OUTPUT ( ) 22 How to connect 1 Connect the digital...
... When connecting HDMI cable 1. How to use ■ Turn on the digital set-top box. ( ) (Refer to HDMI/DVI IN 1(DVI) or 2 jack on the remote control. HDMI/DVI IN 1(DVI) DIGITAL AUDIO OUT (OPTICAL) 2 M.P.I RJP INTERFACE 1 VIDEO AUDIO COMPONENT IN HDMI-DTV OUTPUT ( ) 22 How to connect 1 Connect the digital...
User Manual
Page 25
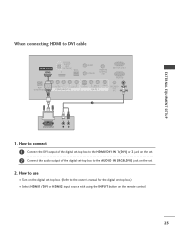
... with using the INPUT button on the digital set-top box. (Refer to DVI cable HDMI/DVI IN 1(DVI) DIGITAL AUDIO OUT (OPTICAL) 2 M.P.I. RESET UPDATE REMOTE CONTROL OUT SERVICE ONLY RGB IN RJP INTERFACE 1 VIDEO AUDIO COMPONENT IN S-VIDEO (MONO) AUDIO AV IN 1 VIDEO SPEAKER AUDIO OUT IN 8 (RGB, DVI) 2 DVI...
... with using the INPUT button on the digital set-top box. (Refer to DVI cable HDMI/DVI IN 1(DVI) DIGITAL AUDIO OUT (OPTICAL) 2 M.P.I. RESET UPDATE REMOTE CONTROL OUT SERVICE ONLY RGB IN RJP INTERFACE 1 VIDEO AUDIO COMPONENT IN S-VIDEO (MONO) AUDIO AV IN 1 VIDEO SPEAKER AUDIO OUT IN 8 (RGB, DVI) 2 DVI...

User Manual
Page 26
... the 2 COMPONENT IN AUDIO jacks on the set . Y PB PR L R Connect the audio outputs of the DVD to the COMPONENT IN VIDEO jacks on the remote control. ■ Refer to the component input ports as shown below. HDMI/DVI IN 1(DVI) 1 2 DIGITAL AUDIO OUT (OPTICAL) 2 M.P.I. ■ Select Component input source with...
... the 2 COMPONENT IN AUDIO jacks on the set . Y PB PR L R Connect the audio outputs of the DVD to the COMPONENT IN VIDEO jacks on the remote control. ■ Refer to the component input ports as shown below. HDMI/DVI IN 1(DVI) 1 2 DIGITAL AUDIO OUT (OPTICAL) 2 M.P.I. ■ Select Component input source with...
User Manual
Page 27
...How to use ■ Turn on the DVD player, insert a DVD. ■ Select A V 1 input source with using the INPUT button on the remote control. ( ) ( ■ Refer to the DVD player's manual for operating instructions. When connecting with using the INPUT button on the set. 2 No... separated audio connection is necessary. S REMOTE CONTROL UPDATE OUT AUDIO NT IN S-VIDEO (MONO) AUDIO AV IN 1 VIDEO SPE O When connecting HDMI cable 1. RJP INTERFACE VIDEO AUDIO...
...How to use ■ Turn on the DVD player, insert a DVD. ■ Select A V 1 input source with using the INPUT button on the remote control. ( ) ( ■ Refer to the DVD player's manual for operating instructions. When connecting with using the INPUT button on the set. 2 No... separated audio connection is necessary. S REMOTE CONTROL UPDATE OUT AUDIO NT IN S-VIDEO (MONO) AUDIO AV IN 1 VIDEO SPE O When connecting HDMI cable 1. RJP INTERFACE VIDEO AUDIO...

User Manual
Page 29
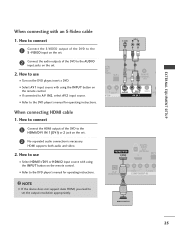
...V 1 input source with using the INPUT button on the set. 2. When connecting with a RCA cable ANT IN S-VIDEO L R VIDEO EXTERNAL EQUIPMENT SETUP 1. SER REMOTE CONTROL UPDATE OUT ■ Insert a video tape into the VCR and press PLAY on the VCR. (Refer to the VCR owner's manual.) ■ Select A V...1 VIDEO SPEAK OUT 8 ■ If connected to the AUDIO L/MONO jack of the VCR to AV IN2, select A V 2 input source. RESET UPDATE 1 REMOTE CONTROL OUT SERV R AUDIO T IN S-VIDEO (MONO) AUDIO AV IN 1 VIDEO SPEAKE OUT 8 NOTE G If you connect both Video and S-Video at the...
...V 1 input source with using the INPUT button on the set. 2. When connecting with a RCA cable ANT IN S-VIDEO L R VIDEO EXTERNAL EQUIPMENT SETUP 1. SER REMOTE CONTROL UPDATE OUT ■ Insert a video tape into the VCR and press PLAY on the VCR. (Refer to the VCR owner's manual.) ■ Select A V...1 VIDEO SPEAK OUT 8 ■ If connected to the AUDIO L/MONO jack of the VCR to AV IN2, select A V 2 input source. RESET UPDATE 1 REMOTE CONTROL OUT SERV R AUDIO T IN S-VIDEO (MONO) AUDIO AV IN 1 VIDEO SPEAKE OUT 8 NOTE G If you connect both Video and S-Video at the...

User Manual
Page 30
HDMI/DVI IN 1(DVI) DIGITAL AUDIO OUT (OPTICAL) 2 M.P.I. 1 ( RJP VIDEO AUDIO S-V NTERFACE COMPONENT IN 2 NOTE G When connecting with using the INPUT button on the remote control. ■ If connected to the digital audio (optical) input on the audio equipment. 3 Set the "TV Speaker option - How to use ■ Select A V 2 input ...
HDMI/DVI IN 1(DVI) DIGITAL AUDIO OUT (OPTICAL) 2 M.P.I. 1 ( RJP VIDEO AUDIO S-V NTERFACE COMPONENT IN 2 NOTE G When connecting with using the INPUT button on the remote control. ■ If connected to the digital audio (optical) input on the audio equipment. 3 Set the "TV Speaker option - How to use ■ Select A V 2 input ...

User Manual
Page 31
... How to use ( ) 1 ■ Turn on the PC and the set 2 ■ Select HDMI1/DVI input source with using the INPUT button on the remote control. 2 1 When connecting HDMI to the HDMI/DVI IN 1(DVI) jack on the set . ■ Select RGB-PC input source with using the INPUT button... on the remote control. RGB IN ( ) ( ) RJP INTERFACE VIDEO ER AUDIO COMPONENT IN (RGB, DVI) 2. How to connect SERVICE ONLY REMOTE CONTROL ATE OUT ( ) ( ) RGB IN 1 Connect the RGB output of the PC to DVI ...
... How to use ( ) 1 ■ Turn on the PC and the set 2 ■ Select HDMI1/DVI input source with using the INPUT button on the remote control. 2 1 When connecting HDMI to the HDMI/DVI IN 1(DVI) jack on the set . ■ Select RGB-PC input source with using the INPUT button... on the remote control. RGB IN ( ) ( ) RJP INTERFACE VIDEO ER AUDIO COMPONENT IN (RGB, DVI) 2. How to connect SERVICE ONLY REMOTE CONTROL ATE OUT ( ) ( ) RGB IN 1 Connect the RGB output of the PC to DVI ...

User Manual
Page 34
... MENU RATIO SAP ENTER VOL TIMER MUTE CH PAGE 1 2 3 4 5 6 7 8 9 0 FLASH BACK 32 WATCHING TV / CHANNEL CONTROL WATCHING TV / CHANNEL CONTROL REMOTE CONTROL FUNCTIONS When using the remote control, aim it at the remote control sensor on screen. TV INPUT In AV 1-2, Component, RGB, HDMI1/DVI, and HDMI2 input sources, screen returns to the...
... MENU RATIO SAP ENTER VOL TIMER MUTE CH PAGE 1 2 3 4 5 6 7 8 9 0 FLASH BACK 32 WATCHING TV / CHANNEL CONTROL WATCHING TV / CHANNEL CONTROL REMOTE CONTROL FUNCTIONS When using the remote control, aim it at the remote control sensor on screen. TV INPUT In AV 1-2, Component, RGB, HDMI1/DVI, and HDMI2 input sources, screen returns to the...

User Manual
Page 35
...- G p.43-44 CC Select a closed caption. G p.34 CHANNEL Select available channels. PIP CH+ PIP SWAP PIP INPUT Installing Batteries Remote control effective range 32/37/42LC5DC*, 42LB5DC, 32/37/42LC5DC*, 32LX5DC*, 32LX50C* 32/37/42LC50C*, 42LB5DC, 42LB50C 42PX8DC ■ Open the battery compartment cover on -screen menus and adjust the system set...
...- G p.43-44 CC Select a closed caption. G p.34 CHANNEL Select available channels. PIP CH+ PIP SWAP PIP INPUT Installing Batteries Remote control effective range 32/37/42LC5DC*, 42LB5DC, 32/37/42LC5DC*, 32LX5DC*, 32LX50C* 32/37/42LC50C*, 42LB5DC, 42LB50C 42PX8DC ■ Open the battery compartment cover on -screen menus and adjust the system set...

User Manual
Page 36
... press the MUTE button. 3 You can cancel the Mute function by using the INPUT(or TV INPUT) button on the remote control. ■ This TV is programmed to remember which power state it was last set to, even if the power ...cord is out. 3 When finished using the TV, press the POWER button on the remote con- At this moment, the TV switches to standby mode. ■ In standby mode to be away on the... remote control. 2 Select the viewing source by pressing the MUTE or VOL ( + or -) button. 34 VOLUME ...
... press the MUTE button. 3 You can cancel the Mute function by using the INPUT(or TV INPUT) button on the remote control. ■ This TV is programmed to remember which power state it was last set to, even if the power ...cord is out. 3 When finished using the TV, press the POWER button on the remote con- At this moment, the TV switches to standby mode. ■ In standby mode to be away on the... remote control. 2 Select the viewing source by pressing the MUTE or VOL ( + or -) button. 34 VOLUME ...
User Manual
Page 61
... RETURN button to save and return to TV viewing. SOUND & LANGUAGE CONTROL 59 Select Mono if you press the S A P button, Mono, Stereo, or S A P appear in remote areas during stereo/SAP broadcasting. Each time you want to listen to select your desired MTS mode in Mono; Mono sound is automatically received if... SETUP This TV can be received in Analog channel. 1 Use the S A P button to the mono sound in turn. ■ If other languages available on the remote control. even though Stereo or SAP has been selected.
... RETURN button to save and return to TV viewing. SOUND & LANGUAGE CONTROL 59 Select Mono if you press the S A P button, Mono, Stereo, or S A P appear in remote areas during stereo/SAP broadcasting. Each time you want to listen to select your desired MTS mode in Mono; Mono sound is automatically received if... SETUP This TV can be received in Analog channel. 1 Use the S A P button to the mono sound in turn. ■ If other languages available on the remote control. even though Stereo or SAP has been selected.
User Manual
Page 77
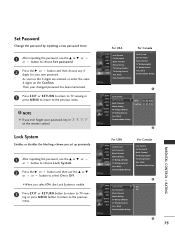
As soon as the 4 digits are entered, re-enter the same 4 digits on the remote control. Then your password, key in '7', '7', '7', '7' on the Confirm. Block Downloadable Rating Lock System Set Password Block Channel TV Rating-English TV Rating-French Aux. ...
As soon as the 4 digits are entered, re-enter the same 4 digits on the remote control. Then your password, key in '7', '7', '7', '7' on the Confirm. Block Downloadable Rating Lock System Set Password Block Channel TV Rating-English TV Rating-French Aux. ...
User Manual
Page 82
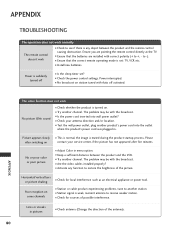
...another channel. Power is weak, reorient antenna to -). ■ Ensure that the batteries are pointing the remote control directly at the TV. ■ Ensure that the correct remote operating mode is muted during the product startup process. No picture &No sound ■ Check whether the ... VCR etc. ■ Install new batteries. Lines or streaks in menu option. ■ Keep a sufficient distance between the product and the remote control causing obstruction. APPENDIX 80 Picture appears slowly ■ This is normal, the image is set ? ■ Check the power control settings....
...another channel. Power is weak, reorient antenna to -). ■ Ensure that the batteries are pointing the remote control directly at the TV. ■ Ensure that the correct remote operating mode is muted during the product startup process. No picture &No sound ■ Check whether the ... VCR etc. ■ Install new batteries. Lines or streaks in menu option. ■ Keep a sufficient distance between the product and the remote control causing obstruction. APPENDIX 80 Picture appears slowly ■ This is normal, the image is set ? ■ Check the power control settings....


