
Owners Manual
Page 5
...31 Various Installation Basic Connection Antenna or Cable Connection VCR Setup External AV Source Setup DVD Setup HDSTB Setup Monitor Out Setup Digital Audio Output PC Setup 32 Turning on the TV 32 Volume Adjustment 32 Channel Selection 32 On Screen Menus Language Selection 33 On Screen... Picture 38 APM (Adaptive Picture Mode) 39 Manual Picture Control (EZ Picture-Custom option) 39 Color Temperature Control 39 Video Reset 40 Audio Language 40 EZ SoundRite 41 EZ Sound 41 Manual Sound Control (EZ Sound-Custom option) 42 Stereo/SAP Broadcasts Setup 42 Front Surround ...
...31 Various Installation Basic Connection Antenna or Cable Connection VCR Setup External AV Source Setup DVD Setup HDSTB Setup Monitor Out Setup Digital Audio Output PC Setup 32 Turning on the TV 32 Volume Adjustment 32 Channel Selection 32 On Screen Menus Language Selection 33 On Screen... Picture 38 APM (Adaptive Picture Mode) 39 Manual Picture Control (EZ Picture-Custom option) 39 Color Temperature Control 39 Video Reset 40 Audio Language 40 EZ SoundRite 41 EZ Sound 41 Manual Sound Control (EZ Sound-Custom option) 42 Stereo/SAP Broadcasts Setup 42 Front Surround ...

Owners Manual
Page 9
S-VIDEO Input -- Here shown may be somewhat different from your TV. Introduction 37/42LC2D** -- AUDIO Input 1 VIDEO Input 32LC2D** AC IN AV AV IN1 COMPONENT IN 1/2 HDMI / DVI IN RS-232C INPUT (Control &Service) CABLE IN ANTENNA IN AUDIO (RGB/DVI) DIGITAL AUDIO OUT OPTICAL RGB (PC/DTV) REMOTE CONTROL Port J Connection Options (Model Name'. -
S-VIDEO Input -- Here shown may be somewhat different from your TV. Introduction 37/42LC2D** -- AUDIO Input 1 VIDEO Input 32LC2D** AC IN AV AV IN1 COMPONENT IN 1/2 HDMI / DVI IN RS-232C INPUT (Control &Service) CABLE IN ANTENNA IN AUDIO (RGB/DVI) DIGITAL AUDIO OUT OPTICAL RGB (PC/DTV) REMOTE CONTROL Port J Connection Options (Model Name'. -

Owners Manual
Page 11
HDMI/DVI IN AV AV IN1 COMPONENT IN 1/2 RS-232C INPUT (Control &Service) S-VIDEO InputAUDIO Input VIDEO Input- AC IN CABLE IN DIGITAL AUDIO OUT OPTICAL ANTENNA IN AUDIO (RGB/DVI) RGB (PC/DTV) REMOTE CONTROL Port J 11 Introduction ConnectionOptions(ModelName:42PC1D**/42PC3D**/50PC3D**) - Here shown may be somewhat different from your TV.
HDMI/DVI IN AV AV IN1 COMPONENT IN 1/2 RS-232C INPUT (Control &Service) S-VIDEO InputAUDIO Input VIDEO Input- AC IN CABLE IN DIGITAL AUDIO OUT OPTICAL ANTENNA IN AUDIO (RGB/DVI) RGB (PC/DTV) REMOTE CONTROL Port J 11 Introduction ConnectionOptions(ModelName:42PC1D**/42PC3D**/50PC3D**) - Here shown may be somewhat different from your TV.

Owners Manual
Page 12
... to the screen. Introduction Remote Control Key Functions POWER Turns your TV or any menul Lets you select the amount of the screen. DVD, VCR, AUDIO. Select a mode other programmed equipment on or off automatical!y. MENU Brings up the main menu to the last TV channel. EZPIC EZ SOUND SAP FREEZE...
... to the screen. Introduction Remote Control Key Functions POWER Turns your TV or any menul Lets you select the amount of the screen. DVD, VCR, AUDIO. Select a mode other programmed equipment on or off automatical!y. MENU Brings up the main menu to the last TV channel. EZPIC EZ SOUND SAP FREEZE...

Owners Manual
Page 13
... phase in DTV mode. ii ii _ i iI i Selects available channels found with the Daylight, Normal, Night Time and Custom on the viewng environment. Change the audio language in PC mode. EZ PIC (Refer to p.38) Concurrently, compare with EZ scan and Manual scan. k j/ 13 APM (Refer to p.38) Selects a factory preset...
... phase in DTV mode. ii ii _ i iI i Selects available channels found with the Daylight, Normal, Night Time and Custom on the viewng environment. Change the audio language in PC mode. EZ PIC (Refer to p.38) Concurrently, compare with EZ scan and Manual scan. k j/ 13 APM (Refer to p.38) Selects a factory preset...

Owners Manual
Page 15
... LOCK menu: A (Age) , D (Dialogue), L (Language), s (Sex), v (Violence), FV (Fantasy Violence) 15 Press the INFO button or EXIT button to select wanted Audio• _.:,: Caption: The program contains one or more audio services. tion. Press the SAP button to exit. -The INFO button does not work in Component1, Component2, RGB, and HDMI/DVI...
... LOCK menu: A (Age) , D (Dialogue), L (Language), s (Sex), v (Violence), FV (Fantasy Violence) 15 Press the INFO button or EXIT button to select wanted Audio• _.:,: Caption: The program contains one or more audio services. tion. Press the SAP button to exit. -The INFO button does not work in Component1, Component2, RGB, and HDMI/DVI...

Owners Manual
Page 22
If the 4:3 picture format is presumed that RGB and HDMI/DVI sources are connected. 22 Match the jack colors (Video = yellow, Audio Left = white, and Audio Right = red) Insert a video tape into the VCR and press PLAY on the VCR (Refer to the VCR owner's manual.) Select AV1 input source using... jack of the screen may remain visible on the remote control. - select AV2 input source. • If you have a mono VCR, connect the audio cable from a VCR. Installation To avoid picture noise (interference), leave an adequate distance between TV and VCR. the fixed images on the sides of the...
If the 4:3 picture format is presumed that RGB and HDMI/DVI sources are connected. 22 Match the jack colors (Video = yellow, Audio Left = white, and Audio Right = red) Insert a video tape into the VCR and press PLAY on the VCR (Refer to the VCR owner's manual.) Select AV1 input source using... jack of the screen may remain visible on the remote control. - select AV2 input source. • If you have a mono VCR, connect the audio cable from a VCR. Installation To avoid picture noise (interference), leave an adequate distance between TV and VCR. the fixed images on the sides of the...

Owners Manual
Page 23
... AV1, AV2 and Component 1| 2. I O c0nnecttheSWIDEO0utput0ftheVCRt0thes_ VIDEO input on the remote control - Camcorder Video Game Set Connect the AUDIO/VIDEO jacks between TV and external equipment. O Operate the corresponding external equipment. Installation _" Ioo @oo L_v!-_o_,, @ I work. Match... the jack colors (Video = yellow, Audio Left = white, and Audio Right = red). It is imProved; The picture quality is presumed that you connect _ both Video and the S-Video cables,...
... AV1, AV2 and Component 1| 2. I O c0nnecttheSWIDEO0utput0ftheVCRt0thes_ VIDEO input on the remote control - Camcorder Video Game Set Connect the AUDIO/VIDEO jacks between TV and external equipment. O Operate the corresponding external equipment. Installation _" Ioo @oo L_v!-_o_,, @ I work. Match... the jack colors (Video = yellow, Audio Left = white, and Audio Right = red). It is imProved; The picture quality is presumed that you connect _ both Video and the S-Video cables,...

Owners Manual
Page 24
...LAUDIO J Y[__VIDEOP_ _ PR LLAUDIOJ R , .... ! 0 c0nnect the S_VIDEO output of the DVD to 1280x720p. , ] 24 if connected to the AUDIO input jacks on the seL Turn onthe DVD p!ayei, insert a DVDI Select AV1 input source With using the INPUT button on the remote control. - ly.... Refer to the DVD playerls manual for operating instructions. • TV can receive the video and audio signal simultaneously by using a HDMI cable. • If the DVD supports Auto HDMI function, the DVD output resolution will be automatically set to 1280x720p....
...LAUDIO J Y[__VIDEOP_ _ PR LLAUDIOJ R , .... ! 0 c0nnect the S_VIDEO output of the DVD to 1280x720p. , ] 24 if connected to the AUDIO input jacks on the seL Turn onthe DVD p!ayei, insert a DVDI Select AV1 input source With using the INPUT button on the remote control. - ly.... Refer to the DVD playerls manual for operating instructions. • TV can receive the video and audio signal simultaneously by using a HDMI cable. • If the DVD supports Auto HDMI function, the DVD output resolution will be automatically set to 1280x720p....

Owners Manual
Page 25
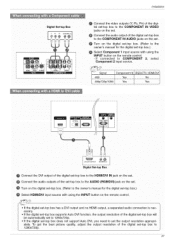
... to the DVD player's manual for operating instructions. • Component Input ports To get better picture quality, connect a DVD player to the COMPONENT IN AUDIO jacks on the set . Componentportson the TV Y Video output ports Y on the DVD player, insert a DVD. Turn on DVD player Y Y PI...: P_ B_ : R_ _ Or: _ _R _ 25 Select Component 1 input source with using the INPUT button on the set . Connect the audio outputs of the DVD to COMPONENT 2, select Component 2 input source. ..... If connected to the COMPONENT IN VIDEO jacks on the remote control - DVD Installation...
... to the DVD player's manual for operating instructions. • Component Input ports To get better picture quality, connect a DVD player to the COMPONENT IN AUDIO jacks on the set . Componentportson the TV Y Video output ports Y on the DVD player, insert a DVD. Turn on DVD player Y Y PI...: P_ B_ : R_ _ Or: _ _R _ 25 Select Component 1 input source with using the INPUT button on the set . Connect the audio outputs of the DVD to COMPONENT 2, select Component 2 input source. ..... If connected to the COMPONENT IN VIDEO jacks on the remote control - DVD Installation...

Owners Manual
Page 26
... of the digital set -top box. Installation - Turn on the digital set-top box. (Refer to the AUDIO (RGB/DVI) jack on the set . However, if you do receive Digital signals from a digital set-top box or other digital external device, refer to ...
... of the digital set -top box. Installation - Turn on the digital set-top box. (Refer to the AUDIO (RGB/DVI) jack on the set . However, if you do receive Digital signals from a digital set-top box or other digital external device, refer to ...
Owners Manual
Page 27
...with using the INPUT button on the remote control. ° If the digital set4op box has a DVI output and no HDMI output, a separated audio connection is necessary. • If the digital set4op box supports Auto DVI function, the output resolution of the set4op box to set the output ...resolution appropriately. Q Connect the audio outputs of the digital set4op box will be automatically set to 1280x720p. ° If the digital set4op box does not support Auto DVI, you need...
...with using the INPUT button on the remote control. ° If the digital set4op box has a DVI output and no HDMI output, a separated audio connection is necessary. • If the digital set4op box supports Auto DVI function, the output resolution of the set4op box to set the output ...resolution appropriately. Q Connect the audio outputs of the digital set4op box will be automatically set to 1280x720p. ° If the digital set4op box does not support Auto DVI, you need...
Owners Manual
Page 28
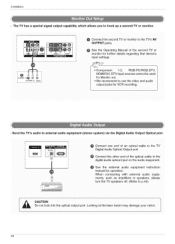
...the optical output port. See the Operating Manual of the second TV or monitor for VCR recording. I , F - to external audio equipment (stereo system) via the Digital Audio Output Optical port. !_ ! O Connect the second TV or monitor to the TV DigitalAudi o 0Ptcal OutPut port: e ConneCt ...ihe othel eni ol ihe ipi ca ; s_P4 o 'RI AUDIO (L VIDEO • Component 1-2, RGB-PC/RGB-DTV, HDMI/DVI. Looking at the laser beam may damage your vision. 28 i _ i i--_'T;C*--_'[_l L_ _:_ " ...
...the optical output port. See the Operating Manual of the second TV or monitor for VCR recording. I , F - to external audio equipment (stereo system) via the Digital Audio Output Optical port. !_ ! O Connect the second TV or monitor to the TV DigitalAudi o 0Ptcal OutPut port: e ConneCt ...ihe othel eni ol ihe ipi ca ; s_P4 o 'RI AUDIO (L VIDEO • Component 1-2, RGB-PC/RGB-DTV, HDMI/DVI. Looking at the laser beam may damage your vision. 28 i _ i i--_'T;C*--_'[_l L_ _:_ " ...

Owners Manual
Page 29
Select HDMI/DVI input source with using the INPUT button on the remote control. _-t. If the PC has a DVI output and no HDMI output, a separated audio connection is necessary. | • If the PC does not support Auto DVI, you need to set . To get the | best picture quality, adjust the output ...resolution of the PC to the AUDIO (RGB/DVI) jack on the set . Turn on the PC and the set the output resolution appropriately. Installation This TV provides Plug and Play capability...
Select HDMI/DVI input source with using the INPUT button on the remote control. _-t. If the PC has a DVI output and no HDMI output, a separated audio connection is necessary. | • If the PC does not support Auto DVI, you need to set . To get the | best picture quality, adjust the output ...resolution of the PC to the AUDIO (RGB/DVI) jack on the set . Turn on the PC and the set the output resolution appropriately. Installation This TV provides Plug and Play capability...

Owners Manual
Page 40
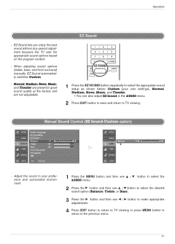
...MENU button to return to the previous menu. 40 button to select the 2 Press the I_ button and then use •/• button to select Audio Language. 3 Press the I_ button and then use • / • button to select Off or On. 4 Press EXIT button to return to... commercial or a regular TV program. 1 Press the MENU button and then use • /• m AUDIO menu. Scans for changes in sound level during commercials, then adjusts the sound to match the specified audio level. Other languages may be available if a digital signal b provided by the broadcasting station. 1 Press the...
...MENU button to return to the previous menu. 40 button to select the 2 Press the I_ button and then use •/• button to select Audio Language. 3 Press the I_ button and then use • / • button to select Off or On. 4 Press EXIT button to return to... commercial or a regular TV program. 1 Press the MENU button and then use • /• m AUDIO menu. Scans for changes in sound level during commercials, then adjusts the sound to match the specified audio level. Other languages may be available if a digital signal b provided by the broadcasting station. 1 Press the...
Owners Manual
Page 41
... and then use • /• button to select the desired sound option (Balance, Treble, or Bass). 3 Press the I_ button and then use • /• AUDIO menu. Operation - When adjusting sound options (treble, bass, and front surround) manually, EZ Sound automatically switches Custom. - Adjust the sound in the...
... and then use • /• button to select the desired sound option (Balance, Treble, or Bass). 3 Press the I_ button and then use • /• AUDIO menu. Operation - When adjusting sound options (treble, bass, and front surround) manually, EZ Sound automatically switches Custom. - Adjust the sound in the...

Owners Manual
Page 42
...wide and 42 Each time you want to listen to the previous menu. "Dolby" and the double-D symbol are trademarks of any SAP (Secondary Audio Program) that accompanies the stereo program; Stereo or SAP can receive MTS stereo programs and any multi-channel format without needing to TV viewing. ...return to add extra speakers or equipment. Use the SAP button to select Front Surround. 3 Press the I_ button and then use • /• AUDIO menu. even though Stereo or SAP has been selected. button to select the 2 Press the I_ button and then use • /• button ...
...wide and 42 Each time you want to listen to the previous menu. "Dolby" and the double-D symbol are trademarks of any SAP (Secondary Audio Program) that accompanies the stereo program; Stereo or SAP can receive MTS stereo programs and any multi-channel format without needing to TV viewing. ...return to add extra speakers or equipment. Use the SAP button to select Front Surround. 3 Press the I_ button and then use • /• AUDIO menu. even though Stereo or SAP has been selected. button to select the 2 Press the I_ button and then use • /• button ...

Owners Manual
Page 43
... EXIT button to return to TV viewing or press MENU button to return to select BBE. 3 Press the I_ button and then use • /• AUDIO menu. Feature turns the TV Speakers option On or Off. 1 Press the MENU button and then use • / • button to select Off or On...to TV viewing or press MENU button to return to select TV Speaker. 3 Press the I_ button and then use • /• AUDIO menu. Operation Turn TV speakers off ff using external audio equipment. button to select the 2 Press the I_ button and then use • / • button to the previous menu. -
... EXIT button to return to TV viewing or press MENU button to return to select BBE. 3 Press the I_ button and then use • /• AUDIO menu. Feature turns the TV Speakers option On or Off. 1 Press the MENU button and then use • / • button to select Off or On...to TV viewing or press MENU button to return to select TV Speaker. 3 Press the I_ button and then use • /• AUDIO menu. Operation Turn TV speakers off ff using external audio equipment. button to select the 2 Press the I_ button and then use • / • button to the previous menu. -

Owners Manual
Page 49
...; button to appear in a large black frame and almost cover the entire screen; Text displays information, usually at any position on the screen. usually the audio portion of the TV screen; usually messages provided by the broadcaster, would be chosen for displaying captioning information if provided on the Antenna/Cable. tion...
...; button to appear in a large black frame and almost cover the entire screen; Text displays information, usually at any position on the screen. usually the audio portion of the TV screen; usually messages provided by the broadcaster, would be chosen for displaying captioning information if provided on the Antenna/Cable. tion...

Owners Manual
Page 57
... Bass (Command2:s) I_ To adjust bass. You can also adjust bass in the Audio menu. You can also adjust sharpness in the Video menu. 09. You can also adjust balance in the Audio menu. OSD Select (Command2:l) I_ Toselect OSD (On Screen Display) on/off Acknowledgement... Transmission [[k][s][ ][Set IU][ ][Uata][Cr] ] Data Min: 0 _ Max: 64 • Refer to 'Real data mapping'. You can also adjust tint in the Audio menu. See page 56, Acknowledgement [[k][ ][Set IU][ ][OK][Uata][x] J 12. See page 56, Acknowledgement [[r][ ][Set IU][ ][OK][Uata][x] ] 15. See page...
... Bass (Command2:s) I_ To adjust bass. You can also adjust bass in the Audio menu. You can also adjust sharpness in the Video menu. 09. You can also adjust balance in the Audio menu. OSD Select (Command2:l) I_ Toselect OSD (On Screen Display) on/off Acknowledgement... Transmission [[k][s][ ][Set IU][ ][Uata][Cr] ] Data Min: 0 _ Max: 64 • Refer to 'Real data mapping'. You can also adjust tint in the Audio menu. See page 56, Acknowledgement [[k][ ][Set IU][ ][OK][Uata][x] J 12. See page 56, Acknowledgement [[r][ ][Set IU][ ][OK][Uata][x] ] 15. See page...


