
Owner's Manual
Page 1
See the label attached on the back cover and quote this manual carefully before operating your dealer when you require service. Record model number and serial number of the set . Color Television OWNER'S MANUAL Please read this information to your set . Retain it for future reference.
See the label attached on the back cover and quote this manual carefully before operating your dealer when you require service. Record model number and serial number of the set . Color Television OWNER'S MANUAL Please read this information to your set . Retain it for future reference.

Owner's Manual
Page 3
... 4 ~ 6 Basic TV operation ...7 Turning on/off the TV ...7 Selecting the on screen language 7 Memorizing Channels ...8 Memorizing the Channels by AUTO PROGRAM 8 Memorizing the Channels by MANUAL PROGRAM 9 Selecting the Channel 9 Adjusting the Volume ...9 Various function ...10 Setting the Clock ...10 Setting the OFF TIMER 10 Setting the ON TIMER 10 Setting...
... 4 ~ 6 Basic TV operation ...7 Turning on/off the TV ...7 Selecting the on screen language 7 Memorizing Channels ...8 Memorizing the Channels by AUTO PROGRAM 8 Memorizing the Channels by MANUAL PROGRAM 9 Selecting the Channel 9 Adjusting the Volume ...9 Various function ...10 Setting the Clock ...10 Setting the OFF TIMER 10 Setting the ON TIMER 10 Setting...
Owner's Manual
Page 7
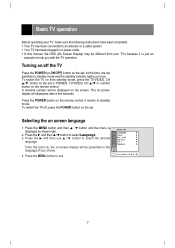
... completed. • Your TV has been connected to an antenna or a cable system. • Your TV has been plugged in a power outlet. • In this manual, the OSD (On Screen Display) may be different from standby mode, press the TV/VIDEO, CH D/E button on the set or POWER, TV/VIDEO, CH...
... completed. • Your TV has been connected to an antenna or a cable system. • Your TV has been plugged in a power outlet. • In this manual, the OSD (On Screen Display) may be different from standby mode, press the TV/VIDEO, CH D/E button on the set or POWER, TV/VIDEO, CH...
Owner's Manual
Page 8
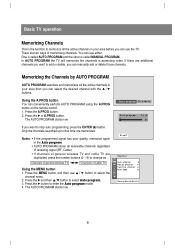
...PROG button You can use either. Press the G or A.PROG button. The AUTO PROGRAM starts now. ++Auto+program OToOOstart OAutoOprogramOOOOOOOOTVO19 O5% If you can manually add or delete those channels. Notes : • If the programmed signal has poor quality, memorize again in ascending order. In AUTO PROGRAM the TV ...can select the desired channel with the D / E buttons. Only the channels searched up to select Auto program. 3. There are memorized. One is called MANUAL PROGRAM. Auto+program { Manual program { Favorite+channel++ { Auto+demo+ ++++{ Move++Next+{+Exit} 8
...PROG button You can use either. Press the G or A.PROG button. The AUTO PROGRAM starts now. ++Auto+program OToOOstart OAutoOprogramOOOOOOOOTVO19 O5% If you can manually add or delete those channels. Notes : • If the programmed signal has poor quality, memorize again in ascending order. In AUTO PROGRAM the TV ...can select the desired channel with the D / E buttons. Only the channels searched up to select Auto program. 3. There are memorized. One is called MANUAL PROGRAM. Auto+program { Manual program { Favorite+channel++ { Auto+demo+ ++++{ Move++Next+{+Exit} 8
Owner's Manual
Page 9
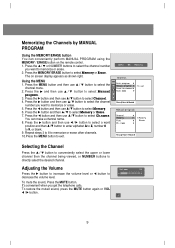
...MMaannuuaall pprrooggrraamm {{ channel menu. Press the G button and then use D/ E button to memorize or erase. You can conveniently perform MANUAL PROGRAM using the MEMORY / ERASE button on screen display appears as shown right. Press the MENU button and then use D/ E button...{{ ++Memory { ++Erase { position and then D/ E button to enter alphabet A to Z, number 0 to select Manual Auto+demo+ + { program . 3. To mute the sound, Press the MUTE button. Manual+program 7. Repeat steps 3 to 8 to memorize or erase other channels. 10.Press the MENU button to exit. Favorite...
...MMaannuuaall pprrooggrraamm {{ channel menu. Press the G button and then use D/ E button to memorize or erase. You can conveniently perform MANUAL PROGRAM using the MEMORY / ERASE button on screen display appears as shown right. Press the MENU button and then use D/ E button...{{ ++Memory { ++Erase { position and then D/ E button to enter alphabet A to Z, number 0 to select Manual Auto+demo+ + { program . 3. To mute the sound, Press the MUTE button. Manual+program 7. Repeat steps 3 to 8 to memorize or erase other channels. 10.Press the MENU button to exit. Favorite...
Owner's Manual
Page 12
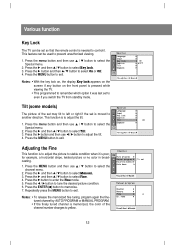
...to memorize. 7. Press the ENTER (A) button to exit. Auto+program { MMaannuuaall pprrooggrraamm {{ Favorite+channel+{ Auto+demo+ + { Move++Next+{+Back} Manual+program Channel { Memory { +FFiinnee {{ Ch.+name { Move++Next+{+Back} To+set to even if you switch the TV from standby mode. Key...G and then D/ E button to exit. Repeatedly press the MENU button to select Manual.. 3. Notes : • To release the memorized fine tuning, program again the finetuned channel by AUTO PROGRAM or MANUAL PROGRAM. • If the finely tuned channel is poor, for example, a horizontal...
...to memorize. 7. Press the ENTER (A) button to exit. Auto+program { MMaannuuaall pprrooggrraamm {{ Favorite+channel+{ Auto+demo+ + { Move++Next+{+Back} Manual+program Channel { Memory { +FFiinnee {{ Ch.+name { Move++Next+{+Back} To+set to even if you switch the TV from standby mode. Key...G and then D/ E button to exit. Repeatedly press the MENU button to select Manual.. 3. Notes : • To release the memorized fine tuning, program again the finetuned channel by AUTO PROGRAM or MANUAL PROGRAM. • If the finely tuned channel is poor, for example, a horizontal...

Owner's Manual
Page 13
... reaches the last display, it starts again from the beginning. Move++Next+{+Back} For further information, refer to select the desired channel number. 5. Auto+program { Manual program { FFaavvoorriittee++cchhaannnneell++{{ Auto+demo+ + { Move++Next+{+Back} CATV++95 To select the favorite channel, repeatedly press the FCR (Favorite Channel Review) button. Auto Demonstration...
... reaches the last display, it starts again from the beginning. Move++Next+{+Back} For further information, refer to select the desired channel number. 5. Auto+program { Manual program { FFaavvoorriittee++cchhaannnneell++{{ Auto+demo+ + { Move++Next+{+Back} CATV++95 To select the favorite channel, repeatedly press the FCR (Favorite Channel Review) button. Auto Demonstration...
Owner's Manual
Page 15
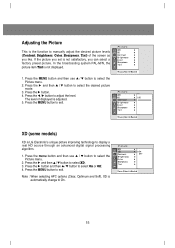
... Picture menu. 2. APC XD ++{ { 100 +CCoonnttrraasstt { Brightness + { Color ++++++++{ Sharpness + { Tint ++++++ + { Move++Next+{+Back} XD (some models) XD is LG Electronic's unique picture improving technology to select XD. 3. Press the G and then D/ E button to display a real HD source through an advanced digital signal processing algorithm...select a factory preset picture. Picture CH. Press the G button. 4. Adjusting the Picture This is the function to manually adjust the desired picture levels (Contrast, Brightness, Color, Sharpness, Tint) of displayed is adjusted. 5.
... Picture menu. 2. APC XD ++{ { 100 +CCoonnttrraasstt { Brightness + { Color ++++++++{ Sharpness + { Tint ++++++ + { Move++Next+{+Back} XD (some models) XD is LG Electronic's unique picture improving technology to select XD. 3. Press the G and then D/ E button to display a real HD source through an advanced digital signal processing algorithm...select a factory preset picture. Picture CH. Press the G button. 4. Adjusting the Picture This is the function to manually adjust the desired picture levels (Contrast, Brightness, Color, Sharpness, Tint) of displayed is adjusted. 5.


