
Owner's Manual
Page 2
... magnetism from disturbing colors purity (uniformity) on an unstable cart, stand, or table. Serial No. 2 NO USER-SERVICEABLE PARTS IN SIDE. REFER SERVICING TO QUALIFIED SERVICE PERSONNEL. Do not place this television receiver near a swimming pool, etc. This television receiver should be abused by persons walking on the power cord. Use Do not allow anything to this television receiver from the type of any kind...
... magnetism from disturbing colors purity (uniformity) on an unstable cart, stand, or table. Serial No. 2 NO USER-SERVICEABLE PARTS IN SIDE. REFER SERVICING TO QUALIFIED SERVICE PERSONNEL. Do not place this television receiver near a swimming pool, etc. This television receiver should be abused by persons walking on the power cord. Use Do not allow anything to this television receiver from the type of any kind...

Owner's Manual
Page 3
... Sound (some models 18 Adjusting the equalizer (User mode in Auto Sound Control 18 Closed caption function...19 Using Closed Captions 19 Operating the Caption and Text 20 PIP function (some models 21 Watching the PIP (Picture in Picture 21 Selecting the Input Signal (in PIP and Double Window Mode 21 Channel Search...22 Moving the Sub Picture (in PIP mode 22 Swapping Screens...22 Still Picture...22 Antenna Connections ...23 Connection of external equipment (some models 24 ~ 25 Connecting DVD player (some models 26 Troubleshooting check list...
... Sound (some models 18 Adjusting the equalizer (User mode in Auto Sound Control 18 Closed caption function...19 Using Closed Captions 19 Operating the Caption and Text 20 PIP function (some models 21 Watching the PIP (Picture in Picture 21 Selecting the Input Signal (in PIP and Double Window Mode 21 Channel Search...22 Moving the Sub Picture (in PIP mode 22 Swapping Screens...22 Still Picture...22 Antenna Connections ...23 Connection of external equipment (some models 24 ~ 25 Connecting DVD player (some models 26 Troubleshooting check list...
Owner's Manual
Page 4
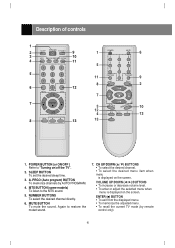
... mode (by AUTO PROGRAM. 4. MUTE BUTTON To mute the sound. PRGO (Auto program) BUTTON To memorize channels by remote control only). 4 PROG MEMORY/ERASE 10 12 4 MTS FCR 13 13 1. VOLUME UP/DOWN (F / G) BUTTONS • To increase or decrease volume level. • To enter or adjust the selected menu when menu is displayed on the screen. POWER BUTTON (or ON/OFF ) Refer to "Turning on the screen. A. CH UP/DOWN (D/ E) BUTTONS • To select the desired channel...
... mode (by AUTO PROGRAM. 4. MUTE BUTTON To mute the sound. PRGO (Auto program) BUTTON To memorize channels by remote control only). 4 PROG MEMORY/ERASE 10 12 4 MTS FCR 13 13 1. VOLUME UP/DOWN (F / G) BUTTONS • To increase or decrease volume level. • To enter or adjust the selected menu when menu is displayed on the screen. POWER BUTTON (or ON/OFF ) Refer to "Turning on the screen. A. CH UP/DOWN (D/ E) BUTTONS • To select the desired channel...
Owner's Manual
Page 5
CAPTION BUTTON (some models) To memorize or erase the desired channel. 11. Refer to "Turning on -screen. 9. Refer to "Closed caption function". 12. TV/VIDEO BUTTON To select TV, VIDEO or COMPONENT mode. 10. FCR (Favorite Channel Review) BUTTON To select the favorite channel. If your product has a protection film attached, remove the film and then wipe the product with a polishing cloth. ON/OFF TV/VIDEO MENU VOL CH 1 14 15 9 8 7 ON/OFF...
CAPTION BUTTON (some models) To memorize or erase the desired channel. 11. Refer to "Turning on -screen. 9. Refer to "Closed caption function". 12. TV/VIDEO BUTTON To select TV, VIDEO or COMPONENT mode. 10. FCR (Favorite Channel Review) BUTTON To select the favorite channel. If your product has a protection film attached, remove the film and then wipe the product with a polishing cloth. ON/OFF TV/VIDEO MENU VOL CH 1 14 15 9 8 7 ON/OFF...
Owner's Manual
Page 6
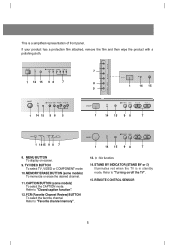
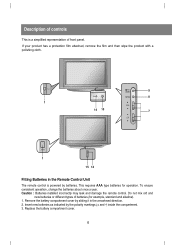
... film and then wipe the product with a polishing cloth. 9 8 1 14 15 7 1 15 14 Fitting Batteries in the arrowhead direction. 2. Remove the battery compartment cover by sliding it in the Remote Control Unit The remote control is a simplified representation of batteries (for operation. Replace the battery compartment cover. 6 Do not mix old and new batteries or different types of front panel.
... film and then wipe the product with a polishing cloth. 9 8 1 14 15 7 1 15 14 Fitting Batteries in the arrowhead direction. 2. Remove the battery compartment cover by sliding it in the Remote Control Unit The remote control is a simplified representation of batteries (for operation. Replace the battery compartment cover. 6 Do not mix old and new batteries or different types of front panel.
Owner's Manual
Page 7
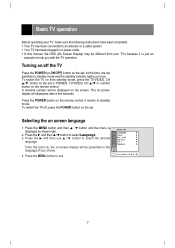
... connected to an antenna or a cable system. • Your TV has been plugged in a power outlet. • In this manual, the OSD (On Screen Display) may be different from standby mode, press the TV/VIDEO, CH D/E button on the set or POWER, TV/VIDEO, CH D/E or number button on the remote control. Press the MENU button to select Language. 3. At this time, the set . Special CH. To switch the TV on the set switches to standby mode...
... connected to an antenna or a cable system. • Your TV has been plugged in a power outlet. • In this manual, the OSD (On Screen Display) may be different from standby mode, press the TV/VIDEO, CH D/E button on the set or POWER, TV/VIDEO, CH D/E or number button on the remote control. Press the MENU button to select Language. 3. At this time, the set . Special CH. To switch the TV on the set switches to standby mode...
Owner's Manual
Page 8
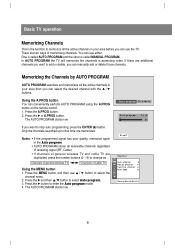
... time are two ways of memorizing channels. Notes : • If the programmed signal has poor quality, memorize again in ascending order. Press the G and then D/ E button to enter the Auto program mode. 4. Press the G button to select Auto program. 3. Using the A.PROG button You can use either. Press the MENU button and then use D / E button to select the channel menu. 2. You can conveniently perform AUTO PROGRAM using the A.PROG button on the remote control. 1. One is called MANUAL PROGRAM. In AUTO PROGRAM...
... time are two ways of memorizing channels. Notes : • If the programmed signal has poor quality, memorize again in ascending order. Press the G and then D/ E button to enter the Auto program mode. 4. Press the G button to select Auto program. 3. Using the A.PROG button You can use either. Press the MENU button and then use D / E button to select the channel menu. 2. You can conveniently perform AUTO PROGRAM using the A.PROG button on the remote control. 1. One is called MANUAL PROGRAM. In AUTO PROGRAM...
Owner's Manual
Page 10
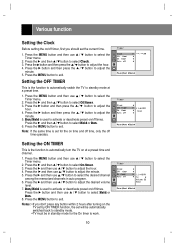
... select the Timer menu. 2. Clock Off_timer OOnn_+_ttiimmeerr Auto+_off+ { { {{ 1_1_:40+PAMM { TV0000006 Volume030 Hold Move++Next+{+Back} Notes: •If you should set for the On timer to adjust the desired volume level. 7. Press the MENU button and then use D / E button to work. 10 Press the G and then D/ E button to exit. Press the G button and then use D/ E button to standby mode at a preset time and channel. 1. Press the G button...
... select the Timer menu. 2. Clock Off_timer OOnn_+_ttiimmeerr Auto+_off+ { { {{ 1_1_:40+PAMM { TV0000006 Volume030 Hold Move++Next+{+Back} Notes: •If you should set for the On timer to adjust the desired volume level. 7. Press the MENU button and then use D / E button to work. 10 Press the G and then D/ E button to exit. Press the G button and then use D/ E button to standby mode at a preset time and channel. 1. Press the G button...
Owner's Manual
Page 11
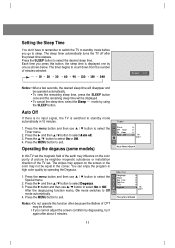
... installation direction of the earth may influence on the screen or the color may appear on the color purity of picture by one as shown below. You can enjoy the program in the corner. Press the SLEEP button to exit. Press the G and then D/ E button to select the Timer menu. 2. The sleep timer automatically turns the TV off . 3. mode by operating the Degauss. Press the menu button and then use D/ E button to select...
... installation direction of the earth may influence on the screen or the color may appear on the color purity of picture by one as shown below. You can enjoy the program in the corner. Press the SLEEP button to exit. Press the G and then D/ E button to select the Timer menu. 2. The sleep timer automatically turns the TV off . 3. mode by operating the Degauss. Press the menu button and then use D/ E button to select...
Owner's Manual
Page 12
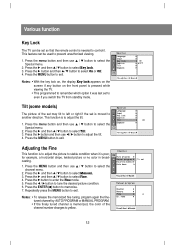
... use D / E button to select Fine. 4. This feature can be used to adjust the tilt. Language Input 1. Adjusting the Fine This function is to adjust the picture to stable condition when it was last set to select On or Off. 4. Language The picture of the channel number changes to adjust the tilt. Key+lock Caption+ Tilt+ 1. Various function Key Lock The TV can be set so that the remote control is needed to Input another direction...
... use D / E button to select Fine. 4. This feature can be used to adjust the tilt. Language Input 1. Adjusting the Fine This function is to adjust the picture to stable condition when it was last set to select On or Off. 4. Language The picture of the channel number changes to adjust the tilt. Key+lock Caption+ Tilt+ 1. Various function Key Lock The TV can be set so that the remote control is needed to Input another direction...

Owner's Manual
Page 13
...menu. 2. Language { Input { 2. Press the D /E button to select the Special Special menu. Press the G button and then use D / E button to select a favorite channel position. 4. Press the MENU button and then use D / E button to select the Channel menu. 2. Game (some models) You can enjoy the TV game with this set . 1. Use the F / G button to 4. 6. Favorite channel memory Favorite channel memory is a convenient feature that lets you to review all the in-between channels. 1. Auto+program { Manual program { FFaavvoorriittee++cchhaannnneell++{{ Auto+demo...
...menu. 2. Language { Input { 2. Press the D /E button to select the Special Special menu. Press the G button and then use D / E button to select a favorite channel position. 4. Press the MENU button and then use D / E button to select the Channel menu. 2. Game (some models) You can enjoy the TV game with this set . 1. Use the F / G button to 4. 6. Favorite channel memory Favorite channel memory is a convenient feature that lets you to review all the in-between channels. 1. Auto+program { Manual program { FFaavvoorriittee++cchhaannnneell++{{ Auto+demo...

Owner's Manual
Page 14
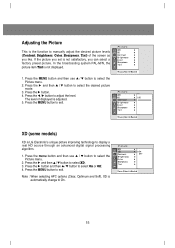
... then D/ E button to select Clear, Optimum, Soft or User. 5. Press the D/ E button to select APC. 3. Picture CH. +AAPPCC ++{ XD { Contrast { Brightness + { Color ++++++++{ Sharpness + { Tint ++++++ + { Clear Optimum Soft User Move++Next+{+Back} 14 Press the ENTER(A) button to exit. Clear Using the MENU button 1. Press the MENU button to exit. Press the G button to enter the APC mode. 4. Picture control Auto Picture Control You can select picture modes programmed at factory as you prefer. Using the APC button 1. Press...
... then D/ E button to select Clear, Optimum, Soft or User. 5. Press the D/ E button to select APC. 3. Picture CH. +AAPPCC ++{ XD { Contrast { Brightness + { Color ++++++++{ Sharpness + { Tint ++++++ + { Clear Optimum Soft User Move++Next+{+Back} 14 Press the ENTER(A) button to exit. Clear Using the MENU button 1. Press the MENU button to exit. Press the G button to enter the APC mode. 4. Picture control Auto Picture Control You can select picture modes programmed at factory as you prefer. Using the APC button 1. Press...
Owner's Manual
Page 15
... is LG Electronic's unique picture improving technology to display a real HD source through an advanced digital signal processing algorithm. 1. The level of the screen as you can select a factory preset picture. APC ++{ XD { Contrast { Brightness + { Color ++++++++{ Sharpness + { Tint ++++++ + { Move++Next+{+Back} 1. Press the menu button and then use D / E button to select the Picture menu. 2. In the broadcasting system PAL-M/N, the picture item Tint is not displayed. Adjusting the Picture This is...
... is LG Electronic's unique picture improving technology to display a real HD source through an advanced digital signal processing algorithm. 1. The level of the screen as you can select a factory preset picture. APC ++{ XD { Contrast { Brightness + { Color ++++++++{ Sharpness + { Tint ++++++ + { Move++Next+{+Back} 1. Press the menu button and then use D / E button to select the Picture menu. 2. In the broadcasting system PAL-M/N, the picture item Tint is not displayed. Adjusting the Picture This is...
Owner's Manual
Page 16
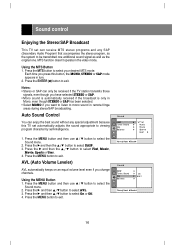
... any SAP (Secondary Audio Program) that accompanies the stereo program, as the system to be received if the TV station transmits those signals, even though you press this TV set automatically adjusts the sound appropriate to viewing program character by self-intelligence. Auto Sound Control You can only be transmitted one additional sound signal as well as the original one. MTS function doesn't operate in the video mode.
... any SAP (Secondary Audio Program) that accompanies the stereo program, as the system to be received if the TV station transmits those signals, even though you press this TV set automatically adjusts the sound appropriate to viewing program character by self-intelligence. Auto Sound Control You can only be transmitted one additional sound signal as well as the original one. MTS function doesn't operate in the video mode.
Owner's Manual
Page 20
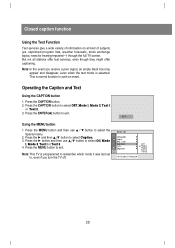
...+lock Caption+ Tilt+ Degauss { { { { +++Off { +++Mode1 { +++Mode2 +++Text1 +++Text2 Move++Next+{+Back} 20 captioned program lists, weather forecasts, stock exchange topics, news for hearing-impaired---) through the full TV screen. This is selected. Press the G button and then use D / E button to select Off, Mode 1, Mode 2, Text 1 or Text 2. 4. Note: In the event you turn the TV off. SSOff Using the MENU button 1. Closed caption function Using the Text Function Text services...
...+lock Caption+ Tilt+ Degauss { { { { +++Off { +++Mode1 { +++Mode2 +++Text1 +++Text2 Move++Next+{+Back} 20 captioned program lists, weather forecasts, stock exchange topics, news for hearing-impaired---) through the full TV screen. This is selected. Press the G button and then use D / E button to select Off, Mode 1, Mode 2, Text 1 or Text 2. 4. Note: In the event you turn the TV off. SSOff Using the MENU button 1. Closed caption function Using the Text Function Text services...
Owner's Manual
Page 21
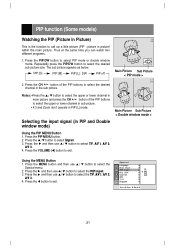
... PIP buttons to select the upper or lower channel in sub picture. • 4:3 and Zoom don't operate in PIP [L] mode. Press the VOLUME (F) button to select Input. 3. Press the G and then use D / E button to select the desired channel in the sub picture. button of the PIP buttons to select the Special menu. 2. Press the D/ E button to exit. Press the MENU button and then use D/ E button to select TV, AV 1, AV 2, AV 3. 4. Language Main+Input PIP+Input+ Key+lock Caption+ ARC...
... PIP buttons to select the upper or lower channel in sub picture. • 4:3 and Zoom don't operate in PIP [L] mode. Press the VOLUME (F) button to select Input. 3. Press the G and then use D / E button to select the desired channel in the sub picture. button of the PIP buttons to select the Special menu. 2. Press the D/ E button to exit. Press the MENU button and then use D/ E button to select TV, AV 1, AV 2, AV 3. 4. Language Main+Input PIP+Input+ Key+lock Caption+ ARC...
Owner's Manual
Page 22
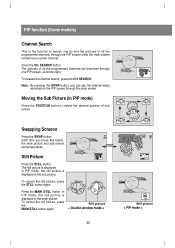
... picture is displayed in the main picture. To cancel the still picture, press the MAIN STILL button again. Press the CH. SEARCH. Still picture < Double window mode > 24 5 Still picture < PIP mode > 22 The pictures of all the programmed channels are searched through one the pictures of sub picture. PIP function (Some models) Channel Search This is the function to select the desired position of all the programmed channels...
... picture is displayed in the main picture. To cancel the still picture, press the MAIN STILL button again. Press the CH. SEARCH. Still picture < Double window mode > 24 5 Still picture < PIP mode > 22 The pictures of all the programmed channels are searched through one the pictures of sub picture. PIP function (Some models) Channel Search This is the function to select the desired position of all the programmed channels...
Owner's Manual
Page 24
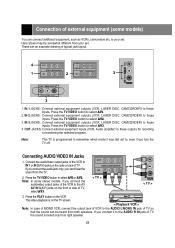
...'t hear the sound from your set . Here shown may be heard from right speaker. 24 IN 3 JACKS : Connect external equipment outputs (VCR, LASER DISC, CAMCORDER) to your set . If you connect the audio jack only, you connect it was last set to these inputs. Press the PLAY button on the side or back of TV, select AV3. < TV > AV IN 3 < TV > 3. VIDEO L/MONO AUDIO R Connecting AUDIO/VIDEO IN Jacks 1. Note: In some models) You can...
...'t hear the sound from your set . Here shown may be heard from right speaker. 24 IN 3 JACKS : Connect external equipment outputs (VCR, LASER DISC, CAMCORDER) to your set . If you connect the audio jack only, you connect it was last set to these inputs. Press the PLAY button on the side or back of TV, select AV3. < TV > AV IN 3 < TV > 3. VIDEO L/MONO AUDIO R Connecting AUDIO/VIDEO IN Jacks 1. Note: In some models) You can...
Owner's Manual
Page 25
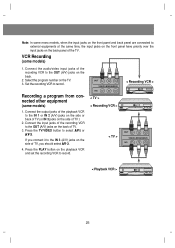
... a program from connected other equipment (some models) 1. Connect the output jacks of the playback VCR to record. Select the program number on the side of TV, you should select AV-3. 4. OUT VIDEO(L/MONO)AUDIO(R) IN1 < TV > < Recording VCR > < TV > < Recording VCR > OUT VIDEO(L/MONO)AUDIO(R) IN1 < Playback VCR > 25 VCR Recording (some models) 1. Connect the input jacks of the recording VCR to external equipments at the same time, the input jacks on the front panel have priority over the input jacks...
... a program from connected other equipment (some models) 1. Connect the output jacks of the playback VCR to record. Select the program number on the side of TV, you should select AV-3. 4. OUT VIDEO(L/MONO)AUDIO(R) IN1 < TV > < Recording VCR > < TV > < Recording VCR > OUT VIDEO(L/MONO)AUDIO(R) IN1 < Playback VCR > 25 VCR Recording (some models) 1. Connect the input jacks of the recording VCR to external equipments at the same time, the input jacks on the front panel have priority over the input jacks...
Owner's Manual
Page 26
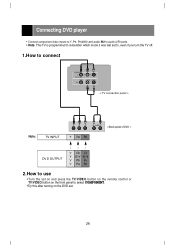
Connecting DVD player • Connect component video inputs to Y, PB, PR(480i) and audio IN2 to audio(L/R) ports. • Note: This TV is programmed to remember which mode it was last set to, even if you turn the TV off. 1.How to connect COMPONENT Y PB PR DVD IN (480i) VIDEO IN2 (L/MONO) AUDIO(R) < TV connection panel > Note: TV INPUT Y PB PR (R) AUDIO (L) < Back panel of DVD > Y PB PR DV D OUTPUT Y Cb Cr Y B -Y R -Y Y Pb Pr Y PB PR 2.How...
Connecting DVD player • Connect component video inputs to Y, PB, PR(480i) and audio IN2 to audio(L/R) ports. • Note: This TV is programmed to remember which mode it was last set to, even if you turn the TV off. 1.How to connect COMPONENT Y PB PR DVD IN (480i) VIDEO IN2 (L/MONO) AUDIO(R) < TV connection panel > Note: TV INPUT Y PB PR (R) AUDIO (L) < Back panel of DVD > Y PB PR DV D OUTPUT Y Cb Cr Y B -Y R -Y Y Pb Pr Y PB PR 2.How...


