
Owners Manual
Page 4
... with the manufacturer's instructions. 11. Only use this apparatus near any of the ventilation openings. IMPORTANT SAFETY INSTRUCTIONS 1. Do not install near water. 6. Protect the power cord from the apparatus. 7. The wide blade or the third prong is provided for replacement of the polarized or grounding type plug. When the provided...
... with the manufacturer's instructions. 11. Only use this apparatus near any of the ventilation openings. IMPORTANT SAFETY INSTRUCTIONS 1. Do not install near water. 6. Protect the power cord from the apparatus. 7. The wide blade or the third prong is provided for replacement of the polarized or grounding type plug. When the provided...

Owners Manual
Page 5
... of the appliance, and have the cord replaced with an exact replacement part by the manufacturer, or sold with TV. - Protect the power cord from tip-over. (9 $3125A 13. If the TV feels cold to rain or moisture, does not operate normally, or has been dropped. \ J S Note -x...with a cart, stand, tripod, bracket, or table specified by an authorized servicer. ratus. I°n°'sposa' a. Avoid touching the LCD screen or holding your appliance, and if its appearance indicates damage or deterioration, unplug it for long periods of these conditions could result ...
... of the appliance, and have the cord replaced with an exact replacement part by the manufacturer, or sold with TV. - Protect the power cord from tip-over. (9 $3125A 13. If the TV feels cold to rain or moisture, does not operate normally, or has been dropped. \ J S Note -x...with a cart, stand, tripod, bracket, or table specified by an authorized servicer. ratus. I°n°'sposa' a. Avoid touching the LCD screen or holding your appliance, and if its appearance indicates damage or deterioration, unplug it for long periods of these conditions could result ...

Owners Manual
Page 8
If any accessory is missing, please contact the dealer from where you purchased the product. Owner's Manual Remote Control / Batteries Twister Holder Arrange the wires with the cloth. Power Cord 75_-_Round Cable G-LINK Cable D-sub 15 pin cable Polishing Cloth Polish the screen with the twister holder. Introduction in Ensure that the following accessories are included with your TV.
If any accessory is missing, please contact the dealer from where you purchased the product. Owner's Manual Remote Control / Batteries Twister Holder Arrange the wires with the cloth. Power Cord 75_-_Round Cable G-LINK Cable D-sub 15 pin cable Polishing Cloth Polish the screen with the twister holder. Introduction in Ensure that the following accessories are included with your TV.

Owners Manual
Page 9
... Button TVNIDEO/®Button S-VIDEO Input CHANNEL (V, A) Buttons MENU Button AudioNideo Input 2 VOLUME (4,1_) Buttons When the TV is in standby mode. Logo Display Lamp Channel Display Power Standby Indicator Illuminates red when the TV is switched on, blinks green and then illuminates green. This is a simplified representation of front panel. - Introduction Co...
... Button TVNIDEO/®Button S-VIDEO Input CHANNEL (V, A) Buttons MENU Button AudioNideo Input 2 VOLUME (4,1_) Buttons When the TV is in standby mode. Logo Display Lamp Channel Display Power Standby Indicator Illuminates red when the TV is switched on, blinks green and then illuminates green. This is a simplified representation of front panel. - Introduction Co...

Owners Manual
Page 11
Introduction Controls (Model Name: 26/32LXID, 26/32LX2D) - Here shown may be somewhat different from your TV. This is switched on, blinks / green and then illuminates green. / ON/OFF Button TV GUIDE Button TV/VI DEO / ® Button MENU Button VOLUME (_1,1_)Buttons CHANNEL (V, A) Buttons i Remote Control Sensor j /Power Standby Indicator / Illuminates red when the TV is in / standby mode. / When the TV is a simplified representation of front panel. -
Introduction Controls (Model Name: 26/32LXID, 26/32LX2D) - Here shown may be somewhat different from your TV. This is switched on, blinks / green and then illuminates green. / ON/OFF Button TV GUIDE Button TV/VI DEO / ® Button MENU Button VOLUME (_1,1_)Buttons CHANNEL (V, A) Buttons i Remote Control Sensor j /Power Standby Indicator / Illuminates red when the TV is in / standby mode. / When the TV is a simplified representation of front panel. -

Owners Manual
Page 37
... to operate the Skipping (rq.q,_P.J) function. • In case the DVHS have a incorrect recognition to the 1394 3. When watching the TV, press the 1394 button. Connected Equipment to Generic, the power of DVHS is complet e y pull out and then Connect again, • When searching the screen (_1_,_) respond by devices. ; On... on the Control Panel. Tape in or not • Lock shape Icon - Installation Connect the_ EEE1394 Cable DVHS Connect the IEEE 1394 jack of the TV to the IEEE 1394 jack of DVHS is for a fast search It searches the program's start point and then plays.
... to operate the Skipping (rq.q,_P.J) function. • In case the DVHS have a incorrect recognition to the 1394 3. When watching the TV, press the 1394 button. Connected Equipment to Generic, the power of DVHS is complet e y pull out and then Connect again, • When searching the screen (_1_,_) respond by devices. ; On... on the Control Panel. Tape in or not • Lock shape Icon - Installation Connect the_ EEE1394 Cable DVHS Connect the IEEE 1394 jack of the TV to the IEEE 1394 jack of DVHS is for a fast search It searches the program's start point and then plays.

Owners Manual
Page 44
.... - when you have more than one Cable system in your area, you power Off the TV and then power it OFF when not in use. (Do not unplug the power cord.) 2. Press ENTER button to setup 1 Reminder Screen The TV Guide On Screen system's Reminder Screen appears: - On ree n Tu System ...- If you select "Set up the TV Guide On Screen system. The TV Guide On Screen system uses Setup information to watching TV and stops the reminder screen from appearing upon power On. 2 Welcome Screen The TV Guide On Screen system's Welcome Screen appears: - Note - Turn OFF...
.... - when you have more than one Cable system in your area, you power Off the TV and then power it OFF when not in use. (Do not unplug the power cord.) 2. Press ENTER button to setup 1 Reminder Screen The TV Guide On Screen system's Reminder Screen appears: - On ree n Tu System ...- If you select "Set up the TV Guide On Screen system. The TV Guide On Screen system uses Setup information to watching TV and stops the reminder screen from appearing upon power On. 2 Welcome Screen The TV Guide On Screen system's Welcome Screen appears: - Note - Turn OFF...

Owners Manual
Page 55
... in the future). * Note: This option reads Watch Now if the show . displays the Record Options menu, from which you can set frequency, when, automatically power On, and auto-tune the...
... in the future). * Note: This option reads Watch Now if the show . displays the Record Options menu, from which you can set frequency, when, automatically power On, and auto-tune the...
Owners Manual
Page 61
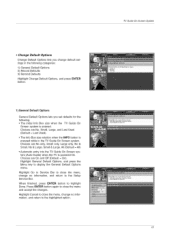
... General Default Options General Default Options lets you set defaults for the following: • The initial Info Box size when the TV Guide On Screen system is pressed while in the TV Guide On Screen system. Choices are No, Small, Large, and Last Used (Default = Last Used). • The Info... only, Large only, No & Small, No & Large, Small & Large, All (Default =All) • Automatic entry into the TV Guide On Screen system (Auto-Guide) when the TV is powered On. Press ENTER button again to the highlighted option. When finished, press ENTER button to the Setup Service Bar. Choices are...
... General Default Options General Default Options lets you set defaults for the following: • The initial Info Box size when the TV Guide On Screen system is pressed while in the TV Guide On Screen system. Choices are No, Small, Large, and Last Used (Default = Last Used). • The Info... only, Large only, No & Small, No & Large, Small & Large, All (Default =All) • Automatic entry into the TV Guide On Screen system (Auto-Guide) when the TV is powered On. Press ENTER button again to the highlighted option. When finished, press ENTER button to the Setup Service Bar. Choices are...

Owners Manual
Page 62
...Defaults Record Default Options lets you set defaults for the following : • When to start the record event. This TV does not provide other devices with a recording feature. Highlight Record Defaults, and press the MENU button to On time....Default = On time) • Recorder choice: Please choose the VCR only. Press ENTER button again to the channel (TV must be On), when a Reminder is scheduled. Choices are Yes and No. (Default = No) • When to... Remind Default Options lets you set defaults for the following : • Power On the TV, if Off, when a Reminder is scheduled.
...Defaults Record Default Options lets you set defaults for the following : • When to start the record event. This TV does not provide other devices with a recording feature. Highlight Record Defaults, and press the MENU button to On time....Default = On time) • Recorder choice: Please choose the VCR only. Press ENTER button again to the channel (TV must be On), when a Reminder is scheduled. Choices are Yes and No. (Default = No) • When to... Remind Default Options lets you set defaults for the following : • Power On the TV, if Off, when a Reminder is scheduled.

Owners Manual
Page 66
There are Yes and No. (Default = No) • Automatically tune the TV to the channel (TV must be On), when a Reminder is scheduled. Choices are Yes and No. (Default =No) • When to display the reminder screen. Press ENTER button again ... button to highlight Schedule Reminder. You see a Remind icon for a show in the list but will not remind until the frequency is changed • Power On the TV, if Off, when a Reminder is scheduled. Highlight Cancel to close the menu. Choices are 2 ways to set a show Reminder in Listings, Search, and Schedule...
There are Yes and No. (Default = No) • Automatically tune the TV to the channel (TV must be On), when a Reminder is scheduled. Choices are Yes and No. (Default =No) • When to display the reminder screen. Press ENTER button again ... button to highlight Schedule Reminder. You see a Remind icon for a show in the list but will not remind until the frequency is changed • Power On the TV, if Off, when a Reminder is scheduled. Highlight Cancel to close the menu. Choices are 2 ways to set a show Reminder in Listings, Search, and Schedule...

Owners Manual
Page 67
channel, tr 3ut combination ,,, the Itsl without "emtnd_ng until the frequency Is changed. • Power On the TV, if Off, when a Reminder is displayed. • Highlight the Frequency option, and use the _1 / _button to choose among Once, Daily, Weekly, and Off, as...button to move through Friday. channel, nput combination Monday through the options. Choices are Yes and No (Default =No). • Automatically tune the TV to the channel (TV must be On), when a Reminder is listed by channel number. Highlight Cancel to the show . TVGuidOe nScreeSnystem 67 Choices are Yes and No (...
channel, tr 3ut combination ,,, the Itsl without "emtnd_ng until the frequency Is changed. • Power On the TV, if Off, when a Reminder is displayed. • Highlight the Frequency option, and use the _1 / _button to choose among Once, Daily, Weekly, and Off, as...button to move through Friday. channel, nput combination Monday through the options. Choices are Yes and No (Default =No). • Automatically tune the TV to the channel (TV must be On), when a Reminder is listed by channel number. Highlight Cancel to the show . TVGuidOe nScreeSnystem 67 Choices are Yes and No (...

Owners Manual
Page 69
...!lydisplayed, The screen may be away Onvacationl disconnect the power plug from the wall power Outlet. • After turning 0nthe TV, it was last set to turn TV on, press the ON/OFF, TV/VIDEO, CH • / • button on the TV or press the POWER, TV INPUT, TV/VIDEO, CH • / •, Number (0 ...volume. 2. Press the VOL • / • button to select a channel number. If you intend to be slightly delayed if the TV was unp!ugged and then powered On. - First select your language. 1 Press the MENU button and then use • / • button to select the OPTION menu....
...!lydisplayed, The screen may be away Onvacationl disconnect the power plug from the wall power Outlet. • After turning 0nthe TV, it was last set to turn TV on, press the ON/OFF, TV/VIDEO, CH • / • button on the TV or press the POWER, TV INPUT, TV/VIDEO, CH • / •, Number (0 ...volume. 2. Press the VOL • / • button to select a channel number. If you intend to be slightly delayed if the TV was unp!ugged and then powered On. - First select your language. 1 Press the MENU button and then use • / • button to select the OPTION menu....

Owners Manual
Page 86
...DTV/CADTV Captions to the previous menu. * Digital Broadcasting System Captions - tion languages: English, Spanish, or French. 4 Press EXIT button to return to TV viewing or press MENU button to return to select caption: CC1, CC2, CC3, CC4, Textl, Text2, Text3, or Text4. • CAPTION The ... _- usually messages provided by the broadcaster, would be chosen for displaying captioning information if provided on the screen. - Choose the language you turn the power off. 1 Use the CC button repeatedly to select Caption Off, CC1, CC2, CC3, CC4, Textl, Text2, Text3, or Text4. • ...
...DTV/CADTV Captions to the previous menu. * Digital Broadcasting System Captions - tion languages: English, Spanish, or French. 4 Press EXIT button to return to TV viewing or press MENU button to return to select caption: CC1, CC2, CC3, CC4, Textl, Text2, Text3, or Text4. • CAPTION The ... _- usually messages provided by the broadcaster, would be chosen for displaying captioning information if provided on the screen. - Choose the language you turn the power off. 1 Use the CC button repeatedly to select Caption Off, CC1, CC2, CC3, CC4, Textl, Text2, Text3, or Text4. • ...

Owners Manual
Page 96
...!!` display images Or play music from a memory card from the TV, please keep the it in a appropriate case to comply with the following steps when ejecting a memory card J 96 Do not bend. Do not turn the power off while using the it may be responsible for damaged data. This Company takes no...
...!!` display images Or play music from a memory card from the TV, please keep the it in a appropriate case to comply with the following steps when ejecting a memory card J 96 Do not bend. Do not turn the power off while using the it may be responsible for damaged data. This Company takes no...

Owners Manual
Page 103
... data write mode, it indicates present status data. Refer to the previous menu. Press the MENU button and then use • / • button to specify a TV ID number. - Aspect Ratio k c 04. Color k g 0 ~ 64 k h 0 ~ 64 k i 0 ~ 64 10. Treble k 17. Color ...(Hexadecimal)(Hexadecima0(Hexadeci0rn(aHexadecima0(Hexadecirnal)(Hexadec0ima 21. Use this format when receiving abnormal data from non-viable functions or communication errors. Power k a 0~1 02. Tint k 11. PIP Input Source k 24. Channel Tuning 22. Communication Parameters • Baud ...
... data write mode, it indicates present status data. Refer to the previous menu. Press the MENU button and then use • / • button to specify a TV ID number. - Aspect Ratio k c 04. Color k g 0 ~ 64 k h 0 ~ 64 k i 0 ~ 64 10. Treble k 17. Color ...(Hexadecimal)(Hexadecima0(Hexadeci0rn(aHexadecima0(Hexadecirnal)(Hexadec0ima 21. Use this format when receiving abnormal data from non-viable functions or communication errors. Power k a 0~1 02. Tint k 11. PIP Input Source k 24. Channel Tuning 22. Communication Parameters • Baud ...

Owners Manual
Page 104
...] 104 05. Contrast (Command2:g) • To adjust screen contrast. Brightness (Command2:h) • To adjust screen brightness. Power (Command2:a) • To control Power On/Off of the TV. Aspect Ratio (Command2:c) (Main picture format) • To adjust the screen format. Transmission I [k][h][ ][Set ID][ ... volume. You can also adjust contrast in the Video menu. Input Select (Command2:b) (Main Picture Input) • To select input source for the TV. Transmission I [k][e][ ][Set ID][ ][Data][Cr] ] Data 0 : Volume mute off (Volume on) 1 : Volume mute on (Volume off)...
...] 104 05. Contrast (Command2:g) • To adjust screen contrast. Brightness (Command2:h) • To adjust screen brightness. Power (Command2:a) • To control Power On/Off of the TV. Aspect Ratio (Command2:c) (Main picture format) • To adjust the screen format. Transmission I [k][h][ ][Set ID][ ... volume. You can also adjust contrast in the Video menu. Input Select (Command2:b) (Main Picture Input) • To select input source for the TV. Transmission I [k][e][ ][Set ID][ ][Data][Cr] ] Data 0 : Volume mute off (Volume on) 1 : Volume mute on (Volume off)...

Owners Manual
Page 110
... be found on the following pages• Again, if the code is correct, the device will turn off on the selected component• Test the POWER button to see if the component responds properly. If not, repeat from step 2. 4 Enter a code number using the number buttons on the remote• When...
... be found on the following pages• Again, if the code is correct, the device will turn off on the selected component• Test the POWER button to see if the component responds properly. If not, repeat from step 2. 4 Enter a code number using the number buttons on the remote• When...

Owners Manual
Page 113
...No picture & No sound Picture appears slowly after five minutes. The problem may be with Auto off • Is the sleep timer set : TV, VCR etc.? • Install new batteries. Poor reception on . • Try another station. • Station signal is muted during the ...obstruction. • Are batteries installed with correct polarity (+ to -)? • Correct remote operating mode set ? • Check the power control settings. Power interrupted • No broadcast on station tuned with the broadcast. • Are the video cables installed properly? • Activate any object...
...No picture & No sound Picture appears slowly after five minutes. The problem may be with Auto off • Is the sleep timer set : TV, VCR etc.? • Install new batteries. Poor reception on . • Try another station. • Station signal is muted during the ...obstruction. • Are batteries installed with correct polarity (+ to -)? • Correct remote operating mode set ? • Check the power control settings. Power interrupted • No broadcast on station tuned with the broadcast. • Are the video cables installed properly? • Activate any object...

Owners Manual
Page 115
...little fabric softener or dish washing detergent. Here's a great way to Width (inches / mm) Height (inches / mm) Depth (inches / mm) Weight (pounds / kg) Power requirement Television System Program Coverage External Antenna Impedance 31 / 787.7 31 / 787.7 36.3 / 922 38.3 / 922 20 / 510 19.2 / 487 23.6 / 599.7 ... piot'swear gsouordgeisd.ea to keep the dust off and unplug the power cord before you begin any cleaning. Wring the cloth until it air-dry before you turn the power off your new TV. Careful and regular cleaning can be changed without prior notice for a...
...little fabric softener or dish washing detergent. Here's a great way to Width (inches / mm) Height (inches / mm) Depth (inches / mm) Weight (pounds / kg) Power requirement Television System Program Coverage External Antenna Impedance 31 / 787.7 31 / 787.7 36.3 / 922 38.3 / 922 20 / 510 19.2 / 487 23.6 / 599.7 ... piot'swear gsouordgeisd.ea to keep the dust off and unplug the power cord before you begin any cleaning. Wring the cloth until it air-dry before you turn the power off your new TV. Careful and regular cleaning can be changed without prior notice for a...


