
Owners Manual
Page 1
P/NO: MFL59868613 (1003-REV06) Printed in Korea www.lg.com OWNER'S MANUAL LCD TV Please read this manual carefully before operating your set and retain it for future reference.
P/NO: MFL59868613 (1003-REV06) Printed in Korea www.lg.com OWNER'S MANUAL LCD TV Please read this manual carefully before operating your set and retain it for future reference.

Owners Manual
Page 3
Do not use on the screen. * Lightly wipe any stains or fingerprints on the surface of the TV with your TV. Owner's Manual Power Cord Batteries RATIO AV MODE POWER ENERGY SAVING LIST Q.VIEW MUTE MENU RETURN Q.MENU MARK FAV Polishing... (Refer to p.6) Protection cover (Refer to p.7) Wall Mounting Bracket(Separate purchase) RW230 AW-47LG30M 1-screw for stand fixing (Refer to p.6) (26/32LH2***) (32/37/42LH2***) 1 ACCESSORIES ACCESSORIES Ensure that the following accessories are included with the polishing cloth. I Here shown may cause scratching or discolouration....
Do not use on the screen. * Lightly wipe any stains or fingerprints on the surface of the TV with your TV. Owner's Manual Power Cord Batteries RATIO AV MODE POWER ENERGY SAVING LIST Q.VIEW MUTE MENU RETURN Q.MENU MARK FAV Polishing... (Refer to p.6) Protection cover (Refer to p.7) Wall Mounting Bracket(Separate purchase) RW230 AW-47LG30M 1-screw for stand fixing (Refer to p.6) (26/32LH2***) (32/37/42LH2***) 1 ACCESSORIES ACCESSORIES Ensure that the following accessories are included with the polishing cloth. I Here shown may cause scratching or discolouration....

Owners Manual
Page 4
...Key Lock 43 Initializing(Reset to secure the power cable 6 Back Cover for PC Mode 22 WATCHING TV / PROGRAMME CONTROL Remote Control Key Functions 26 Turning on the TV 28 Programme Selection 28 Volume Adjustment 28 Quick Menu 29 On-Screen Menus Selection and Adjustment..... 30 ...Auto Programme Tuning 31 Manual Programme Tuning 32 Programme Edit 34 2 PICTURE CONTROL Picture Size (Aspect Ratio) Control 60 Energy ...
...Key Lock 43 Initializing(Reset to secure the power cable 6 Back Cover for PC Mode 22 WATCHING TV / PROGRAMME CONTROL Remote Control Key Functions 26 Turning on the TV 28 Programme Selection 28 Volume Adjustment 28 Quick Menu 29 On-Screen Menus Selection and Adjustment..... 30 ...Auto Programme Tuning 31 Manual Programme Tuning 32 Programme Edit 34 2 PICTURE CONTROL Picture Size (Aspect Ratio) Control 60 Energy ...

Owners Manual
Page 9
...different from the Dual Lock, stick it when you can adjust the TV manually to the left or right direction by pressing the Velcro strips together. 7 NOTE G Do not hold the CABLE MANAGEMENT CLIP when moving the TV. - CABLE MANAGEMENT CLIP HOW TO USE DUAL LOCK™ (This... not available for all models. To connect additional equipment, see the External Equipment Setup section of the manual. SWIVEL STAND I After installing the TV, you want to. 1 After removing the protection paper from your viewing position. PREPARATION 2 Open the CABLE MANAGEMENT CLIP as shown. ! I ...
...different from the Dual Lock, stick it when you can adjust the TV manually to the left or right direction by pressing the Velcro strips together. 7 NOTE G Do not hold the CABLE MANAGEMENT CLIP when moving the TV. - CABLE MANAGEMENT CLIP HOW TO USE DUAL LOCK™ (This... not available for all models. To connect additional equipment, see the External Equipment Setup section of the manual. SWIVEL STAND I After installing the TV, you want to. 1 After removing the protection paper from your viewing position. PREPARATION 2 Open the CABLE MANAGEMENT CLIP as shown. ! I ...
Owners Manual
Page 13
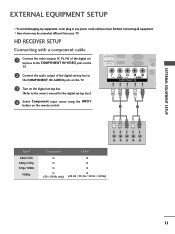
...component cable 1 Connect the video outputs (Y, PB, PR) of the digital set top box to the COMPONENT IN VIDEO jacks on the TV. 2 /DVI IN 1 RGB IN (PC) AUDIO IN (RGB/DVI) A 2 Connect the audio output of the digital set-top... box to the COMPONENT IN AUDIO jacks on the TV. 3 Turn on the digital set-top box. (Refer to the owner's manual for the digital set-top box.) VIDEO AUDIO COMPONENT IN VIDEO C S 4 Select Component input...Hz / 50 Hz / 60 Hz) 11 EXTERNAL EQUIPMENT SETUP EXTERNAL EQUIPMENT SETUP I Here shown may be somewhat different from your TV.
...component cable 1 Connect the video outputs (Y, PB, PR) of the digital set top box to the COMPONENT IN VIDEO jacks on the TV. 2 /DVI IN 1 RGB IN (PC) AUDIO IN (RGB/DVI) A 2 Connect the audio output of the digital set-top... box to the COMPONENT IN AUDIO jacks on the TV. 3 Turn on the digital set-top box. (Refer to the owner's manual for the digital set-top box.) VIDEO AUDIO COMPONENT IN VIDEO C S 4 Select Component input...Hz / 50 Hz / 60 Hz) 11 EXTERNAL EQUIPMENT SETUP EXTERNAL EQUIPMENT SETUP I Here shown may be somewhat different from your TV.

Owners Manual
Page 14
... input source using the INPUT button on the digital set-top box. (Refer to the owner's manual for more than 10m for HDMI cable, and recommend to HDMI/DVI IN 1 or HDMI2 jack on the TV. 2 Turn on the remote control. 2 /DVI IN 1 RS-232C IN (CONTROL&SERVICE) RGB IN (PC) AUDIO...
... input source using the INPUT button on the digital set-top box. (Refer to the owner's manual for more than 10m for HDMI cable, and recommend to HDMI/DVI IN 1 or HDMI2 jack on the TV. 2 Turn on the remote control. 2 /DVI IN 1 RS-232C IN (CONTROL&SERVICE) RGB IN (PC) AUDIO...

Owners Manual
Page 15
... the audio output of the digital set-top box to the AUDIO IN (RGB/DVI) jack on the TV. 3 Turn on the digital set-top box. (Refer to the owner's manual for the digital set-top box.) 4 Select HDMI1 input source using the INPUT button on the remote control. 2 /DVI IN 1 RS...
... the audio output of the digital set-top box to the AUDIO IN (RGB/DVI) jack on the TV. 3 Turn on the digital set-top box. (Refer to the owner's manual for the digital set-top box.) 4 Select HDMI1 input source using the INPUT button on the remote control. 2 /DVI IN 1 RS...
Owners Manual
Page 16
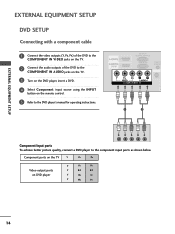
... the audio outputs of the DVD to the component input ports as shown below. Component ports on the TV Y PB PR Video output ports on the remote control. 5 Refer to the DVD player's manual for operating instructions. 2 /DVI IN 1 RS-232C IN (CONTROL&SERVICE) RGB IN (PC) AUDIO IN ...(RGB/DVI) A VIDEO AUDIO COMPONENT IN VIDEO V C S 1 2 Component Input ports To achieve better picture quality, connect a DVD player to the COMPONENT IN AUDIO jacks on the TV. 3 Turn on the...
... the audio outputs of the DVD to the component input ports as shown below. Component ports on the TV Y PB PR Video output ports on the remote control. 5 Refer to the DVD player's manual for operating instructions. 2 /DVI IN 1 RS-232C IN (CONTROL&SERVICE) RGB IN (PC) AUDIO IN ...(RGB/DVI) A VIDEO AUDIO COMPONENT IN VIDEO V C S 1 2 Component Input ports To achieve better picture quality, connect a DVD player to the COMPONENT IN AUDIO jacks on the TV. 3 Turn on the...

Owners Manual
Page 17
NOTE G The TV can result. Please use amplifier or repeater for operating instructions. 2 /DVI IN 1 RS-232C IN (CONTROL&SERVICE) RGB IN (PC) AUDIO (RGB/D Y PB... cables don't support HDMI version 1.3, flickering or no screen display can receive video and audio signals simultaneously when using the INPUT button on the TV. 2 Select HDMI1 or HDMI2 input source using a HDMI cable. G If the DVD does not support Auto HDMI, you must set the output...HDMI output of the DVD to the HDMI/DVI IN 1 or HDMI2 jack on the remote control. 3 Refer to the DVD player's manual for more than that. 15
NOTE G The TV can result. Please use amplifier or repeater for operating instructions. 2 /DVI IN 1 RS-232C IN (CONTROL&SERVICE) RGB IN (PC) AUDIO (RGB/D Y PB... cables don't support HDMI version 1.3, flickering or no screen display can receive video and audio signals simultaneously when using the INPUT button on the TV. 2 Select HDMI1 or HDMI2 input source using a HDMI cable. G If the DVD does not support Auto HDMI, you must set the output...HDMI output of the DVD to the HDMI/DVI IN 1 or HDMI2 jack on the remote control. 3 Refer to the DVD player's manual for more than that. 15

Owners Manual
Page 19
... you have a mono VCR, connect the audio cable from the VCR to the VCR owner's manual.) AUDIO ENT IN 3 Select A V input source using the INPUT button on the L R VCR. (Refer to the AUDIO L/MONO jack of the TV. VIDEO /MONO AUDIO VOLUME STEREO\ CONTROL (8 ) ANTENNA IN SPEAKER OUT 1 ! Match the jack colours... a video tape into the VCR and press PLAY on the remote control. EXTERNAL EQUIPMENT SETUP Connecting with a RCA cable 1 Connect the AUDIO/VIDEO jacks between TV and VCR.
... you have a mono VCR, connect the audio cable from the VCR to the VCR owner's manual.) AUDIO ENT IN 3 Select A V input source using the INPUT button on the L R VCR. (Refer to the AUDIO L/MONO jack of the TV. VIDEO /MONO AUDIO VOLUME STEREO\ CONTROL (8 ) ANTENNA IN SPEAKER OUT 1 ! Match the jack colours... a video tape into the VCR and press PLAY on the remote control. EXTERNAL EQUIPMENT SETUP Connecting with a RCA cable 1 Connect the AUDIO/VIDEO jacks between TV and VCR.

Owners Manual
Page 26
Make appropriate adjustments. • Press the MENU button to return to normal TV viewing. • Press the RETURN button to move to the previous menu screen. 24 PICTURE SSccrreeeenn Move OK E • Contrast 90 • Brightness 50 • ... for screen Position, Size, Phase If the picture is not clear after auto adjustment and especially if characters are still trembling, adjust the picture phase manually. Position operates in RGB mode.
Make appropriate adjustments. • Press the MENU button to return to normal TV viewing. • Press the RETURN button to move to the previous menu screen. 24 PICTURE SSccrreeeenn Move OK E • Contrast 90 • Brightness 50 • ... for screen Position, Size, Phase If the picture is not clear after auto adjustment and especially if characters are still trembling, adjust the picture phase manually. Position operates in RGB mode.

Owners Manual
Page 31
...3 Vivid Standard MONO Off Off USB Device Eject Close 1 Q. For Zoom Setting, select 16:9, Original, 4:3, 14:9, Zoom and Cinema Zoom in this manual. After completing Zoom Setting, the display goes back to Q.Menu. • Clear Voice ll : By differentiating the human sound range from that shown in... Ratio Menu. Q.Menu (Quick Menu) is a feature to normal TV viewing. 29 MENU Display each menu. 2 Select your desired Picture Mode. • Sound Mode : It is a menu of features which it deems...
...3 Vivid Standard MONO Off Off USB Device Eject Close 1 Q. For Zoom Setting, select 16:9, Original, 4:3, 14:9, Zoom and Cinema Zoom in this manual. After completing Zoom Setting, the display goes back to Q.Menu. • Clear Voice ll : By differentiating the human sound range from that shown in... Ratio Menu. Q.Menu (Quick Menu) is a feature to normal TV viewing. 29 MENU Display each menu. 2 Select your desired Picture Mode. • Sound Mode : It is a menu of features which it deems...

Owners Manual
Page 32
... 0L Sound Mode : Standard • SRS TruSurround XT : Off • Treble 50 • Bass 50 E OK + R WATCHING TV / PROGRAMME CONTROL SETUP PICTURE AUDIO TIME OPTION USB TIME Move OK Clock Off Time On Time Sleep Timer : Off : Off : Off OPTION Menu Language ... Move OK : English : On : Off : 1 : Off USB Photo List Music List Movie List DivX Reg. Your TV's OSD (On Screen Display) may be somewhat different from that shown in this manual. SETUP Auto Tuning Manual Tuning Programme Edit Move OK PICTURE Move OK Aspect Ratio : 16:9 Energy Saving : Off Picture Mode : Vivid...
... 0L Sound Mode : Standard • SRS TruSurround XT : Off • Treble 50 • Bass 50 E OK + R WATCHING TV / PROGRAMME CONTROL SETUP PICTURE AUDIO TIME OPTION USB TIME Move OK Clock Off Time On Time Sleep Timer : Off : Off : Off OPTION Menu Language ... Move OK : English : On : Off : 1 : Off USB Photo List Music List Movie List DivX Reg. Your TV's OSD (On Screen Display) may be somewhat different from that shown in this manual. SETUP Auto Tuning Manual Tuning Programme Edit Move OK PICTURE Move OK Aspect Ratio : 16:9 Energy Saving : Off Picture Mode : Vivid...

Owners Manual
Page 33
...previous menu screen. 31 Then, press the OK but- Otherwise select N o. • Press the MENU button to return to normal TV viewing. • Press the RETURN button to move to automatically find and store all previously stored service information will be deleted. Yes ... s. 4 OK Run Auto Tuning. • If you start auto programming, all available programmes. SETUP Auto Tuning Manual Tuning Programme Edit Move OK SETUP Auto Tuning Manual Tuning Programme Edit Move OK Check your antenna connection. The previous channel information will be updated during Auto Tuning. When ...
...previous menu screen. 31 Then, press the OK but- Otherwise select N o. • Press the MENU button to return to normal TV viewing. • Press the RETURN button to move to automatically find and store all previously stored service information will be deleted. Yes ... s. 4 OK Run Auto Tuning. • If you start auto programming, all available programmes. SETUP Auto Tuning Manual Tuning Programme Edit Move OK SETUP Auto Tuning Manual Tuning Programme Edit Move OK Check your antenna connection. The previous channel information will be updated during Auto Tuning. When ...

Owners Manual
Page 34
...) D K : PAL D/K, SECAM D/K (China / Africa) M : Philippines • To store another channel, repeat steps 3 to 9. 32 Select Manual Tuning. 1 2 3 Select the desired pro- WATCHING TV / PROGRAMME CONTROL SETUP Auto Tuning Manual Tuning Programme Edit Move OK SETUP Auto Tuning Manual Tuning Programme Edit Move OK Storage System Band Channel Fine Search Name F 1G BG V/UHF 0 FG...
...) D K : PAL D/K, SECAM D/K (China / Africa) M : Philippines • To store another channel, repeat steps 3 to 9. 32 Select Manual Tuning. 1 2 3 Select the desired pro- WATCHING TV / PROGRAMME CONTROL SETUP Auto Tuning Manual Tuning Programme Edit Move OK SETUP Auto Tuning Manual Tuning Programme Edit Move OK Storage System Band Channel Fine Search Name F 1G BG V/UHF 0 FG...

Owners Manual
Page 35
WATCHING TV / PROGRAMME CONTROL SETUP Auto Tuning Manual Tuning Programme Edit Move OK SETUP Auto Tuning Manual Tuning Programme Edit Move OK Storage System Band Channel Fine Search Name F 1G BG V/UHF 0 FG FG C 02 Store Close A Assigning a station name ... can assign a station name with five characters to 9, +/ , and blank. Select F i n e. 5 6 OK OK Select S t o r e. • Press the MENU button to return to normal TV viewing. • Press the RETURN button to move to the previous menu screen. 33 acter, and so on. Select N a me. 4 OK 5 6 OK Select the position...
WATCHING TV / PROGRAMME CONTROL SETUP Auto Tuning Manual Tuning Programme Edit Move OK SETUP Auto Tuning Manual Tuning Programme Edit Move OK Storage System Band Channel Fine Search Name F 1G BG V/UHF 0 FG FG C 02 Store Close A Assigning a station name ... can assign a station name with five characters to 9, +/ , and blank. Select F i n e. 5 6 OK OK Select S t o r e. • Press the MENU button to return to normal TV viewing. • Press the RETURN button to move to the previous menu screen. 33 acter, and so on. Select N a me. 4 OK 5 6 OK Select the position...

Owners Manual
Page 36
...13 15 E P Page Change Move Previous Skip 1 MENU Select SETUP. 2 OK Select Programme Edit. 3 OK 4 Enter the Programme Edit. WATCHING TV / PROGRAMME CONTROL WATCHING TV / PROGRAMME CONTROL PROGRAMME EDIT When a programme number is skipped, it means that you will be stored or skipped. • Press the MENU button ...P viewing. This function enables you wish to skip the stored programmes. SETUP Auto Tuning Manual Tuning Programme Edit Move OK 1 C 01 Delete Pr. button during TV If you to select the skipped programme, directly enter the programme number with the NUMBER ...
...13 15 E P Page Change Move Previous Skip 1 MENU Select SETUP. 2 OK Select Programme Edit. 3 OK 4 Enter the Programme Edit. WATCHING TV / PROGRAMME CONTROL WATCHING TV / PROGRAMME CONTROL PROGRAMME EDIT When a programme number is skipped, it means that you will be stored or skipped. • Press the MENU button ...P viewing. This function enables you wish to skip the stored programmes. SETUP Auto Tuning Manual Tuning Programme Edit Move OK 1 C 01 Delete Pr. button during TV If you to select the skipped programme, directly enter the programme number with the NUMBER ...

Owners Manual
Page 66
..., Contrast, Brightness, Sharpness, Colour or T i nt. Make appropriate adjustments. • Press the MENU button to return to normal TV viewing. • Press the RETURN button to move to 60%. - Select Picture Mode. You can enjoy a better quality definition.) ... • Brightness 5E0xpert1 • Sharpness 7E0xpert2 • Colour 70 E 1 MENU 2 OK 3 OK 4 OK 5 OK Select PICTURE. PICTURE CONTROL MANUAL PICTURE ADJUSTMENT Picture Mode-User option • Backlight To control the brightness of the screen, adjust the brightness of using Backlight - Adjusting the backlight when...
..., Contrast, Brightness, Sharpness, Colour or T i nt. Make appropriate adjustments. • Press the MENU button to return to normal TV viewing. • Press the RETURN button to move to 60%. - Select Picture Mode. You can enjoy a better quality definition.) ... • Brightness 5E0xpert1 • Sharpness 7E0xpert2 • Colour 70 E 1 MENU 2 OK 3 OK 4 OK 5 OK Select PICTURE. PICTURE CONTROL MANUAL PICTURE ADJUSTMENT Picture Mode-User option • Backlight To control the brightness of the screen, adjust the brightness of using Backlight - Adjusting the backlight when...


