Specification
Page 1
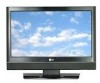
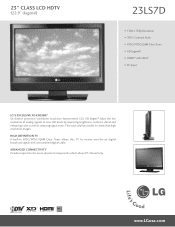
23" CLASS LCD HDTV (22.9" diagonal) 23LS7D • 1366 x 768p Resolution • 700:1 Contrast Ratio • ATSC/NTSC/QAM Clear Tuner • XD Engine® • HDMI™ with HDCP • PC Input LG's Exclusive XD Engine® Six distinct processes contribute to receive over-the-air digital broadcast signals and unscrambled digital cable. advanced connectivity Includes inputs for the most advanced components which allows PC interactivity. www...
23" CLASS LCD HDTV (22.9" diagonal) 23LS7D • 1366 x 768p Resolution • 700:1 Contrast Ratio • ATSC/NTSC/QAM Clear Tuner • XD Engine® • HDMI™ with HDCP • PC Input LG's Exclusive XD Engine® Six distinct processes contribute to receive over-the-air digital broadcast signals and unscrambled digital cable. advanced connectivity Includes inputs for the most advanced components which allows PC interactivity. www...
Specification
Page 2
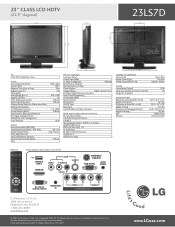
... Color Gloss Black Remote Control Type Universal VESA® Compatible (W x H) 100mm x 100mm POWER Consumption (Typical) 85 W Stand-by Consumption (Cable Card Off) 1W Energy Star Compliant • Specifications Dimensions w/Out Stand (W x H x D) 22.9" x 16.3" x 3.3" Weight w/Out Stand 16.7 lbs. All other trademarks are trademarks of their respective owners. UPC 719192171381 Warranty 1 Year Parts/Labor REMOTE REAR AUDIO/VIDEO INPUTS/OUTPUTS SERVICE ONLY HDMI IN VIDEO AV IN AUDIO S-VIDEO L(MONO) R ANTENNA/ CABLE IN RGB IN (PC) AUDIO...
... Color Gloss Black Remote Control Type Universal VESA® Compatible (W x H) 100mm x 100mm POWER Consumption (Typical) 85 W Stand-by Consumption (Cable Card Off) 1W Energy Star Compliant • Specifications Dimensions w/Out Stand (W x H x D) 22.9" x 16.3" x 3.3" Weight w/Out Stand 16.7 lbs. All other trademarks are trademarks of their respective owners. UPC 719192171381 Warranty 1 Year Parts/Labor REMOTE REAR AUDIO/VIDEO INPUTS/OUTPUTS SERVICE ONLY HDMI IN VIDEO AV IN AUDIO S-VIDEO L(MONO) R ANTENNA/ CABLE IN RGB IN (PC) AUDIO...
Owner's Manual (English)
Page 3
... radio frequency energy and, if not installed and used in accordance with arrowhead symbol, within an equilateral triangle, is intended to alert the user to radio communications. Any changes or modifications not expressly approved by the party responsible for help. NO USER SERVICEABLE PARTS INSIDE. The lightning flash with the instructions, may be connected to the grounding system of the building...
... radio frequency energy and, if not installed and used in accordance with arrowhead symbol, within an equilateral triangle, is intended to alert the user to radio communications. Any changes or modifications not expressly approved by the party responsible for help. NO USER SERVICEABLE PARTS INSIDE. The lightning flash with the instructions, may be connected to the grounding system of the building...
Owner's Manual (English)
Page 6
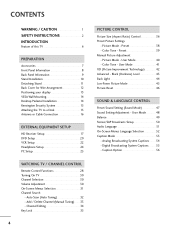
...Advanced - Digital Broadcasting System Captions 55 - User Mode 40 - Channel Editing 34 Key Lock 35 4 PICTURE CONTROL Picture Size (Aspect Ratio) Control 36 Preset Picture Settings - Black (Darkness) Level 43 Back Light 44 Low-Power Picture Mode 45 Picture Reset 46 SOUND & LANGUAGE CONTROL Preset Sound Setting (Sound Mode 47 Sound Setting Adjustment - Picture Mode - CONTENTS WARNING / CAUTION 1 SAFETY INSTRUCTIONS 2 INTRODUCTION Feature of this TV 6 PREPARATION Accessories 7 Front Panel Information 8 Back Panel Information 9 Stand Installation 10 Detaching Stand 11...
...Advanced - Digital Broadcasting System Captions 55 - User Mode 40 - Channel Editing 34 Key Lock 35 4 PICTURE CONTROL Picture Size (Aspect Ratio) Control 36 Preset Picture Settings - Black (Darkness) Level 43 Back Light 44 Low-Power Picture Mode 45 Picture Reset 46 SOUND & LANGUAGE CONTROL Preset Sound Setting (Sound Mode 47 Sound Setting Adjustment - Picture Mode - CONTENTS WARNING / CAUTION 1 SAFETY INSTRUCTIONS 2 INTRODUCTION Feature of this TV 6 PREPARATION Accessories 7 Front Panel Information 8 Back Panel Information 9 Stand Installation 10 Detaching Stand 11...
Owner's Manual (English)
Page 19
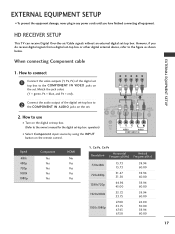
... connecting Component cable EXTERNAL EQUIPMENT SETUP 1. HD RECEIVER SETUP This TV can receive Digital Over-the-air/Cable signals without an external digital set -top box or other digital external device, refer to the COMPONENT IN VIDEO jacks on the set -top box. Match the jack colors (Y = green, PB = blue, and PR = red). 2 Connect the audio output of the digital set top box to the figure as shown below. How to connect 1 Connect the video outputs (Y, PB, PR) of the digital set-top box to the owner's manual for the digital set...
... connecting Component cable EXTERNAL EQUIPMENT SETUP 1. HD RECEIVER SETUP This TV can receive Digital Over-the-air/Cable signals without an external digital set -top box or other digital external device, refer to the COMPONENT IN VIDEO jacks on the set -top box. Match the jack colors (Y = green, PB = blue, and PR = red). 2 Connect the audio output of the digital set top box to the figure as shown below. How to connect 1 Connect the video outputs (Y, PB, PR) of the digital set-top box to the owner's manual for the digital set...
Owner's Manual (English)
Page 20
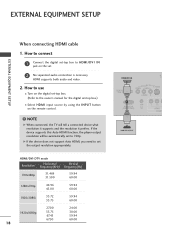
... HDMI/DVI IN jack on the set -top box.) I Select H D M I input source by using the I N P U T button on the digital set-top box. (Refer to 720p. G If the device does not support Auto HDMI, you need to set to the owner's manual for the digital set . 2 No separated audio connection is necessary. If the device supports this Auto HDMI function, the player output resolution will tell a connected device what resolution it supports and the resolution it prefers. HDMI supports both audio and video. 2. EXTERNAL EQUIPMENT SETUP EXTERNAL EQUIPMENT SETUP When connecting HDMI cable...
... HDMI/DVI IN jack on the set -top box.) I Select H D M I input source by using the I N P U T button on the digital set-top box. (Refer to 720p. G If the device does not support Auto HDMI, you need to set to the owner's manual for the digital set . 2 No separated audio connection is necessary. If the device supports this Auto HDMI function, the player output resolution will tell a connected device what resolution it supports and the resolution it prefers. HDMI supports both audio and video. 2. EXTERNAL EQUIPMENT SETUP EXTERNAL EQUIPMENT SETUP When connecting HDMI cable...
Owner's Manual (English)
Page 21
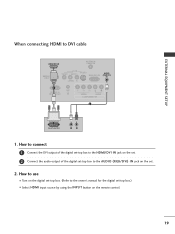
... box to DVI cable HDMI/DVI IN ANTENNA/ CABLE IN SERVICE ONLY VIDEO AV IN S-VIDEO AUDIO RGB (PC) IN L(MONO) R AUDIO (RGB/DVI) IN 1 H/P RS-232C IN (SERVICE ONLY) VIDEO AUDIO COMPONENT IN 2 DVI-DTV OUTPUT L R 1. How to connect 1 Connect the DVI output of the digital set-top box to the HDMI/DVI IN jack on the set. 2 Connect the audio output of the digital set . 2. EXTERNAL EQUIPMENT SETUP When connecting HDMI to the AUDIO (RGB/DVI) I Select HDMI input source by using the INPUT button on the remote control...
... box to DVI cable HDMI/DVI IN ANTENNA/ CABLE IN SERVICE ONLY VIDEO AV IN S-VIDEO AUDIO RGB (PC) IN L(MONO) R AUDIO (RGB/DVI) IN 1 H/P RS-232C IN (SERVICE ONLY) VIDEO AUDIO COMPONENT IN 2 DVI-DTV OUTPUT L R 1. How to connect 1 Connect the DVI output of the digital set-top box to the HDMI/DVI IN jack on the set. 2 Connect the audio output of the digital set . 2. EXTERNAL EQUIPMENT SETUP When connecting HDMI to the AUDIO (RGB/DVI) I Select HDMI input source by using the INPUT button on the remote control...
Owner's Manual (English)
Page 22
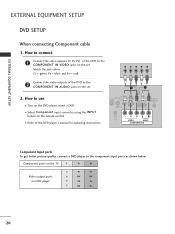
... VIDEO AUDIO COMPONENT IN Component Input ports To get better picture quality, connect a DVD player to the COMPONENT IN AUDIO jacks on the set . EXTERNAL EQUIPMENT SETUP EXTERNAL EQUIPMENT SETUP DVD SETUP When connecting Component cable 1. How to use I Refer to the COMPONENT IN VIDEO jacks on the DVD player, insert a DVD. Match the jack colors (Y = green, PB = blue, and PR = red). I Select Component input source by using the INPUT button on DVD player Y PB PR Y B-Y R-Y Y Cb Cr Y Pb Pr 20 Component ports on the TV Y PB PR Video output ports on the remote control...
... VIDEO AUDIO COMPONENT IN Component Input ports To get better picture quality, connect a DVD player to the COMPONENT IN AUDIO jacks on the set . EXTERNAL EQUIPMENT SETUP EXTERNAL EQUIPMENT SETUP DVD SETUP When connecting Component cable 1. How to use I Refer to the COMPONENT IN VIDEO jacks on the DVD player, insert a DVD. Match the jack colors (Y = green, PB = blue, and PR = red). I Select Component input source by using the INPUT button on DVD player Y PB PR Y B-Y R-Y Y Cb Cr Y Pb Pr 20 Component ports on the TV Y PB PR Video output ports on the remote control...

Owner's Manual (English)
Page 23
... HDMI supports both audio and video. 2. How to use I Turn on the remote control. G If the device does not support Auto HDMI, you need to 720p. I N P U T button on the set to set . 2. How to connect 1 Connect the HDMI output of the DVD to use I Select H D M I input source by using the I Refer to the DVD player's manual for operating instructions. ! If the device supports this Auto HDMI function, the player output resolution will tell a connected device what resolution it supports and the resolution it prefers. How to 720p. VI IN ANTENNA/ CABLE...
... HDMI supports both audio and video. 2. How to use I Turn on the remote control. G If the device does not support Auto HDMI, you need to 720p. I N P U T button on the set to set . 2. How to connect 1 Connect the HDMI output of the DVD to use I Select H D M I input source by using the I Refer to the DVD player's manual for operating instructions. ! If the device supports this Auto HDMI function, the player output resolution will tell a connected device what resolution it supports and the resolution it prefers. How to 720p. VI IN ANTENNA/ CABLE...
Owner's Manual (English)
Page 25
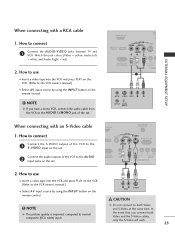
... set . EXTERNAL EQUIPMENT SETUP When connecting with an S-Video cable 1. I Select A V input source by using the INPUT button on the remote control. How to use I Insert a video tape into the VCR and press PLAY on the VCR. (Refer to the AUDIO L/MONO jack of the VCR to the VCR owner's manual.) I Select A V input source by using the INPUT button on the remote control. ! How to connect 1 Connect the S-VIDEO output of the VCR to the S -VIDEO input on the set. 2 Connect the audio outputs of the set...
... set . EXTERNAL EQUIPMENT SETUP When connecting with an S-Video cable 1. I Select A V input source by using the INPUT button on the remote control. How to use I Insert a video tape into the VCR and press PLAY on the VCR. (Refer to the AUDIO L/MONO jack of the VCR to the VCR owner's manual.) I Select A V input source by using the INPUT button on the remote control. ! How to connect 1 Connect the S-VIDEO output of the VCR to the S -VIDEO input on the set. 2 Connect the audio outputs of the set...
Owner's Manual (English)
Page 26
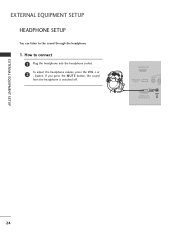
button. EXTERNAL EQUIPMENT SETUP HEADPHONE SETUP You can listen to connect 1 Plug the headphone into the headphone socket. 2 To adjust the headphone volume, press the VOL + or - HDMI/DVI IN SERVICE ONLY VIDEO A L(MON H/P RS-232C IN (SERVICE ONLY) EXTERNAL EQUIPMENT SETUP 24 If you press the M U T E button, the sound from the headphone is switched off. How to the sound through the headphone. 1.
button. EXTERNAL EQUIPMENT SETUP HEADPHONE SETUP You can listen to connect 1 Plug the headphone into the headphone socket. 2 To adjust the headphone volume, press the VOL + or - HDMI/DVI IN SERVICE ONLY VIDEO A L(MON H/P RS-232C IN (SERVICE ONLY) EXTERNAL EQUIPMENT SETUP 24 If you press the M U T E button, the sound from the headphone is switched off. How to the sound through the headphone. 1.
Owner's Manual (English)
Page 27
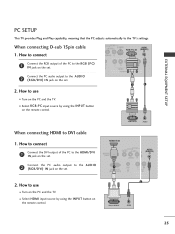
I Select HDMI input source by using the INPUT button on the remote control. I N jack on the set . HDMI/DVI IN SERVICE ONLY VIDEO AV IN AUDIO AUDIO N (RGB/DVI) IN L(MONO) R 1 H/P RS-232C IN (SERVICE ONLY) IO 2. EXTERNAL EQUIPMENT SETUP PC SETUP This TV provides Plug and Play capability, meaning that the PC adjusts automatically to DVI cable 1. How to connect 1 Connect the DVI output of the PC to the R GB (P C) I N jack on the set. /P Connect the PC audio output to...
I Select HDMI input source by using the INPUT button on the remote control. I N jack on the set . HDMI/DVI IN SERVICE ONLY VIDEO AV IN AUDIO AUDIO N (RGB/DVI) IN L(MONO) R 1 H/P RS-232C IN (SERVICE ONLY) IO 2. EXTERNAL EQUIPMENT SETUP PC SETUP This TV provides Plug and Play capability, meaning that the PC adjusts automatically to DVI cable 1. How to connect 1 Connect the DVI output of the PC to the R GB (P C) I N jack on the set. /P Connect the PC audio output to...
Owner's Manual (English)
Page 29
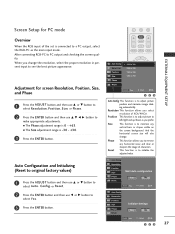
.../down as the main input mode. Resolution Position Size Phase Reset Initialize Settings Yes No ADJUST Prev F G Select OK 123 27 Resolution Position Size Phase Reset Start Auto configuration Yes No ADJUST Prev F G Select OK Auto Config. When you to see the best picture appearance. Auto Config. Phase Reset This function allows you change . After connecting RGB-PC to make appropriate adjustments. Adjustment for PC mode - 0 FAV EXTERNAL EQUIPMENT SETUP Overview When the RGB...
.../down as the main input mode. Resolution Position Size Phase Reset Initialize Settings Yes No ADJUST Prev F G Select OK 123 27 Resolution Position Size Phase Reset Start Auto configuration Yes No ADJUST Prev F G Select OK Auto Config. When you to see the best picture appearance. Auto Config. Phase Reset This function allows you change . After connecting RGB-PC to make appropriate adjustments. Adjustment for PC mode - 0 FAV EXTERNAL EQUIPMENT SETUP Overview When the RGB...
Owner's Manual (English)
Page 30
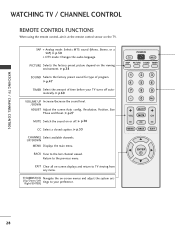
..., Size Phase and Reset. Return to TV viewing from any menu. UP/DOWN MENU Displays the main menu. PICTURE Selects the factory preset picture depend on the TV. G p.27 MUTE Switch the sound on -screen displays and return to the previous menu. EXIT Clear all on or off automatically. G p.47 TIMER Select the amount of program. WATCHING TV / CHANNEL CONTROL WATCHING TV / CHANNEL CONTROL REMOTE CONTROL FUNCTIONS When using the remote control, aim it at the remote control sensor on the viewing environment. SAP Analog mode...
..., Size Phase and Reset. Return to TV viewing from any menu. UP/DOWN MENU Displays the main menu. PICTURE Selects the factory preset picture depend on the TV. G p.27 MUTE Switch the sound on -screen displays and return to the previous menu. EXIT Clear all on or off automatically. G p.47 TIMER Select the amount of program. WATCHING TV / CHANNEL CONTROL WATCHING TV / CHANNEL CONTROL REMOTE CONTROL FUNCTIONS When using the remote control, aim it at the remote control sensor on the viewing environment. SAP Analog mode...
Owner's Manual (English)
Page 33
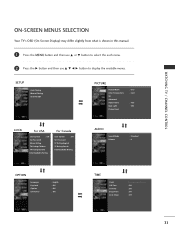
... this manual. 1 Press the MENU button and then use D or E button to select the each menu. 2 Press the G button and then use D E F G button to display the available menus. SETUP Auto Tuning Manual Tuning Channel Edit PICTURE Picture Mode Color Temperature XD Advanced Aspect Ratio Back Light Picture Reset : User : Cool : 16:9 : 100 LOCK For USA Lock System : Off Set Password Movie Rating TV Rating-Children TV Rating-General Downloadable Rating For Canada Lock System : Off Set Password TV Rating-English TV Rating-French Downloadable Rating AUDIO Sound Mode...
... this manual. 1 Press the MENU button and then use D or E button to select the each menu. 2 Press the G button and then use D E F G button to display the available menus. SETUP Auto Tuning Manual Tuning Channel Edit PICTURE Picture Mode Color Temperature XD Advanced Aspect Ratio Back Light Picture Reset : User : Cool : 16:9 : 100 LOCK For USA Lock System : Off Set Password Movie Rating TV Rating-Children TV Rating-General Downloadable Rating For Canada Lock System : Off Set Password TV Rating-English TV Rating-French Downloadable Rating AUDIO Sound Mode...
Owner's Manual (English)
Page 34
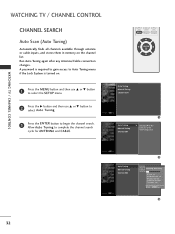
... TV / CHANNEL CONTROL WATCHING TV / CHANNEL CONTROL CHANNEL SEARCH Auto Scan (Auto Tuning) Automatically finds all channels available through antenna or cable inputs, and stores them in memory on . 1 Press the MENU button and then use D or E button to select the SETUP menu. 2 Press the G button and then use D or E button to select Auto Tuning. 3 Press the ENTER button to complete the channel search cycle for ANTENNA and CABLE. Run Auto Tuning again after any Antenna/Cable connection changes. Auto Tuning screen. DTV Ch. 23 Found Channel...
... TV / CHANNEL CONTROL WATCHING TV / CHANNEL CONTROL CHANNEL SEARCH Auto Scan (Auto Tuning) Automatically finds all channels available through antenna or cable inputs, and stores them in memory on . 1 Press the MENU button and then use D or E button to select the SETUP menu. 2 Press the G button and then use D or E button to select Auto Tuning. 3 Press the ENTER button to complete the channel search cycle for ANTENNA and CABLE. Run Auto Tuning again after any Antenna/Cable connection changes. Auto Tuning screen. DTV Ch. 23 Found Channel...
Owner's Manual (English)
Page 38
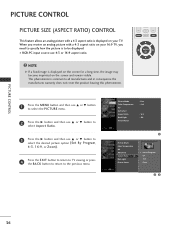
... then use D or E button to select the PICTURE menu. 2 Press the G button and then use D or E button to the previous menu. Picture Mode Color Temperature XD Advanced Aspect Ratio Back Light Picture Reset : User : Cool : 16:9 : 100 1 Picture Mode Color Temperature XD Advanced Aspect Ratio G Back Light Picture Reset Set By Program 4:3 16:9 Zoom 23 36 I RGB-PC input source use D or E button to select the desired picture option (Set By Program, 4 : 3, 16:9, or Zoom). 4 Press the EXIT button to return to TV viewing...
... then use D or E button to select the PICTURE menu. 2 Press the G button and then use D or E button to the previous menu. Picture Mode Color Temperature XD Advanced Aspect Ratio Back Light Picture Reset : User : Cool : 16:9 : 100 1 Picture Mode Color Temperature XD Advanced Aspect Ratio G Back Light Picture Reset Set By Program 4:3 16:9 Zoom 23 36 I RGB-PC input source use D or E button to select the desired picture option (Set By Program, 4 : 3, 16:9, or Zoom). 4 Press the EXIT button to return to TV viewing...
Owner's Manual (English)
Page 52
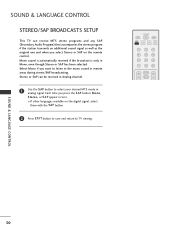
SOUND & LANGUAGE CONTROL STEREO/SAP BROADCASTS SETUP This TV can be received in analog signal. Select Mono if you select Stereo or SAP on the digital signal, select them with the S A P button. 2 Press EXIT button to save and return to select your desired MTS mode in Analog channel. 1 Use the S A P button to TV viewing. Stereo or SAP can receive MTS stereo programs and any SAP (Secondary Audio Program) that accompanies the stereo program if...
SOUND & LANGUAGE CONTROL STEREO/SAP BROADCASTS SETUP This TV can be received in analog signal. Select Mono if you select Stereo or SAP on the digital signal, select them with the S A P button. 2 Press EXIT button to save and return to select your desired MTS mode in Analog channel. 1 Use the S A P button to TV viewing. Stereo or SAP can receive MTS stereo programs and any SAP (Secondary Audio Program) that accompanies the stereo program if...
Owner's Manual (English)
Page 64
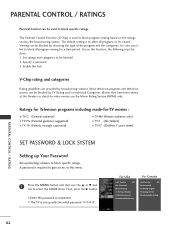
... G button. The Parental Control Function (V-Chip) is also possible to block all programs to be viewed. I TV-Y7 (Children 7 years older) SET PASSWORD & LOCK SYSTEM Setting up Your Password Set up with the initial password "0-0-0-0". For USA Lock System : Off Set Password Movie Rating TV Rating-Children TV Rating-General Downloadable Rating For Canada Lock System : Off Set Password TV Rating-English TV Rating-French Downloadable Rating PARENTAL CONTROL / RATING 62 It is used to block specific ratings. PARENTAL CONTROL / RATINGS Parental Control...
... G button. The Parental Control Function (V-Chip) is also possible to block all programs to be viewed. I TV-Y7 (Children 7 years older) SET PASSWORD & LOCK SYSTEM Setting up Your Password Set up with the initial password "0-0-0-0". For USA Lock System : Off Set Password Movie Rating TV Rating-Children TV Rating-General Downloadable Rating For Canada Lock System : Off Set Password TV Rating-English TV Rating-French Downloadable Rating PARENTAL CONTROL / RATING 62 It is used to block specific ratings. PARENTAL CONTROL / RATINGS Parental Control...
Owner's Manual (English)
Page 69
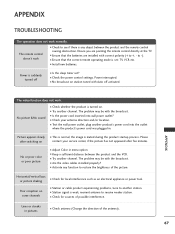
... remote operating mode is muted during the product startup process. I Adjust Color in menu option. Please after five minutes. No or poor color or poor picture I Is the power cord inserted into the outlet where the product's power cord was plugged in pictures I Keep a sufficient distance between the product and the remote control causing obstruction. I Try another product's power cord into wall power outlet? APPENDIX TROUBLESHOOTING The operation does not work . I Are the video cables installed...
... remote operating mode is muted during the product startup process. I Adjust Color in menu option. Please after five minutes. No or poor color or poor picture I Is the power cord inserted into the outlet where the product's power cord was plugged in pictures I Keep a sufficient distance between the product and the remote control causing obstruction. I Try another product's power cord into wall power outlet? APPENDIX TROUBLESHOOTING The operation does not work . I Are the video cables installed...


