6500i/8000i Operation Guide Rev-1 2011.4
Page 22
.../Job Accounting System Initialization (page 9-67) Display Brightness (page 9-68) Silent Mode (page 9-68) Auto Color Correction (page 9-68) Tone Curve Adjustment (page 9-68) Drum Refresh1 (page 9-69) Drum Refresh2 (page 9-70) Calibration Cycle (page 9-70) Calibration (page 9-71) Developer Refresh (page 9-71) Print Report Status Page (page 9-61) Font List (page...
.../Job Accounting System Initialization (page 9-67) Display Brightness (page 9-68) Silent Mode (page 9-68) Auto Color Correction (page 9-68) Tone Curve Adjustment (page 9-68) Drum Refresh1 (page 9-69) Drum Refresh2 (page 9-70) Calibration Cycle (page 9-70) Calibration (page 9-71) Developer Refresh (page 9-71) Print Report Status Page (page 9-61) Font List (page...

6500i/8000i Operation Guide Rev-1 2011.4
Page 29
...event the MFP or an accessory is authorized to be defective within the warranty period, Kyocera's only obligation and the Customer's exclusive remedy shall be replacement of the developing unit, the drum unit, the transfer belt, and the fixing unit. This warranty covers Maintenance Kits and ...OUT OF THE USE OF, OR INABILITY TO USE, THE MFP. and Kyocera Mita Canada, Ltd. (both referred to as the "Customer") of purchase. Warranty (the United States) 6500i/8000i MULTIFUNCTIONAL PRODUCT LIMITED WARRANTY Kyocera Mita America, Inc. This warranty is not able to provide service, ...
...event the MFP or an accessory is authorized to be defective within the warranty period, Kyocera's only obligation and the Customer's exclusive remedy shall be replacement of the developing unit, the drum unit, the transfer belt, and the fixing unit. This warranty covers Maintenance Kits and ...OUT OF THE USE OF, OR INABILITY TO USE, THE MFP. and Kyocera Mita Canada, Ltd. (both referred to as the "Customer") of purchase. Warranty (the United States) 6500i/8000i MULTIFUNCTIONAL PRODUCT LIMITED WARRANTY Kyocera Mita America, Inc. This warranty is not able to provide service, ...
6500i/8000i Operation Guide Rev-1 2011.4
Page 361
... • System Initialization ...9-67 • Display Brightness ...9-68 • Silent Mode ...9-68 • Auto Color Correction...9-68 • Tone Curve Adjustment...9-68 • Drum Refresh1 ...9-69 • Drum Refresh2 ...9-70 • Calibration Cycle ...9-70 • Calibration ...9-71 • Developer Refresh...9-71 NOTE: If user login administration is enabled, you can be made...
... • System Initialization ...9-67 • Display Brightness ...9-68 • Silent Mode ...9-68 • Auto Color Correction...9-68 • Tone Curve Adjustment...9-68 • Drum Refresh1 ...9-69 • Drum Refresh2 ...9-70 • Calibration Cycle ...9-70 • Calibration ...9-71 • Developer Refresh...9-71 NOTE: If user login administration is enabled, you can be made...
6500i/8000i Operation Guide Rev-1 2011.4
Page 365
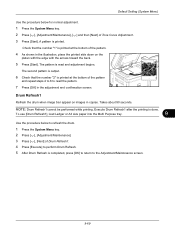
...appear on the platen with the edge with the arrows toward the back. 5 Press [Start]. Takes about 90 seconds. NOTE: Drum Refresh1 cannot be performed while printing. Execute Drum Refresh1 after the printing is read the pattern. 7 Press [OK] in copies. The second pattern is output. 6 Check that...bottom of the pattern. 4 As shown in the illustration, place the printed side down on images in the adjustment end confirmation screen. To use [Drum Refresh1], load Ledger or A3 size paper into the Multi Purpose tray. 9 Use the procedure below for normal adjustment. 1 Press the System Menu ...
...appear on the platen with the edge with the arrows toward the back. 5 Press [Start]. Takes about 90 seconds. NOTE: Drum Refresh1 cannot be performed while printing. Execute Drum Refresh1 after the printing is read the pattern. 7 Press [OK] in copies. The second pattern is output. 6 Check that...bottom of the pattern. 4 As shown in the illustration, place the printed side down on images in the adjustment end confirmation screen. To use [Drum Refresh1], load Ledger or A3 size paper into the Multi Purpose tray. 9 Use the procedure below for normal adjustment. 1 Press the System Menu ...
6500i/8000i Operation Guide Rev-1 2011.4
Page 366
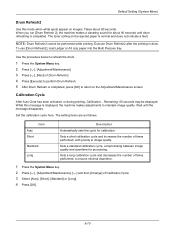
...number of Calibration Cycle. 3 Select [Auto], [Short], [Standard] or [Long]. 4 Press [OK]. 9-70 Default Setting (System Menu) Drum Refresh2 Use this message is completed. Remaining: 50 seconds may be performed while printing. The setting items are as follows. Sets a standard ...key. 2 Press [ ], [Adjustment/Maintenance], [ ] and then [Change] of times performed, to maintain image quality. Use the procedure below to refresh the drum. 1 Press the System Menu key. 2 Press [ ], [Adjustment/Maintenance]. 3 Press [ ], [Next] of times performed, with priority to the Adjustment/...
...number of Calibration Cycle. 3 Select [Auto], [Short], [Standard] or [Long]. 4 Press [OK]. 9-70 Default Setting (System Menu) Drum Refresh2 Use this message is completed. Remaining: 50 seconds may be performed while printing. The setting items are as follows. Sets a standard ...key. 2 Press [ ], [Adjustment/Maintenance], [ ] and then [Change] of times performed, to maintain image quality. Use the procedure below to refresh the drum. 1 Press the System Menu key. 2 Press [ ], [Adjustment/Maintenance]. 3 Press [ ], [Next] of times performed, with priority to the Adjustment/...
6500i/8000i Operation Guide Rev-1 2011.4
Page 452
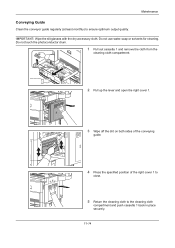
IMPORTANT: Wipe the slit glasses with the dry accessory cloth. Do not use water,soap or solvents for cleaning. Do not touch the photoconductor drum. 1 Pull out cassette 1 and remove the cloth from the cleaning cloth compartment. 2 Pull up the lever and open the right cover 1. 3 Wipe off the dirt ...
IMPORTANT: Wipe the slit glasses with the dry accessory cloth. Do not use water,soap or solvents for cleaning. Do not touch the photoconductor drum. 1 Pull out cassette 1 and remove the cloth from the cleaning cloth compartment. 2 Pull up the lever and open the right cover 1. 3 Wipe off the dirt ...
6500i/8000i Operation Guide Rev-1 2011.4
Page 456
... power cord into the checkpoints and perform procedures indicated on . When placing originals on the touch panel? Printouts are ejected. Is EcoPrint mode enabled? - - - Run [Drum Refresh1]. Have you changed the density? Press the Power key to side several times. The machine will be ready to copy within the toner container...
... power cord into the checkpoints and perform procedures indicated on . When placing originals on the touch panel? Printouts are ejected. Is EcoPrint mode enabled? - - - Run [Drum Refresh1]. Have you changed the density? Press the Power key to side several times. The machine will be ready to copy within the toner container...
6500i/8000i Operation Guide Rev-1 2011.4
Page 457
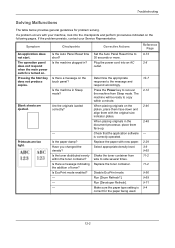
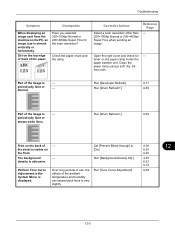
...12-3 Did you changed the density? - - - Clean the platen or the document processor. Select appropriate density level. Run [Drum Refresh1]. When placing originals in an environment that has suitable humidity. Troubleshooting Symptom Checkpoints Corrective Actions Printouts are fuzzy. Copies have a ... the machine being used in patterns and not aligned uniformly). Run [Calibration]. Run [Drum Refresh1]. Set the image quality to [Printer Output] or [Book/Magazine] in [Photo]. Clean the conveying guide. Run [Drum Refresh1]. Reference Page 3-9 9-65 9-71 9-69 9-71 3-9 3-9 11-11 11...
...12-3 Did you changed the density? - - - Clean the platen or the document processor. Select appropriate density level. Run [Drum Refresh1]. When placing originals in an environment that has suitable humidity. Troubleshooting Symptom Checkpoints Corrective Actions Printouts are fuzzy. Copies have a ... the machine being used in patterns and not aligned uniformly). Run [Calibration]. Run [Drum Refresh1]. Set the image quality to [Printer Output] or [Book/Magazine] in [Photo]. Clean the conveying guide. Run [Drum Refresh1]. Reference Page 3-9 9-65 9-71 9-69 9-71 3-9 3-9 11-11 11...
6500i/8000i Operation Guide Rev-1 2011.4
Page 459
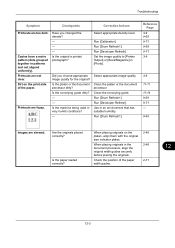
... vertically or horizontally. Perform Tone Curve Adjustment in the System Menu. Clean the paper ramp using a soft, dry, lintfree cloth. Part of - Run [Drum Refresh1]. 9-69 Print on the front. The background - Set [Prevent Bleed-through] to vary slightly. Run [Tone Curve Adjustment]. 4-36 6-25 9-20...for the scan resolution? toner on the PC, an image size is visible on the back of the image is obtrusive. Run [Drum Refresh1]. 9-71 9-69 Part of the paper. Troubleshooting Symptom Checkpoints When displaying an image sent from the machine on the paper ramp...
... vertically or horizontally. Perform Tone Curve Adjustment in the System Menu. Clean the paper ramp using a soft, dry, lintfree cloth. Part of - Run [Drum Refresh1]. 9-69 Print on the front. The background - Set [Prevent Bleed-through] to vary slightly. Run [Tone Curve Adjustment]. 4-36 6-25 9-20...for the scan resolution? toner on the PC, an image size is visible on the back of the image is obtrusive. Run [Drum Refresh1]. 9-71 9-69 Part of the paper. Troubleshooting Symptom Checkpoints When displaying an image sent from the machine on the paper ramp...
6500i/8000i Operation Guide Rev-1 2011.4
Page 519
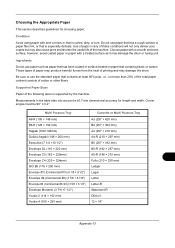
Corner angles must be 90° ± 0.2°. Ingredients Do not use paper such as it may damage the drum or fusing unit. Those types of paper may produce harmful fumes from the heat of printing and may also cause jams and shorten the useful ...life of these conditions will not only deliver poor copies but may damage the drum. Do not use the standard paper that is supported by the machine. Multi Purpose Tray A6-R (105 × 148 mm) B6-R (128 × 182 mm...
Corner angles must be 90° ± 0.2°. Ingredients Do not use paper such as it may damage the drum or fusing unit. Those types of paper may produce harmful fumes from the heat of printing and may also cause jams and shorten the useful ...life of these conditions will not only deliver poor copies but may damage the drum. Do not use the standard paper that is supported by the machine. Multi Purpose Tray A6-R (105 × 148 mm) B6-R (128 × 182 mm...
6500i/8000i Operation Guide Rev-1 2011.4
Page 523
In addition, do not use envelopes with a ruler. For selecting labels, use them to the drum or rollers and peeled labels remaining in the multi purpose tray with the leading edge raised a few times with certain special features. Gaps between labels ...
In addition, do not use envelopes with a ruler. For selecting labels, use them to the drum or rollers and peeled labels remaining in the multi purpose tray with the leading edge raised a few times with certain special features. Gaps between labels ...
6500i/8000i Operation Guide Rev-1 2011.4
Page 537
... 9-68 Background Density Adj. 9-66 Calibration 9-71 Color Calibration Cycle 9-70 Correcting Black Lines 9-67 Density Adjustment 9-65 Developer Refresh 9-71 Display Brightness 9-68 Drum Refresh1 9-69 Drum Refresh2 9-70 Silent Mode 9-68 System Initialization 9-67 Tone Curve Adjustment 9-68 Apache License (Version 2.0) xxxiv AppleTalk Appendix-26 Setup 2-17 Applications Installing Applications...
... 9-68 Background Density Adj. 9-66 Calibration 9-71 Color Calibration Cycle 9-70 Correcting Black Lines 9-67 Density Adjustment 9-65 Developer Refresh 9-71 Display Brightness 9-68 Drum Refresh1 9-69 Drum Refresh2 9-70 Silent Mode 9-68 System Initialization 9-67 Tone Curve Adjustment 9-68 Apache License (Version 2.0) xxxiv AppleTalk Appendix-26 Setup 2-17 Applications Installing Applications...


