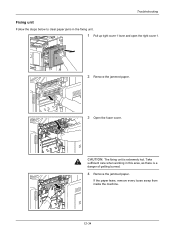
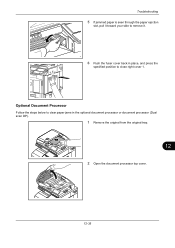
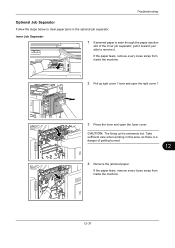
PRESCRIBE Commands Command Reference Manual Rev 4.8
Page 172
set MeDia type ATtribute Format MDAT [media-type[, paper-weight, fuser-mode, duplex[, density]]]; PRESCRIBE Command Reference MDAT - Parameters media-type 1 = Plain 2 = Transparency 3 = Preprinted 4 = Label 5 = Bond 6 = Recycled 7 = Vellum 8 = Rough 9 = Letterhead 10 = Color 11 = Prepunched 12 = Envelope ...
PRESCRIBE Commands Command Reference Manual Rev 4.8
Page 173
Related Command MTYP 163 The paper-weight attribute affects the printing system's transfer bias, fuser-mode affects the fuser temperature, and duplex determines whether the paper with that paper type is used to their defaults. File To ... are omitted, this command resets the three attributes back to customize the default attributes of a media type for duplex printing or not. MDAT 2, 1, 0, 1; EXIT; MDAT fuser-mode 0 = High 1 = Middle 2 = Low 3 = Vellum duplex 0 = Enable 1 = Disable density 1 = Light 2 = Medium Light 3 = Normal 4 = Medium Heavy 5 = Heavy Function The MDAT...
PRESCRIBE Commands Command Reference Manual Rev 4.8
Page 358
... MP tray for a tray when thickness and print-density parameters are omitted. This enables the printing system to optimize the electrical properties (such as the fuser temperature and the transfer bias) so that the best print quality is relevant to the defaults: !R! TATR; Function The TATR command applies a paper source (MP...
PRESCRIBE Commands Command Reference Manual Rev 4.8
Page 407
... priority, 116 font mode, 108, 119 saving current, 270 selection by assigning typeface, 294 Font attributes, 291 Font list, 105 printing a, 105 Font mode, 119 Fuser mode, 162, 163 G Graphics state, 228, 272 Gray pattern, 122 Grouping, 27 H Hard disk, 141, 246, 250, 256, 258 error codes, 136 I Image ...Job separation, 145 choosing first or all pages, 145 separating copies by command, 145 K KCGL pen color, 297 KIR, 304 refinement level, 304 KPDL, 287 Kyocera Image Refinement, 304 L left, 307 Lightness, 155 Line, 73, 80, 82, 87 drawing by angle, 82 drawing to absolute, 73 drawing to relative, 80...
PRESCRIBE Commands Technical Reference Manual - Rev. 4.7
Page 105
... bits H2 7 or 8 8 Serial interface stop bits H3 1 or 2 1 Serial interface parity H4 0: None 0 1: Odd 2: Even 3: Ignore Serial interface protocol H5 0: Combination of page 0 1: Fuser sensor activated 2: Fuser sensor deactivated 3: Page ejection 4: Same as 0; Error is ignored. 1: XON is sent every 5 seconds during the 0 printing system is ready or waiting. A4 full...
PRESCRIBE Commands Technical Reference Manual - Rev. 4.7
Page 110
... driver priority mode. 9: Combination of value 1 and 8. 10: Combination of value 2 and 8. 11: Combination of 7) Environment Paper type for 'Press GO' Automatic continue timer Quick fuser heater Parameter Value 8: Rough 9: Letterhead 10: Color 11: Prepunched 12: Envelope 13: Cardstock 21: Custom1 22: Custom2 23: Custom3 24: Custom4 25: Custom5 26: Custom6...
3500i/4500i/5500i Operation Guide Rev-1 2011.4
Page 477
... machine will display Paper Jam. Refer to these procedures to the affected component in the machine. JAM Status Hold 02/04 1. JAM 1. Open fuser cover (A1) and remove the paper. 4. Remove the paper from the multi purpose tray. 3. Open main unit right cover 1 and remove ...the paper. Close the cover. Paper jam. Remove the paper from the paper ejector. 2. Open fuser cover (A1) and remove the paper. 4. Troubleshooting Clearing Paper Jams Paper jam. Clearing instructions will be displayed as the following figure with a letter...
3500i/4500i/5500i Operation Guide Rev-1 2011.4
Page 490
CAUTION: The fixing unit is a danger of getting burned. 4 Remove the jammed paper. If the paper tears, remove every loose scrap from inside the machine. 12-34 Take sufficient care when working in the fixing unit. 1 Pull up right cover 1 lever and open the right cover 1. 2 Remove the jammed paper. 3 Open the fuser cover. Troubleshooting Fixing unit Follow the steps below to clear paper jams in this area, as there is extremely hot.
3500i/4500i/5500i Operation Guide Rev-1 2011.4
Page 491
Troubleshooting 5 If jammed paper is seen through the paper ejection slot, pull it toward your side to remove it. 6 Push the fuser cover back in place, and press the specified position to clear paper jams in the optional document processor or document processor (Dual scan DP). 1 Remove the original from the original tray. 12 2 Open the document processor top cover. 12-35 Optional Document Processor Follow the steps below to close right cover 1.
3500i/4500i/5500i Operation Guide Rev-1 2011.4
Page 493
... tears, remove every loose scrap from inside the machine. 2 Pull up right cover 1 lever and open the right cover 1. 3 Press the lever and open the fuser cover. Troubleshooting Optional Job Separator Follow the steps below to remove it toward your side to clear paper jams in this area, as there is...