KM-NET for Accounting Operation Guide Rev-1.4
Page 12
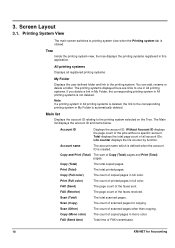
... All printing systems. If you delete a link in My Folder, the corresponding printing system in All printing systems is clicked. Account ID Displays the account ID. Copy and Print (Total) The sum of the jobs without a specific account. Scan (Total) The total scanned pages. All printing systems Displays all account IDs. The printing...
... All printing systems. If you delete a link in My Folder, the corresponding printing system in All printing systems is clicked. Account ID Displays the account ID. Copy and Print (Total) The sum of the jobs without a specific account. Scan (Total) The total scanned pages. All printing systems Displays all account IDs. The printing...
KM-NET for Accounting Operation Guide Rev-1.4
Page 13
... in red and the maximum output/input value is displayed in the account and not to accounts in All accounts is clicked. My Folder Displays the user-defined folder and link to account view when the Account tab is not deleted. You can be selected from the combo box on the upper... right of the page counter, such as Copy, Print, Scan, FAX (Send), FAX (Receive) and Media (if supported). Tree Inside the account view, the tree...
... in red and the maximum output/input value is displayed in the account and not to accounts in All accounts is clicked. My Folder Displays the user-defined folder and link to account view when the Account tab is not deleted. You can be selected from the combo box on the upper... right of the page counter, such as Copy, Print, Scan, FAX (Send), FAX (Receive) and Media (if supported). Tree Inside the account view, the tree...

Scan To SMB (PC) Setup Guide Rev-3
Page 3
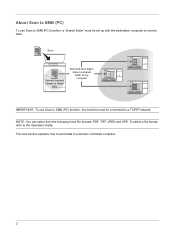
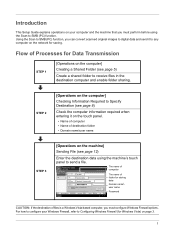
...machine] Sending File (see page 5) Create a shared folder to any computer on the network for Data Transmission STEP 1 [Operations on page 3. 1 Place original. For how to configure your computer and the machine that you can convert scanned original images to digital data and send it on the ...touch panel. • Name of computer • Name of folder for Windows Vista) on the computer] Creating a Shared Folder (see page 12) Enter the destination data using the Scan to SMB (PC) function...
...machine] Sending File (see page 5) Create a shared folder to any computer on the network for Data Transmission STEP 1 [Operations on page 3. 1 Place original. For how to configure your computer and the machine that you can convert scanned original images to digital data and send it on the ...touch panel. • Name of computer • Name of folder for Windows Vista) on the computer] Creating a Shared Folder (see page 12) Enter the destination data using the Scan to SMB (PC) function...
Scan To SMB (PC) Setup Guide Rev-3
Page 4
The next section explains how to send data to receive data. About Scan to SMB (PC) To use Scan to SMB (PC) function, the machine must be connected to the Operation Guide. NOTE: You can select from the following three file formats: PDF, TIFF, JPEG and XPS. Scan Convert scanned images to digital data Send and store digital data in a shared folder of any computer IMPORTANT: To use Scan to SMB (PC) function, a "shared folder" must be set up with the destination computer to a domain controlled computer. 2 To select a file format, refer to a TCP/IP network.
The next section explains how to send data to receive data. About Scan to SMB (PC) To use Scan to SMB (PC) function, the machine must be connected to the Operation Guide. NOTE: You can select from the following three file formats: PDF, TIFF, JPEG and XPS. Scan Convert scanned images to digital data Send and store digital data in a shared folder of any computer IMPORTANT: To use Scan to SMB (PC) function, a "shared folder" must be set up with the destination computer to a domain controlled computer. 2 To select a file format, refer to a TCP/IP network.

Scan To SMB (PC) Setup Guide Rev-3
Page 16
For details, refer to the shared folder of file in [File Name Entry] before sending it. The scanned original data is checked, press [OK]. 6 Press the Start key. You can also specify a name of the computer you specified. 5 Once the connection is converted to a file and sent to the Operation Guide. 14 For example, a file containing data sent on December 31, 2008, 02:30:40 pm will be "doc20081231143040". NOTE: The file name containing scanned originals starts with "doc" followed by additional information (by default, a timestamp).
For details, refer to the shared folder of file in [File Name Entry] before sending it. The scanned original data is checked, press [OK]. 6 Press the Start key. You can also specify a name of the computer you specified. 5 Once the connection is converted to a file and sent to the Operation Guide. 14 For example, a file containing data sent on December 31, 2008, 02:30:40 pm will be "doc20081231143040". NOTE: The file name containing scanned originals starts with "doc" followed by additional information (by default, a timestamp).
250ci/300ci/400ci/500ci SCAN TO SMB (PC) Operation Guide
Page 3
...Firewall options. Using the Scan to SMB (PC) function, you can convert scanned original images to digital data and send it on the computer] Creating a Shared Folder (see page 12) Enter the destination data using the Scan to Addr Book Status Next Dest. Folder Path Entry SMB Host ...Name pc4050 FTP Path scannerdata Login User Name abcdnet\ james.smith Login Password Specify the folder on page 3. 1 Flow of ...
...Firewall options. Using the Scan to SMB (PC) function, you can convert scanned original images to digital data and send it on the computer] Creating a Shared Folder (see page 12) Enter the destination data using the Scan to Addr Book Status Next Dest. Folder Path Entry SMB Host ...Name pc4050 FTP Path scannerdata Login User Name abcdnet\ james.smith Login Password Specify the folder on page 3. 1 Flow of ...

250ci/300ci/400ci/500ci SCAN TO SMB (PC) Operation Guide
Page 4
About Scan to SMB (PC) To use Scan to SMB (PC) function, the machine must be connected to a TCP/IP network. Scan Convert scanned images to digital data Send and store digital data in a shared folder of any computer IMPORTANT: To use Scan to SMB (PC) function, a "shared folder" must be set up with the destination computer to receive data. NOTE: You can select from the following three file formats: PDF, TIFF, JPEG and XPS. To select a file format, refer to a domain controlled computer. 2 The next section explains how to send data to the Operation Guide.
About Scan to SMB (PC) To use Scan to SMB (PC) function, the machine must be connected to a TCP/IP network. Scan Convert scanned images to digital data Send and store digital data in a shared folder of any computer IMPORTANT: To use Scan to SMB (PC) function, a "shared folder" must be set up with the destination computer to receive data. NOTE: You can select from the following three file formats: PDF, TIFF, JPEG and XPS. To select a file format, refer to a domain controlled computer. 2 The next section explains how to send data to the Operation Guide.

250ci/300ci/400ci/500ci SCAN TO SMB (PC) Operation Guide
Page 16
You can also specify a name of the computer you specified. NOTE: The file name containing scanned originals starts with "doc" followed by additional information (by default, a timestamp). For example, a file containing data sent on December 31, 2008, 02:30:40 pm will be "doc20081231143040". For details, refer to the shared folder of file in [File Name Entry] before sending it. 5 Once the connection is converted to a file and sent to the Operation Guide. 14 The scanned original data is checked, press [OK]. 6 Press the Start key.
You can also specify a name of the computer you specified. NOTE: The file name containing scanned originals starts with "doc" followed by additional information (by default, a timestamp). For example, a file containing data sent on December 31, 2008, 02:30:40 pm will be "doc20081231143040". For details, refer to the shared folder of file in [File Name Entry] before sending it. 5 Once the connection is converted to a file and sent to the Operation Guide. 14 The scanned original data is checked, press [OK]. 6 Press the Start key.
250ci/300ci/400ci/500ci/552ci Operation Guide Rev-1
Page 9
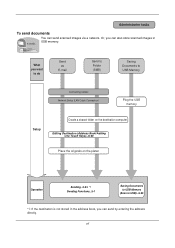
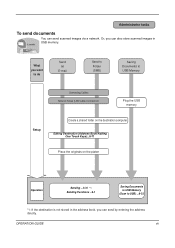
Administrator tasks To send documents It sends. What you can also store scanned images in the address book, you can send scanned images via a network. vii Or, you want to do Send as E-mail Send to Folder (SMB) Saving Documents to USB)...6-22 *1: If the destination is... on the platen Operation Sending...3-24 *1 Sending Functions...5-1 Saving Documents to USB Memory (Scan to USB Memory Connecting Cables Network Setup (LAN Cable Connection) Plug the USB memory Setup Create a shared folder on the destination computer. You can send by entering the address directly.
Administrator tasks To send documents It sends. What you can also store scanned images in the address book, you can send scanned images via a network. vii Or, you want to do Send as E-mail Send to Folder (SMB) Saving Documents to USB)...6-22 *1: If the destination is... on the platen Operation Sending...3-24 *1 Sending Functions...5-1 Saving Documents to USB Memory (Scan to USB Memory Connecting Cables Network Setup (LAN Cable Connection) Plug the USB memory Setup Create a shared folder on the destination computer. You can send by entering the address directly.
250ci/300ci/400ci/500ci/552ci Operation Guide Rev-1
Page 77
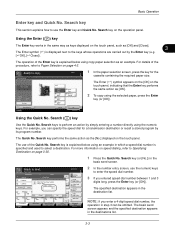
... GGG HHH III 0009 OK 0010 JJJ 1/100 Destination Status Quick Setup Original/Sending Data Format Color/ Image Quality Destination Address Book E-mail Addr Entry Folder Path Entry FAX No. The Enter ( ) symbol appears on the [OK] on speed dialing, refer to copy. Search key performs the same action as... way as keys displayed on the touch panel, such as the [No.] displayed on page 3-30. 1 Press the Quick No. Entry i-FAX Addr Entry WSD Scan Advanced Setup 08/08/2009 10:10 2 In the number entry screen, use the Enter key and Quick No. Using the Quick No. Ready to...
... GGG HHH III 0009 OK 0010 JJJ 1/100 Destination Status Quick Setup Original/Sending Data Format Color/ Image Quality Destination Address Book E-mail Addr Entry Folder Path Entry FAX No. The Enter ( ) symbol appears on the [OK] on speed dialing, refer to copy. Search key performs the same action as... way as keys displayed on the touch panel, such as the [No.] displayed on page 3-30. 1 Press the Quick No. Entry i-FAX Addr Entry WSD Scan Advanced Setup 08/08/2009 10:10 2 In the number entry screen, use the Enter key and Quick No. Using the Quick No. Ready to...
250ci/300ci/400ci/500ci/552ci Operation Guide Rev-1
Page 98
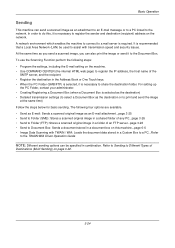
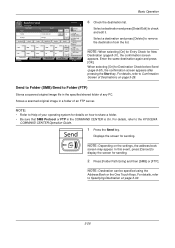
... following four options are available. • Send as E-mail: Sends a scanned original image as an E-mail attachment...page 3-25 • Send to Folder (SMB): Stores a scanned original image in a shared folder of any PC...page 3-26 • Send to Folder (FTP): Stores a scanned original image in a folder of an FTP server...page 3-26 • Send to a mail...
... following four options are available. • Send as E-mail: Sends a scanned original image as an E-mail attachment...page 3-25 • Send to Folder (SMB): Stores a scanned original image in a shared folder of any PC...page 3-26 • Send to Folder (FTP): Stores a scanned original image in a folder of an FTP server...page 3-26 • Send to a mail...
250ci/300ci/400ci/500ci/552ci Operation Guide Rev-1
Page 100
...In this event, press [Cancel] to the KYOCERA COMMAND CENTER Operation Guide. 1 Press the Send key. For details, refer to display the screen for sending. 2 Press [Folder Path Entry] and then [SMB] or [FTP]. Entry i-FAX Addr Entry WSD Scan Advanced Setup 08/08/2009 10:10 6 ... edit it. Select a destination and press [Detail/Edit] to send. Select a destination and press [Delete] to Folder (FTP) Stores a scanned original image file in the specified shared folder of your operating system for sending. For details, refer to Confirmation Screen of an FTP server. NOTE: When selecting...
...In this event, press [Cancel] to the KYOCERA COMMAND CENTER Operation Guide. 1 Press the Send key. For details, refer to display the screen for sending. 2 Press [Folder Path Entry] and then [SMB] or [FTP]. Entry i-FAX Addr Entry WSD Scan Advanced Setup 08/08/2009 10:10 6 ... edit it. Select a destination and press [Detail/Edit] to send. Select a destination and press [Delete] to Folder (FTP) Stores a scanned original image file in the specified shared folder of your operating system for sending. For details, refer to Confirmation Screen of an FTP server. NOTE: When selecting...
250ci/300ci/400ci/500ci/552ci Operation Guide Rev-1
Page 103
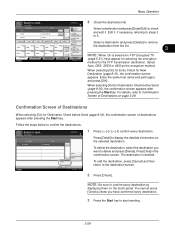
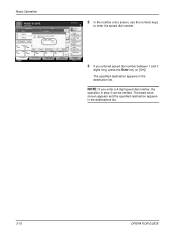
... start sending. 3-29 Select Auto, DES, 3DES or AES as the encryption method. Place original. AAA BBB CCC DDD EEE Address Book E-mail Addr Entry Folder Path Entry FAX No. NOTE: Be sure to confirm every destination. The destination is selected in the confirmation screen. Enter the same host name and... the list. 3 0006 0007 0008 FFF GGG HHH III 0009 JJJ 0010 1/100 Destination Status Quick Setup Original/Sending Data Format Color/ Image Quality WSD Scan Advanced Setup 08/08/2009 10:10 NOTE: When On is deleted.
... start sending. 3-29 Select Auto, DES, 3DES or AES as the encryption method. Place original. AAA BBB CCC DDD EEE Address Book E-mail Addr Entry Folder Path Entry FAX No. NOTE: Be sure to confirm every destination. The destination is selected in the confirmation screen. Enter the same host name and... the list. 3 0006 0007 0008 FFF GGG HHH III 0009 JJJ 0010 1/100 Destination Status Quick Setup Original/Sending Data Format Color/ Image Quality WSD Scan Advanced Setup 08/08/2009 10:10 NOTE: When On is deleted.
250ci/300ci/400ci/500ci/552ci Operation Guide Rev-1
Page 104
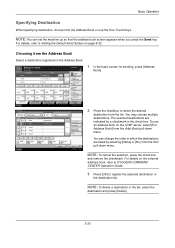
...details, refer to Setting the Default Send Screen on the external address book, refer to KYOCERA COMMAND CENTER Operation Guide. 3 Press [OK] to register the selected destination in the ... 1/100 Destination Status Quick Setup Original/Sending Data Format Color/ Image Quality Destination Address Book E-mail Addr Entry Folder Path Entry FAX No. You may choose multiple destinations. You can set the machine up so that the address...Address Book] from the Sort pull-down menu. Entry i-FAX Addr Entry WSD Scan Advanced Setup 08/08/2009 10:10 Address Book Addr Book Address Book Dest.
...details, refer to Setting the Default Send Screen on the external address book, refer to KYOCERA COMMAND CENTER Operation Guide. 3 Press [OK] to register the selected destination in the ... 1/100 Destination Status Quick Setup Original/Sending Data Format Color/ Image Quality Destination Address Book E-mail Addr Entry Folder Path Entry FAX No. You may choose multiple destinations. You can set the machine up so that the address...Address Book] from the Sort pull-down menu. Entry i-FAX Addr Entry WSD Scan Advanced Setup 08/08/2009 10:10 Address Book Addr Book Address Book Dest.
250ci/300ci/400ci/500ci/552ci Operation Guide Rev-1
Page 106
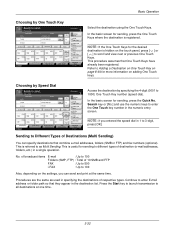
...Touch key number in the numeric entry screen. This is useful for sending to as used in specifying the destinations of destination (e-mail addresses, folders, etc.) in the destination list. This is referred to different types of respective types. Continue to Adding a Destination on One Touch Key...that One Touch Keys have already been registered. Entry i-FAX Addr Entry WSD Scan Advanced Setup 08/08/2009 10:10 Select the destination using the One Touch Keys. Refer to enter E-mail address or folder path so that they appear in a single operation. In the basic screen...
...Touch key number in the numeric entry screen. This is useful for sending to as used in specifying the destinations of destination (e-mail addresses, folders, etc.) in the destination list. This is referred to different types of respective types. Continue to Adding a Destination on One Touch Key...that One Touch Keys have already been registered. Entry i-FAX Addr Entry WSD Scan Advanced Setup 08/08/2009 10:10 Select the destination using the One Touch Keys. Refer to enter E-mail address or folder path so that they appear in a single operation. In the basic screen...
250ci/300ci/400ci/500ci/552ci Operation Guide Rev-1
Page 146
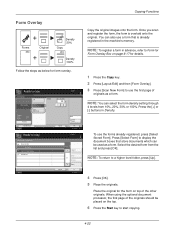
...originals should be used as below for details. When using the optional document processor, the first page of the other originals. Select Stored Form Scan New Form Original Zoom Paper : --- : 100% : --- To use a form that store documents which can also use the forms already... registered, press [Select Stored Form]. NOTE: To return to a higher level folder, press [Up]. 4 Press [OK]. 5 Place the originals. You can be placed on page 6-17 for form overlay. Copying Functions Form Overlay Forms Original...
...originals should be used as below for details. When using the optional document processor, the first page of the other originals. Select Stored Form Scan New Form Original Zoom Paper : --- : 100% : --- To use a form that store documents which can also use the forms already... registered, press [Select Stored Form]. NOTE: To return to a higher level folder, press [Up]. 4 Press [OK]. 5 Place the originals. You can be placed on page 6-17 for form overlay. Copying Functions Form Overlay Forms Original...
250ci/300ci/400ci/500ci/552ci Operation Guide Rev-1
Page 224
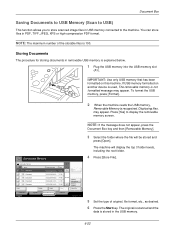
...USB memory. 6-22 NOTE: The maximum number of original, file format, etc., as desired. 6 Press the Start key. Removable Memory. The original is scanned and the data is 100. Displaying files. If USB memory formatted on this machine. may appear. Removable Memory Name 1 Document 2 Document 3 Document 4 ...Store File Custom Box Status Job Box Removable Memory FAX Box 08/08/2009 10:10 3 Select the folder where the file will display the top 3 folder levels, including the root folder. 4 Press [Store File]. 5 Set the type of the storable files is stored in USB memory ...
...USB memory. 6-22 NOTE: The maximum number of original, file format, etc., as desired. 6 Press the Start key. Removable Memory. The original is scanned and the data is 100. Displaying files. If USB memory formatted on this machine. may appear. Removable Memory Name 1 Document 2 Document 3 Document 4 ...Store File Custom Box Status Job Box Removable Memory FAX Box 08/08/2009 10:10 3 Select the folder where the file will display the top 3 folder levels, including the root folder. 4 Press [Store File]. 5 Set the type of the storable files is stored in USB memory ...
250ci/300ci/400ci/500ci/552ci Operation Guide Rev-1
Page 435
...Reserve Next 3-16 Reserve Next Priority 8-28 Resolution Appendix-21 Restarting the System 8-72 S Safety Conventions i SAFETY OF LASER BEAM (USA) xv Scan Resolution 5-18 Default settings 8-17 Scanner Cleaning 8-53, 8-54 Secure Protocol 8-77 Send File Format 5-12 Image Quality 5-16 Original Size Selection ...5-2 Print 5-30 Sending Size Selection 5-3 Setup 8-30 Store 5-30 Sending Send as E-mail 3-25 Index Send to Folder (FTP) 3-28 Send to Folder (SMB) 3-27 Sending E-mail 2-18 Sending Functions 5-1 Sending Settings 8-30 Color Type 8-30, 8-31 Quick Setup Registration 8-30 ...
...Reserve Next 3-16 Reserve Next Priority 8-28 Resolution Appendix-21 Restarting the System 8-72 S Safety Conventions i SAFETY OF LASER BEAM (USA) xv Scan Resolution 5-18 Default settings 8-17 Scanner Cleaning 8-53, 8-54 Secure Protocol 8-77 Send File Format 5-12 Image Quality 5-16 Original Size Selection ...5-2 Print 5-30 Sending Size Selection 5-3 Setup 8-30 Store 5-30 Sending Send as E-mail 3-25 Index Send to Folder (FTP) 3-28 Send to Folder (SMB) 3-27 Sending E-mail 2-18 Sending Functions 5-1 Sending Settings 8-30 Color Type 8-30, 8-31 Quick Setup Registration 8-30 ...
500ci/400ci/300ci/250ci Operation Guide Rev-1
Page 9
...platen Operation Sending ...3-31 *1 Sending Functions ...5-1 Saving Documents to USB Memory (Scan to USB Memory Connecting Cables Network Setup (LAN Cable Connection) Plug the USB memory Setup Create a shared folder on the destination computer. OPERATION GUIDE vii Administrator tasks To send documents It ...sends. Or, you can also store scanned images in the address book, you want to do Send as E-mail Send to Folder (SMB) Saving Documents to USB...
...platen Operation Sending ...3-31 *1 Sending Functions ...5-1 Saving Documents to USB Memory (Scan to USB Memory Connecting Cables Network Setup (LAN Cable Connection) Plug the USB memory Setup Create a shared folder on the destination computer. OPERATION GUIDE vii Administrator tasks To send documents It ...sends. Or, you can also store scanned images in the address book, you want to do Send as E-mail Send to Folder (SMB) Saving Documents to USB...
500ci/400ci/300ci/250ci Operation Guide Rev-1
Page 82
...GGG HHH III 0009 OK 0010 JJJ 1/100 Destination Status Quick Setup Original/Sending Data Format Color/ Image Quality Destination Address Book E-mail Addr Entry Folder Path Entry FAX No. The basic send screen appears and the specified destination appears in the destination list. Place original. NOTE: If you entered speed... number, the operation in step 3 can be omitted. The specified destination appears in the destinations list. 3-10 OPERATION GUIDE Entry i-FAX Addr Entry WSD Scan Advanced Setup 2008/10/10 10:10 2 In the number entry screen, use the numeric keys to send.
...GGG HHH III 0009 OK 0010 JJJ 1/100 Destination Status Quick Setup Original/Sending Data Format Color/ Image Quality Destination Address Book E-mail Addr Entry Folder Path Entry FAX No. The basic send screen appears and the specified destination appears in the destination list. Place original. NOTE: If you entered speed... number, the operation in step 3 can be omitted. The specified destination appears in the destinations list. 3-10 OPERATION GUIDE Entry i-FAX Addr Entry WSD Scan Advanced Setup 2008/10/10 10:10 2 In the number entry screen, use the numeric keys to send.


