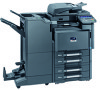
TASKalfa MFP Network Fax Driver Operation Guide Rev.2011.1
Page 5
... 2-12 Transmission Control 2-17 3 Using Cover Pages Cover Page Selection (Transmission Settings 3-1 Cover Page Registration (Default Settings 3-6 Creating New Cover Page Templates 3-8 4 Appendix Error Message 4-1 Specifications 4-2 iii
TASKalfa MFP Network Fax Driver Operation Guide Rev.2011.1
Page 22
Use Specific Login User Name: Enter the Login User Name and Password. Prompt for Login User Name: A screen for Login User Name as desired. NOTE: For information .... Sending a Fax (2) Cover Page Tab 1 1 Attach Cover Page checkbox Check the checkbox when you want to add a cover page to User Login, select either Use Specific Login User Name or Prompt for entering the Login User Name and Password will be performed using the entered Login User Name and Password.
TASKalfa MFP Network Fax Driver Operation Guide Rev.2011.1
Page 23
.... Sending a Fax 2 Job Accounting checkbox If the fax machine is allowed for entering the Account ID will be set to Job Accounting, select either Use Specific Account ID or Prompt for the machine.) 2-11 Z and a - Available characters: Symbols and }) Alphanumerics (0 - 9, A - Use...
TASKalfa MFP Network Fax Driver Operation Guide Rev.2011.1
Page 42
.... Requires the input of a Login User Name and Password in the Network FAX Driver when User Login, is turned ON in the fax machine. Appendix Specifications Operating Environment Item Hardware Interface Operating system Description IBM PC-AT compatible computer 10BASE-T or 100BASE-TX Windows XP, Windows Server 2003, Windows Vista, Windows...
Data Security Kit (E) Operation Guide Rev-4 2013.1
Page 3
... the Document Box. 2 Data restoration is not possible even when sophisticated restoration techniques are two overwrite methods, which can be possibly leaked or tampered with specific characters, their complements, and random characters to process a larger amount of security than Once Overwrite method to prevent data restoration. The security kit deletes and...
Fax System (W) Operation Guide Rev-2.2013.1
Page 3
...warning] .... [Warning of high temperature] The symbol indicates that the related section includes information on actions which must be performed. Specifics of the prohibited action are indicated inside the symbol. .... [Alert of required action] .... [Remove the power plug from insufficient...the related points. The symbols and their meanings are indicated below. WARNING: Indicates that the related section includes safety warnings. i Specifics of the required action are indicated inside the symbol. .... [Warning of prohibited action] .... [Disassembly prohibited] The z symbol...
Fax System (W) Operation Guide Rev-2.2013.1
Page 7
Precautions When Turning Power OFF 10-3 Error Messages ...10-4 Troubleshooting ...10-5 11 Appendix ...11-1 Character Entry Method 11-2 Specifications ...11-5 Menu List ...11-6 Received FAX Sizes and Paper Priority (Inch Model 11-11 Received FAX Sizes and Paper Priority (Metric Model 11-13 Error Code List ...11-16 Index ...Index-1 v
Fax System (W) Operation Guide Rev-2.2013.1
Page 13
... current 16A Safety of information technology equipment, including electrical business equipment Terminal Equipment (TE); Attachment requirements for pan-European approval for equipment with the following specifications. Declarations to European Directives DECLARATION OF CONFORMITY TO 2004/108/EC, 2006/95/EEC, 93/68/EEC and 1999/5/EC We declare under our sole...
Fax System (W) Operation Guide Rev-2.2013.1
Page 16
Introduction About This Guide This guide consists of the machine. Chapter 3 - Chapter 5 - Chapter 6 - Chapter 8 - Chapter 11 - Appendix Explains character entry and the specifications of the following chapters. The inch version of the same originals to check the status of fax. FAX Operation (Advanced) Explains convenient fax functions such ...
Fax System (W) Operation Guide Rev-2.2013.1
Page 29
... to move the cursor. Address: - Preparation Before Use > Using the Address Book [Pause] Pressing this method to insert a pause before resuming dialing after you dial a specific number. 10Press [Change] of Sub Address. For example, when dialing the receiving system on page 4-38. 11Press [Sub Address] and enter the sub address using...
Fax System (W) Operation Guide Rev-2.2013.1
Page 45
... direct entry of fax numbers with the numeric keys when faxes are prompted to confirm the FAX number is On, press [OK] and you dial a specific number. 3-7 AAA BBB CCC DDD EEE 0006 0007 0008 FFF GGG HHH III 0009 0010 JJJ 1/100 Destination Status Quick Setup Org./Sending Data Format...
Fax System (W) Operation Guide Rev-2.2013.1
Page 67
... Received Faxes by Requirements (Memory Forwarding 4-17 Type of Forwarding Destination and Requirements for Forwarding 4-17 Use Rule for All Receptions ...4-19 Use Rule for Specific RX ...4-21 Changing/Deleting Requirements for Forwarding 4-25 Forwarding Detail Settings...4-26 Settings for Forwarding from Command Center RX (RX/Forward Requirements 4-29 FAX Box...
Fax System (W) Operation Guide Rev-2.2013.1
Page 84
FAX Operation (Advanced) > Printing/Sending Received Faxes by Requirements (Memory Forwarding) Sub address confidential delivery You can restrict relay broadcasting to a specific communication. Refer to print the received originals. Setting example 2 Sub Address transmission Sub Address:1234 1 FAX Box registration 001 3 Memory forwarding Sub Address:1234 4 Print 1 ...
Fax System (W) Operation Guide Rev-2.2013.1
Page 85
... [OK] to add the other party to rules. NOTE To register setting by each reception requirement, refer to Use Rule for Specific RX on the requirements. Off Use Rule for Specific RX Use Rule for all receptions, use requirements for All RX Forward Settings: Print: 1 Copy(s) Schedule: All Day Next Change Change...
Fax System (W) Operation Guide Rev-2.2013.1
Page 87
...) Use Rule for the requirement name. 10Press [Change] of Rule Name. 9 Enter the requirement name, and press [OK]. Off Use Rule for Specific RX Use Rule for All RX On ID 01 FAX A others Rule Name Priority 1 1/1 Detail Delete Raise Priority Status Cancel 5 Press [Change] of... RX/Forward Rules. 3 Press [Use Rule for Specific RX]. 4 Press [Add]. Up to 32 characters can enter the requirement number between 001 and 100. 7 Press [OK]. 8 Press [Change] of Rule. ...
Fax System (W) Operation Guide Rev-2.2013.1
Page 91
...of Requirements for Forwarding To raise the priority of the requirements for forwarding, follow the steps below. 1 Follow steps 1 to 3 of Use Rule for Specific RX on page 4-21. 2 Select the requirement name to step 4. 3 Press [Delete]. Cancelling the Setting of RX/Forward Rules To cancel the memory .../Deleting Requirements for Forwarding To change or delete the requirements for forwarding, follow the steps below. 1 Follow steps 1 to 3 of Use Rule for Specific RX on page 4-21. 2 Select the requirement name to the next step. When the confirmation screen is displayed, press [Yes] and go to ...
Fax System (W) Operation Guide Rev-2.2013.1
Page 92
...Forwarding) Forwarding Detail Settings With the forwarding settings, you are available. NOTE Enter the time on page 4-19. Follow steps 1 to 3 of Use Rule for Specific RX on page 4-21, select the rule, and press [Detail]. 2 Press [Change] of Priority. 3 Press [+] or [-] or use the numeric keys..., and press [Detail]. 2 Press [Change] of File Format. 3 Press [PDF], [TIFF] or [XPS] and then [OK]. Schedule Specify the time for Specific RX on page 4-19. Rule: - Print or forward the faxes received during the preset time according to the machine's Operation Guide. 4 Press [OK]. 4-26 ...
Fax System (W) Operation Guide Rev-2.2013.1
Page 93
...3 Press [Off] or [Each Page]. Follow steps 1 to 3 of Use Rule for All Receptions on page 4-19. For details, refer to 4 of Use Rule for Specific RX on page 4-19. Follow steps 1 to 3 of Use Rule for each page, select [Each Page]. 4 Press [OK]. Follow steps 1 to 3 of Use Rule...Receptions on page 4-21, select the rule, and press [Detail]. 2 Press [Change] of Print. 3 Press [On] or [Off]. To have one file created for Specific RX on page 4-21, select the rule, press [Detail], and then follow step 14. 2 Press [Change] of Secure Protocol is On. Info Setting Specify whether...
Fax System (W) Operation Guide Rev-2.2013.1
Page 94
... information into the file name, press [Job No.], [Date and Time], [Add No./Addr to Front] or [Add No./Addr to 3 of Use Rule for Specific RX on page 4-21, select the rule, and press [Detail]. 2 Press [Change] of Use Rule for All Receptions on page 4-19.
Fax System (W) Operation Guide Rev-2.2013.1
Page 96
.... 4-30 The settings available on page 4-30.) After completing the settings, click [Submit] to Forward Settings on the selected item. Item Off Use Rule for Specific RX Use Rule for All RX Description Disables the forwarding process. Executes the forwarding process according to the specified conditions. (For the setting procedure, refer...