
KM-NET Viewer Operation Guide Rev-5.2-2010.10
Page 4
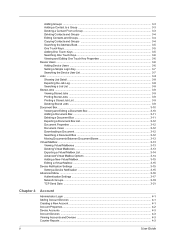
... 3-3 Deleting Contacts and Groups 3-4 Editing Contacts and Groups 3-4 Copying Contacts and Groups 3-4 Searching the Address Book 3-5 One Touch Keys ...3-5 Adding One Touch Keys ...3-5 Searching One Touch Keys ...3-6 Viewing and Editing One Touch Key Properties 3-6 Device Users ...3-6 Adding Device Users ...3-6 Setting a Simple Login Key ...3-7 Searching the Device User List 3-7 Jobs ...3-8 Showing Job Detail ...3-8 Exporting the Job Log ...3-8 Searching a Job List...
... 3-3 Deleting Contacts and Groups 3-4 Editing Contacts and Groups 3-4 Copying Contacts and Groups 3-4 Searching the Address Book 3-5 One Touch Keys ...3-5 Adding One Touch Keys ...3-5 Searching One Touch Keys ...3-6 Viewing and Editing One Touch Key Properties 3-6 Device Users ...3-6 Adding Device Users ...3-6 Setting a Simple Login Key ...3-7 Searching the Device User List 3-7 Jobs ...3-8 Showing Job Detail ...3-8 Exporting the Job Log ...3-8 Searching a Job List...
KM-NET Viewer Operation Guide Rev-5.2-2010.10
Page 23
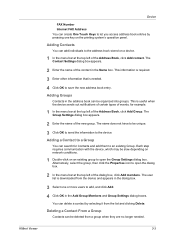
.... 1 In the menu bar at the top left of the Address Book, click Add contact. Device FAX Number Internet FAX Address You can create One Touch Keys to let you access address book entries by selecting it from the device and appears in the dialog box. 3 Select one... key on the printing system's operation panel. Each step requires communication with the device, which may be unique. 3 Click OK to send the information to the ...
.... 1 In the menu bar at the top left of the Address Book, click Add contact. Device FAX Number Internet FAX Address You can create One Touch Keys to let you access address book entries by selecting it from the device and appears in the dialog box. 3 Select one... key on the printing system's operation panel. Each step requires communication with the device, which may be unique. 3 Click OK to send the information to the ...
KM-NET Viewer Operation Guide Rev-5.2-2010.10
Page 25
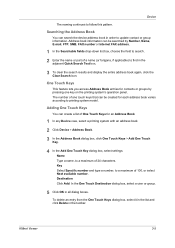
...You can be created for each address book varies according to update contact or group information. Adding One Touch Keys You can be searched by pressing one touch keys that can create a list of One Touch Keys for contacts or groups by Number, Name, E-mail, FTP, SMB, FAX number or Internet FAX address... Device view, select a printing system with an address book. 2 Click Device > Address Book. 3 In the Address Book dialog box, click One Touch Keys > Add One Touch Key. 4 In the Add One Touch Key dialog box, select settings: Name Type a name, to find in all dialog boxes. The number of one...
...You can be created for each address book varies according to update contact or group information. Adding One Touch Keys You can be searched by pressing one touch keys that can create a list of One Touch Keys for contacts or groups by Number, Name, E-mail, FTP, SMB, FAX number or Internet FAX address... Device view, select a printing system with an address book. 2 Click Device > Address Book. 3 In the Address Book dialog box, click One Touch Keys > Add One Touch Key. 4 In the Add One Touch Key dialog box, select settings: Name Type a name, to find in all dialog boxes. The number of one...
KM-NET Viewer Operation Guide Rev-5.2-2010.10
Page 26
... Device > Address Book. 3 In the Address Book dialog box, click One Touch Keys > Add One Touch Key. 4 In the One Touch Keys dialog box, select a list item and click Properties to view the One Touch Key details. 5 In the One Touch Key Properties dialog box, you can edit the Name and Destination. 6 Click OK ...in all dialog boxes. Regardless of the device. Device Searching One Touch Keys In the One Touch Keys dialog box, you can search by Number, Type, Name, and Destination. 1 In the Searchable Fields list, select the field to search...
... Device > Address Book. 3 In the Address Book dialog box, click One Touch Keys > Add One Touch Key. 4 In the One Touch Keys dialog box, select a list item and click Properties to view the One Touch Key details. 5 In the One Touch Key Properties dialog box, you can edit the Name and Destination. 6 Click OK ...in all dialog boxes. Regardless of the device. Device Searching One Touch Keys In the One Touch Keys dialog box, you can search by Number, Type, Name, and Destination. 1 In the Searchable Fields list, select the field to search...
Kyocera Command Center Operation Guide Rev 6.3
Page 16
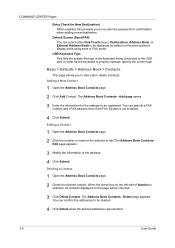
... add, edit or delete Contacts. Delete page appears. Deleting a Contact 1 Open the Address Book Contacts page. 2 Check the desired contact. You can select either One Touch (keys), Destinations, Address Book, or External Address Book to be checked. 3 Click Delete Contact. USB Keyboard Type This tells the system the type of Number is...
... add, edit or delete Contacts. Delete page appears. Deleting a Contact 1 Open the Address Book Contacts page. 2 Check the desired contact. You can select either One Touch (keys), Destinations, Address Book, or External Address Book to be checked. 3 Click Delete Contact. USB Keyboard Type This tells the system the type of Number is...
Fax System (S) C Operation Guide Rev-2
Page 5
... Send 3-4 FAX Automatic Reception 3-12 Canceling Communication 3-14 Using the Address Book 3-17 Using One-touch Keys 3-29 Using the Speed Dial key 3-32 Dialing the Same Receiving System (Redial 3-33 Previewing Images 3-34 4 FAX Operation (Advanced) Long Originals 4-2 Delayed Transmission 4-3 Broadcast Transmission 4-6 Standby Transmission 4-8 Interrupt Send 4-9...of Telephone Line (Inch version only 2-2 Selection of Transmit Terminal Identification (TTI 2-3 Setting the TTI information 2-4 Date and Time Entry 2-6 3 FAX Operation (Basic) Enter key and Quick No.
... Send 3-4 FAX Automatic Reception 3-12 Canceling Communication 3-14 Using the Address Book 3-17 Using One-touch Keys 3-29 Using the Speed Dial key 3-32 Dialing the Same Receiving System (Redial 3-33 Previewing Images 3-34 4 FAX Operation (Advanced) Long Originals 4-2 Delayed Transmission 4-3 Broadcast Transmission 4-6 Standby Transmission 4-8 Interrupt Send 4-9...of Telephone Line (Inch version only 2-2 Selection of Transmit Terminal Identification (TTI 2-3 Setting the TTI information 2-4 Date and Time Entry 2-6 3 FAX Operation (Basic) Enter key and Quick No.

Fax System (S) C Operation Guide Rev-2
Page 29
3 FAX Operation (Basic) This chapter explains the following basic operations. • Enter key and Quick No. Search key 3-2 • Automatic Send ...3-4 • FAX Automatic Reception 3-12 • Canceling Communication 3-14 • Using the Address Book 3-17 • Using One-touch Keys 3-29 • Using the Speed Dial key 3-32 • Dialing the Same Receiving System (Redial 3-33 • Previewing Images 3-34 OPERATION GUIDE 3-1
3 FAX Operation (Basic) This chapter explains the following basic operations. • Enter key and Quick No. Search key 3-2 • Automatic Send ...3-4 • FAX Automatic Reception 3-12 • Canceling Communication 3-14 • Using the Address Book 3-17 • Using One-touch Keys 3-29 • Using the Speed Dial key 3-32 • Dialing the Same Receiving System (Redial 3-33 • Previewing Images 3-34 OPERATION GUIDE 3-1

Fax System (S) C Operation Guide Rev-2
Page 31
... [OK]). Entry i-FAX Addr Entry WSD Scan 2 In the number entry screen, use the numeric keys to send. Destination Detail A OFFICE 1234567890 B OFFICE C OFFICE On Hook Direct Enter One Touch key number using # keys. (0001 - 1000) 0011 0001 00 AAA BBB Cancel 0006 0007 0008 FFF GGG HHH III 0009 OK 0010 JJJ 1/10...
... [OK]). Entry i-FAX Addr Entry WSD Scan 2 In the number entry screen, use the numeric keys to send. Destination Detail A OFFICE 1234567890 B OFFICE C OFFICE On Hook Direct Enter One Touch key number using # keys. (0001 - 1000) 0011 0001 00 AAA BBB Cancel 0006 0007 0008 FFF GGG HHH III 0009 OK 0010 JJJ 1/10...
Fax System (S) C Operation Guide Rev-2
Page 36
...communication setting, press this key, you can dial the number of noise on page 4-12. After pressing this key. For details, refer to the receiving system. To send faxes using the numeric keys • Using the Address Book (Refer to page 3-17.) • Using One-touch keys (Refer to page 3-29....) • Using the Speed Dial key (Refer to page 3-32.) • Manual Redial (recall) (Refer to page 3-33.) ...
...communication setting, press this key, you can dial the number of noise on page 4-12. After pressing this key. For details, refer to the receiving system. To send faxes using the numeric keys • Using the Address Book (Refer to page 3-17.) • Using One-touch keys (Refer to page 3-29....) • Using the Speed Dial key (Refer to page 3-32.) • Manual Redial (recall) (Refer to page 3-33.) ...

Fax System (S) C Operation Guide Rev-2
Page 57
...] shows the detailed information of One-touch Key. One Touch Key Register One Touch key. 0001 AAA BBB 0002 CCC 0003 0006 0007 0008 0011 0012 0013 0004 0009 0014 0005 No. 0010 Register /Edit Delete 0015 1/50 3 Select the One-touch key number to which to register the destination... search for the destination by destination name, group name, or address number. 6 Press [OK]. Edit Destination - Search key or [No.] directly selects the One-touch key number. 0016 0017 0018 0019 0020 Detail Status Close 08/08/2009 10:10 4 Press [Register/Edit]. 5 Select ...
...] shows the detailed information of One-touch Key. One Touch Key Register One Touch key. 0001 AAA BBB 0002 CCC 0003 0006 0007 0008 0011 0012 0013 0004 0009 0014 0005 No. 0010 Register /Edit Delete 0015 1/50 3 Select the One-touch key number to which to register the destination... search for the destination by destination name, group name, or address number. 6 Press [OK]. Edit Destination - Search key or [No.] directly selects the One-touch key number. 0016 0017 0018 0019 0020 Detail Status Close 08/08/2009 10:10 4 Press [Register/Edit]. 5 Select ...

Fax System (S) C Operation Guide Rev-2
Page 58
... Format Image Quality Destination Address Book E-mail Addr Entry Folder Path Entry FAX No. Pressing Quick No. The next/previous One-touch keys are displayed. FAX Operation (Basic) Selecting a Destination by a One-touch key. Destination Detail A OFFICE 1234567890 B OFFICE 1234568907 C OFFICE 1234569078 On Hook Direct Chain Detail/Edit Delete 1/1 Recall 0001 0002 0003 0004...
... Format Image Quality Destination Address Book E-mail Addr Entry Folder Path Entry FAX No. Pressing Quick No. The next/previous One-touch keys are displayed. FAX Operation (Basic) Selecting a Destination by a One-touch key. Destination Detail A OFFICE 1234567890 B OFFICE 1234568907 C OFFICE 1234569078 On Hook Direct Chain Detail/Edit Delete 1/1 Recall 0001 0002 0003 0004...

Fax System (S) C Operation Guide Rev-2
Page 59
FAX Operation (Basic) When deleting registration contents 1 Press [Delete]. 2 Pressing [Yes] on the deletion confirmation screen deletes the registration contents of the One-touch key. 3 OPERATION GUIDE 3-31
FAX Operation (Basic) When deleting registration contents 1 Press [Delete]. 2 Pressing [Yes] on the deletion confirmation screen deletes the registration contents of the One-touch key. 3 OPERATION GUIDE 3-31

Fax System (S) C Operation Guide Rev-2
Page 60
... you don't need to enter zero (0) at the beginning. (For example, you can designate a four-digit (0001 to 1000) One-touch key number (speed dial) to select the destination. Destination Detail A OFFICE 1234567890 B OFFICE 1234568907 C OFFICE 1234569078 On Hook Direct Chain Detail/Edit ...Delete 1/1 Recall 0001 0002 0003 0004 0005 No. NOTE: When entering a one -touch key number in the [Destination] screen and enter one , two, or three digits One- FAX Operation (Basic) Using the Speed Dial...
... you don't need to enter zero (0) at the beginning. (For example, you can designate a four-digit (0001 to 1000) One-touch key number (speed dial) to select the destination. Destination Detail A OFFICE 1234567890 B OFFICE 1234568907 C OFFICE 1234569078 On Hook Direct Chain Detail/Edit ...Delete 1/1 Recall 0001 0002 0003 0004 0005 No. NOTE: When entering a one -touch key number in the [Destination] screen and enter one , two, or three digits One- FAX Operation (Basic) Using the Speed Dial...

Fax System (S) C Operation Guide Rev-2
Page 71
... the destination from the Address Book 1 Press [Address Book]. 2 Select the check boxes beside the destinations to select from the One-touch keys 4 Press all the destinations, press [OK]. Transmission begins. NOTE: When On is selected in Destination Check before Send, a destination confirmation... screen is displayed when you can select destinations using a combination of One-touch keys, refer to Using One-touch Keys on page 3-17. For details, refer to Confirmation Screen of the Address Book, refer to Using the Address Book on...
... the destination from the Address Book 1 Press [Address Book]. 2 Select the check boxes beside the destinations to select from the One-touch keys 4 Press all the destinations, press [OK]. Transmission begins. NOTE: When On is selected in Destination Check before Send, a destination confirmation... screen is displayed when you can select destinations using a combination of One-touch keys, refer to Using One-touch Keys on page 3-17. For details, refer to Confirmation Screen of the Address Book, refer to Using the Address Book on...

Fax System (S) C Operation Guide Rev-2
Page 74
...FAX No. Re-enter the same FAX number and press [OK]. NOTE: For the Address Book and One-touch keys, refer to Using the Address Book on page 3-17 and Using One-touch Keys on page 3-29. It is convenient to register chain numbers that allows you do not need to enter ...such numbers for each transmission. Place original. For registration to Onetouch keys, refer to Registering a New One-touch Key on page 3-29. As an example, when using the numeric keys, and press [OK]. FAX Operation (Advanced) Chain Dial Chain dial is a function that are used ...
...FAX No. Re-enter the same FAX number and press [OK]. NOTE: For the Address Book and One-touch keys, refer to Using the Address Book on page 3-17 and Using One-touch Keys on page 3-29. It is convenient to register chain numbers that allows you do not need to enter ...such numbers for each transmission. Place original. For registration to Onetouch keys, refer to Registering a New One-touch Key on page 3-29. As an example, when using the numeric keys, and press [OK]. FAX Operation (Advanced) Chain Dial Chain dial is a function that are used ...

Fax System (S) C Operation Guide Rev-2
Page 75
You can select several destinations. 3 Press [OK]. Select fax number from the Address Book 1 Press [Address Book]. 2 Select the destination from One-touch keys. Transmission begins. Select fax number from One-touch key 4 Select the destination from the list. For details, refer to all the destinations, press [OK]. NOTE: When On is selected in Destination...
You can select several destinations. 3 Press [OK]. Select fax number from the Address Book 1 Press [Address Book]. 2 Select the destination from One-touch keys. Transmission begins. Select fax number from One-touch key 4 Select the destination from the list. For details, refer to all the destinations, press [OK]. NOTE: When On is selected in Destination...

Fax System (S) C Operation Guide Rev-2
Page 101
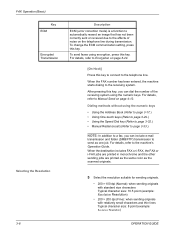
When registering a sub address and sub address password in the Address Book and One-touch keys, you can be equipped with the ITU-T (International Telecommunication Union) recommendations. Sub Address With the machine, sub address and sub address passwords are called sub ... the receiving system) and polling communication (reception of functional communication. Using sub address communication and the memory forwarding function on page 4-17. 1 Press the Send key. 2 Place the originals. 3 Press [FAX No.
When registering a sub address and sub address password in the Address Book and One-touch keys, you can be equipped with the ITU-T (International Telecommunication Union) recommendations. Sub Address With the machine, sub address and sub address passwords are called sub ... the receiving system) and polling communication (reception of functional communication. Using sub address communication and the memory forwarding function on page 4-17. 1 Press the Send key. 2 Place the originals. 3 Press [FAX No.

Fax System (S) C Operation Guide Rev-2
Page 102
... to Addr Book Status Next Dest. Status Cancel OK 08/08/2009 10:10 7 Press [Password] and enter the sub address password using the numeric keys. Re-enter the same FAX number and press [OK]. FAX Operation (Advanced) NOTE: When a sub address has been registered to Entry Check for New Destination... to 20 digits including the numbers from 0 to 9, ' (space)', '#' and '*' characters to enter the fax number of the Address Book, you can use the One-touch key. When a sub address-registered destination in Entry Check for the entered FAX number.
... to Addr Book Status Next Dest. Status Cancel OK 08/08/2009 10:10 7 Press [Password] and enter the sub address password using the numeric keys. Re-enter the same FAX number and press [OK]. FAX Operation (Advanced) NOTE: When a sub address has been registered to Entry Check for New Destination... to 20 digits including the numbers from 0 to 9, ' (space)', '#' and '*' characters to enter the fax number of the Address Book, you can use the One-touch key. When a sub address-registered destination in Entry Check for the entered FAX number.

Fax System (S) C Operation Guide Rev-2
Page 109
...to Using Polling Reception with 30 ppm, 42/52 ppm and 55/ 50 ppm models. 6 Press the Start key. For details, refer to Entry Check for polling transmission. (Refer to Polling Transmission on page 5-12. This setting... is available with Sub Addresses below. 1 Press the Send/FAX key. 2 Press [Advanced Setup], and then [FAX Polling RX]. 3 Press [On]. 4 Press [OK]. 5 Select the destination... is via the other party is using a combination of numeric keys input and Address Book or One-touch keys selection.
...to Using Polling Reception with 30 ppm, 42/52 ppm and 55/ 50 ppm models. 6 Press the Start key. For details, refer to Entry Check for polling transmission. (Refer to Polling Transmission on page 5-12. This setting... is available with Sub Addresses below. 1 Press the Send/FAX key. 2 Press [Advanced Setup], and then [FAX Polling RX]. 3 Press [On]. 4 Press [OK]. 5 Select the destination... is via the other party is using a combination of numeric keys input and Address Book or One-touch keys selection.

Fax System (S) C Operation Guide Rev-2
Page 110
... sub address set at the sending machine. When On is selected in Destination Check before Send, a destination confirmation screen is using a combination of numeric keys input, One-touch keys selection and selection from the Address Book containing registered sub addresses. This setting is displayed for the machine. This communication is still possible when...
... sub address set at the sending machine. When On is selected in Destination Check before Send, a destination confirmation screen is using a combination of numeric keys input, One-touch keys selection and selection from the Address Book containing registered sub addresses. This setting is displayed for the machine. This communication is still possible when...


