IB-51 WEB Browser Management Guide
Page 2
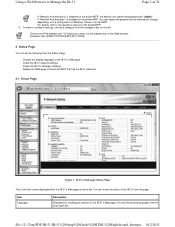
... can do the following from this page. Example: http://[FE80:0:0:0:2C0:EEFF:FE11:2233]/ 2. If "Network Authentication" is enabled on the printer/MFP, the default user name and password are "Admin". - Home Page Figure 1. For details, refer to Manage the IB-51 Page 2 of 22 - Change the display language of ... the IB-51 attached 2-1. Status Page You can check the status of the IB-51 from the Status Page. - Using a Web Browser to the operation manual of the printer/MFP. 4. IB-51's Web page Status Page This is the first screen displayed after the IB-51's Web page is disabled on...
... can do the following from this page. Example: http://[FE80:0:0:0:2C0:EEFF:FE11:2233]/ 2. If "Network Authentication" is enabled on the printer/MFP, the default user name and password are "Admin". - Home Page Figure 1. For details, refer to Manage the IB-51 Page 2 of 22 - Change the display language of ... the IB-51 attached 2-1. Status Page You can check the status of the IB-51 from the Status Page. - Using a Web Browser to the operation manual of the printer/MFP. 4. IB-51's Web page Status Page This is the first screen displayed after the IB-51's Web page is disabled on...
Fax System (W) Operation Guide Rev-2.2013.1
Page 55
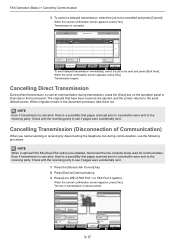
...Device/ Communicate i-FAX Paper/ Supplies Check New FAX Close 02/02/2013 10:10 3-17 Accepted Time Type Destination 0007 9:30 A OFFICE User Name Start Time 12:00 1/1 Cancel Start Now Detail Printing Jobs Status Sending Jobs Storing Jobs Device/ Communicate Paper/ Supplies Close 02/02/...during transmission, press the [Stop] key on the operation panel or [Cancel] on the touch panel. Status Scanner Ready. Line Off Manual RX FAX Printing Jobs Status Log Sending Jobs Storing Jobs Hard Disk Overwriting... When the cancel confirmation screen appears, press [Yes]. Check with...
...Device/ Communicate i-FAX Paper/ Supplies Check New FAX Close 02/02/2013 10:10 3-17 Accepted Time Type Destination 0007 9:30 A OFFICE User Name Start Time 12:00 1/1 Cancel Start Now Detail Printing Jobs Status Sending Jobs Storing Jobs Device/ Communicate Paper/ Supplies Close 02/02/...during transmission, press the [Stop] key on the operation panel or [Cancel] on the touch panel. Status Scanner Ready. Line Off Manual RX FAX Printing Jobs Status Log Sending Jobs Storing Jobs Hard Disk Overwriting... When the cancel confirmation screen appears, press [Yes]. Check with...

Fax System (W) Operation Guide Rev-2.2013.1
Page 130
... on the other party's machine (for each destination. Press [Detail] to check the result for fax reception and manual reception). User name Blank if no information is displayed. Result (Result/ Destination) Job Type Destination User Name Job Name Accepted Time End Time Original Pages Color/Black & White Connected to error. Checking Transmission Results...
... on the other party's machine (for each destination. Press [Detail] to check the result for fax reception and manual reception). User name Blank if no information is displayed. Result (Result/ Destination) Job Type Destination User Name Job Name Accepted Time End Time Original Pages Color/Black & White Connected to error. Checking Transmission Results...

Fax System (W) Operation Guide Rev-2.2013.1
Page 145
... ringing tone twice. (Only the other party can hear the ringing tone.) Receive originals from a telephone, the machine makes a ringing tone urging the user to the machine. IMPORTANT In order to use FAX/TEL Auto Switch Reception, it is necessary to connect a telephone set , you lift the handset ...of reception FAX When the other party has sent originals with automatic send FAX When the other party has sent originals with manual send Telephone When the other party is calling from a telephone Receives incoming call without making ringing tone. (The other party is required ...
... ringing tone twice. (Only the other party can hear the ringing tone.) Receive originals from a telephone, the machine makes a ringing tone urging the user to the machine. IMPORTANT In order to use FAX/TEL Auto Switch Reception, it is necessary to connect a telephone set , you lift the handset ...of reception FAX When the other party has sent originals with automatic send FAX When the other party has sent originals with manual send Telephone When the other party is calling from a telephone Receives incoming call without making ringing tone. (The other party is required ...

Fax System (W) Operation Guide Rev-2.2013.1
Page 146
... other party. NOTE If you can change the number of rings (for FAX/TEL Auto Switch), the connected telephone does not ring. NOTE You can manually receive the originals. (Refer to FAX/TEL Auto Switch Reception on page 4-15.) When the call is set makes a ringing tone. Lift the handset of... switches to fax reception. 3 Talk to select [Auto (FAX/TEL)]. 1 The connected telephone set as the number of times the ringing tone rings. (Refer to Manual Reception on page 6-9.) When the call is from a telephone 2 The machine makes a ringing tone urging the...
... other party. NOTE If you can change the number of rings (for FAX/TEL Auto Switch), the connected telephone does not ring. NOTE You can manually receive the originals. (Refer to FAX/TEL Auto Switch Reception on page 4-15.) When the call is set makes a ringing tone. Lift the handset of... switches to fax reception. 3 Talk to select [Auto (FAX/TEL)]. 1 The connected telephone set as the number of times the ringing tone rings. (Refer to Manual Reception on page 6-9.) When the call is from a telephone 2 The machine makes a ringing tone urging the...

Fax System (W) Operation Guide Rev-2.2013.1
Page 147
...When the other party has sent When the other party has sent When the other party is absent, the other party that the user is convenient when using FAX/Answering Machine Auto Switch Reception function, if a silence continues for at least 30 seconds before one ... > FAX/Answering Machine Auto Switch Reception FAX/Answering Machine Auto Switch Reception This method is absent. Therefore, when the user is originals with automatic send originals with manual send calling from a telephone Receive fax originals from the other party automatically (FAX Automatic Reception). When the other party....
...When the other party has sent When the other party has sent When the other party is absent, the other party that the user is convenient when using FAX/Answering Machine Auto Switch Reception function, if a silence continues for at least 30 seconds before one ... > FAX/Answering Machine Auto Switch Reception FAX/Answering Machine Auto Switch Reception This method is absent. Therefore, when the user is originals with automatic send originals with manual send calling from a telephone Receive fax originals from the other party automatically (FAX Automatic Reception). When the other party....

Fax System (W) Operation Guide Rev-2.2013.1
Page 148
When the call is from a fax The machine starts receiving fax originals. 6-12 When the call is from a telephone, but the user is absent The answering machine plays a response message, and starts recording the other party's message. NOTE When silence continues for at least 30... [Auto (TAD)]. 1 The connected telephone set makes ringing tone the set is still making the ringing tone, the machine enters a status the same as manual reception. (Refer to fax reception. Setup and Registration > FAX/Answering Machine Auto Switch Reception Preparation: Refer to Receiving Mode on page 4-15.) 2 The ...
When the call is from a fax The machine starts receiving fax originals. 6-12 When the call is from a telephone, but the user is absent The answering machine plays a response message, and starts recording the other party's message. NOTE When silence continues for at least 30... [Auto (TAD)]. 1 The connected telephone set makes ringing tone the set is still making the ringing tone, the machine enters a status the same as manual reception. (Refer to fax reception. Setup and Registration > FAX/Answering Machine Auto Switch Reception Preparation: Refer to Receiving Mode on page 4-15.) 2 The ...
Fax System (W) Operation Guide Rev-2.2013.1
Page 200
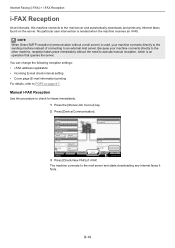
Manual i-FAX Reception Use this machine connects to the mail server and automatically downloads and prints any Internet faxes it finds. 8-14 Because your machine connects ...) > i-FAX Reception i-FAX Reception At set intervals, this procedure to check for faxes immediately. 1 Press the [Status/Job Cancel] key. 2 Press [Device/Communication]. Line Off Manual RX Hard Disk Overwriting... No particular user intervention is an operation that queries the server. NOTE When Direct SMTP reception (communication without the need to execute...
Manual i-FAX Reception Use this machine connects to the mail server and automatically downloads and prints any Internet faxes it finds. 8-14 Because your machine connects ...) > i-FAX Reception i-FAX Reception At set intervals, this procedure to check for faxes immediately. 1 Press the [Status/Job Cancel] key. 2 Press [Device/Communication]. Line Off Manual RX Hard Disk Overwriting... No particular user intervention is an operation that queries the server. NOTE When Direct SMTP reception (communication without the need to execute...
File Management Utility Operation Guide Rev 3.01.2013.3
Page 4
... set the application to specified network folders or computers. Starting the Application If the application is grayed out, restart File Management Utility with administrator privileges. 1-1 User Guide If Open FMU is not set to start automatically. 1 Open the application. 2 In the Windows system task bar, right-click the File Management Utility...
... set the application to specified network folders or computers. Starting the Application If the application is grayed out, restart File Management Utility with administrator privileges. 1-1 User Guide If Open FMU is not set to start automatically. 1 Open the application. 2 In the Windows system task bar, right-click the File Management Utility...
Kyocera Command Center RX User Guide Rev-2013.02
Page 33
... be expanded for scanning. Original image (Send/Store) The original quality for the following items as required. The default setting is downloaded. User Guide 29 Auto Color (Color/Grayscale) and Auto Color (Color/Black & White) allow you identify color for scanning or storing. Note:... or greater, the internal memory must be selected according to the type of the original. Initial Scan Settings 1. Original orientation You can manually select Black & White to the left. To scan in full color or grayscale with a solution of the original. Scan Resolution Specifies ...
... be expanded for scanning. Original image (Send/Store) The original quality for the following items as required. The default setting is downloaded. User Guide 29 Auto Color (Color/Grayscale) and Auto Color (Color/Black & White) allow you identify color for scanning or storing. Note:... or greater, the internal memory must be selected according to the type of the original. Initial Scan Settings 1. Original orientation You can manually select Black & White to the left. To scan in full color or grayscale with a solution of the original. Scan Resolution Specifies ...
Kyocera Command Center RX User Guide Rev-2013.02
Page 35
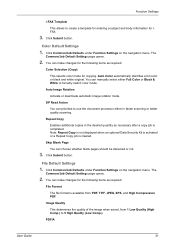
... black and white original. You can choose whether blank pages should be delivered or not. 3. Skip Blank Page You can manually select either in the desired quantity as required. PDF/A User Guide 31 Color Default Settings 1. Note: Repeat Copy is not displayed when an optional Data Security Kit is activated or a Repeat...
... black and white original. You can choose whether blank pages should be delivered or not. 3. Skip Blank Page You can manually select either in the desired quantity as required. PDF/A User Guide 31 Color Default Settings 1. Note: Repeat Copy is not displayed when an optional Data Security Kit is activated or a Repeat...
Kyocera Command Center RX User Guide Rev-2013.02
Page 48
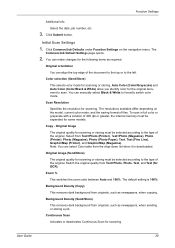
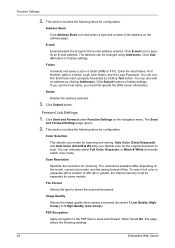
E-mail Email forwards the E-mail to a folder, Login User Name, and the Login Password. Enter the Host Name, Port Number, path to the E-mail address entered. The Send and Forward Settings page opens. 2. You ... quality when saving a scanned document 1 Low Quality (High Comp.) to forcedly switch color mode. This section includes the following items for scanning. The address can manually select Full Color, Grayscale, or Black & White to 5 High Quality (Low Comp.). Delete Deletes the address selected. 3. You can also edit an address by clicking...
E-mail Email forwards the E-mail to a folder, Login User Name, and the Login Password. Enter the Host Name, Port Number, path to the E-mail address entered. The Send and Forward Settings page opens. 2. You ... quality when saving a scanned document 1 Low Quality (High Comp.) to forcedly switch color mode. This section includes the following items for scanning. The address can manually select Full Color, Grayscale, or Black & White to 5 High Quality (Low Comp.). Delete Deletes the address selected. 3. You can also edit an address by clicking...

Kyocera Command Center RX User Guide Rev-2013.02
Page 61
...Key Management Type: Select a type of the server certificate is disabled, the expiration will be verified. When you to reach the device. User Guide 57 Click Submit button. This section includes the following on the navigation menu. Restriction Specifies the default policy for the rule from IKEv1..., IKEv2, and Manual. Select IPv4 or IPv6. This section allows you are used or not. Denied means only IPSec traffic (as defined by the IPSec rules...
...Key Management Type: Select a type of the server certificate is disabled, the expiration will be verified. When you to reach the device. User Guide 57 Click Submit button. This section includes the following on the navigation menu. Restriction Specifies the default policy for the rule from IKEv1..., IKEv2, and Manual. Select IPv4 or IPv6. This section allows you are used or not. Denied means only IPSec traffic (as defined by the IPSec rules...
Kyocera Command Center RX User Guide Rev-2013.02
Page 63
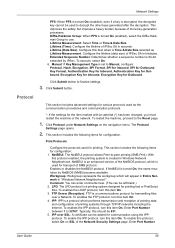
... is a protocol which will appear in Entire Network in seconds. To enable the IPP protocol, turn this item On. Enter Port Number User Guide 59 Lifetime Measurement: Select Time or Time & Data Size. With this protocol, select On on the navigation menu. FTP Server (Reception... to use. Extended Sequence Number: Determines whether a sequence number is 64-bit extended by NetBIOS (NMB) becomes available. Manual: If Key Management Type is set to Manual, configure: Protocol, Hash, Encryption, SPI Format, SPI for Inbound, SPI for Outbound, Key Format, Authentication Key for ...
... is a protocol which will appear in Entire Network in seconds. To enable the IPP protocol, turn this item On. Enter Port Number User Guide 59 Lifetime Measurement: Select Time or Time & Data Size. With this protocol, select On on the navigation menu. FTP Server (Reception... to use. Extended Sequence Number: Determines whether a sequence number is 64-bit extended by NetBIOS (NMB) becomes available. Manual: If Key Management Type is set to Manual, configure: Protocol, Hash, Encryption, SPI Format, SPI for Inbound, SPI for Outbound, Key Format, Authentication Key for ...

Kyocera NET ADMIN Operation Guide for Ver 3.1
Page 6
...created, open "C:\KNetAdminBackup" folder and locate the backup zip file. Restoring a Database in Version 3.x After KYOCERA Net Admin 3.x is installed, you can restore them manually in another folder on the computer. You can restore a database backup. Log files Firmware files Map .... 2 Select the Immediate option. 3 Click Submit. 4 After the backup file is "backup zip". 5 Copy the backup file into another user-specified backup location. 1 Open the Administration console. 2 Click Preferences > Database restore. 3 Select from the list the backup file created from the computer...
...created, open "C:\KNetAdminBackup" folder and locate the backup zip file. Restoring a Database in Version 3.x After KYOCERA Net Admin 3.x is installed, you can restore them manually in another folder on the computer. You can restore a database backup. Log files Firmware files Map .... 2 Select the Immediate option. 3 Click Submit. 4 After the backup file is "backup zip". 5 Copy the backup file into another user-specified backup location. 1 Open the Administration console. 2 Click Preferences > Database restore. 3 Select from the list the backup file created from the computer...

Kyocera NET ADMIN Operation Guide for Ver 3.1
Page 7
...controller. 1 Copy and extract the KYOCERA Net Admin (KNA) zip file to your firewall is configured correctly to read, view, and print a copy of the license agreement. You can also open and view the user and installation guides and the Readme... from local client option in C:\Program Files\Kyocera\NetAdmin\Admin\log, or to edit the default List View tabs. Server Installation The KYOCERA Net Admin server installer provides an easy and intuitive process for installing and configuring KYOCERA Net Admin. Installing KYOCERA Net Admin You can manually...
...controller. 1 Copy and extract the KYOCERA Net Admin (KNA) zip file to your firewall is configured correctly to read, view, and print a copy of the license agreement. You can also open and view the user and installation guides and the Readme... from local client option in C:\Program Files\Kyocera\NetAdmin\Admin\log, or to edit the default List View tabs. Server Installation The KYOCERA Net Admin server installer provides an easy and intuitive process for installing and configuring KYOCERA Net Admin. Installing KYOCERA Net Admin You can manually...
Kyocera NET ADMIN Operation Guide for Ver 3.1
Page 10
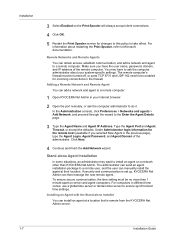
... an Agent with the Stand-alone Installer You can manually install the agent at a location that is set up, KYOCERA Net Admin can obtain access, establish communication, and add a network and agent to a remote user, and the user can install an agent at their location. If security... and communication is remote from the KYOCERA Net Admin server. 1-7 Installation Guide Make sure you selected New Agent in different time ...
... an Agent with the Stand-alone Installer You can manually install the agent at a location that is set up, KYOCERA Net Admin can obtain access, establish communication, and add a network and agent to a remote user, and the user can install an agent at their location. If security... and communication is remote from the KYOCERA Net Admin server. 1-7 Installation Guide Make sure you selected New Agent in different time ...

Kyocera Net Viewer Operation Guide Rev 5.3 2013.06
Page 3
......1-2 Excluded Devices ...1-3 Host Discovery ...1-3 Activating Host Services ...1-4 Adding Hosts ...1-5 Automatic Host Discovery ...1-6 Excluded Hosts ...1-6 User Interface ...1-7 Main Menu ...1-7 My Views ...1-7 Default Views ...1-7 Toolbar ...1-7 List View ...1-7 Closing the Application Window ...1-8... Updating and Saving a View ...2-4 Duplicating a View ...2-4 Deleting a View ...2-5 Dynamic View ...2-5 Adding a Dynamic View ...2-5 Manual View ...2-5 Adding a Manual View Using Selection 2-6 Exporting a View to a File ...2-6 Exporting a List to a File ...2-6 Exporting Device Information to ...
......1-2 Excluded Devices ...1-3 Host Discovery ...1-3 Activating Host Services ...1-4 Adding Hosts ...1-5 Automatic Host Discovery ...1-6 Excluded Hosts ...1-6 User Interface ...1-7 Main Menu ...1-7 My Views ...1-7 Default Views ...1-7 Toolbar ...1-7 List View ...1-7 Closing the Application Window ...1-8... Updating and Saving a View ...2-4 Duplicating a View ...2-4 Deleting a View ...2-5 Dynamic View ...2-5 Adding a Dynamic View ...2-5 Manual View ...2-5 Adding a Manual View Using Selection 2-6 Exporting a View to a File ...2-6 Exporting a List to a File ...2-6 Exporting Device Information to ...

Kyocera Net Viewer Operation Guide Rev 5.3 2013.06
Page 8
... to a set up to select communication settings and a discovery schedule, and confirm discovery settings. Click Next to date. 1-2 User Guide Custom Options for printing devices. Click Next to select communication settings and a discovery schedule, and confirm discovery settings. When...and click Remove. Quick Start Device Discovery Discovery is opened, the Add Devices wizard automatically launches. This process can be performed manually for adding devices: Express Uses predefined communication settings to select the following options: On your local network, a specific IP ...
... to a set up to select communication settings and a discovery schedule, and confirm discovery settings. Click Next to date. 1-2 User Guide Custom Options for printing devices. Click Next to select communication settings and a discovery schedule, and confirm discovery settings. When...and click Remove. Quick Start Device Discovery Discovery is opened, the Add Devices wizard automatically launches. This process can be performed manually for adding devices: Express Uses predefined communication settings to select the following options: On your local network, a specific IP ...

Kyocera Net Viewer Operation Guide Rev 5.3 2013.06
Page 13
... each icon to display more information. Click the triangle icon to organize and manage My Views. KYOCERA Net Viewer 5.3 1-7 You can create folders to expand the row and see . They cannot ... My Views by the application to the View menu and clicking Add dynamic view or Add manual view using selection. When you select a custom view under My Views, and standard Default ...about your environment. You can move your devices on a custom map background. Quick Start User Interface The user interface displays the information you can organize. The screen is located at the top of ...
... each icon to display more information. Click the triangle icon to organize and manage My Views. KYOCERA Net Viewer 5.3 1-7 You can create folders to expand the row and see . They cannot ... My Views by the application to the View menu and clicking Add dynamic view or Add manual view using selection. When you select a custom view under My Views, and standard Default ...about your environment. You can move your devices on a custom map background. Quick Start User Interface The user interface displays the information you can organize. The screen is located at the top of ...


