Fax System (V) Operation Guide
Page 6
6 Setup and Registration Selection of Telephone Line (Inch version only 6-2 Selection of Transmit Terminal Identification (TTI 6-3 Setting the TTI information 6-4 FAX/TEL ...(A 7-2 Expansion Memory 7-3 Dual FAX 7-3 8 Internet Faxing (i-FAX) (Option) What is i-FAX 8-2 i-FAX Settings 8-4 i-FAX Transmission 8-8 i-FAX Reception 8-13 9 About Network FAX What is Network FAX 9-2 Setup 9-4 10 Troubleshooting Indicators During Sending/Receiving Operation 10-2 Precautions When Turning Power OFF 10-3 Error Messages 10-4 Troubleshooting 10-6 Appendix Character Entry Method...
6 Setup and Registration Selection of Telephone Line (Inch version only 6-2 Selection of Transmit Terminal Identification (TTI 6-3 Setting the TTI information 6-4 FAX/TEL ...(A 7-2 Expansion Memory 7-3 Dual FAX 7-3 8 Internet Faxing (i-FAX) (Option) What is i-FAX 8-2 i-FAX Settings 8-4 i-FAX Transmission 8-8 i-FAX Reception 8-13 9 About Network FAX What is Network FAX 9-2 Setup 9-4 10 Troubleshooting Indicators During Sending/Receiving Operation 10-2 Precautions When Turning Power OFF 10-3 Error Messages 10-4 Troubleshooting 10-6 Appendix Character Entry Method...

Fax System (V) Operation Guide
Page 14
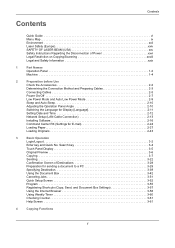
... such as adjusting the volume of the alarm sound. Setup and Registration Explains various settings and registration pertaining to check the status of fax. Internet Faxing (i-FAX) (Option) Explains how to use Network FAX functions. Introduction About This Guide This guide consists ... sending originals and receiving originals. Part Names and Functions Explains the parts of the machine. Chapter 7 - Chapter 8 - Read the Network FAX Driver Operation Guide in the included DVD (online manual) as forwarding, saving, and printing the received originals for Internet faxing. Also...
... such as adjusting the volume of the alarm sound. Setup and Registration Explains various settings and registration pertaining to check the status of fax. Internet Faxing (i-FAX) (Option) Explains how to use Network FAX functions. Introduction About This Guide This guide consists ... sending originals and receiving originals. Part Names and Functions Explains the parts of the machine. Chapter 7 - Chapter 8 - Read the Network FAX Driver Operation Guide in the included DVD (online manual) as forwarding, saving, and printing the received originals for Internet faxing. Also...
Fax System (V) Operation Guide
Page 186
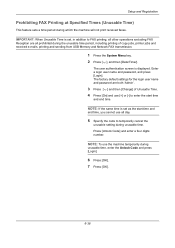
..., including printing of Unusable Time. 4 Press [On] and use [+] or [-] to temporarily cancel the unusable setting during unusable time. Setup and Registration Prohibiting FAX Printing at Specified Times (Unusable Time) This feature sets a time period during unusable time, enter the Unlock Code and...Reception are both 'Admin'. 3 Press [ ] and then [Change] of copy jobs, printer jobs and received e-mails, printing and sending from USB Memory and Network FAX transmission. 1 Press the System Menu key. 2 Press [ ], and then [Date/Timer]. Press [Unlock Code] and enter a four digits number. ...
..., including printing of Unusable Time. 4 Press [On] and use [+] or [-] to temporarily cancel the unusable setting during unusable time. Setup and Registration Prohibiting FAX Printing at Specified Times (Unusable Time) This feature sets a time period during unusable time, enter the Unlock Code and...Reception are both 'Admin'. 3 Press [ ] and then [Change] of copy jobs, printer jobs and received e-mails, printing and sending from USB Memory and Network FAX transmission. 1 Press the System Menu key. 2 Press [ ], and then [Date/Timer]. Press [Unlock Code] and enter a four digits number. ...

Fax System (V) Operation Guide
Page 207
Please also read the Network FAX Driver Operation Guide (Online Manual) contained in the included DVD, which describes how to operate your PC to use Network FAX. 9 About Network FAX This chapter explains how to send a fax using Network FAX and make various settings. • What is Network FAX 9-2 • Setup ...9-4 9-1
Please also read the Network FAX Driver Operation Guide (Online Manual) contained in the included DVD, which describes how to operate your PC to use Network FAX. 9 About Network FAX This chapter explains how to send a fax using Network FAX and make various settings. • What is Network FAX 9-2 • Setup ...9-4 9-1
Fax System (V) Operation Guide
Page 210
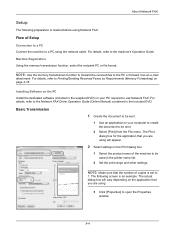
...4-18. NOTE: Make sure that you are using will vary depending on your PC required to be used in the included DVD. About Network FAX Setup The following screen is an example. For details, refer to Printing/Sending Received Faxes by Requirements (Memory Forwarding) on your computer to create... the Print dialog box. 1 Select the product name of the machine to a PC using Network FAX. Basic Transmission 1 Create the document to be sent. 1 Use an application on the application that the number of Setup Connection to a PC Connect the machine to be sent. 2 Select [Print] from the ...
...4-18. NOTE: Make sure that you are using will vary depending on your PC required to be used in the included DVD. About Network FAX Setup The following screen is an example. For details, refer to Printing/Sending Received Faxes by Requirements (Memory Forwarding) on your computer to create... the Print dialog box. 1 Select the product name of the machine to a PC using Network FAX. Basic Transmission 1 Create the document to be sent. 1 Use an application on the application that the number of Setup Connection to a PC Connect the machine to be sent. 2 Select [Print] from the ...
Fax System (V) Operation Guide
Page 244
... Output 6-16 Memory Reception 3-12, 10-7 Memory Transmission Cancel 3-14 Menu List Appendix-6 MP Tray Paper Output 6-18 N Network FAX 9-1 Basic Transmission 9-4 FAX Setting Tab 9-6 Flow of Receiving 9-2 Flow of Sending 9-2 Online Manual 9-1, 9-7 Setup 9-4 No Print Output 10-6 O One-touch Keys 2-14 Change/Delete 2-15 Registering a New Destination 2-14 Select Destination 3-21...
... Output 6-16 Memory Reception 3-12, 10-7 Memory Transmission Cancel 3-14 Menu List Appendix-6 MP Tray Paper Output 6-18 N Network FAX 9-1 Basic Transmission 9-4 FAX Setting Tab 9-6 Flow of Receiving 9-2 Flow of Sending 9-2 Online Manual 9-1, 9-7 Setup 9-4 No Print Output 10-6 O One-touch Keys 2-14 Change/Delete 2-15 Registering a New Destination 2-14 Select Destination 3-21...

Kyocera Command Center RX User Guide Rev-1.2
Page 52
...printer in Mac OS X using "Bonjour Print Services for Windows". The format of the IPv6 address is also available in Windows OS using the Printer Setup Utility. The procedure varies slightly between Mac OS X versions. IPv6 Settings • IPv6 Specifies whether or not to enable the IPv6 protocol. When... KPDL. • Bonjour Name If Bonjour is Off in the printing system. You can be entered in this field as part of the system network settings. Settings Pages 6-30 Turn On to automatically assign a unique IP address even though a DHCP server does not exist or DHCP setting is ...
...printer in Mac OS X using "Bonjour Print Services for Windows". The format of the IPv6 address is also available in Windows OS using the Printer Setup Utility. The procedure varies slightly between Mac OS X versions. IPv6 Settings • IPv6 Specifies whether or not to enable the IPv6 protocol. When... KPDL. • Bonjour Name If Bonjour is Off in the printing system. You can be entered in this field as part of the system network settings. Settings Pages 6-30 Turn On to automatically assign a unique IP address even though a DHCP server does not exist or DHCP setting is ...

Kyocera Command Center RX User Guide Rev-1.2
Page 55
...Privileges. With Novell Client, creation of the NDS Tree. NDS Context Enter the NDS Context. COMMAND CENTER RX 6-33 NetWare setup requires installation of the primary File Server. Bindery Mode Enables or disables Bindery Mode. File Server (Primary) Enter the name of... Interval Enter the Queue Polling Interval in either Novell or Microsoft. Password (optional) Enter the Password, if required. For Admin Privileges, network operations (creating queues etc.) require 'admin' or 'supervisor' privileges (or equivalent). Print Server Name Enter the Print Server Name. This...
...Privileges. With Novell Client, creation of the NDS Tree. NDS Context Enter the NDS Context. COMMAND CENTER RX 6-33 NetWare setup requires installation of the primary File Server. Bindery Mode Enables or disables Bindery Mode. File Server (Primary) Enter the name of... Interval Enter the Queue Polling Interval in either Novell or Microsoft. Password (optional) Enter the Password, if required. For Admin Privileges, network operations (creating queues etc.) require 'admin' or 'supervisor' privileges (or equivalent). Print Server Name Enter the Print Server Name. This...

TASKalfa MFP Network Fax Driver Operation Guide Rev.2011.1
Page 7
... open the drive directory and then double click on the DVD drive icon to install the Network FAX Driver. For information regarding the programs on the DVD is loaded, double click on setup.exe. 1-1 The main menu window then appears. The machine must be displayed. If the... AutoPlay window appears, click Run setup.exe. NOTE: If the set -up network, etc.). To accept the agreement conditions, click on the power to the machine. 1 Installing the Corresponding Software Installing the Network FAX Driver 1 Turn on the Accept button. The set -up...
... open the drive directory and then double click on the DVD drive icon to install the Network FAX Driver. For information regarding the programs on the DVD is loaded, double click on setup.exe. 1-1 The main menu window then appears. The machine must be displayed. If the... AutoPlay window appears, click Run setup.exe. NOTE: If the set -up network, etc.). To accept the agreement conditions, click on the power to the machine. 1 Installing the Corresponding Software Installing the Network FAX Driver 1 Turn on the Accept button. The set -up...
3500i/4500i/5500i Operation Guide Rev-1 2011.4
Page 4
...and Auto Sleep 2-10 Adjusting the Operation Panel Angle 2-10 Switching the Language for Display [Language 2-11 Setting Date and Time 2-12 Network Setup (LAN Cable Connection 2-13 Installing Software 2-16 Command Center RX (Settings for sending a document to a PC 3-29 Specifying Destination ...3-39 Using the Document Box 3-42 Canceling Jobs 3-51 Quick Setup Screen 3-52 Program 3-55 Registering Shortcuts (Copy, Send, and Document Box Settings 3-57 Using the Internet Browser 3-58 Using Weekly Timer...
...and Auto Sleep 2-10 Adjusting the Operation Panel Angle 2-10 Switching the Language for Display [Language 2-11 Setting Date and Time 2-12 Network Setup (LAN Cable Connection 2-13 Installing Software 2-16 Command Center RX (Settings for sending a document to a PC 3-29 Specifying Destination ...3-39 Using the Document Box 3-42 Canceling Jobs 3-51 Quick Setup Screen 3-52 Program 3-55 Registering Shortcuts (Copy, Send, and Document Box Settings 3-57 Using the Internet Browser 3-58 Using Weekly Timer...
3500i/4500i/5500i Operation Guide Rev-1 2011.4
Page 8
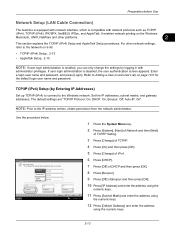
... directly from Applications ...5-2 You can also fine-tune the copy settings by changing the paper size, adjusting the density, etc. You can print via a network Connecting Cables Network Setup (LAN Cable Connection) Install the printer driver on your computer *1 Loading Paper...2-27 Placing Originals on the Platen...2-43 Operation Copying Functions ...4-1 Printing Documents...
... directly from Applications ...5-2 You can also fine-tune the copy settings by changing the paper size, adjusting the density, etc. You can print via a network Connecting Cables Network Setup (LAN Cable Connection) Install the printer driver on your computer *1 Loading Paper...2-27 Placing Originals on the Platen...2-43 Operation Copying Functions ...4-1 Printing Documents...
3500i/4500i/5500i Operation Guide Rev-1 2011.4
Page 9
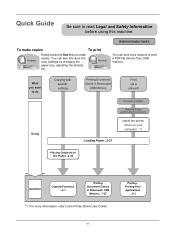
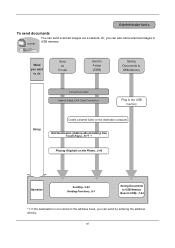
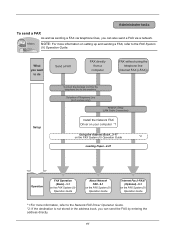
...Saving Documents to USB)...7-24 *1: If the destination is not stored in the address book, you can also store scanned images in the USB memory Setup Create a shared folder on the destination computer. Administrator tasks To send documents It sends. Edit Destination (Address Book/Adding One Touch Keys)...9-77 *1... Placing Originals on the Platen...2-43 Operation Sending...3-22 Sending Functions...6-1 Saving Documents to USB Memory (Scan to USB Memory Connecting Cables Network Setup (LAN Cable Connection) Plug in USB memory. vii Or, you can send scanned images via...
...Saving Documents to USB)...7-24 *1: If the destination is not stored in the address book, you can also store scanned images in the USB memory Setup Create a shared folder on the destination computer. Administrator tasks To send documents It sends. Edit Destination (Address Book/Adding One Touch Keys)...9-77 *1... Placing Originals on the Platen...2-43 Operation Sending...3-22 Sending Functions...6-1 Saving Documents to USB Memory (Scan to USB Memory Connecting Cables Network Setup (LAN Cable Connection) Plug in USB memory. vii Or, you can send scanned images via...
3500i/4500i/5500i Operation Guide Rev-1 2011.4
Page 10
... also send a FAX via telephone lines, you can send the FAX by entering the address directly. Selection of Telephone Line (Inch version only) Network Setup (LAN Cable Connection) Install the Network FAX Driver on your computer *1 Using the Address Book...3-17 on the FAX System (V) Operation Guide *2 Loading Paper...2-27 Operation FAX Operation...
... also send a FAX via telephone lines, you can send the FAX by entering the address directly. Selection of Telephone Line (Inch version only) Network Setup (LAN Cable Connection) Install the Network FAX Driver on your computer *1 Using the Address Book...3-17 on the FAX System (V) Operation Guide *2 Loading Paper...2-27 Operation FAX Operation...

3500i/4500i/5500i Operation Guide Rev-1 2011.4
Page 49
... Auto Sleep 2-10 • Adjusting the Operation Panel Angle 2-10 • Switching the Language for Display [Language 2-11 • Setting Date and Time 2-12 • Network Setup (LAN Cable Connection 2-13 • Installing Software 2-16 • Command Center RX (Settings for E-mail 2-24 • Loading Paper 2-27 • Loading Originals 2-43...
... Auto Sleep 2-10 • Adjusting the Operation Panel Angle 2-10 • Switching the Language for Display [Language 2-11 • Setting Date and Time 2-12 • Network Setup (LAN Cable Connection 2-13 • Installing Software 2-16 • Command Center RX (Settings for E-mail 2-24 • Loading Paper 2-27 • Loading Originals 2-43...

3500i/4500i/5500i Operation Guide Rev-1 2011.4
Page 53
... connector located on left side of the body. 3 Connect the other than this , turn off . Check that lamps other end of the cable to Network Setup (LAN Cable Connection) on the operation panel. Preparation before Use Connecting Cables Connecting LAN Cable (Optional) Follow the steps below to connect a LAN cable to ...
... connector located on left side of the body. 3 Connect the other than this , turn off . Check that lamps other end of the cable to Network Setup (LAN Cable Connection) on the operation panel. Preparation before Use Connecting Cables Connecting LAN Cable (Optional) Follow the steps below to connect a LAN cable to ...
3500i/4500i/5500i Operation Guide Rev-1 2011.4
Page 61
.... If user login administration is disabled, the user authentication screen appears. Preparation before Use Network Setup (LAN Cable Connection) The machine is equipped with network interface, which is compatible with administrator privileges. Enter a login user name and password, and press [Login]. IP Address Subnet Mask On Default Gateway 0.0.0.0 0.0.0.0 0.0.0.0 Off DHCP ...
.... If user login administration is disabled, the user authentication screen appears. Preparation before Use Network Setup (LAN Cable Connection) The machine is equipped with network interface, which is compatible with administrator privileges. Enter a login user name and password, and press [Login]. IP Address Subnet Mask On Default Gateway 0.0.0.0 0.0.0.0 0.0.0.0 Off DHCP ...

3500i/4500i/5500i Operation Guide Rev-1 2011.4
Page 63
... [Change] of IPv4. 6 Press [Auto-IP]. 7 Press [On] or [Off] of Auto-IP and then press [OK]. 8 After changing the setting, restart the network from the system menu, or turn the machine OFF and then ON. Refer to AppleTalk on page 9-101. For detailed information on restarting the... network, refer to use Auto-IP. The default setting is On. The default setting is On. AppleTalk Setup Select the Apple Talk network connection. Preparation before Use Auto-IP Settings Select whether or not to Restart...
... [Change] of IPv4. 6 Press [Auto-IP]. 7 Press [On] or [Off] of Auto-IP and then press [OK]. 8 After changing the setting, restart the network from the system menu, or turn the machine OFF and then ON. Refer to AppleTalk on page 9-101. For detailed information on restarting the... network, refer to use Auto-IP. The default setting is On. The default setting is On. AppleTalk Setup Select the Apple Talk network connection. Preparation before Use Auto-IP Settings Select whether or not to Restart...

3500i/4500i/5500i Operation Guide Rev-1 2011.4
Page 64
...of this machine to a Windows PC, follow the next steps to install the software. The optional Fax Kit is displayed, click Run Setup.exe. If the autorun screen is required in order to make use either Express Mode or Custom Mode to install the software. For ...• KX driver • KX (XPS) printer driver • Mini printer driver (PCL/KPDL) • TWAIN driver • WIA driver • Network FAX driver • File Management Utility • KM-NET for Direct Printing • KMnet Viewer • Font NOTE: Installation on with administrator privileges. Installing ...
...of this machine to a Windows PC, follow the next steps to install the software. The optional Fax Kit is displayed, click Run Setup.exe. If the autorun screen is required in order to make use either Express Mode or Custom Mode to install the software. For ...• KX driver • KX (XPS) printer driver • Mini printer driver (PCL/KPDL) • TWAIN driver • WIA driver • Network FAX driver • File Management Utility • KM-NET for Direct Printing • KMnet Viewer • Font NOTE: Installation on with administrator privileges. Installing ...

3500i/4500i/5500i Operation Guide Rev-1 2011.4
Page 240
Displays the screen for Windows 7) 1 Click Start and then Network in the computer. 2 Right-click the machine's icon (Kyocera: XXX:XXX) and then click Install. Installing Driver Software (for sending. NOTE: Depending on the task bar to On in the document ...processor or on the Driver Software Installation screen, the installation is completed. 1 Press the Send Key. connected, and WSD Scan Setup (page 9-96) is network- If ...
Displays the screen for Windows 7) 1 Click Start and then Network in the computer. 2 Right-click the machine's icon (Kyocera: XXX:XXX) and then click Install. Installing Driver Software (for sending. NOTE: Depending on the task bar to On in the document ...processor or on the Driver Software Installation screen, the installation is completed. 1 Press the Send Key. connected, and WSD Scan Setup (page 9-96) is network- If ...

3500i/4500i/5500i Operation Guide Rev-1 2011.4
Page 384
... under Host Name. TCP/IP Select whether or not to Restart Network on page 9-101. Default Setting (System Menu) Network The following network settings are available. • Host Name ...9-90 • TCP/IP ...9-90 • TCP/IP (IPv4) Setup ...9-91 • TCP/IP (IPv6) Setup ...9-92 • Protocol Detail ...9-94 • NetWare ...9-95 • AppleTalk...
... under Host Name. TCP/IP Select whether or not to Restart Network on page 9-101. Default Setting (System Menu) Network The following network settings are available. • Host Name ...9-90 • TCP/IP ...9-90 • TCP/IP (IPv4) Setup ...9-91 • TCP/IP (IPv6) Setup ...9-92 • Protocol Detail ...9-94 • NetWare ...9-95 • AppleTalk...


