Kyocera TASKalfa 300ci Waste Toner Container
View Results Below
Free Kyocera TASKalfa 300ci manuals!
Problems with Kyocera TASKalfa 300ci?
Ask a Question
Free Kyocera TASKalfa 300ci manuals!
Problems with Kyocera TASKalfa 300ci?
Ask a Question
Related Manual Pages


Similar Questions


Changing Waste Toner Box And Toner Kyocera 3550ci
Please Provide Instructions On How To Change Waste Toner Box And Toner On Kyocera 3550 Ci
Please Provide Instructions On How To Change Waste Toner Box And Toner On Kyocera 3550 Ci
(Posted by DHUGHESMUA 10 years ago)

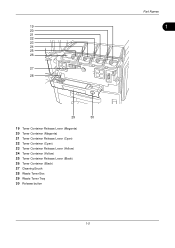
How To Tell Which Toner To Replace
HOw do you know which color toner to replace
HOw do you know which color toner to replace
(Posted by payrollclerk 11 years ago)