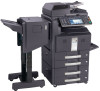
KM-NET ADMIN Operation Guide for Ver 2.0
Page 9
... completes. To configure queues later, clear the check box. 4 To exit the installer, click Finish. Cookies must be enabled. Select Configure Print Queues Now if you want to a managed KMSTLMON port on each print server. Supported Printers Kyocera network printers and most third party network printers that support the standard printer MIB...
KM-NET ADMIN Operation Guide for Ver 2.0
Page 10
To exit the installer, click Finish. To exit the uninstaller, click Finish. Installing the Job Release for Print Job Manager Installation of Job Release software is only necessary if you repair or remove Job release features. Select ... Agent is completely reinstalled as it was installed in the previous setup. Remove Job Release Job Release is completely uninstalled. To exit the installer, click Finish. Job Release for Print Job Manager You can install Job Release from the application directory. 1 Run the Job Release installer from C:\KMnetAdmin\host-agent\Job...
KM-NET ADMIN Operation Guide for Ver 2.0
Page 38
... designate a time for the device configuration to run by Devices. Schedule If you select Run now, Multi-Set configures the selected devices when you click Finish on the toolbar. 3 Click Next. 4 Designate which devices you want to run , type the time in the corresponding list. Select the day, month, and year... the devices in the selected group, leave All model types in the form hh:mm. Click Next. 7 Confirm the accuracy of your selections, then click Finish to configure from the corresponding lists.
KM-NET ADMIN Operation Guide for Ver 2.0
Page 39
... for all devices, type the chosen Write Community value in the text box. Log File The Log File contains a record of your selections, then click Finish to configure the selected devices. You can be found in the KMnetAdmin\log folder. Click Next. Firmware Upgrade is initiated using the Firmware Upgrade wizard... value for all devices and the Write Community does not match the one stored on the right pane toolbar. 3 Click Next. 4 Select the changes you finish the upgrade.
KM-NET ADMIN Operation Guide for Ver 2.0
Page 47
... the available options. 4 Click OK. Supplies Displays the current quantity of the printing device with the IP address. Refresh At any installed paper feeders or finishers. The Properties dialog box displays detailed information about the selected network device. When the device is being managed by the application. Device Manager Displaying Device...
KM-NET ADMIN Operation Guide for Ver 2.0
Page 65
... selected group. If no group is selected, then the wizard provides a device selection step. If no device is selected, this wizard, you click the Finish button. 7 Click Finish . 8 If Now was selected, a progress window will appear. Use the shift and control keys to select one or more devices. Using this button is...
KM-NET ADMIN Operation Guide for Ver 2.0
Page 71
... include in the report, click today's date, then click the date 29 days ago. Creating a group that includes one printing device lets you click the Finish button. 9 If Now was selected, a progress window will be cancelled after you create a report on the calendar at a later time, the job cannot be displayed...
KM-NET ADMIN Operation Guide for Ver 2.0
Page 88
... any time. Managed queues appear and are tracked in the left pane under Unmanaged Queues. 2 To move a queue from network printing devices. Managed queues are finished managing queues, click OK to save your changes and close the Queue Management dialog box, click OK. 11 In KM Service Manager, click Start to...
KM-NET ADMIN Operation Guide for Ver 2.0
Page 92
... Name This column shows the print job name as provided by the spooler. Click Delete to toggle between ascending and descending sort orders. It contains finished print jobs that column. By default, completed print jobs are descriptions of completion for the print job in that are sorted as integers. Click the...
KM-NET ADMIN Operation Guide for Ver 2.0
Page 96
... are tracked in the left arrow. 3 When you open the dialog, all printing systems connected to TCP/IP on the server with Host Agent are finished managing queues, click OK to save your changes and close the Configure Queues dialog. The first time you are listed in the left pane under...
KM-NET Viewer Operation Guide Rev-5.2-2010.10
Page 8
... starting and ending IPv4 addresses and click Add to add them to run on any network. 3 For the selected method, complete the wizard and click Finish to continue through the wizard to save the password. This process can be performed manually for adding devices: Express Uses predefined communication settings to find...
KM-NET Viewer Operation Guide Rev-5.2-2010.10
Page 9
... is performed. 1 Click Device > Discovery > Excluded Devices. 2 In the list, select an excluded device to include. 3 Click Include device. 1-3 On the Confirm Discovery page, click Finish to save your changes. 4 The new discovery mode is added to the list. Including a Device A printing device that was placed in the Excluded Devices window...
KM-NET Viewer Operation Guide Rev-5.2-2010.10
Page 16
... characteristics. As you move from view to the original list of the screen, click Edit > Remove from view. Quick Search entries are displayed until you finish typing, the view shows only the devices or accounts containing text that match the selected criteria. Up to Advanced Search.
KM-NET Viewer Operation Guide Rev-5.2-2010.10
Page 30
... from the list. It is a type of virtual mailbox on the device. If authentication on the hard disk. 1 Select a device. 2 Select Device > Document Box to finish. Number Select an available box number. Restrict usage (MB) 3-10 User Guide Click Delete > Delete Selected Jobs. In the Properties dialog box, you can view...
KM-NET Viewer Operation Guide Rev-5.2-2010.10
Page 33
... installed. This feature is not deleted. The Virtual Mailbox dialog box opens. 3 Select a virtual mailbox from the list. 4 Click Delete Mailbox, then click Yes to finish. Only one or more files, and move them by dragging from the right-side view to select a device from the device list. 2 Select Device > Virtual...
KM-NET Viewer Operation Guide Rev-5.2-2010.10
Page 49
...the following printing system functions: Job accounting for copying Job accounting for printing Job accounting for scanning Job accounting for FAX 3 If you are finished selecting Job Accounting options, you can select other options in the dialog box, or you can save all your selections by size and type ... clicking OK. The list of options is expanded. 2 For each of the lists select Cancel, Cancel immediately, or Warning only. 4 If you are finished selecting Media Type options, you can select other options in the dialog box, or you do not want to track the number of your selections...
KM-NET Viewer Operation Guide Rev-5.2-2010.10
Page 50
... send configuration parameters for job accounting, media type, error handling, permitting job processing without an account ID, and copy counter. 4-8 User Guide The devices are finished selecting Additional options, you can select other options in the dialog box, or you can also select groups of your selections, click Cancel. Selecting Accounting...
KM-NET Viewer Operation Guide Rev-5.2-2010.10
Page 51
Warning: When Account List is selected in .XML format. 5 Click Finish. 4-9 If the process completes successfully, the properties or settings are saved to preserve the destination device settings. Browse or type a file name with information about ... Account Account List This is a list of device accounts with an extension of .CSV. Clear this check box to a file with the extension .XML.Click Finish. Click Next. 3 The Confirmation page shows a list of the settings you want to save the error list, click Export to open a dialog box to make...
KM-NET Viewer Operation Guide Rev-5.2-2010.10
Page 52
... a list of the errors. If the process does not complete successfully, you are done making settings, click OK to a file with the extension .XML. 4 Click Finish. A dialog box opens containing settings for this Account or View Accounts on the selection in step 1, in your changes to the settings. 2 When you can...
KM-NET Viewer Operation Guide Rev-5.2-2010.10
Page 58
.... Creating Settings From a File You can click Details to open a dialog box for accessing a device. Browse or type a file name with the extension .XML.Click Finish. These settings vary by device. The availability of .CSV. Click Next. 2 Click on the device, and administrator access permission. Device Document Box Users' Custom and...