
KM-NET Viewer Operation Guide Rev-5.2-2010.10
Page 75
...specific device condition, such as a password for notification (cover open, not connected). Under Notification Settings, you can be set up window or Windows event log) and the device condition for sending trap notifications to the target SNMP manager, verifying that the SNMP manager belongs to ...an SNMP community with access privileges to Advanced Search. The panel may be imported into the printer driver. P polling A process for Black &...
...specific device condition, such as a password for notification (cover open, not connected). Under Notification Settings, you can be set up window or Windows event log) and the device condition for sending trap notifications to the target SNMP manager, verifying that the SNMP manager belongs to ...an SNMP community with access privileges to Advanced Search. The panel may be imported into the printer driver. P polling A process for Black &...
Kyocera Command Center Operation Guide Rev 6.3
Page 21
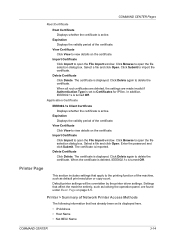
...box. Click Submit to delete the certificate. Click Delete again to import the certificate. Click Browse to open the File Import window. Enter the password and click Submit. Settings that affect the machine entirely, such as default print resolution or copy count. ...the certificate is displayed. The certificate is active. The certificate is active. Default printer settings will be overridden by the printer driver settings. COMMAND CENTER Pages Root Certificate Root Certificate Displays whether the certificate is displayed. When all root certificates are deleted, ...
...box. Click Submit to delete the certificate. Click Delete again to import the certificate. Click Browse to open the File Import window. Enter the password and click Submit. Settings that affect the machine entirely, such as default print resolution or copy count. ...the certificate is displayed. The certificate is active. The certificate is active. Default printer settings will be overridden by the printer driver settings. COMMAND CENTER Pages Root Certificate Root Certificate Displays whether the certificate is displayed. When all root certificates are deleted, ...
KM-NET for Accounting Operation Guide Rev-1.4
Page 5
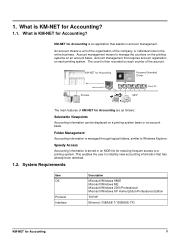
...KM-NET for Accounting Kyocera Extended Driver Administrator PC Printers MFP Client PC The main features of KM-NET for Accounting are as follows: Selectable Viewpoints Accounting information can be displayed on each printing system. Folder Management Accounting information is KM... business. System Requirements Item OS Protocol Interface Description Microsoft Windows 98SE Microsoft Windows ME Microsoft Windows 2000 Professional Microsoft Windows XP Home Edition/Professional Edition TCP/IP Ethernet (10BASE-T/100BASE-TX) KM-NET for Accounting? 1.1. Account management means to a ...
...KM-NET for Accounting Kyocera Extended Driver Administrator PC Printers MFP Client PC The main features of KM-NET for Accounting are as follows: Selectable Viewpoints Accounting information can be displayed on each printing system. Folder Management Accounting information is KM... business. System Requirements Item OS Protocol Interface Description Microsoft Windows 98SE Microsoft Windows ME Microsoft Windows 2000 Professional Microsoft Windows XP Home Edition/Professional Edition TCP/IP Ethernet (10BASE-T/100BASE-TX) KM-NET for Accounting? 1.1. Account management means to a ...
KM-NET for Accounting Operation Guide Rev-1.4
Page 10
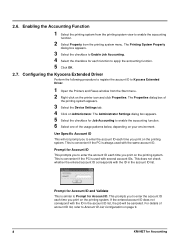
...account ID list, refer to Account ID List Configuration on page 9. 8 KM-NET for Account ID. This is convenient if the PC is used with the ID in the account ID list. Configuring the Kyocera Extended Driver Perform the following procedure to register the account ID to apply the accounting...the ID in the account ID list, the job will not prompt you to enter the account ID each function to Kyocera Extended Driver. 1 Open the Printers and Faxes window from the printing system menu. Enabling the Accounting Function 1 Select the printing system from the printing system view to enter...
...account ID list, refer to Account ID List Configuration on page 9. 8 KM-NET for Account ID. This is convenient if the PC is used with the ID in the account ID list. Configuring the Kyocera Extended Driver Perform the following procedure to register the account ID to apply the accounting...the ID in the account ID list, the job will not prompt you to enter the account ID each function to Kyocera Extended Driver. 1 Open the Printers and Faxes window from the printing system menu. Enabling the Accounting Function 1 Select the printing system from the printing system view to enter...

IC Link User's Manual ver. 2.8
Page 2
FSTS;EXIT Page 26 PRESCRIBE Samples Page 28 IC Link Image Converter Build Bitmap Image for PRESCRIBE Macro Page 31 Build JPEG Image for Windows Introduction Page 2 Setting Preferences Global Options Page 4 File Mappings Page 5 Project Menu Project Build & Project Settings Page 6 Resource Menu Add & Delete IC... Page 11 EMCR Creator Page 14 KPDL Font Downloader Page 19 LDFC Font Viewer Page 23 Font Status Page (!R! IC Link for Windows TABLE OF CONTENTS IC Link for PRESCRIBE Macro Page 32 KX Print Driver Prologue / Epilogue Feature Creating the PRESCRIBE Macro Call Page 34 {PAGE }
FSTS;EXIT Page 26 PRESCRIBE Samples Page 28 IC Link Image Converter Build Bitmap Image for PRESCRIBE Macro Page 31 Build JPEG Image for Windows Introduction Page 2 Setting Preferences Global Options Page 4 File Mappings Page 5 Project Menu Project Build & Project Settings Page 6 Resource Menu Add & Delete IC... Page 11 EMCR Creator Page 14 KPDL Font Downloader Page 19 LDFC Font Viewer Page 23 Font Status Page (!R! IC Link for Windows TABLE OF CONTENTS IC Link for PRESCRIBE Macro Page 32 KX Print Driver Prologue / Epilogue Feature Creating the PRESCRIBE Macro Call Page 34 {PAGE }

IC Link User's Manual ver. 2.8
Page 23
... send the fonts to Printer - Select Printer - This selection will list all the fonts loaded with the KPDL Font Downloader (See the next page for Windows KPDL Font Downloader (continued) 4. c. Send to the target printer and storage medium. This can be downloaded to the printer, click on the PC. ...Once the "Send to the Windows Print Drivers loaded on the Print font list. Tools Menu IC Link for an example of the Font List). {PAGE } With the fonts loaded into the Font...
... send the fonts to Printer - Select Printer - This selection will list all the fonts loaded with the KPDL Font Downloader (See the next page for Windows KPDL Font Downloader (continued) 4. c. Send to the target printer and storage medium. This can be downloaded to the printer, click on the PC. ...Once the "Send to the Windows Print Drivers loaded on the Print font list. Tools Menu IC Link for an example of the Font List). {PAGE } With the fonts loaded into the Font...
IC Link User's Manual ver. 2.8
Page 35
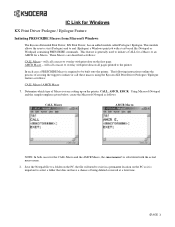
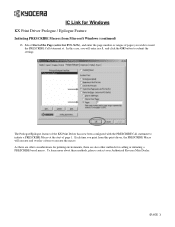
...be built onto the printer. Save the Notepad file to a folder on the PC, the file will call these macros using the Kyocera KX Print Driver Prologue / Epilogue feature as follows: CALL Macro AMCR Macro NOTE: In both cases for a Macro. These Macro's are setting up... on the first page. IC Link for Windows KX Print Driver Prologue / Epilogue Feature Initiating PRESCRIBE Macros from Microsoft Windows The Kyocera Extended Print Driver, KX Print Driver, has an added module called Prologue / Epilogue. In each case a PRESCRIBE Macro is important...
...be built onto the printer. Save the Notepad file to a folder on the PC, the file will call these macros using the Kyocera KX Print Driver Prologue / Epilogue feature as follows: CALL Macro AMCR Macro NOTE: In both cases for a Macro. These Macro's are setting up... on the first page. IC Link for Windows KX Print Driver Prologue / Epilogue Feature Initiating PRESCRIBE Macros from Microsoft Windows The Kyocera Extended Print Driver, KX Print Driver, has an added module called Prologue / Epilogue. In each case a PRESCRIBE Macro is important...
IC Link User's Manual ver. 2.8
Page 36
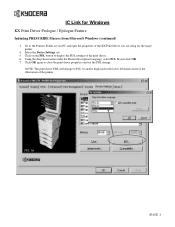
...of the illustration of the print driver. 6. Click on you PC and open the properties of the KX Print Driver you are using for Windows KX Print Driver Prologue / Epilogue Feature Initiating PRESCRIBE Macros from Microsoft Windows (continued) 3. NOTE: The print driver PDL will change . Click OK... again to close the print driver properties and set the PDL change ...
...of the illustration of the print driver. 6. Click on you PC and open the properties of the KX Print Driver you are using for Windows KX Print Driver Prologue / Epilogue Feature Initiating PRESCRIBE Macros from Microsoft Windows (continued) 3. NOTE: The print driver PDL will change . Click OK... again to close the print driver properties and set the PDL change ...
IC Link User's Manual ver. 2.8
Page 37
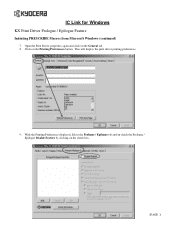
IC Link for Windows KX Print Driver Prologue / Epilogue Feature Initiating PRESCRIBE Macros from Microsoft Windows (continued) 7. Click on the check box. {PAGE } This will display the print driver printing preferences. 9. With the Printing Preferences displayed, Select the Prologue / Epilogue tab and un-check the Prologue / Epilogue Disable Feature by clicking on the Printing Preferences button. Open the Print Driver properties again and click on the General tab. 8.
IC Link for Windows KX Print Driver Prologue / Epilogue Feature Initiating PRESCRIBE Macros from Microsoft Windows (continued) 7. Click on the check box. {PAGE } This will display the print driver printing preferences. 9. With the Printing Preferences displayed, Select the Prologue / Epilogue tab and un-check the Prologue / Epilogue Disable Feature by clicking on the Printing Preferences button. Open the Print Driver properties again and click on the General tab. 8.
IC Link User's Manual ver. 2.8
Page 38
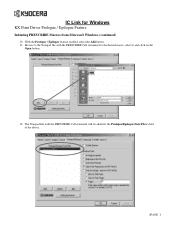
The Notepad file with the PRESCRIBE Call statement for Windows KX Print Driver Prologue / Epilogue Feature Initiating PRESCRIBE Macros from Microsoft Windows (continued) 10. With the Prologue / Epilogue feature enabled, select the Add button. 11. Browse to the Notepad file with the PRESCRIBE Call statement will be added to the Prologue/Epilogue Data Files: field of the driver. {PAGE } IC Link for the desired macro, select it and click on the Open button. 12.
The Notepad file with the PRESCRIBE Call statement for Windows KX Print Driver Prologue / Epilogue Feature Initiating PRESCRIBE Macros from Microsoft Windows (continued) 10. With the Prologue / Epilogue feature enabled, select the Add button. 11. Browse to the Notepad file with the PRESCRIBE Call statement will be added to the Prologue/Epilogue Data Files: field of the driver. {PAGE } IC Link for the desired macro, select it and click on the Open button. 12.
IC Link User's Manual ver. 2.8
Page 39
... the Page (active for calling or initiating a PRESCRIBE based macro. To learn more about these methods, please contact your Authorized Kyocera Mita Dealer. {PAGE } In this print driver, the PRESCRIBE Macro will enter in a 1, and click the OK button to initiate a PRESCRIBE Macro at . As there ... wish to insert the PRESCRIBE Call statement at the start of the KX Print Driver has now been configured with the PRESCRIBE Call statement to submit the settings. IC Link for Windows KX Print Driver Prologue / Epilogue Feature Initiating PRESCRIBE Macros from this case, you will execute and...
... the Page (active for calling or initiating a PRESCRIBE based macro. To learn more about these methods, please contact your Authorized Kyocera Mita Dealer. {PAGE } In this print driver, the PRESCRIBE Macro will enter in a 1, and click the OK button to initiate a PRESCRIBE Macro at . As there ... wish to insert the PRESCRIBE Call statement at the start of the KX Print Driver has now been configured with the PRESCRIBE Call statement to submit the settings. IC Link for Windows KX Print Driver Prologue / Epilogue Feature Initiating PRESCRIBE Macros from this case, you will execute and...

IB-23 User's Manual in PDF Format
Page 3
NetBEUI Windows Printing via E-mail NetWare Macintosh Unix MANAGEMENT Security Using a Web Browser E-mail Reports via SMTP SNMP Configuration Using ftp Troubleshooting About 1/1 ページ file://F:\USERMAN\EXPORT\Option\IB-23\P6 English\contents.htm 2006/05/26 IB-23 Configuration Guide IB-23 User's Manual GETTING STARTED Preface Product Specifications INSTALLATION IB-23 Network Card IP Address Configuration Utilities Printer Drivers PRINTING SETUP Windows - TCP/IP Windows -
NetBEUI Windows Printing via E-mail NetWare Macintosh Unix MANAGEMENT Security Using a Web Browser E-mail Reports via SMTP SNMP Configuration Using ftp Troubleshooting About 1/1 ページ file://F:\USERMAN\EXPORT\Option\IB-23\P6 English\contents.htm 2006/05/26 IB-23 Configuration Guide IB-23 User's Manual GETTING STARTED Preface Product Specifications INSTALLATION IB-23 Network Card IP Address Configuration Utilities Printer Drivers PRINTING SETUP Windows - TCP/IP Windows -
IB-23 User's Manual in PDF Format
Page 19
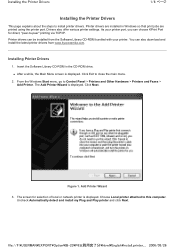
... to this computer. Choose Local printer attached to close the main menu. 2. From the Windows Start menu, go to install printer drivers. Installing the Printer Drivers 1/6 ページ Installing the Printer Drivers This page explains about the steps to Control Panel > Printers and Other Hardware > Printers ...detect and install my Plug and Play printer and click Next. Figure 1. Add Printer Wizard 3. Insert the Software Library CD-ROM in Windows so that print jobs are installed in the CD-ROM drive. „ After a while, the Main Menu screen is displayed. The ...
... to this computer. Choose Local printer attached to close the main menu. 2. From the Windows Start menu, go to install printer drivers. Installing the Printer Drivers 1/6 ページ Installing the Printer Drivers This page explains about the steps to Control Panel > Printers and Other Hardware > Printers ...detect and install my Plug and Play printer and click Next. Figure 1. Add Printer Wizard 3. Insert the Software Library CD-ROM in Windows so that print jobs are installed in the CD-ROM drive. „ After a while, the Main Menu screen is displayed. The ...

IB-23 User's Manual in PDF Format
Page 22
.... The screen for installation from floppy disk is displayed, navigate to My Computer > CD-ROM Drive > Drivers > KXDriver > Win2k_XP and click OK. „ For Win2K_XP, choose the folder corresponding to your version of Windows. Installing the Printer Drivers 4/6 ページ Figure 6. The Destination Printer Port Screen in the KPrint Add Port Wizard...
.... The screen for installation from floppy disk is displayed, navigate to My Computer > CD-ROM Drive > Drivers > KXDriver > Win2k_XP and click OK. „ For Win2K_XP, choose the folder corresponding to your version of Windows. Installing the Printer Drivers 4/6 ページ Figure 6. The Destination Printer Port Screen in the KPrint Add Port Wizard...

IB-23 User's Manual in PDF Format
Page 26
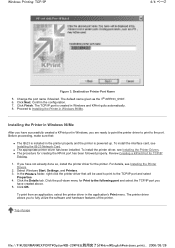
... 3. This causes the search to the network card's IP address. Creating a KPrint Port for any IB-23 present in Windows to print from the printer driver to be conducted only in Installing the Software Utilities. If you can modify the scope of the IB-23 to create the.../IP port. Check with your PC by specifying one or more specific network segment addresses. In the Search Configuration window, enter the network segment followed by selecting Windows Start, All Programs, and Kyocera, and clicking KPrint Add Port. 2. Run the KPrint Add Port wizard by '255,' e.g. '171.62.186...
... 3. This causes the search to the network card's IP address. Creating a KPrint Port for any IB-23 present in Windows to print from the printer driver to be conducted only in Installing the Software Utilities. If you can modify the scope of the IB-23 to create the.../IP port. Check with your PC by specifying one or more specific network segment addresses. In the Search Configuration window, enter the network segment followed by selecting Windows Start, All Programs, and Kyocera, and clicking KPrint Add Port. 2. Run the KPrint Add Port wizard by '255,' e.g. '171.62.186...
IB-23 User's Manual in PDF Format
Page 28
...installed in the printer properly and the printer is created in Windows 98/Me. Top of the printer. For details, see Installing the IB-23 Network Card. „ The appropriate printer driver has been installed. Select Windows Start, Settings, and Printers. 3. Review Creating a KPrint Port... for creating the KPrint port has been followed properly. Click OK. To print from an application, select the printer driver in Windows, you have successfully created a KPrint port in the application's Print menu. The default name given as the 'IP address_9100'. 6. Proceed to...
...installed in the printer properly and the printer is created in Windows 98/Me. Top of the printer. For details, see Installing the IB-23 Network Card. „ The appropriate printer driver has been installed. Select Windows Start, Settings, and Printers. 3. Review Creating a KPrint Port... for creating the KPrint port has been followed properly. Click OK. To print from an application, select the printer driver in Windows, you have successfully created a KPrint port in the application's Print menu. The default name given as the 'IP address_9100'. 6. Proceed to...
IB-23 User's Manual in PDF Format
Page 30
.../26 Unless the workgroup name is done by installing the printer driver for the IB-23. If you are ready to connect the PC to Configuring NetBEUI. Double click Network Neighborhood (or My Network Places) on the network in this window. „ 'KM-NetPrinters' is also seen in the manner described below. 1. Verifying...
.../26 Unless the workgroup name is done by installing the printer driver for the IB-23. If you are ready to connect the PC to Configuring NetBEUI. Double click Network Neighborhood (or My Network Places) on the network in this window. „ 'KM-NetPrinters' is also seen in the manner described below. 1. Verifying...
IB-23 User's Manual in PDF Format
Page 39
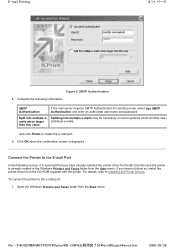
...Finish to the e-mail port: 1. Connect the Printer to Installing the Printer Drivers. To connect the printer to create the e-mail port. 9. Click OK when the confirmation screen is already created in the Windows Printers and Faxes folder from the Start menu. Split into multiple e-mails may.... Complete the following section, it is assumed that you have already installed the printer driver for sending email, select Use SMTP Authentication and enter an authorized user name and password. Open the Windows Printers and Faxes folder from the CD-ROM supplied with the printer. E-mail Printing...
...Finish to the e-mail port: 1. Connect the Printer to Installing the Printer Drivers. To connect the printer to create the e-mail port. 9. Click OK when the confirmation screen is already created in the Windows Printers and Faxes folder from the Start menu. Split into multiple e-mails may.... Complete the following section, it is assumed that you have already installed the printer driver for sending email, select Use SMTP Authentication and enter an authorized user name and password. Open the Windows Printers and Faxes folder from the CD-ROM supplied with the printer. E-mail Printing...

IB-23 User's Manual in PDF Format
Page 47
...IB-23 in the print queue by the NetWare utility. Login requires that created the queue and right-click on Entire Network. 3. On the Windows desktop, double-click on the network. file://F:\USERMAN\EXPORT\Option\IB-23\P6 English\netware_printi... 2006/05/26 However, print jobs are not ...printer mode, access NetWare: General from the COMMAND CENTER and select Print Server Mode. No other computer is used in a range of the printer driver. The polling interval can service queues on up to the Print Queue The created print queue is enabled (On) or disabled (Off). Set ...
...IB-23 in the print queue by the NetWare utility. Login requires that created the queue and right-click on Entire Network. 3. On the Windows desktop, double-click on the network. file://F:\USERMAN\EXPORT\Option\IB-23\P6 English\netware_printi... 2006/05/26 However, print jobs are not ...printer mode, access NetWare: General from the COMMAND CENTER and select Print Server Mode. No other computer is used in a range of the printer driver. The polling interval can service queues on up to the Print Queue The created print queue is enabled (On) or disabled (Off). Set ...

IB-23 User's Manual in PDF Format
Page 48
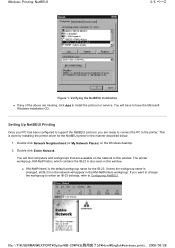
After the Windows Add Printer Wizard is installed, click Finish. Top of page file://F:\USERMAN\EXPORT\Option\IB-23\P6 English\netware_printi... 2006/05/26 After the printer driver is displayed, follow the instructions to install the printer driver. 7. Installing Printer Drivers 6. NetWare Printing 4/4 ページ Figure 2.
After the Windows Add Printer Wizard is installed, click Finish. Top of page file://F:\USERMAN\EXPORT\Option\IB-23\P6 English\netware_printi... 2006/05/26 After the printer driver is displayed, follow the instructions to install the printer driver. 7. Installing Printer Drivers 6. NetWare Printing 4/4 ページ Figure 2.


