
KM-NET ADMIN Operation Guide for Ver 2.0
Page 67
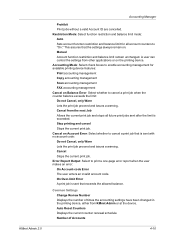
Manual Account function restriction and balance limit remain unchanged. Auto Reset Counters Displays the current counter renewal schedule. Stop printing and cancel Stops the current print ... balance limit mode: Auto Sets account function restriction and balance limit for available printing device features: Print accounting management Copy accounting management Scan accounting management FAX accounting management Cancel on . KMnet Admin 2.0 Accounting Manager Prohibit Print jobs without a valid Account ID are cancelled. Accounting Mode: Select check boxes to enable accounting...
Manual Account function restriction and balance limit remain unchanged. Auto Reset Counters Displays the current counter renewal schedule. Stop printing and cancel Stops the current print ... balance limit mode: Auto Sets account function restriction and balance limit for available printing device features: Print accounting management Copy accounting management Scan accounting management FAX accounting management Cancel on . KMnet Admin 2.0 Accounting Manager Prohibit Print jobs without a valid Account ID are cancelled. Accounting Mode: Select check boxes to enable accounting...
KM-NET ADMIN Operation Guide for Ver 2.0
Page 100
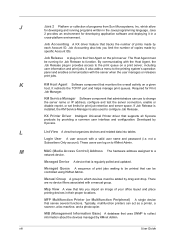
...print job retention and server space. KX Printer Driver Intelligent Universal Printer driver that supports all Kyocera products by specific Account IDs. L List View A view that is also used to a... jobs. If Job Release is installed, the KM Service Manager is regularly polled and updated. These users can act as a printer, a scanner, a fax machine, and a photocopier. which devices must ... Accounting A KX driver feature that serves several functions. Login User A user account with a manual group. There are no device filters associated with a valid user name and password (i.e. MFP ...
...print job retention and server space. KX Printer Driver Intelligent Universal Printer driver that supports all Kyocera products by specific Account IDs. L List View A view that is also used to a... jobs. If Job Release is installed, the KM Service Manager is regularly polled and updated. These users can act as a printer, a scanner, a fax machine, and a photocopier. which devices must ... Accounting A KX driver feature that serves several functions. Login User A user account with a manual group. There are no device filters associated with a valid user name and password (i.e. MFP ...
KM-NET for Clients Operation Guide Rev-3.7
Page 27
...feed setting in the remote switching function. This is selected in 1 print Remote switching dial number Number of paper to fax reception per FAX reception mode. Change the dial number used for printing. Media type Select the type of rings Encrypted reception Paper source ...printed on European models. Main Item Reception settings-1 Reception settings-2 Properties Sub Item FAX receive DRD pattern Receive date/time 2 in the FAX reception. Auto (Normal) Auto (FAX/TEL) Auto (TAD) Auto (DRD) * Manual * This is printed out on European models. Specify the output tray in ...
...feed setting in the remote switching function. This is selected in 1 print Remote switching dial number Number of paper to fax reception per FAX reception mode. Change the dial number used for printing. Media type Select the type of rings Encrypted reception Paper source ...printed on European models. Main Item Reception settings-1 Reception settings-2 Properties Sub Item FAX receive DRD pattern Receive date/time 2 in the FAX reception. Auto (Normal) Auto (FAX/TEL) Auto (TAD) Auto (DRD) * Manual * This is printed out on European models. Specify the output tray in ...
KX Driver User Guide Version 5.90
Page 8
... the list, select the Printing System to install, and click Next. 4 5 In Printer Settings you want to the network, click Discover. To manually select your system. Click Finish to exit the Printer Installation Wizard and return to the CD-ROM main menu. 7 The installation of the printer is... 7 The Printer Installed Successfully page appears. You can create a custom name to step 4 on page 1-3. -OR- This name appears in Windows Printers and Faxes and in the printer lists in the Port name list, select it and click Next, then go to share this printer with others or set...
... the list, select the Printing System to install, and click Next. 4 5 In Printer Settings you want to the network, click Discover. To manually select your system. Click Finish to exit the Printer Installation Wizard and return to the CD-ROM main menu. 7 The installation of the printer is... 7 The Printer Installed Successfully page appears. You can create a custom name to step 4 on page 1-3. -OR- This name appears in Windows Printers and Faxes and in the printer lists in the Port name list, select it and click Next, then go to share this printer with others or set...

KX Driver User Guide Version 5.90
Page 11
The software release notes provide information about the contents of available manuals. Installing using the Add Printer Wizard This section describes how to install a printer driver using the Add Printer Wizard. 1 Click Start in the Printer ...the Add Printer Wizard page appears, click Finish. 4 User Guide 1-6 Remove software provides a tool to open the Printers and Faxes window. 1 2 Click Add a printer in the Windows taskbar, and click Printers and Faxes to eliminate the KX driver from the language menu. The Product Library menus use the selected language. Windows XP...
The software release notes provide information about the contents of available manuals. Installing using the Add Printer Wizard This section describes how to install a printer driver using the Add Printer Wizard. 1 Click Start in the Printer ...the Add Printer Wizard page appears, click Finish. 4 User Guide 1-6 Remove software provides a tool to open the Printers and Faxes window. 1 2 Click Add a printer in the Windows taskbar, and click Printers and Faxes to eliminate the KX driver from the language menu. The Product Library menus use the selected language. Windows XP...
Network Fax Online Manual (Revision)
Page 2
... terms of use as well. About this On-Line Manual This On-Line Manual explains the setting procedures required in order to use the Network FAX functions when the Printer/ Scanner Kit* and Fax Kit are installed in this On-Line Manual are trademarks or registered trademarks of their respective companies. ...Edition), Windows 95 (OSR2 or later), Windows Me and Windows XP The screen shots used in this On-Line Manual are compiled from the CD-ROM. * In the case of the KM-C850, this is a registered trademark of Xerox Corporation. • IBM and IBM PC-AT are trademarks of International...
... terms of use as well. About this On-Line Manual This On-Line Manual explains the setting procedures required in order to use the Network FAX functions when the Printer/ Scanner Kit* and Fax Kit are installed in this On-Line Manual are trademarks or registered trademarks of their respective companies. ...Edition), Windows 95 (OSR2 or later), Windows Me and Windows XP The screen shots used in this On-Line Manual are compiled from the CD-ROM. * In the case of the KM-C850, this is a registered trademark of Xerox Corporation. • IBM and IBM PC-AT are trademarks of International...
Network Fax Online Manual (Revision)
Page 3
... being shared. (See page 1-7.) * In the case of the KM-C850, this manual). ii Address Book for sending documents directly from your computer. Address Editor for FAX utility is the address book that has been created with the KM-3035, KM-4035 and KM-5035. Network FAX Driver This software allows you to send documents created on...
... being shared. (See page 1-7.) * In the case of the KM-C850, this manual). ii Address Book for sending documents directly from your computer. Address Editor for FAX utility is the address book that has been created with the KM-3035, KM-4035 and KM-5035. Network FAX Driver This software allows you to send documents created on...
Network Fax Online Manual (Revision)
Page 7
...Based Communication 2-2 (3) Concurrent Print ...2-2 (4) Save Transmitted Original 2-2 (5) Attaching a Cover Page ...2-3 (6) Restricted Access ...2-3 2-2 Basic Transmission Page 2-4 2-3 Fax Setting Tab Page 2-6 2-4 Default Setting Dialogue Box Page 2-7 (1) Sending Options Tab ...2-7 (2) Sender Information Tab ...2-9 (3) Machine Setting Tab ...2-10 (4) Restricted... Control Page 2-21 vi Contents About this On-Line Manual i Trademark Information i Operating Environment i Included Utilities ii Outline of the Network FAX Functions iii Section 1 Installing the Corresponding Software ..
...Based Communication 2-2 (3) Concurrent Print ...2-2 (4) Save Transmitted Original 2-2 (5) Attaching a Cover Page ...2-3 (6) Restricted Access ...2-3 2-2 Basic Transmission Page 2-4 2-3 Fax Setting Tab Page 2-6 2-4 Default Setting Dialogue Box Page 2-7 (1) Sending Options Tab ...2-7 (2) Sender Information Tab ...2-9 (3) Machine Setting Tab ...2-10 (4) Restricted... Control Page 2-21 vi Contents About this On-Line Manual i Trademark Information i Operating Environment i Included Utilities ii Outline of the Network FAX Functions iii Section 1 Installing the Corresponding Software ..

Network Fax Online Manual (Revision)
Page 10
...Read the conditions of the computer in the main menu. 4. Click on Network FAX Drivers. 5. Section 1 Installing the Corresponding Software 1-1 Installing the Network FAX Driver 1. Page 1-1 Click once again on Network FAX Drivers in which you want to continue the installation procedure. The set-up ...screen will appear automatically. * If the set-up screen does not appear, start the appropriate software manually from the CD-ROM....
...Read the conditions of the computer in the main menu. 4. Click on Network FAX Drivers. 5. Section 1 Installing the Corresponding Software 1-1 Installing the Network FAX Driver 1. Page 1-1 Click once again on Network FAX Drivers in which you want to continue the installation procedure. The set-up ...screen will appear automatically. * If the set-up screen does not appear, start the appropriate software manually from the CD-ROM....
Network Fax Online Manual (Revision)
Page 14
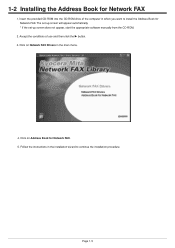
... the P button. 3. The set-up screen will appear automatically. * If the set-up screen does not appear, start the appropriate software manually from the CD-ROM. 2. Page 1-5 Click on Network FAX Drivers in the main menu. 4. Accept the conditions of the computer in the installation wizard to install the Address Book for...
... the P button. 3. The set-up screen will appear automatically. * If the set-up screen does not appear, start the appropriate software manually from the CD-ROM. 2. Page 1-5 Click on Network FAX Drivers in the main menu. 4. Accept the conditions of the computer in the installation wizard to install the Address Book for...

Network Fax Online Manual (Revision)
Page 15
Click on Scanner File Utility. Insert the provided CD-ROM into the CD-ROM drive of use and then click the P button. 3. Click on Network FAX Utilities in which you want to install the Scanner File Utility. The set-up screen will appear automatically. * If the set-up screen does not appear, start the appropriate software manually from the CD-ROM. 2. Page 1-6 Accept the conditions of the computer in the main menu. 4. 1-3 Installing the Scanner File Utility 1.
Click on Scanner File Utility. Insert the provided CD-ROM into the CD-ROM drive of use and then click the P button. 3. Click on Network FAX Utilities in which you want to install the Scanner File Utility. The set-up screen will appear automatically. * If the set-up screen does not appear, start the appropriate software manually from the CD-ROM. 2. Page 1-6 Accept the conditions of the computer in the main menu. 4. 1-3 Installing the Scanner File Utility 1.
Network Fax Online Manual (Revision)
Page 17
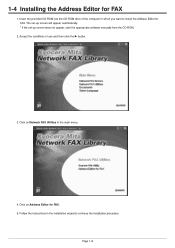
Accept the conditions of the computer in the installation wizard to install the Address Editor for FAX 1. Click on Address Editor for FAX. 5. 1-4 Installing the Address Editor for FAX. Page 1-8 Click on Network FAX Utilities in the main menu. 4. Follow the instructions in which you want to continue the installation procedure. The set-up screen will appear automatically. * If the set-up screen does not appear, start the appropriate software manually from the CD-ROM. 2. Insert the provided CD-ROM into the CD-ROM drive of use and then click the P button. 3.
Accept the conditions of the computer in the installation wizard to install the Address Editor for FAX 1. Click on Address Editor for FAX. 5. 1-4 Installing the Address Editor for FAX. Page 1-8 Click on Network FAX Utilities in the main menu. 4. Follow the instructions in which you want to continue the installation procedure. The set-up screen will appear automatically. * If the set-up screen does not appear, start the appropriate software manually from the CD-ROM. 2. Insert the provided CD-ROM into the CD-ROM drive of use and then click the P button. 3.

Network Fax Online Manual (Revision)
Page 24
...: "Section 9 Network FAX Settings (Option)" in the Fax Edition of that Operation Guide • KM-2530/3530/4030: "Section 8 Network FAX Settings (Option)" in the Fax Edition of the corresponding Operation Guide * For the procedure to save the data for transmitted fax documents, refer to "3-1 Summary of Delivery Settings" on page 3-2 of this manual. 4 Attach Cover Page...
...: "Section 9 Network FAX Settings (Option)" in the Fax Edition of that Operation Guide • KM-2530/3530/4030: "Section 8 Network FAX Settings (Option)" in the Fax Edition of the corresponding Operation Guide * For the procedure to save the data for transmitted fax documents, refer to "3-1 Summary of Delivery Settings" on page 3-2 of this manual. 4 Attach Cover Page...
Network Fax Online Manual (Revision)
Page 45
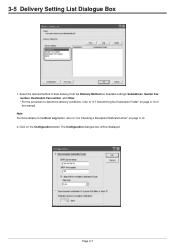
The Configuration dialogue box will be displayed. Click on page 3-14. 2. Note For more details on the Error Log button, refer to "3-7 Determining the Destination Folder" on page 3-13 of data delivery from the Delivery Method list. Select the desired method of this manual. Available settings: Subaddress, Sender Fax number, Destination Fax number, and Other. * For the procedure to determine delivery conditions, refer to "3-9 Checking a Reception Notification Error" on the Configuration button. Page 3-7 3-5 Delivery Setting List Dialogue Box 1.
The Configuration dialogue box will be displayed. Click on page 3-14. 2. Note For more details on the Error Log button, refer to "3-7 Determining the Destination Folder" on page 3-13 of data delivery from the Delivery Method list. Select the desired method of this manual. Available settings: Subaddress, Sender Fax number, Destination Fax number, and Other. * For the procedure to determine delivery conditions, refer to "3-9 Checking a Reception Notification Error" on the Configuration button. Page 3-7 3-5 Delivery Setting List Dialogue Box 1.
Network Fax Online Manual (Revision)
Page 46
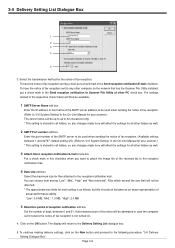
...2 SMTP Port number edit box Enter the port number of the SMTP server to be used when sending the notice of fax reception. (Refer to "2-6 System Setting" in the On-Line Manual for your scanner.) * This setting is not turned on the network that retransmission of the notice will be used when... sending the notice of fax reception. (Available setting: between 0 and 31, that has the Scanner File Utility installed, put a check mark in case the computer set to "2-6 System Setting" in the On-Line Manual for all folders, so any other PC check box. 3-5 ...
...2 SMTP Port number edit box Enter the port number of the SMTP server to be used when sending the notice of fax reception. (Refer to "2-6 System Setting" in the On-Line Manual for your scanner.) * This setting is not turned on the network that retransmission of the notice will be used when... sending the notice of fax reception. (Available setting: between 0 and 31, that has the Scanner File Utility installed, put a check mark in case the computer set to "2-6 System Setting" in the On-Line Manual for all folders, so any other PC check box. 3-5 ...

Scan System (F) Operation Guide (Functions Edition)
Page 105
Document Information, "Keyword" is to be used. For more detailed information, refer to the Network FAX On-Line Manual that the utility is running will appear in the Windows Task Bar. (2) Uninstalling the Scanner File Utility Use the "Add/Remove Programs"... addition, an icon that indicates that is completed, the Scanner File Utility will start up automatically with your optional Network FAX package. KM-Network FAX Receive Handler Added when the Network FAX Kit is added on the scanned image. Select the following components when you want to add the following components. DataBase...
Document Information, "Keyword" is to be used. For more detailed information, refer to the Network FAX On-Line Manual that the utility is running will appear in the Windows Task Bar. (2) Uninstalling the Scanner File Utility Use the "Add/Remove Programs"... addition, an icon that indicates that is completed, the Scanner File Utility will start up automatically with your optional Network FAX package. KM-Network FAX Receive Handler Added when the Network FAX Kit is added on the scanned image. Select the following components when you want to add the following components. DataBase...

Scan System (F) Operation Guide (Functions Edition)
Page 115
.... * In order to use this function, it is also necessary to setup the DB Assistant (page 3-128) or the Network FAX software. (For more detailed information, refer to the Network FAX On-Line Manual that is necessary for the folder that is included with your optional Network... the designated folder. CSV File inputting the Document Information is to system connect in the "System Connection Program" field. KM-Network FAX Receive Handler Added when the Network FAX Kit is created with the entered information. The selected folder will be used. DataBase Link Handler ....... Page 3-19 For...
.... * In order to use this function, it is also necessary to setup the DB Assistant (page 3-128) or the Network FAX software. (For more detailed information, refer to the Network FAX On-Line Manual that is necessary for the folder that is included with your optional Network... the designated folder. CSV File inputting the Document Information is to system connect in the "System Connection Program" field. KM-Network FAX Receive Handler Added when the Network FAX Kit is created with the entered information. The selected folder will be used. DataBase Link Handler ....... Page 3-19 For...
Fax System (L) Operation Guide
Page 7
... available when the optional Network scanner is installed on this fax. Use this section as adjusting the volume of the alarm that sounds in the message display and tables with its operation. Be sure to read the On-Line Manual on the included CD-ROM as well. 10 Reference Information ...This section contains information on the specifications for this fax for those individuals who can transmit and receive documents with this machine as well as ...
... available when the optional Network scanner is installed on this fax. Use this section as adjusting the volume of the alarm that sounds in the message display and tables with its operation. Be sure to read the On-Line Manual on the included CD-ROM as well. 10 Reference Information ...This section contains information on the specifications for this fax for those individuals who can transmit and receive documents with this machine as well as ...
Fax System (L) Operation Guide
Page 9
... List 2-31 Dialing the Same Number Again (Redailing functions 2-32 Automatic Redialing ...2-32 Manual Redialing ...2-32 3 Various Functions of this Fax 3-1 Sending 2-Sided Documents (Duplex Transmission 3-1 Preparing the Next Documents During Another Communication(Standby... Contents of the Communication 3-15 Deleting the Communication 3-20 Initiating the Fax Connection Manually (Manual Fax Transmission 3-21 Initiating the Fax Connection Manually (Manual Fax Reception 3-22 4 Troubleshooting 4-1 When the Fax Data Indicator is Lit 4-1 CAUTIONS before Disconnecting the Power Cord 4-1...
... List 2-31 Dialing the Same Number Again (Redailing functions 2-32 Automatic Redialing ...2-32 Manual Redialing ...2-32 3 Various Functions of this Fax 3-1 Sending 2-Sided Documents (Duplex Transmission 3-1 Preparing the Next Documents During Another Communication(Standby... Contents of the Communication 3-15 Deleting the Communication 3-20 Initiating the Fax Connection Manually (Manual Fax Transmission 3-21 Initiating the Fax Connection Manually (Manual Fax Reception 3-22 4 Troubleshooting 4-1 When the Fax Data Indicator is Lit 4-1 CAUTIONS before Disconnecting the Power Cord 4-1...
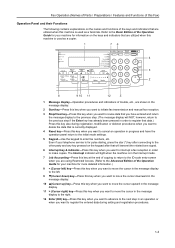
Fax System (L) Operation Guide
Page 17
...to the ID-code entry screen when you are shown in the message display. 2 Start key-Press this key when you want to initiate fax transmission and manual fax reception. 3 Stop/Clear key-Press this key when you want to revise data that you have the operation panel return to the initial mode... settings. 5 Keypad-Use the keypad to enter fax numbers, etc. The Interrupt indicator will light when the machine is currently displayed. 4 Reset key-Press this...
...to the ID-code entry screen when you are shown in the message display. 2 Start key-Press this key when you want to initiate fax transmission and manual fax reception. 3 Stop/Clear key-Press this key when you want to revise data that you have the operation panel return to the initial mode... settings. 5 Keypad-Use the keypad to enter fax numbers, etc. The Interrupt indicator will light when the machine is currently displayed. 4 Reset key-Press this...


