
IB-23 User's Manual in PDF Format
Page 1
...has been tested and found to comply with the limits for choosing the award winning Kyocera network printing products. The IB-23 enables Kyocera Mita printers and digital copiers to radio communications. This equipment generates, uses and can be easily installed without removing ...in accordance with the instructions, may not cause harmful interference, and 2. Preface 1/2 ページ IB-23 Network Card User's Manual Kyocera Mita Corporation 2-28, 1-Chome, Tamatsukuri, Chuo-ku Osaka, Japan 540-8585 http://www.kyoceramita.com/ Preface Thank you will not occur...
...has been tested and found to comply with the limits for choosing the award winning Kyocera network printing products. The IB-23 enables Kyocera Mita printers and digital copiers to radio communications. This equipment generates, uses and can be easily installed without removing ...in accordance with the instructions, may not cause harmful interference, and 2. Preface 1/2 ページ IB-23 Network Card User's Manual Kyocera Mita Corporation 2-28, 1-Chome, Tamatsukuri, Chuo-ku Osaka, Japan 540-8585 http://www.kyoceramita.com/ Preface Thank you will not occur...

IB-23 User's Manual in PDF Format
Page 15
.... file://F:\USERMAN\EXPORT\Option\IB-23\P6 English\tcpip_setting.h... 2006/05/26 For digital copier operator panel setting instructions, refer to the next segment. Press the > key. 4....proceed as follows: 1. Again, use the < key to move the cursor to the operation manual. The following procedure is complete. Press the > key. 6. Press the ^ (+) key. ...the above does not show 'Option,' press ENTER. A cursor (_) begins to decrease the figure for all Kyocera Mita printers except those having no operator panel. Press MENU (MODE). 2. Then, press ENTER again. 3. ...
.... file://F:\USERMAN\EXPORT\Option\IB-23\P6 English\tcpip_setting.h... 2006/05/26 For digital copier operator panel setting instructions, refer to the next segment. Press the > key. 4....proceed as follows: 1. Again, use the < key to move the cursor to the operation manual. The following procedure is complete. Press the > key. 6. Press the ^ (+) key. ...the above does not show 'Option,' press ENTER. A cursor (_) begins to decrease the figure for all Kyocera Mita printers except those having no operator panel. Press MENU (MODE). 2. Then, press ENTER again. 3. ...
Kyocera Extended Driver 4.0 User Guide Rev-2.1
Page 116
... left side or top of printers and copiers. Account IDs can be assigned at the printing system's operation panel. Job Storage offers a secure print option using the Access code, at the printing system and stored in the output tray. KM-NET Software that provides network-wide management ...system does not support a duplex unit. Kyocera image refinement (KIR) Imaging feature that can adjust Halftone screen settings to create shades of some printing options depends on both sides of pages printed by each print job in the driver. Manual duplex Method for printing on the selected ...
... left side or top of printers and copiers. Account IDs can be assigned at the printing system's operation panel. Job Storage offers a secure print option using the Access code, at the printing system and stored in the output tray. KM-NET Software that provides network-wide management ...system does not support a duplex unit. Kyocera image refinement (KIR) Imaging feature that can adjust Halftone screen settings to create shades of some printing options depends on both sides of pages printed by each print job in the driver. Manual duplex Method for printing on the selected ...

Scan System (F) Operation Guide (Functions Edition)
Page 31
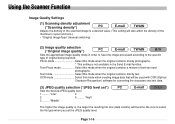
... are as follows. • Inch specifications: Auto, 11" x 17", Computer Form (11" x 15"), 8-1/2" x 14", 8-1/2" x 11" and 5-1/2" x 8-1/2" * A4 is also available in monochrome copiers. • Metric specifications: Auto, A3, Computer Form (11" x 15"), B4, Folio, A4, B5, A5 and B6 * 11" x 8-1/2" is also available in monochrome...desired scanning area. Using the Scanner Function Basic Settings (1) Original size selection ("Select original size") The original sizes (scanning area) available for KM-C830/830D) * The original size cannot be entered manually when using an optional Document Processor.
... are as follows. • Inch specifications: Auto, 11" x 17", Computer Form (11" x 15"), 8-1/2" x 14", 8-1/2" x 11" and 5-1/2" x 8-1/2" * A4 is also available in monochrome copiers. • Metric specifications: Auto, A3, Computer Form (11" x 15"), B4, Folio, A4, B5, A5 and B6 * 11" x 8-1/2" is also available in monochrome...desired scanning area. Using the Scanner Function Basic Settings (1) Original size selection ("Select original size") The original sizes (scanning area) available for KM-C830/830D) * The original size cannot be entered manually when using an optional Document Processor.
Scan System (F) Operation Guide (Functions Edition)
Page 34
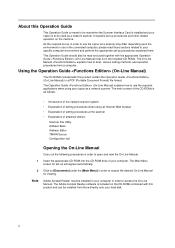
... adjustment ("Scanning density") Adjusts the density of the scanned image to a desired value. (This setting will also affect the density of the machine's copier functions.) • "Original Image Type" (manual switching) (2) Image quality selection ("Original image quality") Sets the appropriate image quality mode in the Send E-mail function. "High" 3 Middle" The higher...
... adjustment ("Scanning density") Adjusts the density of the scanned image to a desired value. (This setting will also affect the density of the machine's copier functions.) • "Original Image Type" (manual switching) (2) Image quality selection ("Original image quality") Sets the appropriate image quality mode in the Send E-mail function. "High" 3 Middle" The higher...
Scan System (F) Operation Guide (Setup Edition)
Page 4
...Acrobat Reader must be installed in your computer in order to open and view the On-Line Manual. 1 Insert the appropriate CD-ROM into the CD-ROM drive of setting procedures when using your copier as follows: • Introduction of the network scanner system • Explanation of your computer.... how to use in the connected computer, please read when the Scanner Interface Card is installed and your copier is to be used together with the appropriate Operation Guide (On-Line Manual) that is on [Documents] under the [Main Menu] in a PDF (Portable Document Format) file format. The ...
...Acrobat Reader must be installed in your computer in order to open and view the On-Line Manual. 1 Insert the appropriate CD-ROM into the CD-ROM drive of setting procedures when using your copier as follows: • Introduction of the network scanner system • Explanation of your computer.... how to use in the connected computer, please read when the Scanner Interface Card is installed and your copier is to be used together with the appropriate Operation Guide (On-Line Manual) that is on [Documents] under the [Main Menu] in a PDF (Portable Document Format) file format. The ...
1650/2050/2550 Operation Guide (Advanced)
Page 11
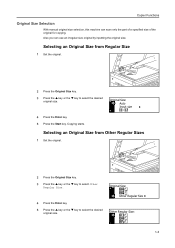
Copying starts. Original Size: Other Regular Size Other Regular Size: 1-3 Copier Functions Original Size Selection With manual original size selection, this machine can use an irregular size original by inputting the original size. Selecting an Original Size from Other Regular Sizes 1 Set ...
Copying starts. Original Size: Other Regular Size Other Regular Size: 1-3 Copier Functions Original Size Selection With manual original size selection, this machine can use an irregular size original by inputting the original size. Selecting an Original Size from Other Regular Sizes 1 Set ...
1650/2050/2550 Operation Guide (Advanced)
Page 13
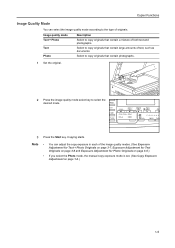
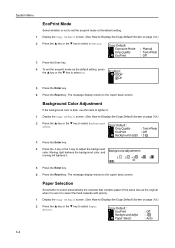
Copier Functions Image Quality Mode You can adjust the copy exposure in each of the image quality modes. (See Exposure Adjustment for Text + Photo Originals on page 3-7, Exposure Adjustment for Text Originals on page 3-8 and Exposure Adjustment for Photo Originals on page 3-8.) • If you select the Photo mode, the manual copy exposure...
Copier Functions Image Quality Mode You can adjust the copy exposure in each of the image quality modes. (See Exposure Adjustment for Text + Photo Originals on page 3-7, Exposure Adjustment for Text Originals on page 3-8 and Exposure Adjustment for Photo Originals on page 3-8.) • If you select the Photo mode, the manual copy exposure...
1650/2050/2550 Operation Guide (Advanced)
Page 14
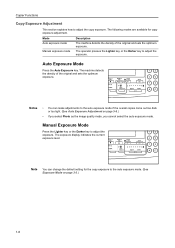
... and sets the optimum exposure. Note You can make adjustments to adjust the copy exposure. Auto Exposure Mode Press the Auto Exposure key. Manual Exposure Mode Press the Lighter key or the Darker key to adjust the exposure. The exposure display indicates the current exposure level. The operator... the Lighter key or the Darker key to adjust the exposure. Notes • You can change the default setting for copy exposure adjustment. Copier Functions Copy Exposure Adjustment This section explains how to the auto exposure mode if the overall copies come out too dark or too light. ...
... and sets the optimum exposure. Note You can make adjustments to adjust the copy exposure. Auto Exposure Mode Press the Auto Exposure key. Manual Exposure Mode Press the Lighter key or the Darker key to adjust the exposure. The exposure display indicates the current exposure level. The operator... the Lighter key or the Darker key to adjust the exposure. Notes • You can change the default setting for copy exposure adjustment. Copier Functions Copy Exposure Adjustment This section explains how to the auto exposure mode if the overall copies come out too dark or too light. ...
1650/2050/2550 Operation Guide (Advanced)
Page 99
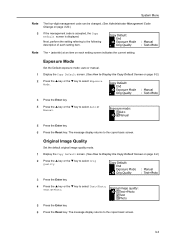
... Exposure Mode Orig Quality : Manual : Text+Photo Note The * (asterisk) at an item on page 3-23.) If the management code is accepted, the Copy Default screen is displayed. The message display returns to the copier basic screen. 3-3 The message display returns to the copier basic screen. Original Image Quality... image quality: * Text+Photo Text Photo 5 Press the Enter key. 6 Press the Reset key. Exposure Mode Set the Default exposure mode: auto or manual. 1 Display the Copy Default screen. (See How to Display the Copy Default Screen on page 3-2.) 2 Press the S key or the T key to...
... Exposure Mode Orig Quality : Manual : Text+Photo Note The * (asterisk) at an item on page 3-23.) If the management code is accepted, the Copy Default screen is displayed. The message display returns to the copier basic screen. 3-3 The message display returns to the copier basic screen. Original Image Quality... image quality: * Text+Photo Text Photo 5 Press the Enter key. 6 Press the Reset key. Exposure Mode Set the Default exposure mode: auto or manual. 1 Display the Copy Default screen. (See How to Display the Copy Default Screen on page 3-2.) 2 Press the S key or the T key to...
1650/2050/2550 Operation Guide (Advanced)
Page 100
... Text+Photo EcoPrint : Off Background adjst : 3 3 Press the Enter key. 4 Press the < key or the > key to the copier basic screen. The message display returns to adjust the background color. The message display returns to select Background adjst. Copy Default : EcoPrint Background ...Default screen. (See How to Display the Copy Default Screen on page 3-2.) 2 Press the S key or the T key to the copier basic screen. Copy Default: Exposure Mode Orig Quality EcoPrint : Manual : Text+Photo : Off 3 Press the Enter key. 4 To set the ecoprint mode as the original when it . 1 2 *3...
... Text+Photo EcoPrint : Off Background adjst : 3 3 Press the Enter key. 4 Press the < key or the > key to the copier basic screen. The message display returns to adjust the background color. The message display returns to select Background adjst. Copy Default : EcoPrint Background ...Default screen. (See How to Display the Copy Default Screen on page 3-2.) 2 Press the S key or the T key to the copier basic screen. Copy Default: Exposure Mode Orig Quality EcoPrint : Manual : Text+Photo : Off 3 Press the Enter key. 4 To set the ecoprint mode as the original when it . 1 2 *3...
1650/2050/2550 Operation Guide (Advanced)
Page 103
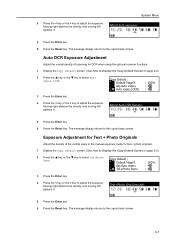
... density of the central value in the manual exposure mode for OCR when using the optional scanner functions. 1 Display the Copy Default screen. (See How to Display the Copy Default Screen on page 3-2.) 2 Press the S key or the T key to the copier basic screen. 3-7 Adj.Auto expos.....Dens.Adj: 5 Press the Enter key. 6 Press the Reset key. The message display returns to the copier basic screen. Moving right darkens the density, and moving left lightens it . The message display returns to the copier basic screen. Txt+Photo Dens. : 100% : 4 : 4 3 Press the Enter key. 4 Press the <...
... density of the central value in the manual exposure mode for OCR when using the optional scanner functions. 1 Display the Copy Default screen. (See How to Display the Copy Default Screen on page 3-2.) 2 Press the S key or the T key to the copier basic screen. 3-7 Adj.Auto expos.....Dens.Adj: 5 Press the Enter key. 6 Press the Reset key. The message display returns to the copier basic screen. Moving right darkens the density, and moving left lightens it . The message display returns to the copier basic screen. Txt+Photo Dens. : 100% : 4 : 4 3 Press the Enter key. 4 Press the <...
1650/2050/2550 Operation Guide (Advanced)
Page 104
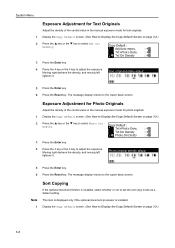
The message display returns to the copier basic screen. Photo original density adjust: 5 Press the Enter key. 6 Press the Reset key. Exposure Adjustment for Photo Originals Adjust the density of the central value in the manual exposure mode for text originals. 1 Display the Copy Default screen. (...See How to Display the Copy Default Screen on page 3-2.) 2 Press the S key or the T key to select Txt Ori Density. The message display returns to the copier basic screen. Note...
The message display returns to the copier basic screen. Photo original density adjust: 5 Press the Enter key. 6 Press the Reset key. Exposure Adjustment for Photo Originals Adjust the density of the central value in the manual exposure mode for text originals. 1 Display the Copy Default screen. (...See How to Display the Copy Default Screen on page 3-2.) 2 Press the S key or the T key to select Txt Ori Density. The message display returns to the copier basic screen. Note...
1650/2050/2550 Operation Guide (Advanced)
Page 161
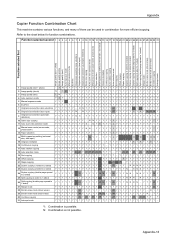
... spread to 1-sided) Y Y Y Y Y Y Y Y Y Y Y Y Y 47 Y Y Y Y Y Y Y N N N - Y Y 30 Combine copying Y Y Y Y Y Y Y 36 Y 37 Y 37 Y 39 Y Y Y 29 Y Y Y Y Y 30 Y 30 33 Y Y - N: Combination is possible. Appendix Copier Function Combination Chart This machine contains various functions, and many of them can be used in combination for function combinations. YYYYYYYYYYYYYYYYYYYYYYYYYYYY 4 Auto exposure mode Y2Y...) Original size selection (automatic detection) Same size copying Auto zoom ratio selection mode Manual zoom mode (zoom mode, preset zoom) Paper selection Multi-bypass tray setting (universal...
... spread to 1-sided) Y Y Y Y Y Y Y Y Y Y Y Y Y 47 Y Y Y Y Y Y Y N N N - Y Y 30 Combine copying Y Y Y Y Y Y Y 36 Y 37 Y 37 Y 39 Y Y Y 29 Y Y Y Y Y 30 Y 30 33 Y Y - N: Combination is possible. Appendix Copier Function Combination Chart This machine contains various functions, and many of them can be used in combination for function combinations. YYYYYYYYYYYYYYYYYYYYYYYYYYYY 4 Auto exposure mode Y2Y...) Original size selection (automatic detection) Same size copying Auto zoom ratio selection mode Manual zoom mode (zoom mode, preset zoom) Paper selection Multi-bypass tray setting (universal...
1650/2050/2550 Operation Guide Rev-4 (Basic)
Page 17
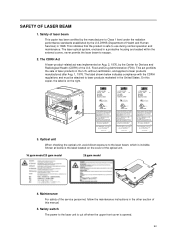
This indicates that the product is safe to escape. 2. On this manual. 5. xv Shown at below indicates compliance with the CDRH regulations and must be attached to laser products marketed in the U.S. The laser optical system, enclosed ... U.S.DHHS (Department of the U.S. SAFETY OF LASER BEAM 1. Food and Drug Administration (FDA). This act prohibits the sale of this copier, the label is invisible. Safety of laser beam This copier has been certified by the Center for Devices and Radiological Health (CDRH) of Health and Human Services) in a protective housing and...
This indicates that the product is safe to escape. 2. On this manual. 5. xv Shown at below indicates compliance with the CDRH regulations and must be attached to laser products marketed in the U.S. The laser optical system, enclosed ... U.S.DHHS (Department of the U.S. SAFETY OF LASER BEAM 1. Food and Drug Administration (FDA). This act prohibits the sale of this copier, the label is invisible. Safety of laser beam This copier has been certified by the Center for Devices and Radiological Health (CDRH) of Health and Human Services) in a protective housing and...
Fax System (L) Operation Guide
Page 17
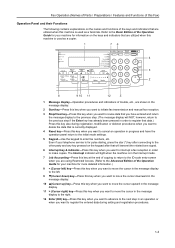
...the keys and indicators that are shown in the message display. 2 Start key-Press this key when you want to initiate fax transmission and manual fax reception. 3 Stop/Clear key-Press this key when you want to revise data that you want to delete the data that is currently... this Fax) Operation Panel and their Functions The following contains explanations on the keys and indicators that are utilized when this machine is used as a copier. 1 76 4 3 2 8 9 10 11 12 5 1 Message display-Operation procedures and indications of trouble, etc., are utilized when this key when you want to ...
...the keys and indicators that are shown in the message display. 2 Start key-Press this key when you want to initiate fax transmission and manual fax reception. 3 Stop/Clear key-Press this key when you want to revise data that you want to delete the data that is currently... this Fax) Operation Panel and their Functions The following contains explanations on the keys and indicators that are utilized when this machine is used as a copier. 1 76 4 3 2 8 9 10 11 12 5 1 Message display-Operation procedures and indications of trouble, etc., are utilized when this key when you want to ...


