
KX Driver User Guide Version 5.90
Page 9
... the Hardware Installation warning dialog box appears, click Continue Anyway. Windows XP - Here you can assign a name to install a KX Driver or mini-driver and fonts, a scanner driver, and KMnet for Driver or Utilities. Network Connection, Custom 1 In the Installation Method page, select Custom ... the printing system to install, and click Next. 3 4 In the Custom Installation page, ensure that the KX Driver is now complete. Windows XP - If prompted, restart your system. Click Cancel to correct the settings. 4 8 In the Printer Installed Successfully dialog box. Click Finish...
... the Hardware Installation warning dialog box appears, click Continue Anyway. Windows XP - Here you can assign a name to install a KX Driver or mini-driver and fonts, a scanner driver, and KMnet for Driver or Utilities. Network Connection, Custom 1 In the Installation Method page, select Custom ... the printing system to install, and click Next. 3 4 In the Custom Installation page, ensure that the KX Driver is now complete. Windows XP - If prompted, restart your system. Click Cancel to correct the settings. 4 8 In the Printer Installed Successfully dialog box. Click Finish...

IC Link User's Manual ver. 2.8
Page 32
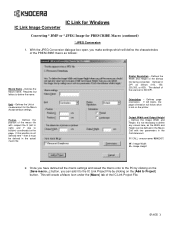
... must be defined in DPI as "rasterized for under the [Macro] tab of this position is 300 DPI. This will define the characteristics of the scanner is not defined here - The default of the PRESCRIBE macro as color data. Position X / Position Y - Once you have defined all the macro settings... saved the macro onto to the PC by clicking on the [Save macro...] button,, you can add it to Project] button. IC Link for Windows IC Link Image Converter Converting *.BMP or *.JPEG Image for future use. 3. Unit - Defines the position of the macro file with respect to bottom...
... must be defined in DPI as "rasterized for under the [Macro] tab of this position is 300 DPI. This will define the characteristics of the scanner is not defined here - The default of the PRESCRIBE macro as color data. Position X / Position Y - Once you have defined all the macro settings... saved the macro onto to the PC by clicking on the [Save macro...] button,, you can add it to Project] button. IC Link for Windows IC Link Image Converter Converting *.BMP or *.JPEG Image for future use. 3. Unit - Defines the position of the macro file with respect to bottom...
IC Link User's Manual ver. 2.8
Page 33
... Width and Height. With the JPEG Conversion dialogue box open, you can be defined in the Call statement. !R! Defines the Macro name. IC Link for Windows IC Link Image Converter Converting *.BMP or *.JPEG Image for the Macro. Defines page orientation. It is set on the page. W = Image Width H =... W,H;EXIT; Requires four letters to define any values here, as follows (100, 150, 200,300, or 600). Unit - Defines the position of the scanner is not defined here - Defined in DPI as the Width and Height can add it must be defined in the Macro Call with respect the...
... Width and Height. With the JPEG Conversion dialogue box open, you can be defined in the Call statement. !R! Defines the Macro name. IC Link for Windows IC Link Image Converter Converting *.BMP or *.JPEG Image for the Macro. Defines page orientation. It is set on the page. W = Image Width H =... W,H;EXIT; Requires four letters to define any values here, as follows (100, 150, 200,300, or 600). Unit - Defines the position of the scanner is not defined here - Defined in DPI as the Width and Height can add it must be defined in the Macro Call with respect the...
Kyocera Extended Driver 3.x User Guide Rev-1.4
Page 10
...for Search for the best driver for Windows 9X and Me. The following procedures should be performed for your device. 3. USB Scanner Device Interface 1 4. For Windows XP, see Hardware Wizard Instructions for Windows XP on installation, C:\Program Files\Kyocera\KMSL\9xDrviers is shown in the ...figure below. All four types follow the same steps. 1. In Windows 2000, all USB drivers are not...
...for Search for the best driver for Windows 9X and Me. The following procedures should be performed for your device. 3. USB Scanner Device Interface 1 4. For Windows XP, see Hardware Wizard Instructions for Windows XP on installation, C:\Program Files\Kyocera\KMSL\9xDrviers is shown in the ...figure below. All four types follow the same steps. 1. In Windows 2000, all USB drivers are not...
Network Fax Online Manual (Revision)
Page 2
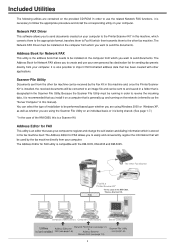
... Acrobat Reader implies agreement to use the Network FAX functions when the Printer/ Scanner Kit* and Fax Kit are compiled from the CD-ROM. * In the case of the KM-C850, this manual. The actual displays on your particular operating system. About ... • Operating system ... Operating Environment The Network FAX functions are trademarks of their respective companies. Trademark Information • Microsoft, Windows, Windows NT and Internet Explorer are registered trademarks of Microsoft Corporation of the United States and other company and product names contained in this is...
... Acrobat Reader implies agreement to use the Network FAX functions when the Printer/ Scanner Kit* and Fax Kit are compiled from the CD-ROM. * In the case of the KM-C850, this manual. The actual displays on your particular operating system. About ... • Operating system ... Operating Environment The Network FAX functions are trademarks of their respective companies. Trademark Information • Microsoft, Windows, Windows NT and Internet Explorer are registered trademarks of Microsoft Corporation of the United States and other company and product names contained in this is...
Network Fax Online Manual (Revision)
Page 3
... editor that has been created with the KM-3035, KM-4035 and KM-5035. Address Editor for FAX This utility is also possible to send documents. Scanner File Utility Documents sent from the other fax machine can be performed based upon whether you are using Windows 2000 or Windows XP, as well as the "Server Computer...
... editor that has been created with the KM-3035, KM-4035 and KM-5035. Address Editor for FAX This utility is also possible to send documents. Scanner File Utility Documents sent from the other fax machine can be performed based upon whether you are using Windows 2000 or Windows XP, as well as the "Server Computer...
Network Fax Online Manual (Revision)
Page 12
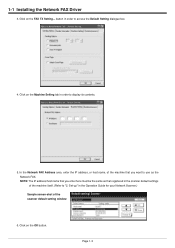
.... 4. In the Network FAX Address area, enter the IP address, or host name, of the machine that registered in the Operation Guide for your Network Scanner.) Sample screen-shot of the machine itself. (Refer to display its contents. 5. Click on the FAX TX Setting... Page 1-3 button in order to "2. Set-up...
.... 4. In the Network FAX Address area, enter the IP address, or host name, of the machine that registered in the Operation Guide for your Network Scanner.) Sample screen-shot of the machine itself. (Refer to display its contents. 5. Click on the FAX TX Setting... Page 1-3 button in order to "2. Set-up...
Network Fax Online Manual (Revision)
Page 16
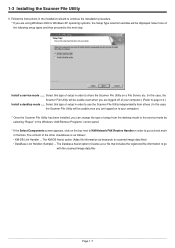
...logged on the box next to KM-Network FAX Receive Handler in order to put a check mark in order to use the Scanner File Utility independently from others. (In this case, the Scanner File Utility will be usable even when you are using Windows 2000 or Windows XP operating systems, the Setup Type... selection window will be displayed. Select this type of the other checkboxes is as keywords to the next step. The KM-DB Assist option (Adds file ...
...logged on the box next to KM-Network FAX Receive Handler in order to put a check mark in order to use the Scanner File Utility independently from others. (In this case, the Scanner File Utility will be usable even when you are using Windows 2000 or Windows XP operating systems, the Setup Type... selection window will be displayed. Select this type of the other checkboxes is as keywords to the next step. The KM-DB Assist option (Adds file ...
Network Fax Online Manual (Revision)
Page 27
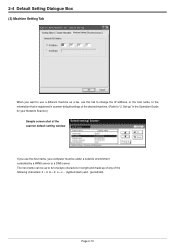
.../dash) and . (period/dot) Page 2-10 2-4 Default Setting Dialogue Box (3) Machine Setting Tab When you use the host name, your Network Scanner.) Sample screen-shot of the scanner default setting window If you want to use a different machine as a fax, use this tab to change the IP address, or the host name, to... "2. Set-up" in the Operation Guide for your computer must be up of any of the desired machine. (Refer to 32 one-byte characters in scanner default settings of the following characters: 0 - 9, A -
.../dash) and . (period/dot) Page 2-10 2-4 Default Setting Dialogue Box (3) Machine Setting Tab When you use the host name, your Network Scanner.) Sample screen-shot of the scanner default setting window If you want to use a different machine as a fax, use this tab to change the IP address, or the host name, to... "2. Set-up" in the Operation Guide for your computer must be up of any of the desired machine. (Refer to 32 one-byte characters in scanner default settings of the following characters: 0 - 9, A -
Network Fax Online Manual (Revision)
Page 39
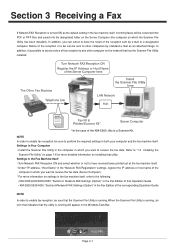
...Turn Network FAX Reception ON and select whether or not to any other computers by e-mail to receive the fax data. Settings in the Windows Task Bar. Section 3 Receiving a Fax If Network FAX Reception is running. NOTE In order to enable fax reception, be sure to "1-3 Installing ...the fax machine itself , refer to the following. • KM-3035/4035/5035/C850: "Section 9 Network FAX Settings (Option)" in the Fax Edition of that has the Scanner File Utility installed. Settings in Your Computer • Install the Scanner File Utility in the computer in the Fax Edition of the ...
...Turn Network FAX Reception ON and select whether or not to any other computers by e-mail to receive the fax data. Settings in the Windows Task Bar. Section 3 Receiving a Fax If Network FAX Reception is running. NOTE In order to enable fax reception, be sure to "1-3 Installing ...the fax machine itself , refer to the following. • KM-3035/4035/5035/C850: "Section 9 Network FAX Settings (Option)" in the Fax Edition of that has the Scanner File Utility installed. Settings in Your Computer • Install the Scanner File Utility in the computer in the Fax Edition of the ...
Network Fax Online Manual (Revision)
Page 40
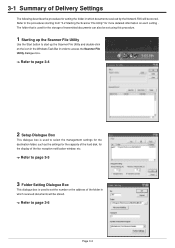
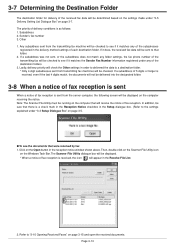
... be stored. -> Refer to page 3-6 Page 3-2 Refer to the procedures starting from "3-2 Starting the Scanner File Utility" for more detailed information on the icon in the Windows Task Bar in order to access the Scanner File Utility dialogue box. -> Refer to page 3-4 2 Setup Dialogue Box This dialogue box is used ... the procedure for the storage of transmitted documents can also be set the number or the address of the fax reception notification window, etc. -> Refer to page 3-5 3 Folder Setting Dialogue Box This dialogue box is used to set using this procedure. 1 Starting up the...
... be stored. -> Refer to page 3-6 Page 3-2 Refer to the procedures starting from "3-2 Starting the Scanner File Utility" for more detailed information on the icon in the Windows Task Bar in order to access the Scanner File Utility dialogue box. -> Refer to page 3-4 2 Setup Dialogue Box This dialogue box is used ... the procedure for the storage of transmitted documents can also be set the number or the address of the fax reception notification window, etc. -> Refer to page 3-5 3 Folder Setting Dialogue Box This dialogue box is used to set using this procedure. 1 Starting up the...
Network Fax Online Manual (Revision)
Page 42
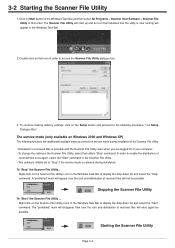
... and an icon that indicates that utility's "Stop" command. Click on the Scanner File Utility's icon in the Windows Task Bar to access the Scanner File Utility dialogue box. 3. The Scanner File Utility will appear in order to display the drop-down list and select the..." mark will disappear from over the icon and distribution of received files will not be possible. 3-2 Starting the Scanner File Utility 1. Double-click on Windows 2000 and Windows XP) The following procedure, "3-3 Setup Dialogue Box". The service mode (only available on that order. Right-click...
... and an icon that indicates that utility's "Stop" command. Click on the Scanner File Utility's icon in the Windows Task Bar to access the Scanner File Utility dialogue box. 3. The Scanner File Utility will appear in order to display the drop-down list and select the..." mark will disappear from over the icon and distribution of received files will not be possible. 3-2 Starting the Scanner File Utility 1. Double-click on Windows 2000 and Windows XP) The following procedure, "3-3 Setup Dialogue Box". The service mode (only available on that order. Right-click...
Network Fax Online Manual (Revision)
Page 43
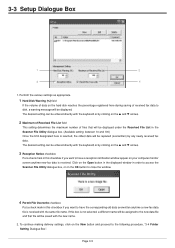
Page 3-5 Click on the Open button in the displayed window in order to access the Scanner File Utility dialogue box, or on the OK button to close the window. 4 Permit File Overwrite checkbox Put a check mark in this checkbox if you want to have the corresponding old data overwritten ... name. The desired setting can be entered directly with the new name. 2. If this checkbox if you want to have a reception notification window appear on your computer monitor screen anytime new fax data is received. Perform the various settings as appropriate. 1 Hard Disk Warning (%) field ...
Page 3-5 Click on the Open button in the displayed window in order to access the Scanner File Utility dialogue box, or on the OK button to close the window. 4 Permit File Overwrite checkbox Put a check mark in this checkbox if you want to have the corresponding old data overwritten ... name. The desired setting can be entered directly with the new name. 2. If this checkbox if you want to have a reception notification window appear on your computer monitor screen anytime new fax data is received. Perform the various settings as appropriate. 1 Hard Disk Warning (%) field ...
Network Fax Online Manual (Revision)
Page 51
...of the transmitting fax will be checked to "3-10 Opening Received Faxes" on the computer receiving the notice. Note: The Scanner File Utility must be running on the Windows Task Bar. Sender's fax number 3. Lastly, delivery priority will check the Other settings in the delivery method settings of...delivery conditions is a check mark in the Reception Notice checkbox in the Setup dialogue box. (Refer to that there is as follows: 1. The Scanner File Utility dialogue box will be displayed. * When a notice of fax reception is sent from transmitting fax machines will be checked. Refer to...
...of the transmitting fax will be checked to "3-10 Opening Received Faxes" on the computer receiving the notice. Note: The Scanner File Utility must be running on the Windows Task Bar. Sender's fax number 3. Lastly, delivery priority will check the Other settings in the delivery method settings of...delivery conditions is a check mark in the Reception Notice checkbox in the Setup dialogue box. (Refer to that there is as follows: 1. The Scanner File Utility dialogue box will be displayed. * When a notice of fax reception is sent from transmitting fax machines will be checked. Refer to...

Network Fax Online Manual (Revision)
Page 53
If the Scanner File Utility dialogue box is listed in the Windows Task Bar. 2. Page 3-15 Once a file is opened yet. The location of that you want to open. * Files listed in order to the date) indicate ... on the provided CD-ROM). Select in the Received File List the file that folder will be displayed in the Received File List within the Scanner File Utility dialogue box. 1. Click on the Open File button to search for the folder where a specific received fax file is available on the...
If the Scanner File Utility dialogue box is listed in the Windows Task Bar. 2. Page 3-15 Once a file is opened yet. The location of that you want to open. * Files listed in order to the date) indicate ... on the provided CD-ROM). Select in the Received File List the file that folder will be displayed in the Received File List within the Scanner File Utility dialogue box. 1. Click on the Open File button to search for the folder where a specific received fax file is available on the...
Network Fax Online Manual (Revision)
Page 54
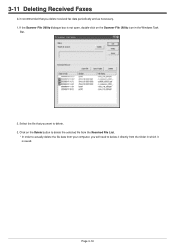
3-11 Deleting Received Faxes Is it is not open, double-click on the Scanner File Utility icon in which it recommended that you delete received fax data periodically and as necessary. 1. Page 3-16 Select the file that you want to delete it directly from the folder in the Windows Task Bar. 2. If the Scanner File Utility dialogue box is saved. Click on the Delete button to delete the selected file from the Received File List. * In order to actually delete the file data from your computer, you will need to delete. 3.
3-11 Deleting Received Faxes Is it is not open, double-click on the Scanner File Utility icon in which it recommended that you delete received fax data periodically and as necessary. 1. Page 3-16 Select the file that you want to delete it directly from the folder in the Windows Task Bar. 2. If the Scanner File Utility dialogue box is saved. Click on the Delete button to delete the selected file from the Received File List. * In order to actually delete the file data from your computer, you will need to delete. 3.
Network Fax Online Manual (Revision)
Page 75
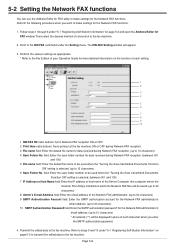
...for FAX utility to make settings for the Network FAX functions. 1. Then select the desired method of the Server Computer (the computer where the Scanner File Utility is selected. (up to 31 characters) * An asterisk ("*") will appear. 3. Perform the various settings as appropriate. * Refer... Network FAX administrator's email address. (up to 64 characters) 10 SMTP Authentication Password field: Enter the SMTP authorization password* for FAX window. field: Enter the save folder number for data received during Network FAX reception. (up to the NW-FAX command under "5-1 Registering Self...
...for FAX utility to make settings for the Network FAX functions. 1. Then select the desired method of the Server Computer (the computer where the Scanner File Utility is selected. (up to 31 characters) * An asterisk ("*") will appear. 3. Perform the various settings as appropriate. * Refer... Network FAX administrator's email address. (up to 64 characters) 10 SMTP Authentication Password field: Enter the SMTP authorization password* for FAX window. field: Enter the save folder number for data received during Network FAX reception. (up to the NW-FAX command under "5-1 Registering Self...

Network Fax Online Manual (Revision)
Page 108
Can be saved as an e-mail attachment to a designated address (includes transmission under Restricted Access) Page 6-1 of models other than the KM-3035/ 4035/5035/C850.) Cover Page Format settings available in the Network FAX Driver Maximum No. Pages which exceed 17" [431 mm] ...98/Me) Up to 1000 pages (when sent using Windows NT/2000/XP) * The maximum amounts noted above may not be attainable depending upon certain fax conditions. G Network FAX Reception Received Faxes Fax data files delivered to designated computer (where Scanner File Utility is installed) in designated format (PDF or...
Can be saved as an e-mail attachment to a designated address (includes transmission under Restricted Access) Page 6-1 of models other than the KM-3035/ 4035/5035/C850.) Cover Page Format settings available in the Network FAX Driver Maximum No. Pages which exceed 17" [431 mm] ...98/Me) Up to 1000 pages (when sent using Windows NT/2000/XP) * The maximum amounts noted above may not be attainable depending upon certain fax conditions. G Network FAX Reception Received Faxes Fax data files delivered to designated computer (where Scanner File Utility is installed) in designated format (PDF or...
Scan System (F) Operation Guide (Functions Edition)
Page 21
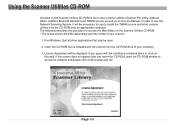
...CD-ROM that may be open the CD-ROM window to access the Main Menu on the Scanner Utilities CD-ROM. * The actual screen will differ depending upon the model of your scanner. 1. If you to install the TWAIN source and other scanner utilities (Scanner File Utility, Address Editor, Address Book,DB ... Licence Agreement will be displayed. Page 1-3 In order to use this screen does not appear after you insert the CD-ROM, open . 2. Run Windows. Using the Scanner Utilities CD-ROM Included on the Scanner Utilities CD-ROM is included with the conditions contained there in, click on [Accept].
...CD-ROM that may be open the CD-ROM window to access the Main Menu on the Scanner Utilities CD-ROM. * The actual screen will differ depending upon the model of your scanner. 1. If you to install the TWAIN source and other scanner utilities (Scanner File Utility, Address Editor, Address Book,DB ... Licence Agreement will be displayed. Page 1-3 In order to use this screen does not appear after you insert the CD-ROM, open . 2. Run Windows. Using the Scanner Utilities CD-ROM Included on the Scanner Utilities CD-ROM is included with the conditions contained there in, click on [Accept].

Scan System (F) Operation Guide (Functions Edition)
Page 32
... value is 96 dpi for a Windows environment and between 150 dpi and 600 dpi for printing. * A high scanning resolution needs to select an image transmission size larger than the original size. * This function is only available with scanners that is generally used for viewing ...(3) Scanning resolution selection ("Scanning resolution") Sets the desired level of 600 dpi, color scanner is not possible to be selected when enlarging or printing an image. Page 1-14 Using the Scanner Function (2) Image transmission size selection ("Select sending size") The image transmission sizes (size ...
... value is 96 dpi for a Windows environment and between 150 dpi and 600 dpi for printing. * A high scanning resolution needs to select an image transmission size larger than the original size. * This function is only available with scanners that is generally used for viewing ...(3) Scanning resolution selection ("Scanning resolution") Sets the desired level of 600 dpi, color scanner is not possible to be selected when enlarging or printing an image. Page 1-14 Using the Scanner Function (2) Image transmission size selection ("Select sending size") The image transmission sizes (size ...


