Operation Guide
Page 18
...error messages (such as paper jam warnings) on the computer screen. 1.2.1 Requirements The Remote Operation Panel utility is used in combination with the Kyocera Mita FS-1010 KX printer driver. With Windows NT 4.0/2000 it can be used over a network. • The Remote Operation Panel utility does not run under ... Panel Utility 1.2 KM-NET Remote Operation Panel Utility The KM-NET Remote Operation Panel utility is provided on the Kyocera Mita Digital Library CD-ROM supplied with the printer is for use it to run under Windows 95/98/Me or Windows NT 4.0/2000 operating systems, and use ...
...error messages (such as paper jam warnings) on the computer screen. 1.2.1 Requirements The Remote Operation Panel utility is used in combination with the Kyocera Mita FS-1010 KX printer driver. With Windows NT 4.0/2000 it can be used over a network. • The Remote Operation Panel utility does not run under ... Panel Utility 1.2 KM-NET Remote Operation Panel Utility The KM-NET Remote Operation Panel utility is provided on the Kyocera Mita Digital Library CD-ROM supplied with the printer is for use it to run under Windows 95/98/Me or Windows NT 4.0/2000 operating systems, and use ...

Operation Guide
Page 59
... 3 Click on Free and Total Memory to confirm the free memory and total memory for the FS-1010, this is installed and available as free memory in the printer. Note 4 After confirming the printer's memory status, click the OK button to return to see the next section. You can confirm how... the total memory (MB) For Host buffer items, see the number of the memory slot in the printer (for the printer. Click on the start -up screen. 2 The Menu dialog box appears. Other Settings 1.6.3 Printer Memory Status You can also obtain information about the number of the memory slots in the...
... 3 Click on Free and Total Memory to confirm the free memory and total memory for the FS-1010, this is installed and available as free memory in the printer. Note 4 After confirming the printer's memory status, click the OK button to return to see the next section. You can confirm how... the total memory (MB) For Host buffer items, see the number of the memory slot in the printer (for the printer. Click on the start -up screen. 2 The Menu dialog box appears. Other Settings 1.6.3 Printer Memory Status You can also obtain information about the number of the memory slots in the...
Operation Guide
Page 68
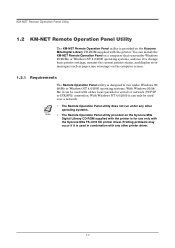
On the previous License Agreement window, click Accept to accept the agreement. The Kyocera Mita Setup Wizard begins. After a few moments, the Main Menu appears. 4 Click Install Drivers. Installing the Printer Driver If you do not have Adobe Acrobat Reader installed on your computer, the following dialog box will open. Click the Next button. 5 In the Select a device model window, click FS-1010. Click the Next button. 2-3 Click the Yes button and install it. 3 Close the License Agreement PDF.
On the previous License Agreement window, click Accept to accept the agreement. The Kyocera Mita Setup Wizard begins. After a few moments, the Main Menu appears. 4 Click Install Drivers. Installing the Printer Driver If you do not have Adobe Acrobat Reader installed on your computer, the following dialog box will open. Click the Next button. 5 In the Select a device model window, click FS-1010. Click the Next button. 2-3 Click the Yes button and install it. 3 Close the License Agreement PDF.
Operation Guide
Page 69
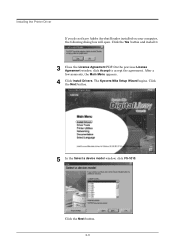
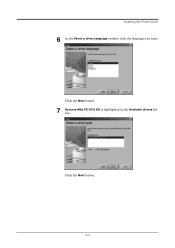
Click the Next button. 2-4 Installing the Printer Driver 6 In the Select a driver language window, click the language you want. Click the Next button. 7 Kyocera Mita FS-1010 KX is highlighted in the Available drivers list box.
Click the Next button. 2-4 Installing the Printer Driver 6 In the Select a driver language window, click the language you want. Click the Next button. 7 Kyocera Mita FS-1010 KX is highlighted in the Available drivers list box.
Operation Guide
Page 73
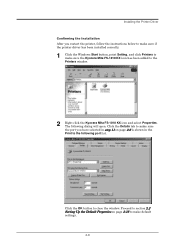
... has been installed correctly. 1 Click the Windows Start button, point Setting, and click Printers to make sure the Kyocera Mita FS-1010 KX icon has been added to the Printers window. 2 Right click the Kyocera Mita FS-1010 KX icon and select Properties. The following port list. Click the Details tab to make default settings. 2-8 Click...
... has been installed correctly. 1 Click the Windows Start button, point Setting, and click Printers to make sure the Kyocera Mita FS-1010 KX icon has been added to the Printers window. 2 Right click the Kyocera Mita FS-1010 KX icon and select Properties. The following port list. Click the Details tab to make default settings. 2-8 Click...
Operation Guide
Page 79
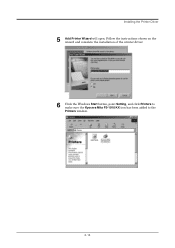
Follow the instructions shown on the wizard and complete the installation of the printer driver. 6 Click the Windows Start button, point Setting, and click Printers to make sure the Kyocera Mita FS-1010 KX icon has been added to the Printers window. 2-14 Installing the Printer Driver 5 Add Printer Wizard will open.
Follow the instructions shown on the wizard and complete the installation of the printer driver. 6 Click the Windows Start button, point Setting, and click Printers to make sure the Kyocera Mita FS-1010 KX icon has been added to the Printers window. 2-14 Installing the Printer Driver 5 Add Printer Wizard will open.
Operation Guide
Page 80
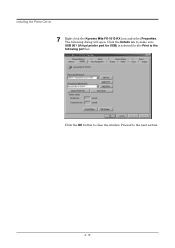
Click the OK button to the next section. 2-15 Installing the Printer Driver 7 Right click the Kyocera Mita FS-1010 KX icon and select Properties. Click the Details tab to make sure USB 001 (Virtual printer port for USB) is selected for the Print to the following dialog will open. Proceed to close the window. The following port list.
Click the OK button to the next section. 2-15 Installing the Printer Driver 7 Right click the Kyocera Mita FS-1010 KX icon and select Properties. Click the Details tab to make sure USB 001 (Virtual printer port for USB) is selected for the Print to the following dialog will open. Proceed to close the window. The following port list.
Operation Guide
Page 81
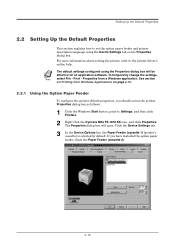
... Up the Default Properties 2.2 Setting Up the Default Properties This section explains how to set the option paper feeder and printer description language using the Properties dialog box will open. The Properties dialog box will be effective for all application software. Properties... 2-16 Click the Device Settings tab. 3 In the Device Options list, the Paper Feeder (cassette 1) [printer's cassette] is selected by default. For more information about setting the printer, refer to Settings, and then click Printers. 2 Right click the Kyocera Mita FS-1010 KX icon, and click Properties.
... Up the Default Properties 2.2 Setting Up the Default Properties This section explains how to set the option paper feeder and printer description language using the Properties dialog box will open. The Properties dialog box will be effective for all application software. Properties... 2-16 Click the Device Settings tab. 3 In the Device Options list, the Paper Feeder (cassette 1) [printer's cassette] is selected by default. For more information about setting the printer, refer to Settings, and then click Printers. 2 Right click the Kyocera Mita FS-1010 KX icon, and click Properties.

Operation Guide
Page 82
...The Properties dialog box will open. The User Settings dialog box opens. 2-17 To configure the printer default properties, you can select from PCL XL, PCL 5e, and KPDL (Kyocera's implementation of the PostScript language). A page description language is referred to as follows. 1 ... 1. Setting Up the Default Properties 2.2.2 Selecting the Page Description Language Page description language (PDL) instructs the printer how to Settings, and then click Printers. 2 Right click the Kyocera Mita FS-1010 KX icon, and click Properties. Click the Device Settings tab. 3 Click the User button.
...The Properties dialog box will open. The User Settings dialog box opens. 2-17 To configure the printer default properties, you can select from PCL XL, PCL 5e, and KPDL (Kyocera's implementation of the PostScript language). A page description language is referred to as follows. 1 ... 1. Setting Up the Default Properties 2.2.2 Selecting the Page Description Language Page description language (PDL) instructs the printer how to Settings, and then click Printers. 2 Right click the Kyocera Mita FS-1010 KX icon, and click Properties. Click the Device Settings tab. 3 Click the User button.
Operation Guide
Page 84
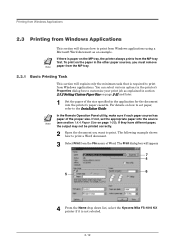
... print. The Print dialog box will explain only the minimum task that is not selected. 2-19 For details on the MP tray, the printer always prints from the File menu of Word. To print on the paper in the application for the document into the source Note (see ... Note paper from the MP tray. 2.3.1 Basic Printing Task This section will appear. 7 4 5 6 4 From the Name drop down list, select the Kyocera Mita FS-1010 KX printer if it is required to print from Windows applications using a Microsoft Word document as explained in section 2.3.2 Setting Custom Paper Size on page 1-20).
... print. The Print dialog box will explain only the minimum task that is not selected. 2-19 For details on the MP tray, the printer always prints from the File menu of Word. To print on the paper in the application for the document into the source Note (see ... Note paper from the MP tray. 2.3.1 Basic Printing Task This section will appear. 7 4 5 6 4 From the Name drop down list, select the Kyocera Mita FS-1010 KX printer if it is required to print from Windows applications using a Microsoft Word document as explained in section 2.3.2 Setting Custom Paper Size on page 1-20).
Operation Guide
Page 90
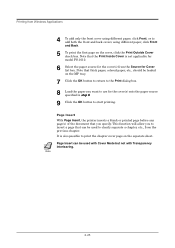
.... Note that you want to use for Cover list box. Page Insert can be loaded on the separate sheet. Page Insert With Page Insert, the printer inserts a blank or printed page before any page(s) of the document that thick paper, colored paper, etc., should be used with Cover Mode but not...
.... Note that you want to use for Cover list box. Page Insert can be loaded on the separate sheet. Page Insert With Page Insert, the printer inserts a blank or printed page before any page(s) of the document that thick paper, colored paper, etc., should be used with Cover Mode but not...

Operation Guide
Page 150
The FS-1010 comes supplied with 16 MB of memory installed. YES NO B-3 Notes on the main circuit board. By installing optional DIMM into your printer so that you wear an antistatic wrist strap. • Touch the main circuit board and DIMM only by the edges. ...• The expansion memory should be installed only by a Kyocera Mita authorized dealer or Kyocera Mita certified technician. Kyocera Mita Note shall not be liable for damage due to install a DIMM (dual in your printer, the memory in the FS-1010 can be increased to discharge yourself of static electricity. A ...
The FS-1010 comes supplied with 16 MB of memory installed. YES NO B-3 Notes on the main circuit board. By installing optional DIMM into your printer so that you wear an antistatic wrist strap. • Touch the main circuit board and DIMM only by the edges. ...• The expansion memory should be installed only by a Kyocera Mita authorized dealer or Kyocera Mita certified technician. Kyocera Mita Note shall not be liable for damage due to install a DIMM (dual in your printer, the memory in the FS-1010 can be increased to discharge yourself of static electricity. A ...
Operation Guide
Page 154
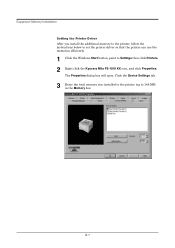
Click the Device Settings tab. 3 Enter the total memory size installed to the printer (up to Settings then click Printers. 2 Right click the Kyocera Mita FS-1010 KX icon, and click Properties. B-7 The Properties dialog box will open. Expansion Memory Installation Setting the Printer Driver After you install the additional memory to the printer, follow the instructions below to set the printer driver so that the printer can use the memories efficiently. 1 Click the Windows Start button, point to 144 MB) in the Memory box.
Click the Device Settings tab. 3 Enter the total memory size installed to the printer (up to Settings then click Printers. 2 Right click the Kyocera Mita FS-1010 KX icon, and click Properties. B-7 The Properties dialog box will open. Expansion Memory Installation Setting the Printer Driver After you install the additional memory to the printer, follow the instructions below to set the printer driver so that the printer can use the memories efficiently. 1 Click the Windows Start button, point to 144 MB) in the Memory box.


