User Manual
Page 5
... the strap 1 Loading the battery 1 Charging the battery 2 Turning on the camera 3 Setting the date/time, first time 3 Storing pictures on an SD or MMC card 4 2 Taking pictures and videos 5 Taking a picture 5 Reviewing pictures and videos 9 Deleting ... your camera 18 Using optical zoom 18 Changing the flash settings 19 Picture-taking modes 20 Running a slide show 23 Cropping pictures 25 Making pictures from a video 26 Viewing picture/video information 26 Using the histogram to view picture brightness 27 Using exposure compensation to adjust picture brightness 27 www.kodak.com...
... the strap 1 Loading the battery 1 Charging the battery 2 Turning on the camera 3 Setting the date/time, first time 3 Storing pictures on an SD or MMC card 4 2 Taking pictures and videos 5 Taking a picture 5 Reviewing pictures and videos 9 Deleting ... your camera 18 Using optical zoom 18 Changing the flash settings 19 Picture-taking modes 20 Running a slide show 23 Cropping pictures 25 Making pictures from a video 26 Viewing picture/video information 26 Using the histogram to view picture brightness 27 Using exposure compensation to adjust picture brightness 27 www.kodak.com...
User Manual
Page 9
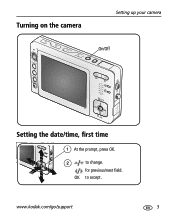
www.kodak.com/go/support 3 Turning on the camera Setting up your camera On/Off Setting the date/time, first time 1 At the prompt, press OK. 2 to accept. OK to change. for previous/next field.
www.kodak.com/go/support 3 Turning on the camera Setting up your camera On/Off Setting the date/time, first time 1 At the prompt, press OK. 2 to accept. OK to change. for previous/next field.
User Manual
Page 11
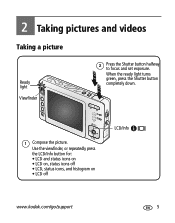
Use the viewfinder, or repeatedly press the LCD/Info button for: • LCD and status icons on • LCD on, status icons off • LCD, status icons, and histogram on • LCD off LCD/Info www.kodak.com/go/support 5 When the ready light turns green, press the Shutter button completely down. 1 Compose the picture. 2 Taking pictures and videos Taking a picture Ready light Viewfinder 2 Press the Shutter button halfway to focus and set exposure.
Use the viewfinder, or repeatedly press the LCD/Info button for: • LCD and status icons on • LCD on, status icons off • LCD, status icons, and histogram on • LCD off LCD/Info www.kodak.com/go/support 5 When the ready light turns green, press the Shutter button completely down. 1 Compose the picture. 2 Taking pictures and videos Taking a picture Ready light Viewfinder 2 Press the Shutter button halfway to focus and set exposure.
User Manual
Page 13
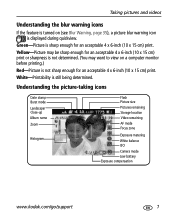
... Album name Zoom Histogram Flash Picture size Pictures remaining Storage location Video remaining AF mode Focus zone Exposure metering White balance ISO Camera mode Low battery Exposure compensation www.kodak.com/go/support 7 White-Printability is not sharp enough for an acceptable 4 x 6-inch (10 x 15 cm) print. Yellow...for an acceptable 4 x 6-inch (10 x 15 cm) print. Taking pictures and videos Understanding the blur warning icons If the feature is turned on a computer monitor before printing.) Red-Picture is still being determined. Green-Picture is displayed during quickview.
... Album name Zoom Histogram Flash Picture size Pictures remaining Storage location Video remaining AF mode Focus zone Exposure metering White balance ISO Camera mode Low battery Exposure compensation www.kodak.com/go/support 7 White-Printability is not sharp enough for an acceptable 4 x 6-inch (10 x 15 cm) print. Yellow...for an acceptable 4 x 6-inch (10 x 15 cm) print. Taking pictures and videos Understanding the blur warning icons If the feature is turned on a computer monitor before printing.) Red-Picture is still being determined. Green-Picture is displayed during quickview.
User Manual
Page 14
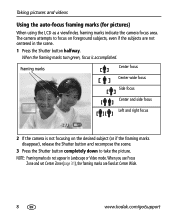
...Side focus Center and side focus Left and right focus 2 If the camera is accomplished. When the framing marks turn green, focus is not focusing on foreground subjects, even if the subjects are fixed at Center Wide. 8 www.kodak.com/go/support When you use Focus Zone and set Center Zone (...page 31), the framing marks are not centered in Landscape or Video mode. The camera attempts to...
...Side focus Center and side focus Left and right focus 2 If the camera is accomplished. When the framing marks turn green, focus is not focusing on foreground subjects, even if the subjects are fixed at Center Wide. 8 www.kodak.com/go/support When you use Focus Zone and set Center Zone (...page 31), the framing marks are not centered in Landscape or Video mode. The camera attempts to...
User Manual
Page 21
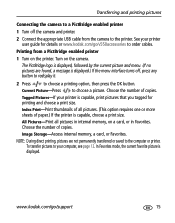
... print size. www.kodak.com/go /v550accessories to the printer. Choose the number of paper.) If the printer is displayed.) If the menu interface turns off the camera and printer. 2 Connect the appropriate USB cable from a PictBridge enabled printer 1 Turn on the camera. Index Print-Print thumbnails... of all pictures in internal memory, on a card, or in Favorites. Transferring and printing pictures Connecting the camera to a PictBridge enabled printer 1 Turn off , press any button to redisplay it. 2 Press to the computer or printer. Tagged Pictures-If your ...
... print size. www.kodak.com/go /v550accessories to the printer. Choose the number of paper.) If the printer is displayed.) If the menu interface turns off the camera and printer. 2 Connect the appropriate USB cable from a PictBridge enabled printer 1 Turn on the camera. Index Print-Print thumbnails... of all pictures in internal memory, on a card, or in Favorites. Transferring and printing pictures Connecting the camera to a PictBridge enabled printer 1 Turn off , press any button to redisplay it. 2 Press to the computer or printer. Tagged Pictures-If your ...
User Manual
Page 22
... online Kodak EasyShare gallery (www.kodakgallery.com) is not PictBridge enabled For details on printing pictures from your pictures. ■ Store pictures, and share them delivered to your door. Transferring and printing pictures Disconnecting the camera from a PictBridge enabled printer 1 Turn off the camera and ...your pictures. ■ Edit, enhance, and add borders to your computer, click the Help button in EasyShare software. Printing from the camera and the printer. See www.kodak.com/go /support Using a printer that is one of the many online print services offered in...
... online Kodak EasyShare gallery (www.kodakgallery.com) is not PictBridge enabled For details on printing pictures from your pictures. ■ Store pictures, and share them delivered to your door. Transferring and printing pictures Disconnecting the camera from a PictBridge enabled printer 1 Turn off the camera and ...your pictures. ■ Edit, enhance, and add borders to your computer, click the Help button in EasyShare software. Printing from the camera and the printer. See www.kodak.com/go /support Using a printer that is one of the many online print services offered in...
User Manual
Page 24
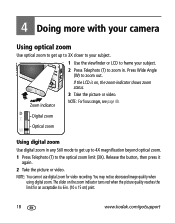
...camera Using optical zoom Use optical zoom to get up to 3X closer to your subject. 2 Press Telephoto (T) to zoom out. If the LCD is on the zoom indicator turns red when the picture quality reaches the limit for video recording. D T Digital zoom Optical zoom W Using digital zoom Use digital... zoom in . (10 x 15 cm) print. 18 www.kodak.com/go/support The slider on , the zoom indicator shows zoom...
...camera Using optical zoom Use optical zoom to get up to 3X closer to your subject. 2 Press Telephoto (T) to zoom out. If the LCD is on the zoom indicator turns red when the picture quality reaches the limit for video recording. D T Digital zoom Optical zoom W Using digital zoom Use digital... zoom in . (10 x 15 cm) print. 18 www.kodak.com/go/support The slider on , the zoom indicator shows zoom...
User Manual
Page 25
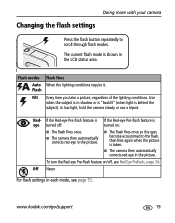
... scroll through flash modes. Flash modes Flash fires Auto When the lighting conditions require it. In low light, hold the camera steady or use a tripod. Doing more with your camera Changing the flash settings Press the flash button repeatedly to the flash, then fires again when the picture is taken. ... subject). Never For flash settings in each mode, see Red Eye Preflash, page 34. www.kodak.com/go/support 19 The current flash mode is shown in shadow or is "backlit" (when light is turned off: turned on /off, see page 51. Flash Fill Every time you take a picture, regardless of ...
... scroll through flash modes. Flash modes Flash fires Auto When the lighting conditions require it. In low light, hold the camera steady or use a tripod. Doing more with your camera Changing the flash settings Press the flash button repeatedly to the flash, then fires again when the picture is taken. ... subject). Never For flash settings in each mode, see Red Eye Preflash, page 34. www.kodak.com/go/support 19 The current flash mode is shown in shadow or is "backlit" (when light is turned off: turned on /off, see page 51. Flash Fill Every time you take a picture, regardless of ...
User Manual
Page 27
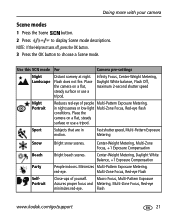
... Subjects that are in night scenes or low-light Multi-Zone Focus, Red-eye flash conditions. Flash www.kodak.com/go/support 21 Use this SCN mode For Camera pre-settings Night Landscape Distant scenery at night. Center-Weight Metering, Daylight White Balance, +1 Exposure Compensation People... +1 Exposure Compensation Bright beach scenes. Flash does not fire. Place the camera on a flat, steady surface or use a tripod. Place the camera on a flat, steady surface or use a tripod. NOTE: If the Help text turns off, press the OK button. 3 Press the OK button to display ...
... Subjects that are in night scenes or low-light Multi-Zone Focus, Red-eye flash conditions. Flash www.kodak.com/go/support 21 Use this SCN mode For Camera pre-settings Night Landscape Distant scenery at night. Center-Weight Metering, Daylight White Balance, +1 Exposure Compensation People... +1 Exposure Compensation Bright beach scenes. Flash does not fire. Place the camera on a flat, steady surface or use a tripod. Place the camera on a flat, steady surface or use a tripod. NOTE: If the Help text turns off, press the OK button. 3 Press the OK button to display ...
User Manual
Page 28
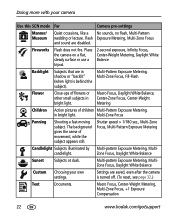
... more with your own settings. Zone Focus, Daylight White Balance Sunset Subjects at dusk. Place the camera on a flat, steady surface or use a tripod. 2-second exposure, Infinity Focus, Center-Weight .... candlelight. Macro Focus, Center-Weight Metering, Multi-Zone Focus, +1 Exposure Compensation 22 www.kodak.com/go/support Multi-Pattern Exposure Metering, Multi-Zone Focus, Fill-Flash Flower Close-ups of... flowers or other small subjects in shadow or "backlit" (when light is turned off. (To reset, see page 32.) Text Documents. Flash Exposure Metering, Multi-Zone Focus...
... more with your own settings. Zone Focus, Daylight White Balance Sunset Subjects at dusk. Place the camera on a flat, steady surface or use a tripod. 2-second exposure, Infinity Focus, Center-Weight .... candlelight. Macro Focus, Center-Weight Metering, Multi-Zone Focus, +1 Exposure Compensation 22 www.kodak.com/go/support Multi-Pattern Exposure Metering, Multi-Zone Focus, Fill-Flash Flower Close-ups of... flowers or other small subjects in shadow or "backlit" (when light is turned off. (To reset, see page 32.) Text Documents. Flash Exposure Metering, Multi-Zone Focus...
User Manual
Page 30
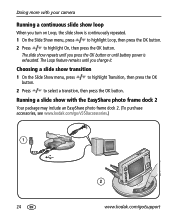
...2 Your package may include an EasyShare photo frame dock 2. (To purchase accessories, see www.kodak.com/go/v550accessories.) 1 2 24 www.kodak.com/go/support Running a slide show transition 1 On the Slide Show menu, press button. Choosing a slide show with your camera Running a continuous slide show loop... When you change it. The slide show repeats until you press the OK button or until you turn on ...
...2 Your package may include an EasyShare photo frame dock 2. (To purchase accessories, see www.kodak.com/go/v550accessories.) 1 2 24 www.kodak.com/go/support Running a slide show transition 1 On the Slide Show menu, press button. Choosing a slide show with your camera Running a continuous slide show loop... When you change it. The slide show repeats until you press the OK button or until you turn on ...
User Manual
Page 33
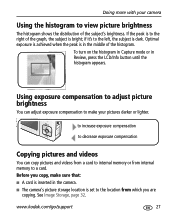
To turn on the histogram in Capture mode or in the middle of the histogram. Optimal exposure is achieved when the peak is dark. if it's to make sure that: ■ A card is inserted in the camera. ■ The camera's picture storage location is bright; See Image Storage, page 32. ... is set to the location from internal memory to the right of the subject's brightness. If the peak is to a card. www.kodak.com/go/support 27 to increase exposure compensation to decrease exposure compensation Copying pictures and videos You can adjust exposure compensation to the left, ...
To turn on the histogram in Capture mode or in the middle of the histogram. Optimal exposure is achieved when the peak is dark. if it's to make sure that: ■ A card is inserted in the camera. ■ The camera's picture storage location is bright; See Image Storage, page 32. ... is set to the location from internal memory to the right of the subject's brightness. If the peak is to a card. www.kodak.com/go/support 27 to increase exposure compensation to decrease exposure compensation Copying pictures and videos You can adjust exposure compensation to the left, ...

User Manual
Page 36
...pictures in the shade in Video mode. 30 www.kodak.com/go/support This setting remains until you change modes or turn off the camera. This setting remains until you change modes or turn off the camera. Fluorescent-corrects the green cast of household light bulbs...natural lighting. ISO Speed Control the sensitivity of ISO the camera sensor. Ideal for indoor pictures under fluorescent lighting without flash. Ideal for indoor pictures under tungsten or halogen lighting without flash. NOTE: EasyShare software also lets you change a color picture to black...
...pictures in the shade in Video mode. 30 www.kodak.com/go/support This setting remains until you change modes or turn off the camera. This setting remains until you change modes or turn off the camera. Fluorescent-corrects the green cast of household light bulbs...natural lighting. ISO Speed Control the sensitivity of ISO the camera sensor. Ideal for indoor pictures under fluorescent lighting without flash. Ideal for indoor pictures under tungsten or halogen lighting without flash. NOTE: EasyShare software also lets you change a color picture to black...
User Manual
Page 37
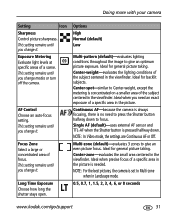
...setting remains until you need to press the Shutter button halfway down . This setting remains until you change modes or turn off the camera. Options High Normal (default) Low Multi-pattern (default)-evaluates lighting conditions throughout the image to focus. Single AF... in the viewfinder. Ideal when precise focus of the subject centered in Landscape mode. 0.5, 0.7, 1, 1.5, 2, 3, 4, 6, or 8 seconds www.kodak.com/go/support 31 Exposure Metering Evaluate light levels at specific areas of focus. Ideal for general picture taking . Ideal for backlit subjects. Long Time...
...setting remains until you need to press the Shutter button halfway down . This setting remains until you change modes or turn off the camera. Options High Normal (default) Low Multi-pattern (default)-evaluates lighting conditions throughout the image to focus. Single AF... in the viewfinder. Ideal when precise focus of the subject centered in Landscape mode. 0.5, 0.7, 1, 1.5, 2, 3, 4, 6, or 8 seconds www.kodak.com/go/support 31 Exposure Metering Evaluate light levels at specific areas of focus. Ideal for general picture taking . Ideal for backlit subjects. Long Time...
User Manual
Page 39
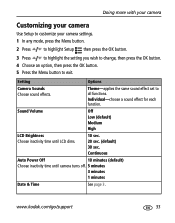
.... Individual-choose a sound effect for each function. Sound Volume Off Low (default) Medium High LCD Brightness Choose inactivity time until camera turns off. 5 minutes 3 minutes 1 minutes Date & Time See page 3. www.kodak.com/go/support 33 Continuous Auto Power Off 10 minutes (default) Choose inactivity time until LCD dims. 10 sec. 20 sec...
.... Individual-choose a sound effect for each function. Sound Volume Off Low (default) Medium High LCD Brightness Choose inactivity time until camera turns off. 5 minutes 3 minutes 1 minutes Date & Time See page 3. www.kodak.com/go/support 33 Continuous Auto Power Off 10 minutes (default) Choose inactivity time until LCD dims. 10 sec. 20 sec...
User Manual
Page 40
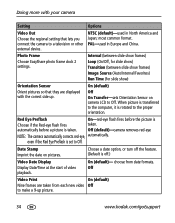
Photo Frame Choose EasyShare photo frame dock 2 settings. Choose a date option, or turn off .) Video Date Display Display Date/Time at the start of video playback. On (default) Off On Transfer-sets Orientation Sensor on pictures. Off (default)-camera removes red-eye NOTE: The camera automatically corrects red-...) Orientation Sensor Orient pictures so that they are taken from date formats. Doing more with the correct side up picture. 34 www.kodak.com/go/support Red Eye Preflash On-red-eye flash fires before a picture is set to a television or other external device. ...
Photo Frame Choose EasyShare photo frame dock 2 settings. Choose a date option, or turn off .) Video Date Display Display Date/Time at the start of video playback. On (default) Off On Transfer-sets Orientation Sensor on pictures. Off (default)-camera removes red-eye NOTE: The camera automatically corrects red-...) Orientation Sensor Orient pictures so that they are taken from date formats. Doing more with the correct side up picture. 34 www.kodak.com/go/support Red Eye Preflash On-red-eye flash fires before a picture is set to a television or other external device. ...
User Manual
Page 42
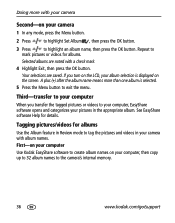
... Set Album , then press the OK button. 3 Press to the camera's internal memory. 36 www.kodak.com/go/support Repeat to exit the menu. First-on your computer Use Kodak EasyShare software to create album names on your camera with album names. Doing more than one album is displayed on the screen.... Third-transfer to your computer When you turn on the LCD, your pictures in the appropriate album. ...
... Set Album , then press the OK button. 3 Press to the camera's internal memory. 36 www.kodak.com/go/support Repeat to exit the menu. First-on your computer Use Kodak EasyShare software to create album names on your camera with album names. Doing more than one album is displayed on the screen.... Third-transfer to your computer When you turn on the LCD, your pictures in the appropriate album. ...
User Manual
Page 47
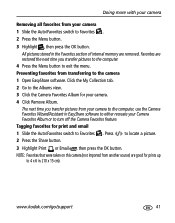
...tab. 2 Go to Favorites . www.kodak.com/go/support 41 All pictures stored in the Favorites section of internal memory are good for your camera. 4 Click Remove Album. Preventing favorites from your camera 1 Slide the Auto/Favorites switch to ...camera Removing all favorites from transferring to the camera 1 Open EasyShare software. Tagging favorites for print and email 1 Slide the Auto/Favorites switch to the Albums view. 3 Click the Camera Favorites Album for prints up to 4 x 6 in EasyShare software to either recreate your Camera Favorites Album or to turn off the Camera...
...tab. 2 Go to Favorites . www.kodak.com/go/support 41 All pictures stored in the Favorites section of internal memory are good for your camera. 4 Click Remove Album. Preventing favorites from your camera 1 Slide the Auto/Favorites switch to ...camera Removing all favorites from transferring to the camera 1 Open EasyShare software. Tagging favorites for print and email 1 Slide the Auto/Favorites switch to the Albums view. 3 Click the Camera Favorites Album for prints up to 4 x 6 in EasyShare software to either recreate your Camera Favorites Album or to turn off the Camera...
User Manual
Page 48
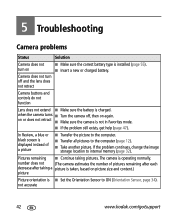
...or does not retract ■ Make sure the camera is installed (page 55). ■ Insert a new or charged battery. not accurate 42 www.kodak.com/go/support when the camera turns ■ Turn the camera off and the lens does not retract Camera buttons and controls do not function Lens does not... extend ■ Make sure the battery is charged. Camera does not turn on picture size and content.) ...
...or does not retract ■ Make sure the camera is installed (page 55). ■ Insert a new or charged battery. not accurate 42 www.kodak.com/go/support when the camera turns ■ Turn the camera off and the lens does not retract Camera buttons and controls do not function Lens does not... extend ■ Make sure the battery is charged. Camera does not turn on picture size and content.) ...


