
User Manual
Page 1
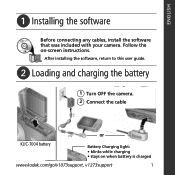
Follow the on when battery is charged www.kodak.com/go/v1073support, v1273support 1 After installing the software, return to this user guide. ᕢ Loading and charging the battery 1 Turn OFF the camera. 2 Connect the cable or KLIC-7004 battery Battery Charging light: • blinks while charging • stays on -screen instructions. ENGLISH ᕡ Installing the software Before connecting any cables, install the software that was included with your camera.
Follow the on when battery is charged www.kodak.com/go/v1073support, v1273support 1 After installing the software, return to this user guide. ᕢ Loading and charging the battery 1 Turn OFF the camera. 2 Connect the cable or KLIC-7004 battery Battery Charging light: • blinks while charging • stays on -screen instructions. ENGLISH ᕡ Installing the software Before connecting any cables, install the software that was included with your camera.
User Manual
Page 2
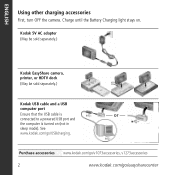
Kodak 5V AC adapter (May be sold separately.) Kodak EasyShare camera, printer, or HDTV dock (May be sold separately.) Kodak USB cable and a USB computer port Ensure that the USB cable is or connected to a powered USB port and the computer is turned on . See www.kodak.com/go /easysharecenter ENGLISH Using other charging accessories First, turn OFF the camera. Purchase accessories www.kodak.com/go/v1073accessories, v1273accessories 2 www.kodak.com/go /USBcharging. Charge until the Battery Charging light stays on (not in sleep mode).
Kodak 5V AC adapter (May be sold separately.) Kodak EasyShare camera, printer, or HDTV dock (May be sold separately.) Kodak USB cable and a USB computer port Ensure that the USB cable is or connected to a powered USB port and the computer is turned on . See www.kodak.com/go /easysharecenter ENGLISH Using other charging accessories First, turn OFF the camera. Purchase accessories www.kodak.com/go/v1073accessories, v1273accessories 2 www.kodak.com/go /USBcharging. Charge until the Battery Charging light stays on (not in sleep mode).
User Manual
Page 4
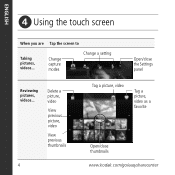
Delete a picture, video View previous picture, video View previous thumbnails 4 Tag a picture, video Tag a picture, video as a favorite Open/close the Settings panel Reviewing pictures, videos... Change capture modes Change a setting Open/close thumbnails www.kodak.com/go/easysharecenter ENGLISH ᕤ Using the touch screen When you are Tap the screen to Taking pictures, videos...
Delete a picture, video View previous picture, video View previous thumbnails 4 Tag a picture, video Tag a picture, video as a favorite Open/close the Settings panel Reviewing pictures, videos... Change capture modes Change a setting Open/close thumbnails www.kodak.com/go/easysharecenter ENGLISH ᕤ Using the touch screen When you are Tap the screen to Taking pictures, videos...
User Manual
Page 5
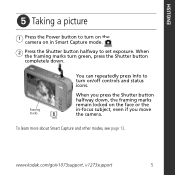
... Info to set exposure. When the framing marks turn on the face or the in Smart Capture mode. 2 Press the Shutter button halfway to turn green, press the Shutter button completely down , the framing marks remain locked on /off controls and status icons. When you press the Shutter button halfway down . www.kodak.com/go/v1073support, v1273support 5 ENGLISH ᕥ Taking a picture 1 Press the Power button to turn on the camera on in -focus subject...
... Info to set exposure. When the framing marks turn on the face or the in Smart Capture mode. 2 Press the Shutter button halfway to turn green, press the Shutter button completely down , the framing marks remain locked on /off controls and status icons. When you press the Shutter button halfway down . www.kodak.com/go/v1073support, v1273support 5 ENGLISH ᕥ Taking a picture 1 Press the Power button to turn on the camera on in -focus subject...
User Manual
Page 7
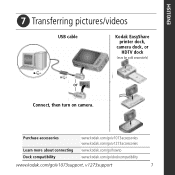
Purchase accessories Learn more about connecting Dock compatibility www.kodak.com/go/v1073accessories www.kodak.com/go/v1273accessories www.kodak.com/go/howto www.kodak.com/go/dockcompatibility www.kodak.com/go/v1073support, v1273support 7 ENGLISH ᕧ Transferring pictures/videos USB cable Kodak EasyShare printer dock, camera dock, or HDTV dock (may be sold separately) or Connect, then turn on camera.
Purchase accessories Learn more about connecting Dock compatibility www.kodak.com/go/v1073accessories www.kodak.com/go/v1273accessories www.kodak.com/go/howto www.kodak.com/go/dockcompatibility www.kodak.com/go/v1073support, v1273support 7 ENGLISH ᕧ Transferring pictures/videos USB cable Kodak EasyShare printer dock, camera dock, or HDTV dock (may be sold separately) or Connect, then turn on camera.
User Manual
Page 8
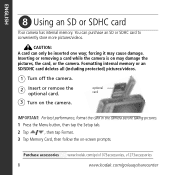
ENGLISH ᕨ Using an SD or SDHC card Your camera has internal memory. optional card IMPORTANT: For best performance, format the card in the camera before taking pictures. 1 Press the Menu button, then tap the Setup tab. 2 Tap , then tap Format. 3 Tap Memory Card, then follow the on the camera. You can only be inserted one way; CAUTION: A card can purchase an SD or SDHC card to conveniently store more pictures/videos. forcing it may...
ENGLISH ᕨ Using an SD or SDHC card Your camera has internal memory. optional card IMPORTANT: For best performance, format the card in the camera before taking pictures. 1 Press the Menu button, then tap the Setup tab. 2 Tap , then tap Format. 3 Tap Memory Card, then follow the on the camera. You can only be inserted one way; CAUTION: A card can purchase an SD or SDHC card to conveniently store more pictures/videos. forcing it may...

User Manual
Page 9
.../v1273support: • the extended user guide • interactive troubleshooting and repairs • interactive tutorials • FAQs • downloads • accessories • printing information • product registration www.kodak.com/go/v1073support, v1273support 9 You have: • set up your camera • taken pictures • transferred pictures to your best pictures! To better understand each menu option, use camera Help-highlight a menu choice, then press the Info button. ENGLISH ᕩ Keep learning about...
.../v1273support: • the extended user guide • interactive troubleshooting and repairs • interactive tutorials • FAQs • downloads • accessories • printing information • product registration www.kodak.com/go/v1073support, v1273support 9 You have: • set up your camera • taken pictures • transferred pictures to your best pictures! To better understand each menu option, use camera Help-highlight a menu choice, then press the Info button. ENGLISH ᕩ Keep learning about...
User Manual
Page 12
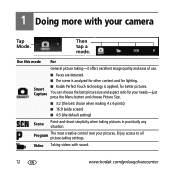
Video Taking videos with your camera Tap Mode. Capture You can choose the best picture size and aspect ratio for your pictures. Then tap a mode. Smart ■ Kodak Perfect Touch technology is analyzed for other content and for better pictures. Program The most creative control over your needs-just press the Menu button and choose Picture Size. ■ 3:2 (the best choice when making 4 x 6 prints) ■ 16:9 (wide screen) ■ 4:3 (the default setting) Scene...
Video Taking videos with your camera Tap Mode. Capture You can choose the best picture size and aspect ratio for your pictures. Then tap a mode. Smart ■ Kodak Perfect Touch technology is analyzed for other content and for better pictures. Program The most creative control over your needs-just press the Menu button and choose Picture Size. ■ 3:2 (the best choice when making 4 x 6 prints) ■ 16:9 (wide screen) ■ 4:3 (the default setting) Scene...
User Manual
Page 13
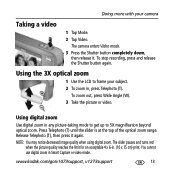
... Capture or video mode. You cannot use digital zoom in any picture-taking mode to get up to frame your camera Taking a video 1 Tap Mode. 2 Tap Video. The slider pauses and turns red when the picture quality reaches the limit for an acceptable 4 x 6-in. (10 x 15 cm) print. www.kodak.com/go/v1073support, v1273support 13 The camera enters Video mode. 3 Press the Shutter button completely down, then release it again. To stop recording, press...
... Capture or video mode. You cannot use digital zoom in any picture-taking mode to get up to frame your camera Taking a video 1 Tap Mode. 2 Tap Video. The slider pauses and turns red when the picture quality reaches the limit for an acceptable 4 x 6-in. (10 x 15 cm) print. www.kodak.com/go/v1073support, v1273support 13 The camera enters Video mode. 3 Press the Shutter button completely down, then release it again. To stop recording, press...
User Manual
Page 14
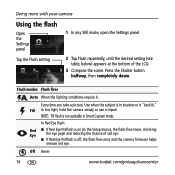
... of the LCD. 3 Compose the scene. NOTE: Fill flash is "backlit." Flash modes Flash fires Auto When the lighting conditions require it. Fill In low light, hold the camera steady or use a tripod. In Red Eye flash: Red Eye ■ If Red Eye Preflash is off, the flash fires once and the camera firmware helps remove red eye. Off Never 14 www.kodak.com/go/easysharecenter Every time you take a picture. Doing more with your camera Using the flash Open the Settings panel...
... of the LCD. 3 Compose the scene. NOTE: Fill flash is "backlit." Flash modes Flash fires Auto When the lighting conditions require it. Fill In low light, hold the camera steady or use a tripod. In Red Eye flash: Red Eye ■ If Red Eye Preflash is off, the flash fires once and the camera firmware helps remove red eye. Off Never 14 www.kodak.com/go/easysharecenter Every time you take a picture. Doing more with your camera Using the flash Open the Settings panel...
User Manual
Page 15
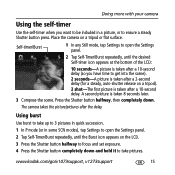
... take up to 3 pictures in quick succession. 1 In P mode (or in a picture, or to ensure a steady Shutter button press. www.kodak.com/go/v1073support, v1273support 15 Doing more with your camera Using the self-timer Use the self-timer when you have time to get into the scene). 2 seconds-A picture is taken after a 2-second delay (for a steady, auto-shutter release on a tripod or flat surface. Place the camera on a tripod). 2 shot...
... take up to 3 pictures in quick succession. 1 In P mode (or in a picture, or to ensure a steady Shutter button press. www.kodak.com/go/v1073support, v1273support 15 Doing more with your camera Using the self-timer Use the self-timer when you have time to get into the scene). 2 seconds-A picture is taken after a 2-second delay (for a steady, auto-shutter release on a tripod or flat surface. Place the camera on a tripod). 2 shot...

User Manual
Page 16
The camera uses infinity auto-focus. Auto-focus framing marks are not available in Landscape. The camera automatically sets the focus distance depending on the zoom position. Press the Shutter button halfway, then completely down. Open the Settings panel 1 Tap Settings to open the Settings panel. Use available light instead of the LCD. (See the table, below.) 3 Compose the scene. Macro Close range. NOTE: Focus modes are not available in Smart Capture mode because focus distance...
The camera uses infinity auto-focus. Auto-focus framing marks are not available in Landscape. The camera automatically sets the focus distance depending on the zoom position. Press the Shutter button halfway, then completely down. Open the Settings panel 1 Tap Settings to open the Settings panel. Use available light instead of the LCD. (See the table, below.) 3 Compose the scene. Macro Close range. NOTE: Focus modes are not available in Smart Capture mode because focus distance...
User Manual
Page 17
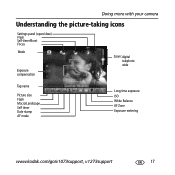
Doing more with your camera Understanding the picture-taking icons Settings panel (open/close) Flash Self-timer/Burst Focus Mode Exposure compensation Zoom: digital telephoto wide Tag name Picture size Flash Macro/Landscape Self timer Date stamp AF mode Long time exposure ISO White Balance AF Zone Exposure metering www.kodak.com/go/v1073support, v1273support 17
Doing more with your camera Understanding the picture-taking icons Settings panel (open/close) Flash Self-timer/Burst Focus Mode Exposure compensation Zoom: digital telephoto wide Tag name Picture size Flash Macro/Landscape Self timer Date stamp AF mode Long time exposure ISO White Balance AF Zone Exposure metering www.kodak.com/go/v1073support, v1273support 17
User Manual
Page 18
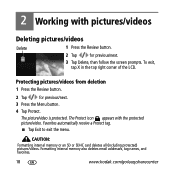
...the LCD. Formatting internal memory also deletes email addresses, tag names, and favorites. 18 www.kodak.com/go/easysharecenter Favorites automatically receive a Protect tag. ■ Tap Exit to exit the menu. Protecting pictures/videos from deletion 1 Press the Review button. 2 Tap for previous/next. 3 Tap Delete, then follow the screen prompts. The Protect icon appears with pictures/videos Deleting pictures/videos Delete 1 Press the Review button. 2 Tap for previous/next. 3 Press the Menu button. 4 Tap Protect. The picture/video is protected. CAUTION: Formatting...
...the LCD. Formatting internal memory also deletes email addresses, tag names, and favorites. 18 www.kodak.com/go/easysharecenter Favorites automatically receive a Protect tag. ■ Tap Exit to exit the menu. Protecting pictures/videos from deletion 1 Press the Review button. 2 Tap for previous/next. 3 Tap Delete, then follow the screen prompts. The Protect icon appears with pictures/videos Deleting pictures/videos Delete 1 Press the Review button. 2 Tap for previous/next. 3 Press the Menu button. 4 Tap Protect. The picture/video is protected. CAUTION: Formatting...
User Manual
Page 20
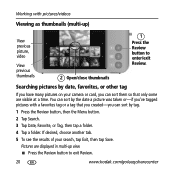
... tap Save. Searching pictures by tag. 1 Press the Review button, then the Menu button. 2 Tap Search. 3 Tap Date, Favorite, or Tag, then tap a folder. 4 Tap a folder. Working with a favorites tag or a tag that you created-you can sort them so that only some are displayed in multi-up ) View previous picture, video View previous thumbnails 2 Open/close thumbnails 1 Press the Review button to exit Review. 20 www.kodak.com/go...
... tap Save. Searching pictures by tag. 1 Press the Review button, then the Menu button. 2 Tap Search. 3 Tap Date, Favorite, or Tag, then tap a folder. 4 Tap a folder. Working with a favorites tag or a tag that you created-you can sort them so that only some are displayed in multi-up ) View previous picture, video View previous thumbnails 2 Open/close thumbnails 1 Press the Review button to exit Review. 20 www.kodak.com/go...

User Manual
Page 21
... picture. 3 Press the Menu button, then tap the Edit tab. to view other parts of the 4 Follow the screen prompts to replace the original picture or to save the enhanced picture as a new one. ■ Tap Exit to pictures taken in Smart Capture mode. (You cannot enhance videos, panoramic pictures, pictures that are already enhanced, or pictures taken in a split screen. Working with pictures/videos Using Kodak Perfect Touch technology Kodak Perfect Touch technology helps...
... picture. 3 Press the Menu button, then tap the Edit tab. to view other parts of the 4 Follow the screen prompts to replace the original picture or to save the enhanced picture as a new one. ■ Tap Exit to pictures taken in Smart Capture mode. (You cannot enhance videos, panoramic pictures, pictures that are already enhanced, or pictures taken in a split screen. Working with pictures/videos Using Kodak Perfect Touch technology Kodak Perfect Touch technology helps...
User Manual
Page 22
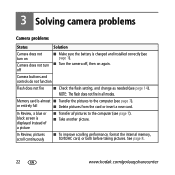
... 7). Memory card is displayed instead of a picture ■ Transfer all modes. In Review, pictures scroll continuously ■ To improve scrolling performance, format the internal memory, SD/SDHC card, or both before taking pictures. 3 Solving camera problems Camera problems Status Solution Camera does not turn on Camera does not turn off , then on again. Camera buttons and controls do not function Flash does not fire ■ Check the flash setting, and change as needed (see page 1). ■ Turn the camera off ■ Make sure the battery is charged and installed...
... 7). Memory card is displayed instead of a picture ■ Transfer all modes. In Review, pictures scroll continuously ■ To improve scrolling performance, format the internal memory, SD/SDHC card, or both before taking pictures. 3 Solving camera problems Camera problems Status Solution Camera does not turn on Camera does not turn off , then on again. Camera buttons and controls do not function Flash does not fire ■ Check the flash setting, and change as needed (see page 1). ■ Turn the camera off ■ Make sure the battery is charged and installed...
User Manual
Page 23
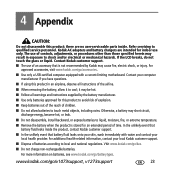
... adapters and battery chargers are no user-serviceable parts inside the product, contact Kodak customer support. ■ In the unlikely event that is stored for an extended period of the airline. ■ When removing the battery, allow batteries to qualified service personnel. Visit www.kodak.com/go /accessories. ■ Use only a USB-certified computer equipped with water and contact your local Kodak customer support. ■ Dispose of controls, adjustments...
... adapters and battery chargers are no user-serviceable parts inside the product, contact Kodak customer support. ■ In the unlikely event that is stored for an extended period of the airline. ■ When removing the battery, allow batteries to qualified service personnel. Visit www.kodak.com/go /accessories. ■ Use only a USB-certified computer equipped with water and contact your local Kodak customer support. ■ Dispose of controls, adjustments...
User Manual
Page 24
... batteries, to be free from malfunctions and defects in making repairs, those parts may be remanufactured, or may be replaced with incompatible accessories or attachments (such as required by jurisdiction. 24 www.kodak.com/go/easysharecenter Proof of the date of purchase. Kodak will repair or replace Products if they fail to function properly during the warranty period, subject to the authorized service...
... batteries, to be free from malfunctions and defects in making repairs, those parts may be remanufactured, or may be replaced with incompatible accessories or attachments (such as required by jurisdiction. 24 www.kodak.com/go/easysharecenter Proof of the date of purchase. Kodak will repair or replace Products if they fail to function properly during the warranty period, subject to the authorized service...
User Manual
Page 25
... purchaser in a particular installation. If this device must be different. FCC and Industry Canada This device complies with Canadian ICES-003. FCC compliance and advisory Kodak EasyShare V1073/V1273 digital camera This equipment has been tested and found to comply with the instructions, may be determined by turning the equipment off and on, the user is connected; 4) consult the dealer...
... purchaser in a particular installation. If this device must be different. FCC and Industry Canada This device complies with Canadian ICES-003. FCC compliance and advisory Kodak EasyShare V1073/V1273 digital camera This equipment has been tested and found to comply with the instructions, may be determined by turning the equipment off and on, the user is connected; 4) consult the dealer...


