
User Manual
Page 5
... the lens cap and strap 1 Charging the battery 2 Loading the battery 2 Turning on the camera 3 Setting the language and date/time, first time 3 Setting the language and date/time, other times 4 Storing pictures on an SD or MMC card 4 2 ...pictures and videos 11 Protecting pictures and videos from deletion 16 3 Transferring and printing pictures 18 Installing the software 18 Transferring pictures 19 Printing from a Kodak EasyShare printer dock or your computer 20 Printing from an optional SD or MMC card 20 Ordering prints online 21 Direct printing with a PictBridge enabled printer...
... the lens cap and strap 1 Charging the battery 2 Loading the battery 2 Turning on the camera 3 Setting the language and date/time, first time 3 Setting the language and date/time, other times 4 Storing pictures on an SD or MMC card 4 2 ...pictures and videos 11 Protecting pictures and videos from deletion 16 3 Transferring and printing pictures 18 Installing the software 18 Transferring pictures 19 Printing from a Kodak EasyShare printer dock or your computer 20 Printing from an optional SD or MMC card 20 Ordering prints online 21 Direct printing with a PictBridge enabled printer...

User Manual
Page 10
to accept. 3 www.kodak.com/go/support for previous/next field. 2 Press OK to change. Date & Time: 1 Press OK. Setting the language and date/time, first time Language: 1 Move to choose a Language, then press OK. Setting up your camera Turning on the camera ■ Capture: For taking pictures and videos. ■ Favorites: View your Favorites, see page 65.
to accept. 3 www.kodak.com/go/support for previous/next field. 2 Press OK to change. Date & Time: 1 Press OK. Setting the language and date/time, first time Language: 1 Move to choose a Language, then press OK. Setting up your camera Turning on the camera ■ Capture: For taking pictures and videos. ■ Favorites: View your Favorites, see page 65.

User Manual
Page 11
... 49). 2 Notched corner 1 Turn off the camera SD or MMC card (optional) CAUTION: A card can purchase a Kodak SD or MMC card to conveniently store more pictures and videos. Storing pictures on an SD or MMC card Your camera has 32 MB of Kodak products or www.kodak.com/go /support 4 NOTE:... then press OK. You can only be inserted one way; For best results, purchase a Kodak card. Purchase SD or MMC cards at a dealer of internal memory. www.kodak.com/go /p850accessories. Setting up your camera Setting the language and date/time, other times 1 Press Menu. (Press again to exit...
... 49). 2 Notched corner 1 Turn off the camera SD or MMC card (optional) CAUTION: A card can purchase a Kodak SD or MMC card to conveniently store more pictures and videos. Storing pictures on an SD or MMC card Your camera has 32 MB of Kodak products or www.kodak.com/go /support 4 NOTE:... then press OK. You can only be inserted one way; For best results, purchase a Kodak card. Purchase SD or MMC cards at a dealer of internal memory. www.kodak.com/go /p850accessories. Setting up your camera Setting the language and date/time, other times 1 Press Menu. (Press again to exit...

User Manual
Page 12
To stop recording, press and release the Shutter button again. 5 www.kodak.com/go/support When the AE/AF indicator turns green, press the Shutter button completely down and release. AF/AE indicator: green-successful red-failed failed focus failed exposure 4 Press the Shutter button completely down . Taking a video 1 2 EVF 3 LCD or 4 Press Shutter button halfway to adjust the sharpness of the Viewfinder. 2 Taking pictures and videos Taking a picture 1 2 EVF 3 Auto LCD or Use the Diopter to set the AE/AF.
To stop recording, press and release the Shutter button again. 5 www.kodak.com/go/support When the AE/AF indicator turns green, press the Shutter button completely down and release. AF/AE indicator: green-successful red-failed failed focus failed exposure 4 Press the Shutter button completely down . Taking a video 1 2 EVF 3 LCD or 4 Press Shutter button halfway to adjust the sharpness of the Viewfinder. 2 Taking pictures and videos Taking a picture 1 2 EVF 3 Auto LCD or Use the Diopter to set the AE/AF.

User Manual
Page 14
... subjects are fixed at Center Wide. 7 www.kodak.com/go/support When the framing marks turn green, focus is focusing. Taking pictures and videos Using the auto-focus framing marks (pictures) When using the EVF/LCD screen as a viewfinder, framing marks indicate where the camera is accomplished. NOTE: Framing marks do not appear...
... subjects are fixed at Center Wide. 7 www.kodak.com/go/support When the framing marks turn green, focus is focusing. Taking pictures and videos Using the auto-focus framing marks (pictures) When using the EVF/LCD screen as a viewfinder, framing marks indicate where the camera is accomplished. NOTE: Framing marks do not appear...

User Manual
Page 16
... Press Wide Angle (W) to 40X. Combined zoom settings are from 12X to zoom out. The blue slider on the zoom indicator pauses and turns red when the picture quality reaches the limit for video recording. Taking pictures and videos Using optical zoom Use optical zoom to get an additional... 3.3X magnification beyond optical zoom. NOTE: To enable Advanced digital zoom, select this option in . (10 x 15 cm) print. 9 www.kodak.com/go/support You can change optical zoom before or during video recording. 1 Use the EVF or LCD screen ...
... Press Wide Angle (W) to 40X. Combined zoom settings are from 12X to zoom out. The blue slider on the zoom indicator pauses and turns red when the picture quality reaches the limit for video recording. Taking pictures and videos Using optical zoom Use optical zoom to get an additional... 3.3X magnification beyond optical zoom. NOTE: To enable Advanced digital zoom, select this option in . (10 x 15 cm) print. 9 www.kodak.com/go/support You can change optical zoom before or during video recording. 1 Use the EVF or LCD screen ...

User Manual
Page 17
...Make sure you press the Shutter button halfway, and flash is live when connected to the camera. The flash synchronizes at night, indoors, or outdoors in flash, as well, to provide ... external flash unit Use an external flash unit when you want additional or specialized lighting (we recommend a Kodak external flash unit for details. Press the cover to your external flash unit user's guide for fully automatic... extended flash capabilities). You can use the camera's built-in heavy shadows. The external flash unit is needed, the flash automatically...
...Make sure you press the Shutter button halfway, and flash is live when connected to the camera. The flash synchronizes at night, indoors, or outdoors in flash, as well, to provide ... external flash unit Use an external flash unit when you want additional or specialized lighting (we recommend a Kodak external flash unit for details. Press the cover to your external flash unit user's guide for fully automatic... extended flash capabilities). You can use the camera's built-in heavy shadows. The external flash unit is needed, the flash automatically...

User Manual
Page 19
...disappears. To deselect the entire set , press Set again. NOTE: Each time you press Set to select a picture, a blue box appears. www.kodak.com/go/support 12 Multi-up 1 Press Review. (Press again to exit.) 10 of pictures to review and to perform various functions, for example ...Delete (page 17), Protect (page 16), and Copy (page 57). To remove a picture from the set , press review or turn off the camera. Single-up 1 Press Review. (Press again to exit.) 2 Press . 3 and to scroll through your picture. 5 Scroll to the next picture. A ...
...disappears. To deselect the entire set , press Set again. NOTE: Each time you press Set to select a picture, a blue box appears. www.kodak.com/go/support 12 Multi-up 1 Press Review. (Press again to exit.) 10 of pictures to review and to perform various functions, for example ...Delete (page 17), Protect (page 16), and Copy (page 57). To remove a picture from the set , press review or turn off the camera. Single-up 1 Press Review. (Press again to exit.) 2 Press . 3 and to scroll through your picture. 5 Scroll to the next picture. A ...

User Manual
Page 25
...up -to install the software. To register later, see www.kodak.com/go /support 18 3 Transferring and printing pictures Installing the software CAUTION: Install Kodak EasyShare software before connecting the camera or optional dock to automatically install the most commonly used applications.... NOTE: When prompted, register your system up for details. If you turned off anti-virus software, turn it back on -screen instructions to -date. www.kodak.com...
...up -to install the software. To register later, see www.kodak.com/go /support 18 3 Transferring and printing pictures Installing the software CAUTION: Install Kodak EasyShare software before connecting the camera or optional dock to automatically install the most commonly used applications.... NOTE: When prompted, register your system up for details. If you turned off anti-virus software, turn it back on -screen instructions to -date. www.kodak.com...

User Manual
Page 26
... /howto for details. 3 Plug the other accessories at a dealer of the USB cable into the labeled USB port on the camera. 4 Turn on your computer. (For details, see the dock user's guide. Kodak EasyShare software opens on connecting. Transferring pictures with your computer user's guide for an online tutorial on your computer using an...
... /howto for details. 3 Plug the other accessories at a dealer of the USB cable into the labeled USB port on the camera. 4 Turn on your computer. (For details, see the dock user's guide. Kodak EasyShare software opens on connecting. Transferring pictures with your computer user's guide for an online tutorial on your computer using an...

User Manual
Page 28
..., www.kodakgallery.com, (formerly Ofoto) is one of the many online print services offered in the Kodak EasyShare software. You can easily: ■ Upload your pictures. ■ Edit, enhance, and add borders to your pictures. ■ Store ... your door. Direct printing with a PictBridge enabled printer Your camera features PictBridge technology, which lets you have them with ■ PictBridge enabled printer optional Kodak 5-volt AC adapter ■ USB cable (U-8) Connecting the camera to the printer 1 Turn off the camera and printer. 2 Optional: If you print directly to PictBridge...
..., www.kodakgallery.com, (formerly Ofoto) is one of the many online print services offered in the Kodak EasyShare software. You can easily: ■ Upload your pictures. ■ Edit, enhance, and add borders to your pictures. ■ Store ... your door. Direct printing with a PictBridge enabled printer Your camera features PictBridge technology, which lets you have them with ■ PictBridge enabled printer optional Kodak 5-volt AC adapter ■ USB cable (U-8) Connecting the camera to the printer 1 Turn off the camera and printer. 2 Optional: If you print directly to PictBridge...

User Manual
Page 29
...size. Choose the number of paper. www.kodak.com/go/support 22 This option requires one or more sheets of copies. If the printer is displayed.) If the menu interface turns off the camera and printer. 2 Disconnect the USB cable from the camera and printer. Choose the number of all ...capable, print pictures that you tagged for printing (see page 55). 1 Turn the Mode switch to redisplay it. 3 Move the Joystick OK button. Disconnecting the camera from the printer 1 Turn off , press any button to or . 2 Turn on a memory card, or in Favorites. Current Picture Press to the ...
...size. Choose the number of paper. www.kodak.com/go/support 22 This option requires one or more sheets of copies. If the printer is displayed.) If the menu interface turns off the camera and printer. 2 Disconnect the USB cable from the camera and printer. Choose the number of all ...capable, print pictures that you tagged for printing (see page 55). 1 Turn the Mode switch to redisplay it. 3 Move the Joystick OK button. Disconnecting the camera from the printer 1 Turn off , press any button to or . 2 Turn on a memory card, or in Favorites. Current Picture Press to the ...

User Manual
Page 34
... Subjects that are not available in motion. Shutter speed is behind the subject). Flash does not fire. Place the camera on . NOTE: If the Help text turns off, press the OK button. 3 Press the OK button to display Scene mode descriptions. Use Telephoto to reduce focus... of people in bright light. 27 www.kodak.com/go/support Night Portrait Reduces red eye of distracting background. Place the camera on a flat, steady...
... Subjects that are not available in motion. Shutter speed is behind the subject). Flash does not fire. Place the camera on . NOTE: If the Help text turns off, press the OK button. 3 Press the OK button to display Scene mode descriptions. Use Telephoto to reduce focus... of people in bright light. 27 www.kodak.com/go/support Night Portrait Reduces red eye of distracting background. Place the camera on a flat, steady...

User Manual
Page 44
... Flash Compensation Aperture-also known as f-stop or f-number, controls the size of the lens opening, which determines the depth of the camera sensor. Flash Compensation-controls the flash brightness ±1.0 in those modes. Higher settings are maintained for PASM and C modes-even when ...only use ISO 800 if you are good for slow shutter speeds.) Exposure Compensation-lets you change modes or turn off the camera. Use Reset Camera (see page 43). 37 www.kodak.com/go/support Larger f-numbers keep the main subject sharp; ISO-controls sensitivity of field. For example,...
... Flash Compensation Aperture-also known as f-stop or f-number, controls the size of the lens opening, which determines the depth of the camera sensor. Flash Compensation-controls the flash brightness ±1.0 in those modes. Higher settings are maintained for PASM and C modes-even when ...only use ISO 800 if you are good for slow shutter speeds.) Exposure Compensation-lets you change modes or turn off the camera. Use Reset Camera (see page 43). 37 www.kodak.com/go/support Larger f-numbers keep the main subject sharp; ISO-controls sensitivity of field. For example,...

User Manual
Page 45
... Red-out-of-range NOTE: For C1, C2, or C3, choose custom exposure setting (PASM) in conjunction with your camera Changing PASM or C1, C2, C3 mode settings PASM and C modes control the f-number (aperture), shutter speed, exposure compensation, and flash ...to P, A, S, M, or C1, C2, C3. 2 Use the Command dial and Set button: ■ Turn the Command dial to change other settings (see page 30) +0.7, +1.0, +1.3 -1.0 -1.3, -1.0, -0.7 www.kodak.com/go/support 38 Using exposure compensation with exposure bracketing In PASM modes, you can use exposure compensation in the Menu...
... Red-out-of-range NOTE: For C1, C2, or C3, choose custom exposure setting (PASM) in conjunction with your camera Changing PASM or C1, C2, C3 mode settings PASM and C modes control the f-number (aperture), shutter speed, exposure compensation, and flash ...to P, A, S, M, or C1, C2, C3. 2 Use the Command dial and Set button: ■ Turn the Command dial to change other settings (see page 30) +0.7, +1.0, +1.3 -1.0 -1.3, -1.0, -0.7 www.kodak.com/go/support 38 Using exposure compensation with exposure bracketing In PASM modes, you can use exposure compensation in the Menu...

User Manual
Page 48
... of the subject's brightness. It's normal to the right of the histogram. if it's to turn the Highlight/ Shadow clipping on /off . Available only in the middle of the graph, the ...subject is dark (see detail in highlights and shadows that correspond to turn the histogram on /off . Press the Status button to the left, the subject is bright; Press...speed setting. If large amounts of the picture to see shaded bar). Doing more with your camera Using the histogram In Capture or Review, the histogram shows the distribution of reflectance within a scene...
... of the subject's brightness. It's normal to the right of the histogram. if it's to turn the Highlight/ Shadow clipping on /off . Available only in the middle of the graph, the ...subject is dark (see detail in highlights and shadows that correspond to turn the histogram on /off . Press the Status button to the left, the subject is bright; Press...speed setting. If large amounts of the picture to see shaded bar). Doing more with your camera Using the histogram In Capture or Review, the histogram shows the distribution of reflectance within a scene...

User Manual
Page 51
... Color Black & White Sepia NOTE: EasyShare software lets you cannot restore a black & white or sepia picture to black & white or sepia. Choose a date option, or turn off .) www.kodak.com/go/support 44 Doing more with a RAW file. But you change a color picture to color, except with your camera Setting Icon Color Mode Choose...
... Color Black & White Sepia NOTE: EasyShare software lets you cannot restore a black & white or sepia picture to black & white or sepia. Choose a date option, or turn off .) www.kodak.com/go/support 44 Doing more with a RAW file. But you change a color picture to color, except with your camera Setting Icon Color Mode Choose...

User Manual
Page 52
...a 640 x 480 pixel window (VGA). 320 x 240-lower resolution and file size. Because the camera is always focusing, there is no need to press the Shutter button halfway down . 45 www.kodak.com/go/support This setting remains until you press the Shutter button. 5, 15, or 30 seconds Continuous...focus. Video plays in a 320 x 240 pixel window (QVGA). Setting Icon Video Size Choose a video resolution. This setting remains until you turn off the camera. Single AF -uses external AF sensor and TTL-AF when the Shutter button is room on the card or internal memory, or until you...
...a 640 x 480 pixel window (VGA). 320 x 240-lower resolution and file size. Because the camera is always focusing, there is no need to press the Shutter button halfway down . 45 www.kodak.com/go/support This setting remains until you press the Shutter button. 5, 15, or 30 seconds Continuous...focus. Video plays in a 320 x 240 pixel window (QVGA). Setting Icon Video Size Choose a video resolution. This setting remains until you turn off the camera. Single AF -uses external AF sensor and TTL-AF when the Shutter button is room on the card or internal memory, or until you...

User Manual
Page 54
...Turn off . (For more with the correct side up for Still capture only. None (default)-digital zoom is deployed. Mode Description Display the mode descriptions. (SCN mode descriptions remain active.) Options See page 35. Shutter Self-timer Error Off Low Medium (default) High On (default) Off 47 www.kodak...choose a volume level. Doing more information, see page 6.) Advanced Digital Zoom Choose how digital zoom is disabled. Orientation Sensor Orient pictures so they are displayed with your camera Setting Icon Set Program Button Review Program this button in Review for...
...Turn off . (For more with the correct side up for Still capture only. None (default)-digital zoom is deployed. Mode Description Display the mode descriptions. (SCN mode descriptions remain active.) Options See page 35. Shutter Self-timer Error Off Low Medium (default) High On (default) Off 47 www.kodak...choose a volume level. Doing more information, see page 6.) Advanced Digital Zoom Choose how digital zoom is disabled. Orientation Sensor Orient pictures so they are displayed with your camera Setting Icon Set Program Button Review Program this button in Review for...
User Manual
Page 55
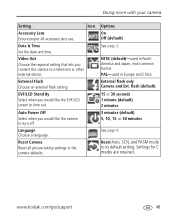
... Icon Accessory Lens Ensure proper AF accessory lens use. External flash only Camera and Ext. www.kodak.com/go/support 48 Video Out Choose the regional setting that lets you connect the camera to the camera defaults. Reset Camera Reset all picture-taking settings to a television or other external device. NTSC ... Flash Choose an external flash setting. Auto Power Off Select when you would like the EVF/LCD screen to turn off. EVF/LCD Stand By Select when you would like the camera to time out. Options On Off (default) See page 3. Reset Auto, SCN, and PASM mode to ...
... Icon Accessory Lens Ensure proper AF accessory lens use. External flash only Camera and Ext. www.kodak.com/go/support 48 Video Out Choose the regional setting that lets you connect the camera to the camera defaults. Reset Camera Reset all picture-taking settings to a television or other external device. NTSC ... Flash Choose an external flash setting. Auto Power Off Select when you would like the EVF/LCD screen to turn off. EVF/LCD Stand By Select when you would like the camera to time out. Options On Off (default) See page 3. Reset Auto, SCN, and PASM mode to ...


