

User Manual
Page 2
Make sure the computer is turned on and not in sleep mode. 2 www.kodak.com/go /accessories. Kodak EasyShare camera or printer docks (may be sold separately) Kodak 5V AC adapter, Kodak Li-Ion universal battery chargers (sold separately) USB AC adapter USB cable Battery Charging light Battery Charging light First, turn OFF the camera. Charge until the Battery Charging...
Make sure the computer is turned on and not in sleep mode. 2 www.kodak.com/go /accessories. Kodak EasyShare camera or printer docks (may be sold separately) Kodak 5V AC adapter, Kodak Li-Ion universal battery chargers (sold separately) USB AC adapter USB cable Battery Charging light Battery Charging light First, turn OFF the camera. Charge until the Battery Charging...
User Manual
Page 3
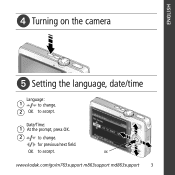
OK to accept. ENGLISH ᕤ Turning on the camera ᕥ Setting the language, date/time Language: 1 to change . for previous/next field. OK www.kodak.com/go/m763support m863support md863support 3 Date/Time: 1 At the prompt, press OK. 2 to change . 2 OK to accept.
OK to accept. ENGLISH ᕤ Turning on the camera ᕥ Setting the language, date/time Language: 1 to change . for previous/next field. OK www.kodak.com/go/m763support m863support md863support 3 Date/Time: 1 At the prompt, press OK. 2 to change . 2 OK to accept.
User Manual
Page 4
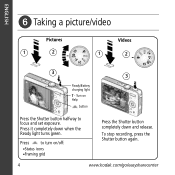
ENGLISH ᕦ Taking a picture/video Pictures 1 2 Videos 1 2 3 3 Ready/Battery charging light T - To stop recording, press the Shutter button again. 4 www.kodak.com/go/easysharecenter Press it completely down and release. Turn on Help button Press the Shutter button halfway to turn on/off: •Status icons •Framing grid Press the Shutter button completely down when the Ready light turns green. Press to focus and set exposure.
ENGLISH ᕦ Taking a picture/video Pictures 1 2 Videos 1 2 3 3 Ready/Battery charging light T - To stop recording, press the Shutter button again. 4 www.kodak.com/go/easysharecenter Press it completely down and release. Turn on Help button Press the Shutter button halfway to turn on/off: •Status icons •Framing grid Press the Shutter button completely down when the Ready light turns green. Press to focus and set exposure.
User Manual
Page 5
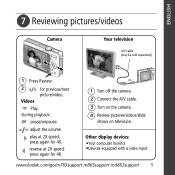
...;Your computer monitor •Devices equipped with a video input www.kodak.com/go/m763support m863support md863support 5 Videos Play. press again for 4X. 1 Turn off the camera. 2 Connect the A/V cable. 3 Turn on the camera. 4 Review pictures/videos/slide shows on television. ENGLISH ᕧ Reviewing pictures/videos Camera Your television A/V cable (may be sold separately) 1 Press Review. 2 for...
...;Your computer monitor •Devices equipped with a video input www.kodak.com/go/m763support m863support md863support 5 Videos Play. press again for 4X. 1 Turn off the camera. 2 Connect the A/V cable. 3 Turn on the camera. 4 Review pictures/videos/slide shows on television. ENGLISH ᕧ Reviewing pictures/videos Camera Your television A/V cable (may be sold separately) 1 Press Review. 2 for...
User Manual
Page 11
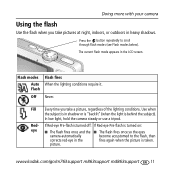
Use when the subject is turned on: eye I The flash fires once and the I The flash fires once so the eyes camera automatically become accustomed to scroll through flash modes (see Flash modes below). Off Never. In low light, hold the camera steady or use a tripod. www.kodak.com/go/m763support m863support md863support 11 Red...
Use when the subject is turned on: eye I The flash fires once and the I The flash fires once so the eyes camera automatically become accustomed to scroll through flash modes (see Flash modes below). Off Never. In low light, hold the camera steady or use a tripod. www.kodak.com/go/m763support m863support md863support 11 Red...
User Manual
Page 13
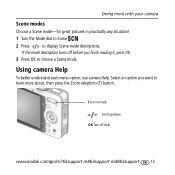
Doing more about, then press the Zoom telephoto (T) button. If the mode description turns off Help www.kodak.com/go/m763support m863support md863support 13 Using camera Help To better understand each menu option, use camera Help. T Turn on Help Scroll up/down OK Turn off before you want to learn more with your camera Scene modes Choose a Scene mode-for great pictures in practically any situation! 1 Turn the Mode dial to Scene . 2 Press to choose a Scene mode. Select an option you finish reading it, press OK. 3 Press OK to display Scene mode descriptions.
Doing more about, then press the Zoom telephoto (T) button. If the mode description turns off Help www.kodak.com/go/m763support m863support md863support 13 Using camera Help To better understand each menu option, use camera Help. T Turn on Help Scroll up/down OK Turn off before you want to learn more with your camera Scene modes Choose a Scene mode-for great pictures in practically any situation! 1 Turn the Mode dial to Scene . 2 Press to choose a Scene mode. Select an option you finish reading it, press OK. 3 Press OK to display Scene mode descriptions.
User Manual
Page 14
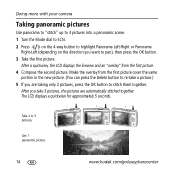
... pictures are taking only 2 pictures, press the OK button to stitch them together. Doing more with your camera Taking panoramic pictures Use panorama to "stitch" up to 3 pictures into a panoramic scene. 1 Turn the Mode dial to SCN. 2 Press on the 4-way button to highlight Panorama Left-Right or Panorama Right...press the OK button. 3 Take the first picture. The LCD displays a quickview for approximately 5 seconds. 1 2 3 Take 2 or 3 pictures. Get 1 panoramic picture. 14 www.kodak.com/go/easysharecenter Make the overlay from the first picture. 4 Compose the second picture.
... pictures are taking only 2 pictures, press the OK button to stitch them together. Doing more with your camera Taking panoramic pictures Use panorama to "stitch" up to 3 pictures into a panoramic scene. 1 Turn the Mode dial to SCN. 2 Press on the 4-way button to highlight Panorama Left-Right or Panorama Right...press the OK button. 3 Take the first picture. The LCD displays a quickview for approximately 5 seconds. 1 2 3 Take 2 or 3 pictures. Get 1 panoramic picture. 14 www.kodak.com/go/easysharecenter Make the overlay from the first picture. 4 Compose the second picture.

User Manual
Page 23
... all pictures and videos, including protected files. I Reformat the card. rechargeable digital camera battery KLIC-7001. charge using USB charging. turn on the LCD; recognize SD card. Battery does not I Install new battery. I See page 2 or visit www.kodak.com/go/usbcharging. www.kodak.com/go /md863support and select Interactive Troubleshooting & Repairs. I Purchase a certified SD...
... all pictures and videos, including protected files. I Reformat the card. rechargeable digital camera battery KLIC-7001. charge using USB charging. turn on the LCD; recognize SD card. Battery does not I Install new battery. I See page 2 or visit www.kodak.com/go/usbcharging. www.kodak.com/go /md863support and select Interactive Troubleshooting & Repairs. I Purchase a certified SD...
User Manual
Page 25
...to inclement weather or you suspect water has gotten inside the camera, turn off the camera and remove the batteries and card. Warranty service will , at least 24 hours before using the camera again. Warranty Kodak warrants Kodak consumer electronic products and accessories ("Products"), excluding batteries, to...software included on the Kodak EasyShare software CD and the camera firmware (the software that runs on the lens or LCD to remove dust and dirt. In the US, visit the Electronics Industry Alliance Web site at your local authorities. For digital camera disposal or recycling ...
...to inclement weather or you suspect water has gotten inside the camera, turn off the camera and remove the batteries and card. Warranty service will , at least 24 hours before using the camera again. Warranty Kodak warrants Kodak consumer electronic products and accessories ("Products"), excluding batteries, to...software included on the Kodak EasyShare software CD and the camera firmware (the software that runs on the lens or LCD to remove dust and dirt. In the US, visit the Electronics Industry Alliance Web site at your local authorities. For digital camera disposal or recycling ...
User Manual
Page 27
This equipment generates, uses, and can be determined by turning the equipment off and on, the user is no guarantee that interference will not occur in a residential installation. www.kodak.com/go/m763support m863support md863support 27 However, there is encouraged to try to correct the interference.... FCC and Industry Canada This device complies with the limits for additional suggestions. FCC compliance and advisory Appendix Kodak EasyShare M763/M863/MD863 digital camera This equipment has been tested and found to comply with Industry Canada RSS-210 and FCC Rules.
This equipment generates, uses, and can be determined by turning the equipment off and on, the user is no guarantee that interference will not occur in a residential installation. www.kodak.com/go/m763support m863support md863support 27 However, there is encouraged to try to correct the interference.... FCC and Industry Canada This device complies with the limits for additional suggestions. FCC compliance and advisory Appendix Kodak EasyShare M763/M863/MD863 digital camera This equipment has been tested and found to comply with Industry Canada RSS-210 and FCC Rules.

User Manual
Page 5
... 1 Charging the battery 2 Turning on the camera 3 Setting the language, date/time 3 Storing pictures on an SD/SDHC card 4 2 Taking pictures/videos 5 Taking a picture 5 Taking a video 6 Using optical zoom 7 Using the flash 8 Using different picture-taking modes 9 Using camera Help 11 Taking panoramic pictures... 12 Understanding the picture-taking icons 13 3 Working with pictures/videos 14 Reviewing pictures/videos 14 Using sound tags 16 Deleting pictures/videos 17 Using the menu button in Review 18 Using Kodak Perfect Touch ...
... 1 Charging the battery 2 Turning on the camera 3 Setting the language, date/time 3 Storing pictures on an SD/SDHC card 4 2 Taking pictures/videos 5 Taking a picture 5 Taking a video 6 Using optical zoom 7 Using the flash 8 Using different picture-taking modes 9 Using camera Help 11 Taking panoramic pictures... 12 Understanding the picture-taking icons 13 3 Working with pictures/videos 14 Reviewing pictures/videos 14 Using sound tags 16 Deleting pictures/videos 17 Using the menu button in Review 18 Using Kodak Perfect Touch ...

User Manual
Page 8
Charge until the Battery Charging light turns off (up your camera Charging the battery USB AC adapter Kodak USB AC adapter (included) USB cable Battery Charging light Kodak EasyShare camera or printer docks (may be sold separately) First, turn OFF the camera. Battery Charging light Kodak 5V AC adapter, Kodak Li-Ion universal battery chargers (sold separately) For dock compatibility, see...
Charge until the Battery Charging light turns off (up your camera Charging the battery USB AC adapter Kodak USB AC adapter (included) USB cable Battery Charging light Kodak EasyShare camera or printer docks (may be sold separately) First, turn OFF the camera. Battery Charging light Kodak 5V AC adapter, Kodak Li-Ion universal battery chargers (sold separately) For dock compatibility, see...

User Manual
Page 9
Date/Time: 1 At the prompt, press OK. 2 to accept. www.kodak.com/go/support 3 OK to change. for previous/next field. Turning on the camera Setting up your camera Setting the language, date/time Language: 1 to change the date/time and language in the future, use the Menu button (page 33). NOTE: To change . 2 OK to accept.
Date/Time: 1 At the prompt, press OK. 2 to accept. www.kodak.com/go/support 3 OK to change. for previous/next field. Turning on the camera Setting up your camera Setting the language, date/time Language: 1 to change the date/time and language in the future, use the Menu button (page 33). NOTE: To change . 2 OK to accept.

User Manual
Page 10
... cause damage. See page 61 for storage capacities. 4 www.kodak.com/go /md863accessories). We recommend Kodak SD or SDHC cards. 1 Turn off the camera. 2 Insert or remove the optional card. 3 Turn on an SD/SDHC card Your camera has internal memory. Setting up your camera Storing pictures on the camera. If you insert or remove a card while the...
... cause damage. See page 61 for storage capacities. 4 www.kodak.com/go /md863accessories). We recommend Kodak SD or SDHC cards. 1 Turn off the camera. 2 Insert or remove the optional card. 3 Turn on an SD/SDHC card Your camera has internal memory. Setting up your camera Storing pictures on the camera. If you insert or remove a card while the...

User Manual
Page 11
... the quickview sooner, press the Shutter button halfway.) The picture is saved unless you press the Delete button. to play a video. www.kodak.com/go/support 5 When the framing marks turn green, press the Shutter button completely down. 2 Taking pictures/videos Taking a picture 1 3 On/Off button 2 Framing marks Press the Shutter button...
... the quickview sooner, press the Shutter button halfway.) The picture is saved unless you press the Delete button. to play a video. www.kodak.com/go/support 5 When the framing marks turn green, press the Shutter button completely down. 2 Taking pictures/videos Taking a picture 1 3 On/Off button 2 Framing marks Press the Shutter button...

User Manual
Page 12
...disappear), release the Shutter button and recompose the scene. 3 Press the Shutter button completely down and release. When the framing marks turn green, focus is accomplished. 2 If the camera is not focusing on foreground subjects, even if the subjects are not centered in the scene. Multiple framing marks may appear when... Wide. NOTE: Framing marks do not appear in Auto mode (see page 9). To stop recording, press and release the Shutter button again. 6 www.kodak.com/go/support Taking pictures/videos Using the framing marks Framing marks indicate the camera focus area.
...disappear), release the Shutter button and recompose the scene. 3 Press the Shutter button completely down and release. When the framing marks turn green, focus is accomplished. 2 If the camera is not focusing on foreground subjects, even if the subjects are not centered in the scene. Multiple framing marks may appear when... Wide. NOTE: Framing marks do not appear in Auto mode (see page 9). To stop recording, press and release the Shutter button again. 6 www.kodak.com/go/support Taking pictures/videos Using the framing marks Framing marks indicate the camera focus area.

User Manual
Page 13
... subject. W TD I As you zoom, you can be as close as 13.8 in. (35 cm) to your subject. Using the digital zoom Use digital zoom in . The slider on the zoom indicator turns red when the picture quality reaches the limit for a combined zoom of 15X. 1 Press Telephoto (T) to zoom out. Press Wide... get up to 5X magnification beyond optical zoom for an acceptable 4 x 6-in. (10 x 15 cm) print. I Always use the auto focus framing marks, page 6. www.kodak.com/go/support 7 The zoom indicator shows zoom status. 3 Take the picture or video. NOTE: For focus distances, see page 58.
... subject. W TD I As you zoom, you can be as close as 13.8 in. (35 cm) to your subject. Using the digital zoom Use digital zoom in . The slider on the zoom indicator turns red when the picture quality reaches the limit for a combined zoom of 15X. 1 Press Telephoto (T) to zoom out. Press Wide... get up to 5X magnification beyond optical zoom for an acceptable 4 x 6-in. (10 x 15 cm) print. I Always use the auto focus framing marks, page 6. www.kodak.com/go/support 7 The zoom indicator shows zoom status. 3 Take the picture or video. NOTE: For focus distances, see page 58.

User Manual
Page 14
... flash mode appears in heavy shadows. To turn the Red-eye Pre-flash feature on : eye I The flash fires once and the I The flash fires once so the eyes camera automatically become accustomed to scroll through flash modes (see page 33. 8 www.kodak.com/go/support Taking pictures/videos Using the... the LCD screen. In low light, hold the camera steady or use a tripod. picture. Flash Off Never. Fill Every time you take a picture, regardless of the lighting conditions. If Red-eye Pre-flash is turned off: If Red-eye Pre-flash is turned on /off, see Flash modes below). Red-...
... flash mode appears in heavy shadows. To turn the Red-eye Pre-flash feature on : eye I The flash fires once and the I The flash fires once so the eyes camera automatically become accustomed to scroll through flash modes (see page 33. 8 www.kodak.com/go/support Taking pictures/videos Using the... the LCD screen. In low light, hold the camera steady or use a tripod. picture. Flash Off Never. Fill Every time you take a picture, regardless of the lighting conditions. If Red-eye Pre-flash is turned off: If Red-eye Pre-flash is turned on /off, see Flash modes below). Red-...

User Manual
Page 16
Left-Right Panorama Stitching up to 3 captured images from right to Auto Focus (see page 32). 10 www.kodak.com/go/support Reducing red eye of people. Place the camera on a flat, steady surface or use a tripod. Flash does not fire. Focus is set to left to Auto Focus (...light conditions. Landscape Night Portrait Night Landscape Snow Beach Text/ Document Fireworks Flower Far-away scenes. Bright snow scenes. If the mode description turns off before you finish reading it, press OK. 3 Press OK to display Scene mode descriptions. Auto-focus framing marks are not available in...
Left-Right Panorama Stitching up to 3 captured images from right to Auto Focus (see page 32). 10 www.kodak.com/go/support Reducing red eye of people. Place the camera on a flat, steady surface or use a tripod. Flash does not fire. Focus is set to left to Auto Focus (...light conditions. Landscape Night Portrait Night Landscape Snow Beach Text/ Document Fireworks Flower Far-away scenes. Bright snow scenes. If the mode description turns off before you finish reading it, press OK. 3 Press OK to display Scene mode descriptions. Auto-focus framing marks are not available in...

User Manual
Page 17
... Subjects that are disabled. Using camera Help To better understand each menu option, use camera Help. Taking pictures/videos Use this For SCN mode Manner/ Museum Quiet occasions, like a wedding or lecture. Children Action pictures of yourself. T Turn on Help Scroll up/down OK Turn off Help www.kodak.com/go/support 11 Self-Portrait...
... Subjects that are disabled. Using camera Help To better understand each menu option, use camera Help. Taking pictures/videos Use this For SCN mode Manner/ Museum Quiet occasions, like a wedding or lecture. Children Action pictures of yourself. T Turn on Help Scroll up/down OK Turn off Help www.kodak.com/go/support 11 Self-Portrait...


