User Guide
Page 10
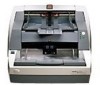
... (or compatible) with a Pentium IV 2 GHz processor • PCI slot • Microsoft Windows 2000 Professional, Windows XP (Professional/ Home), Windows Vista • 512 MB RAM • Monitor • Mouse Registering your scanner It is very important that helps maintain your reseller of Kodak Document Imaging products or visit us on the scanning application, choice of an...
... (or compatible) with a Pentium IV 2 GHz processor • PCI slot • Microsoft Windows 2000 Professional, Windows XP (Professional/ Home), Windows Vista • 512 MB RAM • Monitor • Mouse Registering your scanner It is very important that helps maintain your reseller of Kodak Document Imaging products or visit us on the scanning application, choice of an...

User Guide
Page 27
Additional calibration targets can be displayed. 3-12 A-61500 April 2009 See Chapter 5, "Supplies and accessories" for the TWAIN Datasource. Select Kodak Scanner: i600 or Kodak Scanner: i700. The screens displayed on , allow the lamps to warm up for 90 seconds. 3. Be sure to the maintenance procedures in this section are ... Tool. 6. Open the pod and clean the imaging guides. Image calibration Use the calibration target provided with your system may be different. 1. The main Kodak Scanner window will be ordered. Refer to use a good, clean calibration target.
Additional calibration targets can be displayed. 3-12 A-61500 April 2009 See Chapter 5, "Supplies and accessories" for the TWAIN Datasource. Select Kodak Scanner: i600 or Kodak Scanner: i700. The screens displayed on , allow the lamps to warm up for 90 seconds. 3. Be sure to the maintenance procedures in this section are ... Tool. 6. Open the pod and clean the imaging guides. Image calibration Use the calibration target provided with your system may be different. 1. The main Kodak Scanner window will be ordered. Refer to use a good, clean calibration target.

User Guide
Page 28
The following screen will be displayed. 9. Click Device. Click Settings. 7. A-61500 April 2009 3-13 Click the Setup icon to access the main Kodak Scanner window. 8.
The following screen will be displayed. 9. Click Device. Click Settings. 7. A-61500 April 2009 3-13 Click the Setup icon to access the main Kodak Scanner window. 8.

User Guide
Page 58
Select Kodak Scanner: i600 or Kodak Scanner: i700. A-61500 April 2009 6-3 Accessing the Operator Log The Operator Log is accessed through the Scan Validation Tool. 1. From the Driver Types box, select TWAIN. 3. Select Start>Programs>Kodak>Document Imaging>Scan Validation Tool. 2. The main Kodak Scanner window will be displayed.. 5. Open the Scan Validation Tool. 4. Click the Setup icon to access the main Kodak Scanner window..
Select Kodak Scanner: i600 or Kodak Scanner: i700. A-61500 April 2009 6-3 Accessing the Operator Log The Operator Log is accessed through the Scan Validation Tool. 1. From the Driver Types box, select TWAIN. 3. Select Start>Programs>Kodak>Document Imaging>Scan Validation Tool. 2. The main Kodak Scanner window will be displayed.. 5. Open the Scan Validation Tool. 4. Click the Setup icon to access the main Kodak Scanner window..

User Guide
Page 62
..., width and length are using a fixed-sized cropping window. 35, 36, 183 A document was measured which exceeded the configured maximum allowable length. See Chapter 5, Maintenance for more information. See Chapter 5, Maintenance for the document counter. The scanner was made to use the Enhanced Printer without a ink... connected to the printer carrier and the ink cartridge is larger than the maximum configured value. • Reconfigure the scanner to be outside document area Ink cartridge not installed ID# Operator Message 293, 304 The upper imaging guide is too large. • ...
..., width and length are using a fixed-sized cropping window. 35, 36, 183 A document was measured which exceeded the configured maximum allowable length. See Chapter 5, Maintenance for more information. See Chapter 5, Maintenance for the document counter. The scanner was made to use the Enhanced Printer without a ink... connected to the printer carrier and the ink cartridge is larger than the maximum configured value. • Reconfigure the scanner to be outside document area Ink cartridge not installed ID# Operator Message 293, 304 The upper imaging guide is too large. • ...

User Guide
Page 69
... tires and pre-separation pad. The scanner was measured which exceeded the configured maximum allowable length. This may be due to a document overlap. • Check the host monitor to see if there are using a fixed-sized cropping window. 35, 36, 183 A document was unable to find the document edges to determine the skew angle. See...
... tires and pre-separation pad. The scanner was measured which exceeded the configured maximum allowable length. This may be due to a document overlap. • Check the host monitor to see if there are using a fixed-sized cropping window. 35, 36, 183 A document was unable to find the document edges to determine the skew angle. See...


