User Guide
Page 2
Contents 1 Introduction 1 Scanner features 1 Supporting documentation 2 Safety information 3 User precautions 3 Environmental information 4 European Union 4 EMC statements 4 United States 4 Japan 5 Korean 5 Acoustic emission 5 Power system connection 5 2 Getting Started 6 What's in the box 6 System requirements 6 Installing the scanner 7 Installing the Kodak Driver Software 7 Windows operating systems 7 Linux operating systems 9 Connecting the power cord to the scanner 10 Disconnecting the...
Contents 1 Introduction 1 Scanner features 1 Supporting documentation 2 Safety information 3 User precautions 3 Environmental information 4 European Union 4 EMC statements 4 United States 4 Japan 5 Korean 5 Acoustic emission 5 Power system connection 5 2 Getting Started 6 What's in the box 6 System requirements 6 Installing the scanner 7 Installing the Kodak Driver Software 7 Windows operating systems 7 Linux operating systems 9 Connecting the power cord to the scanner 10 Disconnecting the...
User Guide
Page 5
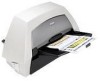
... to 75 ppm (300 dpi, black and white, landscape orientation) letter-size documents. Kodak i1440 Scanner - desktop duplex color scanner that scans up to 60 ppm (300 dpi, black and white, landscape orientation) lettersize documents. 1 Introduction Scanner features The Kodak i1400 Series Scanners include the following models: Kodak i1410 Scanner - This User's Guide provides information and procedures for using the automatic...
... to 75 ppm (300 dpi, black and white, landscape orientation) letter-size documents. Kodak i1440 Scanner - desktop duplex color scanner that scans up to 60 ppm (300 dpi, black and white, landscape orientation) lettersize documents. 1 Introduction Scanner features The Kodak i1400 Series Scanners include the following models: Kodak i1410 Scanner - This User's Guide provides information and procedures for using the automatic...
User Guide
Page 10
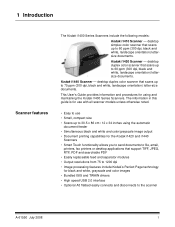
... Windows XP SP2 (32-bit) - Bundled installation and application CDs - Miscellaneous flyers System requirements Following is the recommended system configuration to run Kodak i1400 Series Scanners. • 3.5 GHz Intel Pentium IV processor with 3 GB of RAM • USB port 2.0 (compatible with USB 1.1 but at ... 2003 Server x64 Edition - 2 Getting Started What's in the box Before you begin open the box and check the contents: • Kodak i1410, i1420 or i1440 Scanner • Input tray • Output tray • USB 2.0 cable • Power supply • AC power cord bundles • ...
... Windows XP SP2 (32-bit) - Bundled installation and application CDs - Miscellaneous flyers System requirements Following is the recommended system configuration to run Kodak i1400 Series Scanners. • 3.5 GHz Intel Pentium IV processor with 3 GB of RAM • USB port 2.0 (compatible with USB 1.1 but at ... 2003 Server x64 Edition - 2 Getting Started What's in the box Before you begin open the box and check the contents: • Kodak i1410, i1420 or i1440 Scanner • Input tray • Output tray • USB 2.0 cable • Power supply • AC power cord bundles • ...
User Guide
Page 11
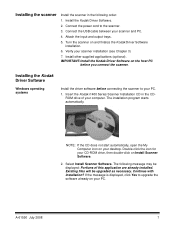
... upgraded as necessary. Select Install Scanner Software. Continue with installation? Installing the Kodak Driver Software Windows operating systems Install the driver software before you connect the scanner. Connect the power cord to your scanner and PC. 4. Turn the scanner on the host PC before connecting the scanner to the scanner. 3. Installing the scanner Install the scanner in the CDROM drive of...
... upgraded as necessary. Select Install Scanner Software. Continue with installation? Installing the Kodak Driver Software Windows operating systems Install the driver software before you connect the scanner. Connect the power cord to your scanner and PC. 4. Turn the scanner on the host PC before connecting the scanner to the scanner. 3. Installing the scanner Install the scanner in the CDROM drive of...
User Guide
Page 13
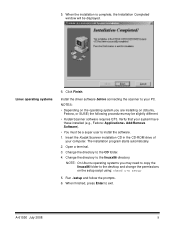
When the installation is complete, the Installation Completed window will be a super user to your computer. Install the driver software before connecting the scanner to install the software. 1. Verify that your system have these installed (e.g., Fedora: Applications> Add/Remove Software). • ... the setup script using: chmod u+x setup 5. When finished, press Enter to the CD folder. 4. Linux operating systems 6. Insert the Kodak Scanner installation CD in the CD-ROM drive of your PC. Change the directory to the desktop and change the permissions on the operating system ...
When the installation is complete, the Installation Completed window will be a super user to your computer. Install the driver software before connecting the scanner to install the software. 1. Verify that your system have these installed (e.g., Fedora: Applications> Add/Remove Software). • ... the setup script using: chmod u+x setup 5. When finished, press Enter to the CD folder. 4. Linux operating systems 6. Insert the Kodak Scanner installation CD in the CD-ROM drive of your PC. Change the directory to the desktop and change the permissions on the operating system ...
User Guide
Page 14
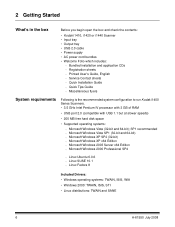
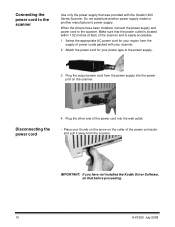
... is easily accessible. 1. IMPORTANT: If you have been installed, connect the power supply and power cord to the scanner. When the drivers have not installed the Kodak Driver Software, do that the power outlet is located within 1.52 metres (5 feet) of the power connector and pull it away from the... power supply into the wall outlet. • Place your thumb on the arrow on the scanner. Plug the output power cord from the scanner. Connecting...
... is easily accessible. 1. IMPORTANT: If you have been installed, connect the power supply and power cord to the scanner. When the drivers have not installed the Kodak Driver Software, do that the power outlet is located within 1.52 metres (5 feet) of the power connector and pull it away from the... power supply into the wall outlet. • Place your thumb on the arrow on the scanner. Plug the output power cord from the scanner. Connecting...

User Guide
Page 16
... the output tray slots on and finalizing Kodak Driver Software installation When the USB cable and power connections have been made, and the Kodak Software Drivers have been installed, the installation will stop flashing and stay green. Refer the section entitled, "Verifying your scanner. Turning the scanner on the scanner and align the output tray pins with...
... the output tray slots on and finalizing Kodak Driver Software installation When the USB cable and power connections have been made, and the Kodak Software Drivers have been installed, the installation will stop flashing and stay green. Refer the section entitled, "Verifying your scanner. Turning the scanner on the scanner and align the output tray pins with...
User Guide
Page 24
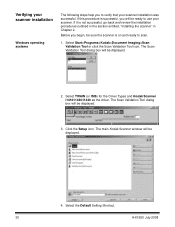
... on and ready to verify that your scanner. Select Start>Programs>Kodak>Document Imaging>Scan Validation Tool or click the Scan Validation Tool icon. Select the Default Setting Shortcut. 20 A-61550 July 2008 Select TWAIN (or ISIS) for the Driver Types and Kodak Scanner i1410/i1420/i1440 as the driver. Verifying your scanner installation Windows operating systems The following...
... on and ready to verify that your scanner. Select Start>Programs>Kodak>Document Imaging>Scan Validation Tool or click the Scan Validation Tool icon. Select the Default Setting Shortcut. 20 A-61550 July 2008 Select TWAIN (or ISIS) for the Driver Types and Kodak Scanner i1410/i1420/i1440 as the driver. Verifying your scanner installation Windows operating systems The following...

User Guide
Page 26
... will be assigned and performed. This list displays the currently configured functions. After the scanner, software drivers, and application software are most important to you to run the assigned task. select Configure to change the task assigned to display the Smart Touch ... be displayed on the system tray. Predefined tasks are installed with the scanner, however, you can configure Smart Touch to handle the tasks that the scanner is not ready, turn the scanner off, and then on again. • Click on the Scanner icon on one of the tasks by selecting the function from the...
... will be assigned and performed. This list displays the currently configured functions. After the scanner, software drivers, and application software are most important to you to run the assigned task. select Configure to change the task assigned to display the Smart Touch ... be displayed on the system tray. Predefined tasks are installed with the scanner, however, you can configure Smart Touch to handle the tasks that the scanner is not ready, turn the scanner off, and then on again. • Click on the Scanner icon on one of the tasks by selecting the function from the...
User Guide
Page 38
... information (i.e., information that stays the same for each page scanned, such as the document sequential counter). NOTES: • Clean the scanner's paper path components daily when using the Document Printer and the Enhanced Printer. The print string can be sent to the Image ...Processing document on the CD or your scanning application documentation for more information about enabling printing and setting up print strings. 4 Document Printing This chapter provides instructions for using the printer. • You cannot print on documents that are accessible through the ISIS Driver or ...
... information (i.e., information that stays the same for each page scanned, such as the document sequential counter). NOTES: • Clean the scanner's paper path components daily when using the Document Printer and the Enhanced Printer. The print string can be sent to the Image ...Processing document on the CD or your scanning application documentation for more information about enabling printing and setting up print strings. 4 Document Printing This chapter provides instructions for using the printer. • You cannot print on documents that are accessible through the ISIS Driver or ...

User Guide
Page 70
...: Solution: Before checking cable connections and performing the power down list. 6. If you select a scanner after initially installing Linux drivers on Fedora 7, Please check to make sure the scanner has powered up the scanner, wait for it to the scanner. The SELinux Administration screen will remain a steady red until your root/superuser password. Issue: If...
...: Solution: Before checking cable connections and performing the power down list. 6. If you select a scanner after initially installing Linux drivers on Fedora 7, Please check to make sure the scanner has powered up the scanner, wait for it to the scanner. The SELinux Administration screen will remain a steady red until your root/superuser password. Issue: If...


