User Guide
Page 5
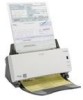
... Touch functionality. Before you begin open the box and check the contents: • Kodak ScanMate i1120 Scanner • Input tray • Output tray • Pre-separation pad (spare) • USB 2.0 cable • Power supply • AC power cord bundles • Welcome Folio: - Supporting documentation What's in PDF format. • Smart Touch User's Guide - Application CDs (includes ScanSoft...
... Touch functionality. Before you begin open the box and check the contents: • Kodak ScanMate i1120 Scanner • Input tray • Output tray • Pre-separation pad (spare) • USB 2.0 cable • Power supply • AC power cord bundles • Welcome Folio: - Supporting documentation What's in PDF format. • Smart Touch User's Guide - Application CDs (includes ScanSoft...
User Guide
Page 6
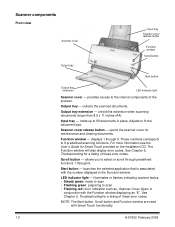
... Scanner cover Output tray Input tray Scanner cover release button Function window Scroll button Start button Output tray extension LED indicator light Scanner cover - provides access to select or scroll through predefined functions 1 through 9. collects the scanned documents. unfold this extension when scanning documents longer than 8.5 x 11 inches (A4). Input tray - allows you to the internal components of these error codes. Output tray...
... Scanner cover Output tray Input tray Scanner cover release button Function window Scroll button Start button Output tray extension LED indicator light Scanner cover - provides access to select or scroll through predefined functions 1 through 9. collects the scanned documents. unfold this extension when scanning documents longer than 8.5 x 11 inches (A4). Input tray - allows you to the internal components of these error codes. Output tray...
User Guide
Page 8
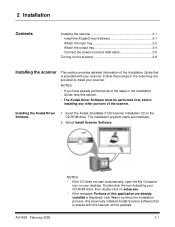
...• The Kodak Driver Software must be updated. 2-1 Insert the Kodak ScanMate i1120 Scanner Installation CD in the order they are already installed is displayed, click Yes to install your scanner. Installing the Kodak Driver Software 1. Select Install Scanner Software. The ... of the scanner. Any previously installed Kodak Scanner software that is shared with your scanner. Follow these steps in the CD-ROM drive. 2 Installation Contents Installing the scanner 2-1 Install the Kodak Driver Software 2-1 Attach the input tray 2-2 Attach the output tray 2-4 Connect ...
...• The Kodak Driver Software must be updated. 2-1 Insert the Kodak ScanMate i1120 Scanner Installation CD in the order they are already installed is displayed, click Yes to install your scanner. Installing the Kodak Driver Software 1. Select Install Scanner Software. The ... of the scanner. Any previously installed Kodak Scanner software that is shared with your scanner. Follow these steps in the CD-ROM drive. 2 Installation Contents Installing the scanner 2-1 Install the Kodak Driver Software 2-1 Attach the input tray 2-2 Attach the output tray 2-4 Connect ...

User Guide
Page 11
Attaching the output tray 1. NOTE: The output tray can be folded up when not in use for easy storage. 2-4 A-61602 February 2009 Align the output tray pins with the slots and lower the output tray into place. Locate the output tray slots on the scanner. 2.
Attaching the output tray 1. NOTE: The output tray can be folded up when not in use for easy storage. 2-4 A-61602 February 2009 Align the output tray pins with the slots and lower the output tray into place. Locate the output tray slots on the scanner. 2.
User Guide
Page 14
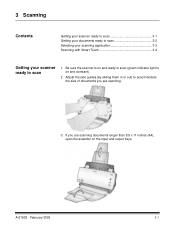
Be sure the scanner is on and ready to scan (green indicator light is on the input and output trays. Adjust the side guides (by sliding them in or out) to scan 1. 3 Scanning Contents Getting your scanner ready to scan 3-1 Getting your documents ready to scan 3-2 Selecting your scanning application 3-3 Scanning with Smart Touch 3-4 Getting your scanner ready to accommodate the size of documents you are scanning. 3. A-61602 February 2009 3-1 If you are scanning documents longer than 8.5 x 11 inches (A4), open the extender on and constant). 2.
Be sure the scanner is on and ready to scan (green indicator light is on the input and output trays. Adjust the side guides (by sliding them in or out) to scan 1. 3 Scanning Contents Getting your scanner ready to scan 3-1 Getting your documents ready to scan 3-2 Selecting your scanning application 3-3 Scanning with Smart Touch 3-4 Getting your scanner ready to accommodate the size of documents you are scanning. 3. A-61602 February 2009 3-1 If you are scanning documents longer than 8.5 x 11 inches (A4), open the extender on and constant). 2.
User Guide
Page 25
...or last page is placed toward the feed tray (not facing you). Documents are jamming or multiple documents are feeding Make sure that: • the input tray, output tray and side guides are adjusted for the width and length of the documents you are scanning one side of scanner and the wall outlet. • the... green LED on the scanner is lit. • the power switch is on. • the wall...
...or last page is placed toward the feed tray (not facing you). Documents are jamming or multiple documents are feeding Make sure that: • the input tray, output tray and side guides are adjusted for the width and length of the documents you are scanning one side of scanner and the wall outlet. • the... green LED on the scanner is lit. • the power switch is on. • the wall...
User Guide
Page 28
... Height: 14 cm / 5.5 in. (not including input tray) Width: 29.8 cm / 11.75 in. (not including input and output trays) Depth: 15.9 cm / 6.25 in. Scanner Weight 2.6 kg / 5.72 lbs. Appendix A Specifications This appendix provides scanner specifications and system requirements. Scanner Type/Speed Duplex color scanner with an automatic document feeder, scans 20 pages per minute (landscape) Scanning...
... Height: 14 cm / 5.5 in. (not including input tray) Width: 29.8 cm / 11.75 in. (not including input and output trays) Depth: 15.9 cm / 6.25 in. Scanner Weight 2.6 kg / 5.72 lbs. Appendix A Specifications This appendix provides scanner specifications and system requirements. Scanner Type/Speed Duplex color scanner with an automatic document feeder, scans 20 pages per minute (landscape) Scanning...

