Kodak I280 Support Question
Kodak I280 Support Question
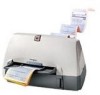
Find answers below for this question about Kodak I280 - Document Scanner.Need a Kodak I280 manual? We have 2 online manuals for this item!
Question posted by vglendinning on May 2nd, 2013
Throughput Speed
We are using the I2800 scanner. The throughput speed is so fast and the output tray is so flimsy that the documents end up getting jammed or the paper feeds between 2 other sheets and they get out of order. Is there a way to slow down the throughput speed?
Current Answers
Related Kodak I280 Manual Pages
User Guide - Page 2
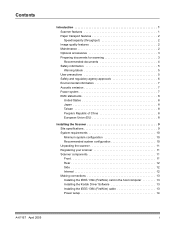
Contents
Introduction 1 Scanner features 1 Paper transport features 2 Speed/capacity (throughput 2 Image quality features 2 Maintenance 2 Optional accessories 3 Preparing documents for scanning 3 Recommended documents 4 Safety information 5 Warning labels 5 User precautions 5 Safety and regulatory agency approvals 6 Environmental information 7 Acoustic emission 7 Power system 7 ...
User Guide - Page 3
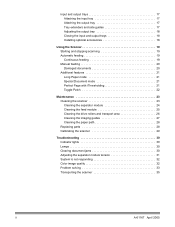
... and output trays 17 Attaching the input tray 17 Attaching the output tray 17 Tray extenders and side guides 17 Adjusting the output tray 18 Closing the input and output trays 18 Installing optional accessories 18
Using the Scanner 19 Starting and stopping scanning 19 Automatic feeding 19 Continuous feeding 19 Manual feeding 20 Damaged documents 20 Additional features 21 Long Paper...
User Guide - Page 5
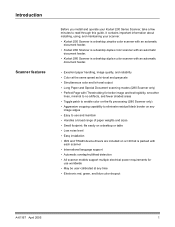
... • May be user-calibrated at the same speed as bi-tonal and grayscale • Simultaneous color and bi-tonal output • Long Paper and Special Document scanning modes (i280 Scanner only) • Perfect Page with iThresholding for
use and maintain • Handles a broad range of paper weights and sizes • Small footprint; fits easily on a desktop or...
User Guide - Page 6
... by document length and/or document thickness
• Automatic document feeder (ADF) with operator-assisted "infinite" and single-sheet feeding
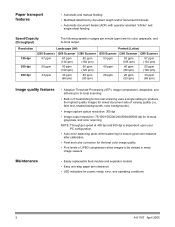
Speed/Capacity (throughput)
The following speeds in many image viewers
Maintenance
• Easily replaceable feed module and separator module • Easy one-step paper jam clearance • LED indicators for color, grayscale, and bi-tonal output...
User Guide - Page 8

...feeding batched documents, the maximum height of the batched documents is 10.2 mm (0.4 in.) or approximately 150 sheets of paper weights from 50 to 200 g (13 to 110 lb.)
Minimum Document Size 8.9 x 6.4 cm (3.5 x 2.5 in.) (Width x Length)
Maximum Document Size i250 Scanner/i260 Scanner...17 in.)
Paper Inks
Correction Fluids
Document Batch Height for Automatic Feeding
i280 Scanner With standard ...
User Guide - Page 15
... can be provided.
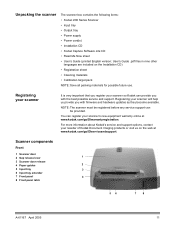
Unpacking the scanner
The scanner box contains the following items: • Kodak i200 Series Scanner • Input tray • Output tray • Power supply • Power cord(s) • Installation CD • Kodak Capture Software Lite CD • Read Me Now sheet • User's Guide (printed English version; Registering your scanner
It is very important that...
User Guide - Page 21
... tray
Document stops
Input tray
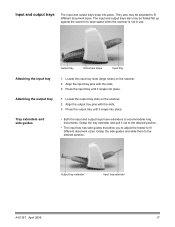
Attaching the input tray
1.
Attaching the output tray
1. Press the output tray until it snaps into place. Grasp the tray extender and pull it snaps into place. Output tray extender
Input tray extender
A-61167 April 2005
17
The input and output trays also may be folded flat up against the scanner to save space when the scanner is not in use...
User Guide - Page 22

... the scanner trays out of the way when the scanner is not in .) long.
1. Installing optional accessories
If you are 14 cm (5.5 in use. 1.
You can move it up or down to the appropriate appendix in this guide for checks
• Set the output tray to the lowest position when you are scanning long documents.
• Set the output tray...
User Guide - Page 23
...., in landscape orientation (longer side as the leading edge). Adjust the document feeder guides. 4. A-61167 April 2005
19 Remove all staples and paper clips before scanning.
1. Pull out the output tray extender, if necessary. 6. Using the Scanner
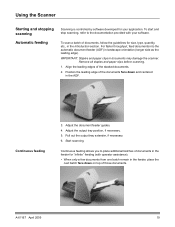
Starting and stopping scanning
Automatic feeding
Scanning is controlled by software developed for your software. IMPORTANT: Staples and...
User Guide - Page 25

... it in a plastic sleeve for A4 or letter-sized documents scanned in multiple images. for the i280 Scanner only:
• Long Paper mode
• Special Document mode
• Perfect Page with iThresholding, these features are using Special Document mode because the scanner will reduce scanner throughput (e.g., for scanning. With the exception of Perfect Page with iThresholding...
User Guide - Page 37
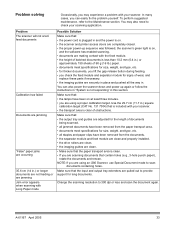
... of documents
being scanned. • all jammed documents have been on at least three minutes. • you are pulled out to provide support for thicker documents, you lift the gap release button during feeding. • you are securely in .) square
calibration target (CAT No. 131 7304) that the input and output tray extenders are using an i280 Scanner, use Special Document mode...
User Guide - Page 39
... April 2005
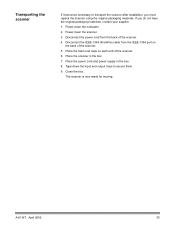
35 If you must repack the scanner using the original packaging materials. Close the box. The scanner is now ready for moving.
Transporting the scanner
If it becomes necessary to secure them. 9. Power down the scanner. 3. Tape down the input and output trays to transport the scanner after installation, you do not have the original packaging...
User Guide - Page 40
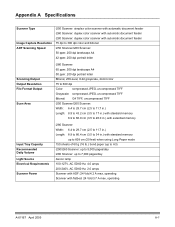
....0 in.) with extended memory
Input Tray Capacity Recommended Daily Volume Light Source Electrical Requirements
Scanner Power
i280 Scanner: Width: 6.4 to 29.7 cm (2.5 to 11.7 in.) Length: 8.9 to 86.4 cm (3.5 to 34 in.) with standard memory
up to 609 cm (20 feet) when using Long Paper mode 150 sheets of 60 g (16 lb.) bond paper (up to A3) i250...
User Guide - Page 44
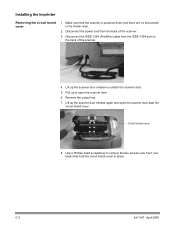
... the output tray. 7. Lift up the scanner door release to remove the two screws (one front, one back) that the scanner is powered down and there are no documents in place. Make sure that hold the circuit board cover in the feeder area.
2. Circuit board cover
8. Installing the imprinter
Removing the circuit board cover
1. Use a Phillips...
User Guide - Page 51

... in the ink cartridge carrier. 8. Place the ink cartridge in the scanner. Replace the imprinter access door. 12.
Lower the locking bar around the ink cartridge. 9. Slide the ink cartridge carrier into the ink
cartridge carrier.
10. Re-attach the output tray. 13.
A-61167 April 2005
C-9 Remove the ink cartridge from its packaging...
User Guide - Page 59
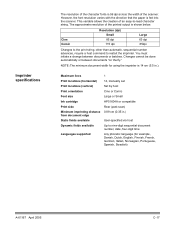
...resolution of the printed output is 96 dpi across the width of the scanner.
Imprinter specifications
The resolution of the character fonts is shown below.
NOTE: The minimum document width for example,...paper is 14 cm (5.5 in .)
User-specified via host Up to nine-digit sequential document number, date, four-digit time Any phonetic language (for using the imprinter is fed into the scanner...
User Guide - Page 60
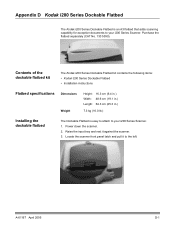
... Dockable Flatbed is an A3 flatbed that adds scanning capability for exception documents to your i200 Series Scanner. 1. A-61167 April 2005
D-1
Raise the input tray and rest it to the left. Locate the scanner front panel latch and pull it against the scanner. 3. Appendix D Kodak i200 Series Dockable Flatbed
The Kodak i200 Series Dockable Flatbed...
User Guide - Page 65
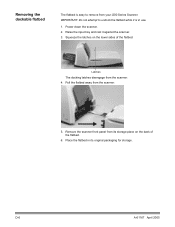
Raise the input tray and rest it is easy to undock the flatbed while it against the scanner. 3.
Removing the dockable flatbed
The flatbed is in its storage place on the lower sides of the flatbed.
6. Remove the scanner front panel from your i200 Series Scanner. D-6
A-61167 April 2005 Place the flatbed in use.
1. Latches The...
User Guide - Page 68

...
E-2
A-61167 April 2005
Use a Phillips-head screwdriver to Appendix C, Kodak i200 Series Imprinter, for information about the imprinter cable.
10. Lift up the scanner door release to open the scanner door past the
circuit board cover. 5. Pull up the scanner door release again and open the scanner door. 8. Circuit board cover
9. Remove the scanner's output tray. 6. Lift up...
User Guide - Page 69
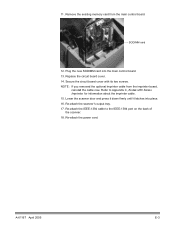
... board cover with its two screws. Refer to the IEEE-1394 port on the back of the scanner. 18. Re-attach the scanner's output tray. 17. A-61167 April 2005
E-3 Replace the circuit board cover. 14. Lower the scanner door and press it down firmly until it latches into the main control board. 13.
Re-attach...
Similar Questions

Why Does The Scanner Display Toner Ink On Face Down Documents At The Point Of Th
Why does the scanner display toner ink on face down documents at the point of the pull-through rolle...
Why does the scanner display toner ink on face down documents at the point of the pull-through rolle...
(Posted by eswesley 7 years ago)

Top Red Light On Kodak I280 Scanner
I have removed the paper jam, but the red light is still on and when I press the scan icon nothing h...
I have removed the paper jam, but the red light is still on and when I press the scan icon nothing h...
(Posted by atroy 8 years ago)

Can I Use The Kodak I1120 Scanner On My Mac Computer
(Posted by fizzldhsc 9 years ago)

I280 Scanner
How do I get a total page count from the scanner. I need the total number of pages it has scanned in
How do I get a total page count from the scanner. I need the total number of pages it has scanned in
(Posted by jsimkavitz 11 years ago)
