User Guide
Page 18
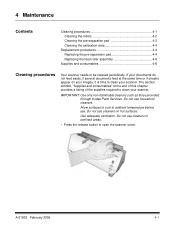
... through Kodak Parts Services. Do not use household cleaners. Do not use cleaners on your images, it is time to open the scanner cover. A-61602 February 2009 4-1 4 Maintenance Contents Cleaning procedures 4-1 Cleaning the rollers 4-2 Cleaning the pre-separation pad 4-3 Cleaning the calibration area 4-4 Replacement procedures 4-4 Replacing the pre-separation pad 4-4 Replacing the feed roller assembly 4-6 Supplies...
... through Kodak Parts Services. Do not use household cleaners. Do not use cleaners on your images, it is time to open the scanner cover. A-61602 February 2009 4-1 4 Maintenance Contents Cleaning procedures 4-1 Cleaning the rollers 4-2 Cleaning the pre-separation pad 4-3 Cleaning the calibration area 4-4 Replacement procedures 4-4 Replacing the pre-separation pad 4-4 Replacing the feed roller assembly 4-6 Supplies...
User Guide
Page 19
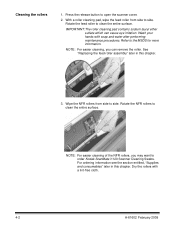
... rollers 1. Rotate the feed roller to the MSDS for more information. NOTE: For easier cleaning, you may want to order Kodak ScanMate i1120 Scanner Cleaning Swabs. Wipe the NFR rollers from side to side. Dry the rollers with soap and water after performing maintenance procedures. Refer to clean the entire surface. NOTE: For easier cleaning of the NFR rollers...
... rollers 1. Rotate the feed roller to the MSDS for more information. NOTE: For easier cleaning, you may want to order Kodak ScanMate i1120 Scanner Cleaning Swabs. Wipe the NFR rollers from side to side. Dry the rollers with soap and water after performing maintenance procedures. Refer to clean the entire surface. NOTE: For easier cleaning of the NFR rollers...
User Guide
Page 23
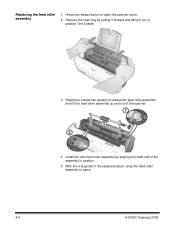
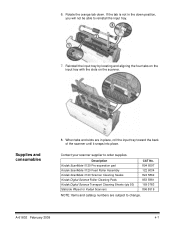
Set it out of position. Rotate the orange tab upward to open the scanner cover. 2. Install the new feed roller assembly by pulling it forward and lifting it aside. 3. Press the release button to release the feed roller assembly and lift the feed roller assembly up and out of the assembly in place. 4-6 A-61602 February 2009 Replacing the feed roller assembly 1. Remove the input tray by aligning the shaft end of the scanner. 4. With the orange tab in the upward position, snap the feed roller assembly in position. 5.
Set it out of position. Rotate the orange tab upward to open the scanner cover. 2. Install the new feed roller assembly by pulling it forward and lifting it aside. 3. Press the release button to release the feed roller assembly and lift the feed roller assembly up and out of the assembly in place. 4-6 A-61602 February 2009 Replacing the feed roller assembly 1. Remove the input tray by aligning the shaft end of the scanner. 4. With the orange tab in the upward position, snap the feed roller assembly in position. 5.
User Guide
Page 24
... and aligning the four tabs on the input tray with the slots on the scanner. Description Kodak ScanMate i1120 Pre-separation pad Kodak ScanMate i1120 Feed Roller Assembly Kodak ScanMate i1120 Scanner Cleaning Swabs Kodak Digital Science Roller Cleaning Pads Kodak Digital Science Transport Cleaning Sheets (qty 50) Staticide Wipes for Kodak Scanners CAT No. 894 6097 122 6034 824 5862 853 5981 169 0783 896...
... and aligning the four tabs on the input tray with the slots on the scanner. Description Kodak ScanMate i1120 Pre-separation pad Kodak ScanMate i1120 Feed Roller Assembly Kodak ScanMate i1120 Scanner Cleaning Swabs Kodak Digital Science Roller Cleaning Pads Kodak Digital Science Transport Cleaning Sheets (qty 50) Staticide Wipes for Kodak Scanners CAT No. 894 6097 122 6034 824 5862 853 5981 169 0783 896...

